Introduction
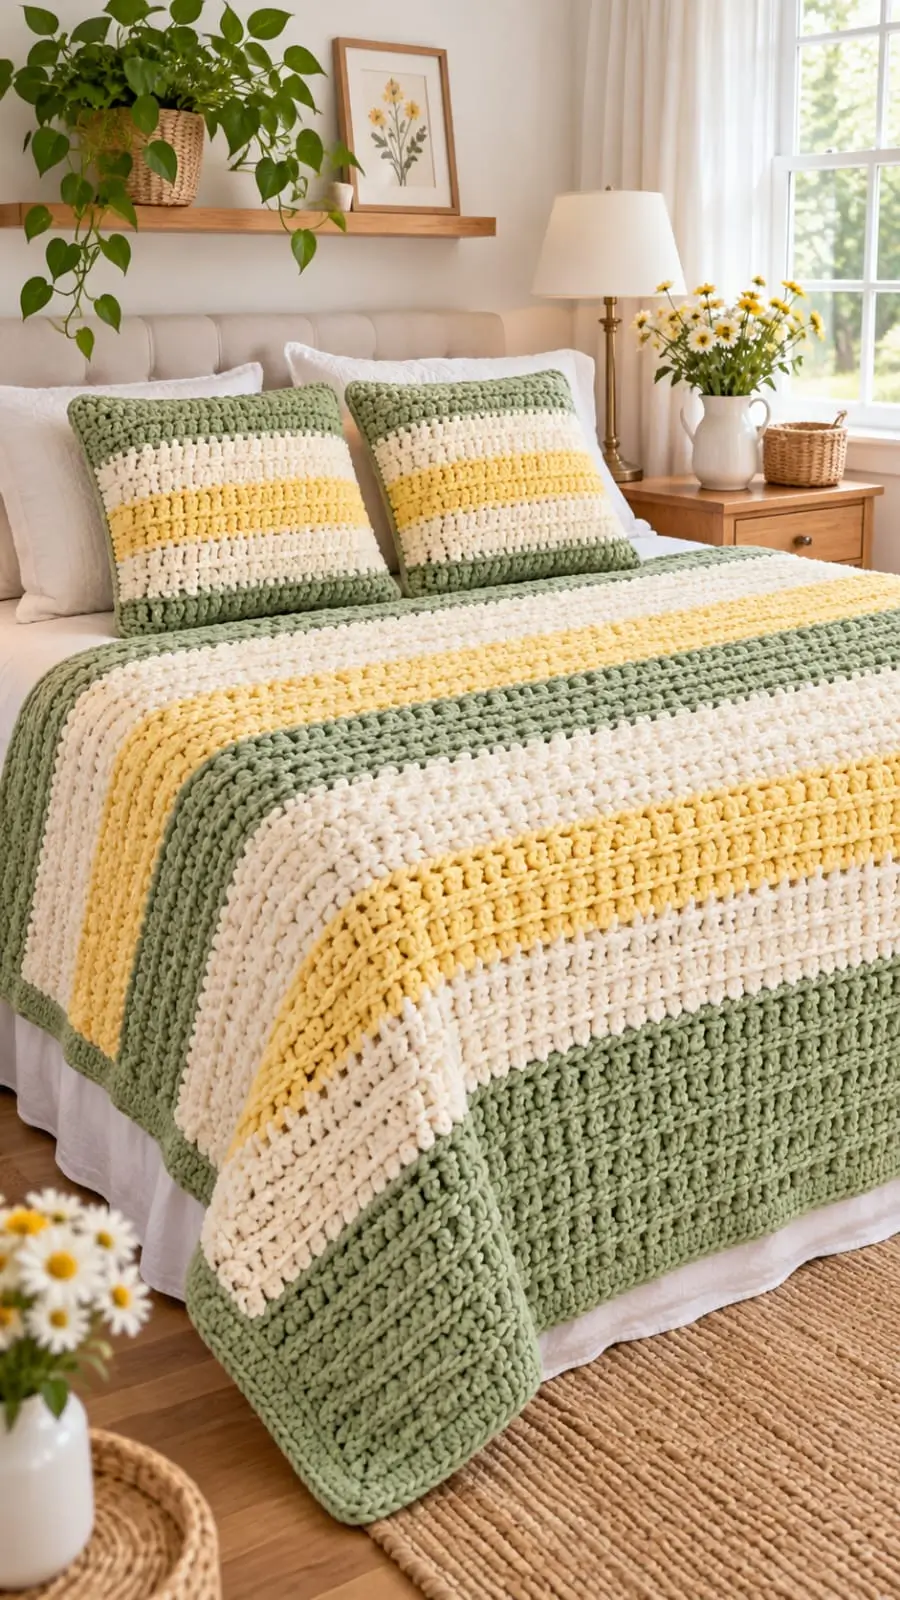
The blanket’s sage border makes its yellow stripes appear narrower than their actual width. This sage green yellow crochet blanket pattern reproduces that color arrangement using textured lemon peel stitch and two matching pillow covers. You need super-bulky chenille-style yarn, an 8 mm hook, and the ability to work single and double crochet. The design targets a full-size throw and approximately 45 cm square cushions, creating a coordinated bedding layer without separate color planning.
The Design: What Makes This Striped Set Different
Sage green frames the blanket and cushions; cream interrupts the stronger hues; pastel yellow adds a repeated central band. This arrangement matters because a thick sage edge visually connects the pillows to the throw, even when their stripe counts differ. The proposed textured crochet blanket pattern uses lemon peel stitch—a repeated single crochet followed by double crochet—to imitate the photograph’s raised surface without claiming to duplicate an unidentified stitch.
Pillows receive narrower sections of color than the blanket, keeping the striped proportions visible on a smaller square. Their plain sage backs reduce finishing ends and provide a consistent rear surface. A common error in a sage and cream crochet throw is changing colors without completing the last stitch in the old color; that creates small misplaced flecks along the boundary. This pattern specifies the color-change point.
Project Info at a Glance
| Property | Specification |
|---|---|
| Skill level | Confident beginner: chains, sc, dc, changing yarn and seams |
| Time | Not externally verified; depends on individual tension and pace |
| Throw size | Target approximately 127 × 152 cm, subject to swatch and border |
| Pillow size | Target approximately 45 × 45 cm each, subject to gauge |
| Hook | 8 mm (US L/11) |
| Yarn | #6 super-bulky chenille-style polyester |
| Best for | Decorative bed throws, sofa throws, matching cushion covers |
The 127 × 152 cm target is based on a comparable published throw size, not a measurement of the photographed blanket or an experimentally validated outcome for these instructions. Bernat Blanket specifies 300 g and 201 m per ball, plus an 8 mm crochet hook; its published stock single-crochet gauge is 7 stitches and 8 rows per 10 cm. Lemon peel stitch will have its own gauge.
Materials and Tools
Yarn
- Sage green — #6 super bulky — budget 900 g (three 300 g balls) — Bernat Blanket or a compatible chenille-style substitute.
- Cream or warm ivory — #6 super bulky — budget 900 g (three 300 g balls) — use the same yarn line and fiber content as the sage.
- Pastel yellow — #6 super bulky — budget 600 g (two 300 g balls) — choose a muted yellow to preserve the photographed contrast.
These figures are purchasing allowances for the throw and two cushion covers, not weighed consumption from a tested sample. Eight balls total provide 2,400 g and, if using the cited Bernat product, 1,608 m. Actual use varies with finished dimensions, stitch gauge, border depth and the yarn chosen. Keep receipts or purchase an extra ball if dye-lot continuity matters.
Tools
- 8 mm crochet hook, or the hook that produces the measured target gauge.
- Two 45 × 45 cm pillow inserts; measure inserts before choosing panel width.
- Large-eye tapestry needle suitable for thick chenille yarn.
- Four removable stitch markers for the throw corners and row endpoints.
- Scissors, flexible tape measure, digital kitchen scale and notebook.
- Locking stitch markers or sewing clips to hold pillow panels together.
There is no stuffing added directly to the crochet: the pillow inserts provide the fill. Safety eyes, amigurumi decreases and a magic ring are not used because every fabric piece is worked flat.
Abbreviations
- ch — chain
- sc — single crochet
- dc — double crochet
- sl st — slip stitch
- st / sts — stitch / stitches
- RS / WS — right side / wrong side
- rep — repeat
- BLO — back loop only; listed for reference but not required in the main fabric
An invisible decrease joins two stitches into one, but it is not needed for these rectangular panels.
All instructions use US crochet terminology. The turning chain does not count as a stitch. The rectangles are worked flat in turned rows, not in a continuous amigurumi spiral.
Before You Crochet: Gauge and Yarn Calculation
Work a test square before buying the full quantities if exact size matters. Chain 21, place an sc in the second chain, then alternate dc and sc until the row ends in dc. This produces 20 worked stitches. Continue the main row repeat until the sample is at least 15 cm tall; let it rest according to the selected yarn label before measuring the center.
Count the stitches across 10 cm and rows across 10 cm. The published Bernat single-crochet gauge is a starting reference only, because alternating taller and shorter stitches changes both width and row height. At 7 stitches per 10 cm, 88 worked stitches span about 126 cm before edging. A denser fabric could come out much narrower. Change hook size or the foundation count to correct that difference before making the full throw.
For a more dependable yarn estimate, weigh a rectangular test swatch and divide its mass by its measured area. Multiply that value by the combined area of the throw and four pillow panels, then add 10–15% for seams, edging and ends. This is a calculation method, not a guaranteed consumption figure. If the measured swatch is markedly heavier than expected, buy extra yarn in each of the three colors.
Pattern — Step by Step
Main Stitch: Lemon Peel Repeat
The lemon peel crochet stitch requires an odd-numbered foundation chain and produces an even number of worked stitches. On every row, alternate sc and dc. An sc goes into the previous row’s dc; a dc goes into the previous row’s sc. This creates a pebble-like surface without added bobbles, so the fabric does not require complicated stitch placement.
Foundation rule: 2 × the number of sc/dc pairs + 1 chain. An 89-chain foundation makes 44 pairs, or 88 stitches. A 33-chain foundation makes 16 pairs, or 32 stitches. No increases or decreases are made, so these counts remain constant across all subsequent rows.
Blanket Panel (Make 1)
Yarn: start in sage green. Foundation and stitch multiple adapted from the established lemon peel stitch method; stripe plan is original.
Foundation: Ch 89.
Row 1: Sc in second ch from hook, dc in next ch; rep [sc in next ch, dc in next ch] across. Ch 1, turn. (88 sts: 44 sc, 44 dc)
Row 2: Sc in first st (the dc from the previous row), dc in next st; rep [sc, dc] across. Ch 1, turn. (88 sts)
Rows 3–10: Rep Row 2 in sage green. (88 sts each row)
Rows 11–20: Rep Row 2 in cream. (88 sts each row)
Rows 21–30: Rep Row 2 in pastel yellow. (88 sts each row)
Rows 31–40: Rep Row 2 in cream. (88 sts each row)
Rows 41–50: Rep Row 2 in sage green. (88 sts each row)
Rows 51–60: Rep Row 2 in cream. (88 sts each row)
Rows 61–70: Rep Row 2 in pastel yellow. (88 sts each row)
Rows 71–80: Rep Row 2 in cream. (88 sts each row)
Rows 81–90: Rep Row 2 in sage green. (88 sts each row)
Rows 91–100: Rep Row 2 in cream. (88 sts each row)
Rows 101–110: Rep Row 2 in pastel yellow. (88 sts each row)
Rows 111–120: Rep Row 2 in cream. (88 sts each row)
Final row: On Row 120, omit the turning chain and fasten off. Leave a 20 cm tail to weave through multiple stitch directions.
Color change: On the final dc of the old-colored row, stop before the last yarn-over, pull the new color through the remaining two loops, then turn and continue. Cut the old strand with a 15–20 cm tail. This limits stray color at the stripe edge.
Length check: If 120 rows do not approach the target length, add or remove rows in full color bands, using the measured row gauge. The pattern specifies 120 rows as a reproducible layout, not proof of a fixed finished measurement.
Sage Border (Make 1 Continuous Border)
Yarn: sage green — original edging instructions.
Round 1: Join sage at any corner. Work sc evenly along the first edge; at each corner work 3 sc into the same corner space. Continue around all four edges, placing approximately one sc per row-end as a starting guide on the vertical sides and one sc in each worked stitch across the short sides. Join with sl st to the first sc.
Round 2: Ch 1, sc in every stitch around, working 3 sc in the center stitch of each previous corner group. Join with sl st and fasten off, leaving a 20 cm tail.
The border stitch total depends on the actual side pickup count. There is deliberately no unsupported fixed stitch total for the perimeter; pin the blanket flat first and adjust stitch spacing if the edge ripples or pulls inward.
Striped Pillow Front (Make 2)
Yarn: sage, cream and pastel yellow — original matching stripe plan.
Foundation: With sage, ch 33.
Row 1: Sc in second ch, dc in next ch; rep [sc, dc] to the end. Ch 1, turn. (32 sts: 16 sc, 16 dc)
Rows 2–8: Rep the blanket’s Row 2 in sage. (32 sts each row)
Rows 9–15: Rep Row 2 in cream. (32 sts each row)
Rows 16–22: Rep Row 2 in pastel yellow. (32 sts each row)
Rows 23–29: Rep Row 2 in cream. (32 sts each row)
Rows 30–36: Rep Row 2 in sage. (32 sts each row)
Fasten off after Row 36, leaving a 20 cm tail. Make the second front the same way. Each front has five color bands and contains 1,152 worked stitches before edge finishing (32 × 36).
Solid Sage Pillow Back (Make 2)
Yarn: sage green — original rectangular back panel.
Foundation: Ch 33.
Row 1: Work [sc, dc] across as for the pillow front. Ch 1, turn. (32 sts)
Rows 2–36: Continue the same lemon peel repeat in sage green with no color changes. (32 sts each row)
Fasten off after Row 36. Leave a 25 cm tail for joining if it is long enough to sew securely; otherwise attach a fresh length of yarn when assembling. Make a second back panel. Match the front and back panels by actual dimensions, not by assuming every maker’s row height will be identical.
Optional Pillow Edge (Make 2)
Yarn: sage green — optional single-crochet trim.
With the front and back held wrong sides together, work one sc through both layers at corresponding edge points around three sides. Place 2–3 sc at a corner only if needed to make the turn flat. Leave the fourth edge available for the insert and finish it using a removable seam or a sewn closure.
Do not add this trim if it makes the cover too small for the measured insert. A decorative edging consumes a little width along the seam and must be considered when selecting panel dimensions.
Assembly — 10 Steps
- Check the throw dimensions. Lay the finished main panel flat, measure the center rather than a stretched edge, and compare the width with the target.
- Finish the blanket border. Pin all four corners into approximate right angles before adding the second round, then remove pins after checking the perimeter.
- Weave the blanket tails. Pass each tail through several neighboring stitch backs, reverse direction, and trim only after the fabric is relaxed.
- Pair each pillow front with a back. Place the right sides outward, with matching rows and corners aligned.
- Pin the first pillow. Put a clip or locking marker at every corner and at the midpoint of each side so the panels cannot shift while joining.
- Sew three edges. Use a firm whipstitch or the optional crocheted edging, catching both layers and avoiding widely spaced gaps.
- Check the insert opening. Test that the unsewn side is large enough for the selected insert without forcing the stitches apart.
- Insert both pillow forms. Push each corner of the insert into the corresponding crochet corner without stretching the fabric diagonally.
- Close the remaining edges. Use a mattress stitch with matching sage yarn, or construct a removable closure if frequent washing is planned.
- Inspect all finishes. Check the corner joins, stripe junctions and hidden tails, then arrange the two pillows on the blanket.
The completed set contains one rectangular striped throw and two matching stuffed pillow covers.
7 Technical Tips
- Mark the first and last stitch of every row. Losing one edge stitch reduces a planned 88-stitch throw row to 87 and disrupts the sc/dc alternation.
- Measure the gauge after at least 15 cm of fabric. A foundation-chain measurement alone can be several centimeters different from the worked blanket width.
- Do not pull chenille color-change tails until the pile compresses. Excess tension narrows the stripe junction and can expose the yarn’s internal core.
- Use the final pull-through of the last dc for the new color. Changing after the turning chain produces a small contrasting loop at the edge.
- Pin a pillow front and back at all four corners before sewing. Without fixed corners, one panel can advance by a row and twist the finished stripe layout.
- Check for border waves after every side. Too many side-edge sc stitches cause ruffling; too few pull the rectangle into a curved shape.
- Weave each yarn tail in two or more directions. A short, straight insertion is more likely to work free from the plush loops after washing.
Adjusting the Pattern to Another Bed or Pillow Size
Width changes must preserve an even number of lemon peel stitches. For a wider throw, add chains in pairs to the original foundation; adding 10 chains increases the working row by 10 stitches. To make a narrower throw, subtract chains in pairs, but leave enough width to cover the intended surface.
Use the formula target width ÷ measured width per stitch = required worked stitches, then round to the nearest even number and add one foundation chain. For example, if the swatch measures 8 stitches over 10 cm, a 120 cm panel needs approximately 96 worked stitches and a starting chain of 97. It is the swatch measurement, not the photographed bed, that determines the final foundation count.
Length is adjusted independently by adding complete rows. For matching pillow proportions, resize both front and back together. An oversized insert can distort the seams, while a smaller insert leaves loose fabric at each corner. Compare the finished panel width with the insert’s stated measurements before sewing.
Washing, Drying and Storage
Read the care label for the exact yarn used. The cited standard Bernat Blanket product is polyester and permits delicate machine washing and gentle tumble drying, but that instruction does not automatically apply to another chenille yarn. If two yarn lines are combined, follow the care instructions for the most delicate component.
Wash the throw separately or inside a large mesh laundry bag if the machine capacity permits. Avoid exposed zippers and hook-and-loop fasteners that can snag the yarn loops. For pillows with sewn-closed openings, confirm the chosen inserts can be washed by the same method before submerging the full cushion.
After drying, check the border for distortion and reshape the rectangle while it is flat. Store the set folded without suspending heavy wet fabric from one corner; the weight can stretch rows and create uneven edges. A test swatch provides the safest place to assess cleaning results before laundering the completed project.
Frequently Asked Questions
Is this the exact stitch used in the photograph?
No. The image shows a thick, pronounced texture, but it cannot reliably reveal whether the original maker used clusters, bobbles, a variation of double crochet or a different combination. This design uses lemon peel stitch because its alternating stitch heights create a similarly textured fabric with repeatable stitch math.
Can I substitute worsted-weight yarn?
Yes, but it will not reproduce the same scale at the given chain count and 8 mm hook. Work a new swatch with the smaller hook recommended for that yarn, recalculate the number of stitches and rows, and expect different yarn consumption. Keep all three colors in the same weight family for regular edges.
Does the blanket have to use 120 rows?
No. Those rows define the planned sequence of three sage, three yellow and six cream bands, each ten rows high. If the blanket reaches its required length earlier, finish at the end of a complete stripe. Additional length requires another four-band cycle or proportionally adjusted row counts.
Why use separate panels for the cushions?
A front-and-back construction keeps the stripe pattern centered on the displayed side and places the seams at the pillow edges. It also allows a plain sage reverse that remains visually consistent when a cushion is turned around. A separate closure may be added if the covers need regular removal.
Conclusion
The stripe sequence works best when the green, ivory and yellow sections remain consistent across the blanket, while the cushions use the same palette at a smaller scale. Before cutting yarn for the full set, complete the lemon peel swatch, record its actual stitch and row gauge, and revise the starting chains if your dimensions differ from the target. The sage green yellow crochet blanket instructions supply reproducible stitch totals and a coordinated pillow layout, but the final size still depends on yarn and tension. Save a finished-project photograph to Pinterest, share your measured dimensions on Instagram, and include #SageGreenYellowBlanket. Which yellow-band width best matches the striped pillows in the reference photograph?
Sources and Editorial Notes
- Yarnspirations: Bernat Blanket yarn specifications — category, ball mass, length, hook and care guidance.
- Yarnspirations: Striped C2C Crochet Blanket — comparable published throw dimensions.
- Mary Maxim: Lemon Peel Stitch — foundation multiple and row mechanics.
- Ravelry: Maisy Velvet Pillow — comparison for striped chenille pillow design.
Editorial transparency: This is a newly drafted photo-inspired pattern, not an identified designer’s original pattern and not a physically tested sample. Exact yarn consumption, finished measurements and photographed stitch identity remain estimates until swatched.









