Introduction
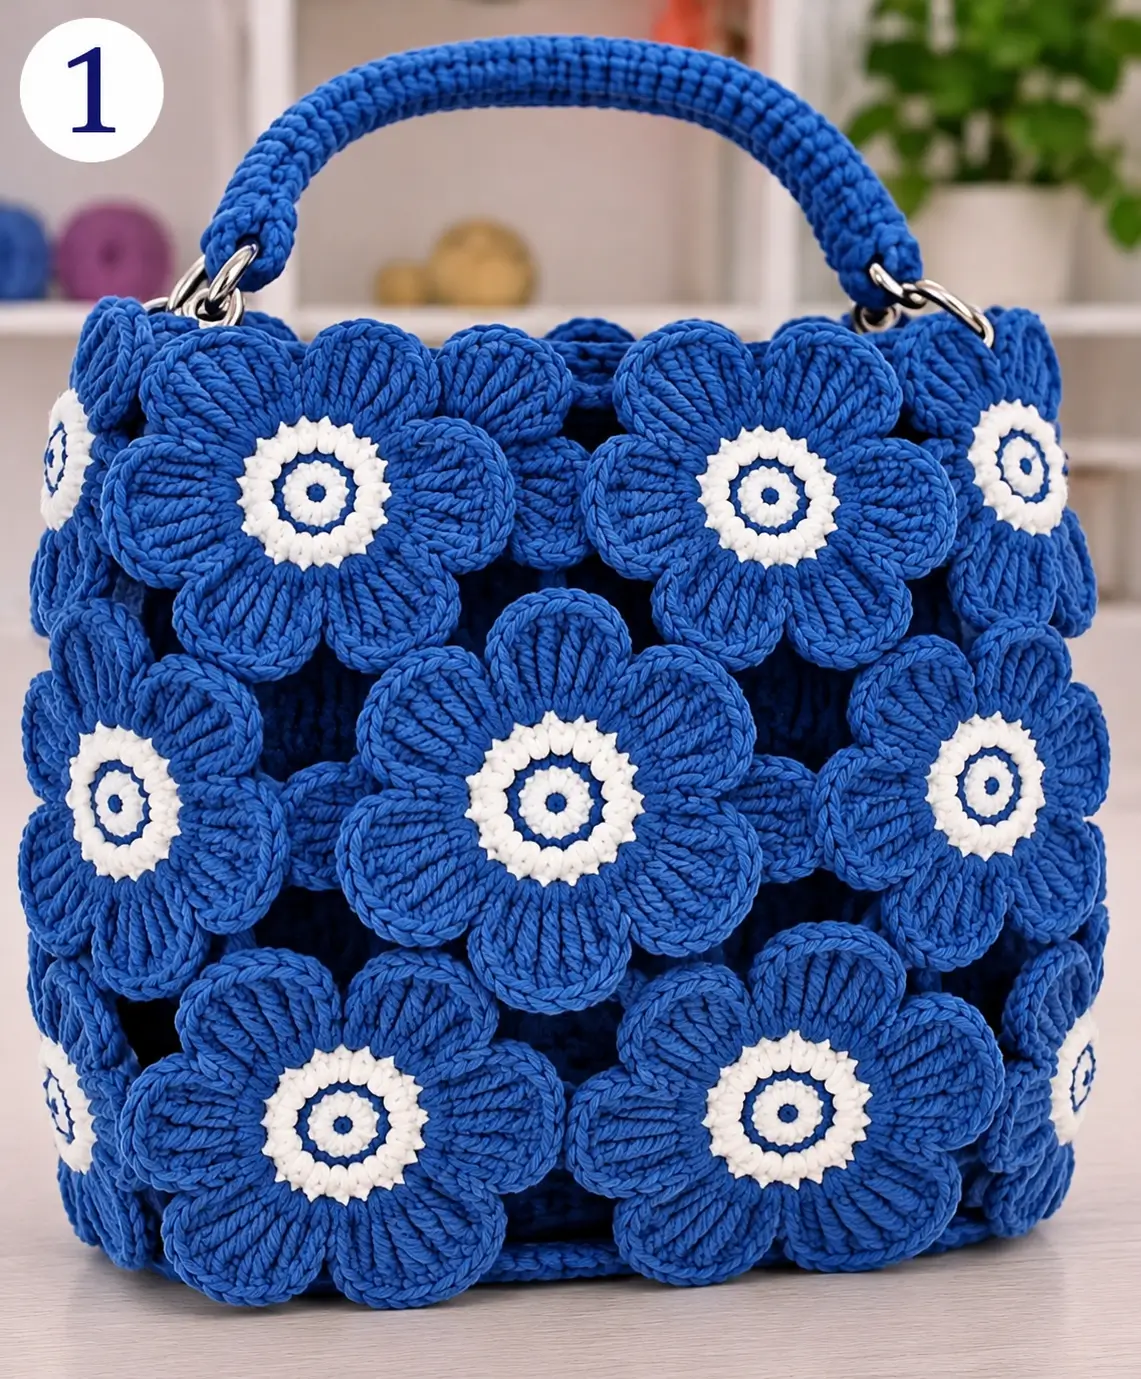
The oversized petals are not the handbag structure; they are a raised decorative layer attached to a firm blue body underneath. This 3D flower crochet handbag pattern uses royal-blue floral appliqués with white ring centers, a dense rectangular bag, and a wrapped top handle. The photo-inspired construction uses cotton or cotton-blend yarn and a 4.0–4.5 mm hook, with particular attention to reinforcement because the flowers add weight.
The Design: What Makes This Flower Bag Different
The bag combines a practical structural shell with large dimensional flowers. Each flower has eight rounded royal-blue petals surrounding a graphic white-and-blue center. Rather than joining the flowers together to form the bag itself, the construction below uses a dense crochet body as support. That approach reduces stretching and prevents openings between petals from exposing the lining.
The flowers overlap slightly across the front, sides, and upper edge. Their placement hides much of the underlying shell while leaving the base relatively clear for stability. A padded crochet handle attaches through metal rings at the top corners.
The main failure point is weight. A loosely crocheted body can lengthen after the flowers, lining, handle, and contents are added, so the structural fabric should be significantly firmer than the petals.
Project Info at a Glance
| Skill Level | Construction | Target Size | Hook | Best For |
|---|---|---|---|---|
| Intermediate | Structured bag with sewn floral appliqués | Approx. 30–34 × 25–29 cm | 4.0–4.5 mm | Handbag or statement tote |
The dimensions above are project targets for this photo-inspired version rather than measurements taken directly from the image.
Materials and Tools
Yarn
- Royal blue — worsted #4 cotton or firm cotton blend — bag body, petals and handle
- White — matching weight — flower centers
- Royal blue scrap yarn — center-ring accents and sewing
Hardware and Tools
- 4.0–4.5 mm crochet hook
- 2 strong metal handle rings
- 2 additional rings or swivel attachments if making a removable handle
- Fabric lining
- Interfacing or bag stabilizer
- Magnetic snap or zipper for optional closure
- Yarn needle
- Stitch markers
- Scissors
- Tape measure
Abbreviations
- MR — magic ring
- ch — chain
- sl st — slip stitch
- sc — single crochet
- hdc — half double crochet
- dc — double crochet
- tr — treble crochet
- inc — two stitches worked into one stitch
- BLO — back loop only
- FLO — front loop only
- st/sts — stitch/stitches
- FO — fasten off
Gauge and Fabric Test
Make a 12 × 12 cm swatch in sc using royal blue. The finished fabric should feel dense enough that the lining is not clearly visible through the stitches.
If the fabric stretches easily when pulled vertically, reduce the hook by 0.5 mm. The flower petals can be made with the larger hook if a softer, rounder shape is preferred.
Bag Construction
The handbag is built from a rectangular base, continuous side walls, a reinforced upper edge, separate flowers, and a padded handle.
For the sample dimensions, target approximately:
- Width: 30–34 cm
- Height: 25–29 cm
- Depth: 8–10 cm
- Handle drop: 16–20 cm
Rectangular Bag Base
With royal blue, chain enough stitches to measure approximately 22–25 cm.
Round 1
Sc in the second chain from the hook and across to the final chain.
Work 3 sc into the final chain.
Continue along the opposite side of the foundation chain.
Work 2 sc into the first foundation chain to complete the turn.
Place a marker in the first stitch.
Round 2
Sc across the first long side.
At the curved end, distribute increases evenly across the three turning stitches.
Sc across the second long side.
Repeat the increases at the opposite end.
Following Base Rounds
Continue increasing only around the two short ends until the base measures approximately 8–10 cm deep.
Keep both long edges straight.
Defining the Bottom Edge
Work one complete round of sc in BLO.
This creates a visible fold line between the base and the vertical walls.
Do not increase during this round.
Lower Bag Body
Return to working through both loops.
Sc in every stitch around.
Continue in a spiral, moving the marker at the beginning of every round.
Work approximately 5–7 cm before checking the bag dimensions.
Building the Main Body
Continue sc without increases until the bag measures approximately 22–25 cm from the base.
Place the empty shell upright periodically. Both side walls should remain close to vertical.
If the top circumference becomes noticeably wider than the base, the working tension has loosened.
Optional Reinforcement Round
For a firmer shell, work one round of sl st in BLO.
Follow with one normal sc round.
This can be repeated once near the middle of the bag if the yarn is particularly soft.
Upper Bag Edge
Work one complete round of sc.
Follow with one round of BLO sc.
Work another complete sc round.
Do not fasten off until the handle attachment positions have been marked.
Handle Attachment Tabs — Make 2
Mark one position near each upper side corner.
Each tab should sit over a structurally strong section of the bag rather than being attached only to the final edge round.
Join royal blue and work approximately 6–8 sc across the marked section.
Turn.
Continue in sc for approximately 5–6 cm.
Pass the strip through the metal ring, fold it back against the inside of the bag, and sew through several rows of the structural shell.
Repeat on the opposite side.
White and Blue Flower Center — Make One Per Flower
The center is worked separately before the petals are added.
Round 1
With royal blue, make a MR.
Work 8 sc into the ring.
Join. (8)
Round 2
Change to white.
Work 2 sc in each stitch around.
Join. (16)
Round 3
Continue in white.
Repeat:
sc in next st, 2 sc in next st.
Join. (24)
Round 4
Change to royal blue.
Sc in each stitch around. (24)
Round 5
Change back to white.
Repeat:
sc in next 2 sts, 2 sc in next st.
Join. (32)
FO white.
Eight-Petal Flower Foundation
Join royal blue to the back of the flower center.
Divide the 32 stitches into eight equal sections of four stitches.
Each four-stitch section supports one petal.
First Petal
Work across the next four center stitches:
sl st in first st, ch 9.
Starting in the second chain from the hook work:
sc, hdc, dc, 3 tr, dc, hdc.
Sl st into the next center stitch.
This creates the first side of the petal.
Completing the Petal
Ch 9 again.
Work the same stitch sequence back toward the flower center:
sc, hdc, dc, 3 tr, dc, hdc.
Secure the second side into the remaining stitches of the four-stitch petal section.
Use the yarn needle later to join the two long edges lightly if a more solid petal is required.
Remaining Seven Petals
Repeat the petal construction around the center.
Maintain four center stitches per petal section.
Check the flower after the fourth petal. The petals should spread around the center rather than stacking heavily over one another.
Alternative Solid Rounded Petal
For petals closer to a dense oval shape, make a ch-10 foundation for each petal.
Starting in the second chain work:
sc, hdc, dc, 4 tr, dc, hdc.
Work 5 tr into the final chain to turn.
Continue down the opposite side:
hdc, dc, 4 tr, dc, hdc, sc.
Sl st at the base.
This version uses more yarn but produces a heavier, fuller flower.
Petal Edging
For stronger definition, work one round of royal-blue sc around each petal.
At the outer tip, work 2 sc into one stitch if the edge begins to pull.
Do not add increases along the complete petal perimeter or the edges will ripple.
Target Flower Size
For a handbag approximately 32 cm wide, aim for flowers around 10–13 cm across.
Make one complete master flower before producing the remaining appliqués.
Keep the other flowers within approximately 5 mm of the master diameter.
How Many Flowers to Make
The exact number depends on the flower diameter and desired coverage.
For a densely decorated bag of this scale, start with approximately 12–16 large flowers.
Additional flowers or partial motifs may be required around the side edges.
Do not make the complete quantity until the first several flowers have been pinned to the bag.
Planning the Front Flower Arrangement
Stuff the handbag temporarily with folded towels so it holds its finished shape.
Place one flower near the center front.
Arrange additional flowers around it, allowing neighboring petals to overlap by approximately 1–2 cm.
Keep the bottom row slightly above the base fold so the flowers do not rub continuously against surfaces.
Upper Flower Row
Place the upper flowers close to the bag opening, but keep their centers below the reinforced top edge.
Petals may extend slightly above the edge as in the photo-inspired design.
Keep flowers away from the moving sections of the handle rings.
Side Flowers
Continue the arrangement around both sides.
A flower can wrap partially around a corner, but its center should remain on one main surface.
This prevents the stiff center disk from folding when the bag is carried.
Attaching the Flowers
Thread a yarn needle with matching royal blue.
Sew securely around the center disk first.
Add hidden stitches through the inner 2–3 cm of each petal.
Leave the outer sections free to preserve the dimensional effect.
Do not attach only the center. Large unsupported petals can curl, snag, or fold downward during use.
Testing Flower Security
After attaching one flower, hold the bag upright and gently move the petals.
The center should not lift from the bag shell.
If the entire flower moves, add several stitches around the inner petal bases.
Crochet Handle
The handle should contain a non-stretch core if the bag will carry more than very light contents.
A cotton cord or suitable bag-handle insert can be covered with crochet.
Handle Foundation
Cut the internal cord to create the desired handle length plus enough allowance for attachment.
A finished handle around 40–50 cm long works as a starting point for a short hand or forearm handle.
Handle Cover
With royal blue, make a chain long enough to wrap around the handle core.
Sc across.
Continue in rows until the rectangle wraps snugly around the core.
FO with a long sewing tail.
Closing the Handle Cover
Wrap the crochet rectangle around the cord.
Using the long tail, mattress stitch the two long edges together.
Keep the seam positioned along the underside of the handle.
Attaching the Handle Rings
Pass each finished handle end through a metal ring.
Fold approximately 3–4 cm back against the handle.
Sew firmly through several layers.
Repeat at the opposite end.
The handle should form a smooth arch without twisting.
Alternative Crochet-Only Handle
If hardware is not being used, crochet a dense strap approximately 3–4 cm wide.
Work sc rows until the strap reaches the desired length.
Fold the strip lengthwise and sew the edges together to create a thicker rounded handle.
Attach each end through several centimeters of the bag wall.
Reinforcing the Bag Opening
After the flowers have been positioned, inspect the upper edge.
If it stretches under the handle tension, work an additional round of tight sc around the opening.
A second option is to sew cotton webbing or a narrow stabilizer strip to the inside before installing the lining.
Optional Magnetic Closure
Mark the center front and center back.
Install the magnetic snap into reinforced lining pieces rather than directly through unsupported crochet.
The closure should sit below the flower petals so it can be reached easily.
Optional Zipper
For a more secure handbag, use a zipper slightly shorter than the opening.
Sew the zipper to a fabric facing first.
Hand-stitch the facing to the inside of the crochet opening.
Keep the stitches below the visible upper edge.
Fabric Lining
Measure the finished bag after the flowers and reinforcement have been added.
Cut two lining panels based on the actual interior width and height, including seam allowance.
Add a bottom gusset if required to match the crochet base depth.
Adding Stabilizer
For a structured handbag, apply interfacing or bag stabilizer to the wrong side of the lining.
Keep the stabilizer slightly smaller than the fabric seam allowance.
A firmer base insert can also be placed between the crochet base and lining.
Optional Interior Pocket
Cut a small fabric rectangle.
Finish its upper edge, fold the remaining seam allowances inward, and stitch it to one lining panel before assembling the lining.
Keep the pocket below the handle reinforcement area.
Installing the Lining
Insert the completed lining into the handbag with wrong sides facing each other.
Fold the lining’s upper seam allowance inward.
Pin it just below the crochet top edge.
Hand-sew around the opening with small stitches.
Avoid sewing through the visible flower petals.
Optional Firm Base Insert
Cut a lightweight plastic canvas or bag-base insert slightly smaller than the crochet base.
Round the corners so they do not push against the stitches.
Place the insert between the lining and crochet base.
The insert should remain removable if the bag needs regular washing.
Alternative Colorways
| Petals and Bag | Flower Center | Style |
|---|---|---|
| Royal Blue | White | Graphic contrast |
| Black | Cream | High contrast |
| Dusty Rose | Ivory | Soft floral palette |
| Sage Green | Cream | Botanical palette |
| Burgundy | Beige | Autumn palette |
| Turquoise | White | Bright summer palette |
Estimating Yarn
Because the large dimensional flowers consume substantially more yarn than flat appliqués, calculate yarn after making a master flower.
Weigh one completed flower. Multiply that weight by the number required.
Then make and weigh a measured swatch of the dense bag fabric to estimate the shell separately.
Add the handle quantity and approximately 10–15% extra for swatching, sewing, reinforcement, and normal tension differences.
Assembly
- Crochet a dense gauge swatch, select the finished bag dimensions, and make the rectangular royal-blue base to the required width and depth.
- Work the bag walls upward without increases, keeping the circumference consistent and reinforcing the upper edge before adding decorations.
- Make the two handle tabs, attach the metal rings through reinforced sections, and test the attachment points before continuing.
- Crochet one complete master flower with its white-and-blue center and eight royal-blue petals, then record its finished diameter.
- Make the remaining flowers to the same dimensions, but stop before producing the full quantity if the bag has not yet been test-arranged.
- Stuff the empty shell temporarily, pin the flowers over the front and sides, and maintain approximately 1–2 cm of overlap between neighboring petals where required.
- Sew each flower through its center and inner petal bases, keeping the outer petal sections raised and clear of the base fold.
- Make the reinforced crochet-covered handle, connect it to the metal rings, and load-test the empty bag before installing the lining.
- Construct the stabilized fabric lining, add the desired pocket and closure, then hand-sew the lining just below the crochet opening.
- Check the base, handle attachments, flower centers, petal edges, closure, and lining before weaving in the final tails and shaping the bag.
The finished handbag should stand upright when empty, hold its rectangular form at the base, and support the raised floral layer without the upper edge collapsing under the handle.
7 Technical Tips
- Use a dense structural gauge for the bag shell. If a 10 cm sc swatch stretches more than approximately 1 cm vertically under moderate hand tension, test a hook 0.5 mm smaller.
- Keep flower diameters within approximately 5 mm of the master motif. A larger variation becomes obvious when petals overlap across the same row.
- Leave at least 1.5–2 cm between the bottom of the lowest flower centers and the base fold. Centers positioned directly on the base edge are repeatedly crushed when the handbag is placed on a surface.
- Reinforce each handle tab through several rows of the bag wall. Attaching a metal ring only to the final top round concentrates the complete carrying load into a narrow line of stitches.
- Secure the inner 2–3 cm of every petal. Sewing only the center disk allows large petals to fold downward, while stitching the entire petal flat removes the dimensional effect.
- Test the handle with approximately the expected carrying weight before installing the lining. Any stretching at the tabs is easier to correct while the inside of the crochet shell remains accessible.
- Cut the base insert several millimeters smaller than the interior base on every side. An insert that presses directly against the crochet corners can distort the bottom and create visible points.
Care and Shaping
Check the yarn and lining care instructions before washing. Remove a detachable base insert and handle hardware whenever the construction permits.
Reshape the bag while damp and fill it lightly with clean towels so the walls dry in their intended position. Arrange the petals individually, keeping their rounded edges visible.
Allow the handbag to dry completely before replacing the base insert or storing items inside it. Do not hang a wet bag by the handle because the combined weight of the water and floral appliqués can stretch the attachment points.
Conclusion
The structural shell carries the load in this 3D flower crochet handbag pattern; the oversized royal-blue flowers provide the surface design. Make the bag body first, reinforce the opening and handle points, then crochet one master flower before calculating how many appliqués are needed. Pin the complete floral arrangement before sewing so the white centers remain balanced across the front and the lowest petals stay clear of the base. The next step is to make a dense sc gauge swatch and choose the finished bag width. Share the finished handbag on Pinterest or Instagram with #RoyalBlueFlowerCrochetBag. Would you keep the white ring centers or replace them with pale blue?









