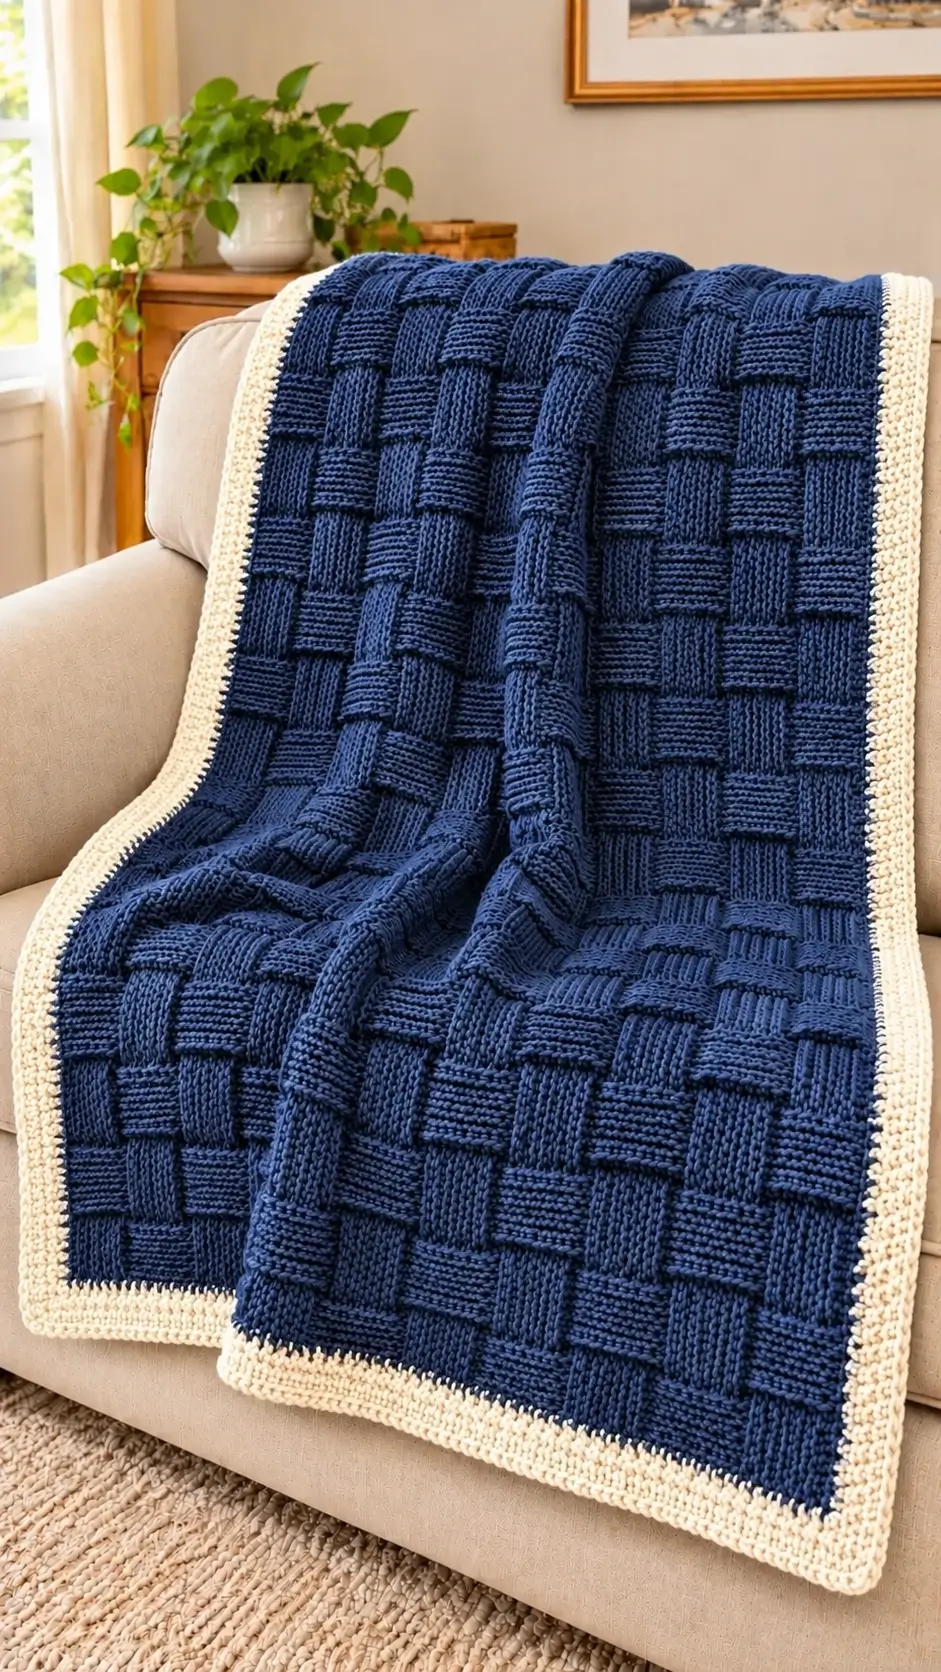
Alternating navy ridges create the rectangular woven blocks that distinguish this basketweave crochet blanket pattern from a standard double crochet throw. The design uses worsted-weight yarn, a 5.5 mm hook, and a contrasting ivory border to produce a target size of approximately 120 × 150 cm. Rated intermediate, the project requires front-post and back-post double crochet. Its dense structure makes it suitable as a sofa throw that maintains visible texture across a large surface.
The Design: What Makes This Basketweave Blanket Different
The blanket uses three structural decisions to reproduce the appearance of the reference photograph.
First, groups of four front-post and four back-post double crochet stitches form alternating raised sections. Changing the visible texture direction after four rows creates the basketweave effect without joining individual squares.
Second, a solid navy body keeps the surface visually continuous. The stitch relief, rather than color changes, defines the rectangular blocks. This makes the textured crochet throw easier to construct with fewer yarn ends.
Third, an ivory single crochet border frames the navy panel and provides a firm outer edge. The contrasting finish is a defining feature of this crochet blanket with border.
A frequent mistake is changing stitch types without accounting for which side of the blanket faces the maker. Because the fabric is turned after every row, front-post and back-post stitches must alternate strategically to maintain the intended visible texture.
Project Info at a Glance
| Specification | Details |
|---|---|
| Skill Level | Intermediate |
| Estimated Time | 25–40 hours |
| Target Finished Size | Approximately 120 × 150 cm |
| Crochet Hook | 5.5 mm / US I-9 |
| Yarn Weight | Worsted, Category 4 |
| Construction | One-piece, worked flat |
| Terminology | US crochet terms |
| Best For | Sofa throws and home décor |
Finished dimensions and time are estimates for this original photo-inspired pattern. Actual measurements depend on gauge.
Materials and Tools
Yarn
- Navy blue worsted-weight yarn — approximately 1,300–1,700 g: Choose a smooth acrylic or acrylic-blend yarn with good stitch definition. Lion Brand Basic Stitch or a comparable category 4 yarn is suitable.
- Ivory worsted-weight yarn — approximately 150–250 g: Use the same yarn weight and preferably the same product line for consistent border tension.
Yarn quantities are planning estimates, not verified consumption figures. The amount required depends on gauge, fiber composition, yarn length per gram, and finished dimensions.
Tools
- 5.5 mm crochet hook
- Stitch markers — at least four
- Tapestry needle
- Scissors
- Measuring tape
- Digital kitchen scale for yarn calculations
- Blocking mats — optional
A hook with a smooth throat helps when working around stitch posts. If the completed sample feels rigid, test a 6 mm hook and measure the gauge again.
Gauge and Yarn Calculation
Make a sample containing at least 24 textured stitches plus two edge stitches. Work enough rows to display two complete texture repeats, then measure the center without stretching.
The written blanket uses 162 working stitches across. Its final width depends on your gauge.
To calculate a different width, divide the desired width by the measured width of one stitch. Adjust the interior stitch count to a multiple of eight, then add two edge stitches.
For a more accurate yarn estimate, weigh the completed sample and calculate its yarn consumption per square centimeter. Multiply by the planned blanket area and add a separate allowance for the border.
Crochet Abbreviations
| Abbreviation | Meaning |
|---|---|
| ch | Chain |
| sc | Single crochet |
| dc | Double crochet |
| FPdc | Front-post double crochet |
| BPdc | Back-post double crochet |
| sl st | Slip stitch |
| st / sts | Stitch / stitches |
| rep | Repeat |
| RS | Right side |
| WS | Wrong side |
| BLO | Back loop only |
| sp | Space |
An invisible decrease is not required because this blanket maintains a constant stitch count throughout the main panel.
Understanding the Basketweave Crochet Stitch
The basketweave texture is formed by working around stitch posts instead of inserting the hook through the upper loops.
Front-Post Double Crochet (FPdc)
Yarn over and insert the hook from the front of the fabric to the back, passing around the vertical post of the next stitch and returning to the front.
Yarn over and draw up a loop. Complete the double crochet by pulling through two loops twice.
The finished stitch projects toward the working side, forming a raised ridge.
Back-Post Double Crochet (BPdc)
Yarn over and insert the hook from the back of the fabric toward the front, passing around the stitch post and returning to the back.
Draw up a loop and complete the double crochet normally.
The resulting stitch appears recessed on the working side.
Because the blanket is turned after each row, the visible relationship between front-post and back-post stitches reverses. The pattern below accounts for this change.
Basketweave Crochet Blanket Pattern – Step by Step
Construction: Worked flat in turned rows using navy yarn, followed by an ivory border.
Part 1: Foundation Chain
Using navy blue worsted-weight yarn and a 5.5 mm crochet hook:
Foundation: Ch 164.
Row 1: Dc in the fourth chain from the hook and in each remaining chain across. The three skipped chains count as the first dc. (162 sts)
Turn the work.
The row contains 160 interior stitches and one edge stitch at each side. This provides twenty complete eight-stitch texture repeats.
Place a stitch marker in the first and last stitch. These two edge stitches remain ordinary double crochet throughout the textured section.
Part 2: First Basketweave Texture Tier
For every following row, chain 2 and turn. The turning chain does not count as a stitch.
Row 2: Ch 2, turn. Dc in first st. [FPdc in next 4 sts, BPdc in next 4 sts] × 20. Dc in last st. (162 sts)
Row 3: Ch 2, turn. Dc in first st. [BPdc in next 4 sts, FPdc in next 4 sts] × 20. Dc in last st. (162 sts)
Row 4: Repeat Row 2. (162 sts)
Row 5: Repeat Row 3. (162 sts)
These four rows form the first texture tier. When viewed from the same side of the blanket, the raised and recessed sections remain aligned.
Part 3: Second Basketweave Texture Tier
Row 6: Ch 2, turn. Dc in first st. [BPdc in next 4 sts, FPdc in next 4 sts] × 20. Dc in last st. (162 sts)
Row 7: Ch 2, turn. Dc in first st. [FPdc in next 4 sts, BPdc in next 4 sts] × 20. Dc in last st. (162 sts)
Row 8: Repeat Row 6. (162 sts)
Row 9: Repeat Row 7. (162 sts)
The second tier reverses the raised and recessed sections when viewed from the same side.
Part 4: Continue the Basketweave Repeat
Repeat Rows 2–9 until the navy panel reaches the desired length, allowing space for the ivory border.
Maintain 162 stitches in every row. Complete a full eight-row repeat before fastening off to keep the texture symmetrical.
The reference blanket features many compact rectangular blocks. Four-row tiers create a dense woven appearance, while taller tiers would produce longer rectangles.
Measure the blanket after every few repeats. If the width changes significantly, inspect the first and last stitches and check for accidental increases or decreases.
Part 5: Prepare the Blanket for the Border
After the final texture row, fasten off the navy yarn and leave a 15 cm tail.
Lay the blanket on a flat surface. Inspect the foundation edge, final row, and both sides.
Gently shape the fabric if necessary. Avoid stretching the textured panel aggressively because excessive tension can flatten the raised stitches.
The ivory border will be worked around all four edges of the blanket.
Part 6: Ivory Crochet Border
Join the ivory yarn with a slip stitch near one corner.
Border Round 1: Ch 1. Work sc evenly around the blanket, placing 3 sc in each corner. Along the top and bottom edges, work approximately one sc into each stitch. Along the side edges, begin with approximately 2 sc for every 3 rows and adjust the spacing to keep the fabric flat. Join with sl st to the first sc.
Record the total stitch count after this round. The exact number depends on the number of completed body rows and the distribution of side-edge stitches.
Border Round 2: Ch 1. Work sc in every stitch around. Place 3 sc in the center stitch of each corner group from the previous round. Join with sl st.
Border Round 3: Ch 1. Repeat Round 2, again placing 3 sc in the center stitch of each corner group. Join with sl st.
Fasten off and leave a 15 cm tail.
The ivory border should measure approximately 2–4 cm wide, depending on gauge. Additional rounds may be added for a wider frame, maintaining the same corner increases.
Checking the Border Stitch Count
Each standard corner increase replaces one stitch with three stitches, adding two stitches per corner.
With four corners, each subsequent border round adds eight stitches to the previous total, provided every other stitch is worked once.
If the border pulls inward, inspect the side-edge spacing and corner increases. If it ripples, check for excessive stitches along the edges.
Assembly and Finishing Instructions
- Inspect the navy panel. Check for dropped stitches, loose loops, and uneven basketweave blocks.
- Confirm the row count. Record the number of completed rows for future reference.
- Measure the width. Check the top, center, and bottom without stretching the fabric.
- Examine the corners. Confirm that all four corners are clearly defined before edging.
- Complete the first ivory border round. Distribute stitches evenly along the side edges.
- Add the remaining border rounds. Maintain consistent corner increases and check for rippling.
- Weave in navy yarn ends. Thread each tail through several stitches on the wrong side.
- Secure the ivory yarn ends. Weave them into the border and change direction once to reduce loosening.
- Block if appropriate. Follow the yarn manufacturer’s care instructions and shape the blanket to the intended dimensions.
- Take final measurements. Record the finished width, length, and total yarn consumption.
The finished blanket consists of one textured navy panel framed by a continuous ivory crochet border.
7 Technical Tips for Better Basketweave Texture
- Mark the edge stitches. Missing the final double crochet can reduce a 162-stitch row to 161 stitches. Move the markers after every row to maintain a consistent width.
- Maintain even post-stitch tension. Overly tight front-post stitches can compress the fabric and narrow the center. Measure the width after each eight-row repeat.
- Track the texture reversal. Repeating one stitch arrangement for five rows instead of four creates uneven block heights. Use a row counter and mark the ends of both texture tiers.
- Check yarn consumption early. Post stitches generally require more yarn than ordinary double crochet fabric. Weigh a completed swatch before calculating the full quantity.
- Prevent a wavy border. Too many single crochet stitches along the side edges can make the ivory edging flare. Begin with approximately two stitches for every three double crochet rows and adjust as needed.
- Keep corners consistent. Missing a corner increase can make the edging curl inward. Mark the center stitch of every corner group before starting the next round.
- Secure yarn tails properly. Short woven ends may loosen during washing. Leave approximately 15 cm when fastening off and weave each tail through multiple stitch paths.
Troubleshooting Common Basketweave Crochet Problems
Why Is My Basketweave Blanket Curling?
Curling may result from tight post stitches, inconsistent turning chains, or a border with too few stitches.
Measure the fabric before adding additional edging. If the entire panel pulls inward, test a larger crochet hook instead of attempting to correct all the tension through the border.
Why Do My Basketweave Blocks Look Like Ribs?
The texture groups may not be reversing after the fourth row, or the working-side changes may not be accounted for.
Review the stitch sequence for Rows 2–9. Each group should remain visually aligned for four rows when viewed from the same side, then reverse for the following four rows.
Can I Use Chunky Yarn for This Blanket?
Yes. Chunky yarn produces a thicker blanket with larger textured blocks.
However, the finished dimensions, drape, and yarn requirements will change. Make a new swatch using the hook size recommended for the yarn, then recalculate the foundation chain.
The eight-stitch basketweave repeat can remain the same.
Is the Basketweave Crochet Stitch Reversible?
The fabric displays texture on both sides, although the raised sections reverse their appearance.
A solid navy yarn keeps both surfaces visually consistent, while the ivory border frames both sides of the completed blanket.
How Can I Make the Blanket Wider?
The original instructions contain 160 interior stitches and two edge stitches.
Increase or decrease the interior stitch count in multiples of eight.
For example, increasing the interior to 176 stitches produces 178 working stitches and requires a foundation chain of 180 using the same starting-chain method.
How Can I Make the Blanket Longer?
Add complete eight-row basketweave repeats until the desired length is reached.
Measure the navy panel before adding the ivory edging, allowing approximately 2–4 cm at each end for the border.
How Should I Wash the Finished Blanket?
Follow the care instructions on the yarn label. Many acrylic yarns are machine washable, but washing and drying requirements vary by product.
Use a gentle cycle when permitted and avoid excessive heat. Dry the blanket according to the yarn manufacturer’s recommendations to preserve the texture and dimensions.
Conclusion
This basketweave crochet blanket pattern combines a structured navy panel with an ivory border to create a woven appearance without assembling separate squares. The eight-row stitch sequence maintains the texture, while consistent edge stitches and measured border spacing control the finished shape.
Before beginning the full blanket, crochet and weigh a sample to confirm your gauge and yarn requirements. Save the completed project to Pinterest or share a finished photograph on Instagram using #NavyBasketweaveBlanket. Include the finished dimensions and hook size so other makers can compare results.
For this navy-and-ivory design, would you keep the narrow cream border or increase it to five rounds for a wider contrasting frame?









