Introduction
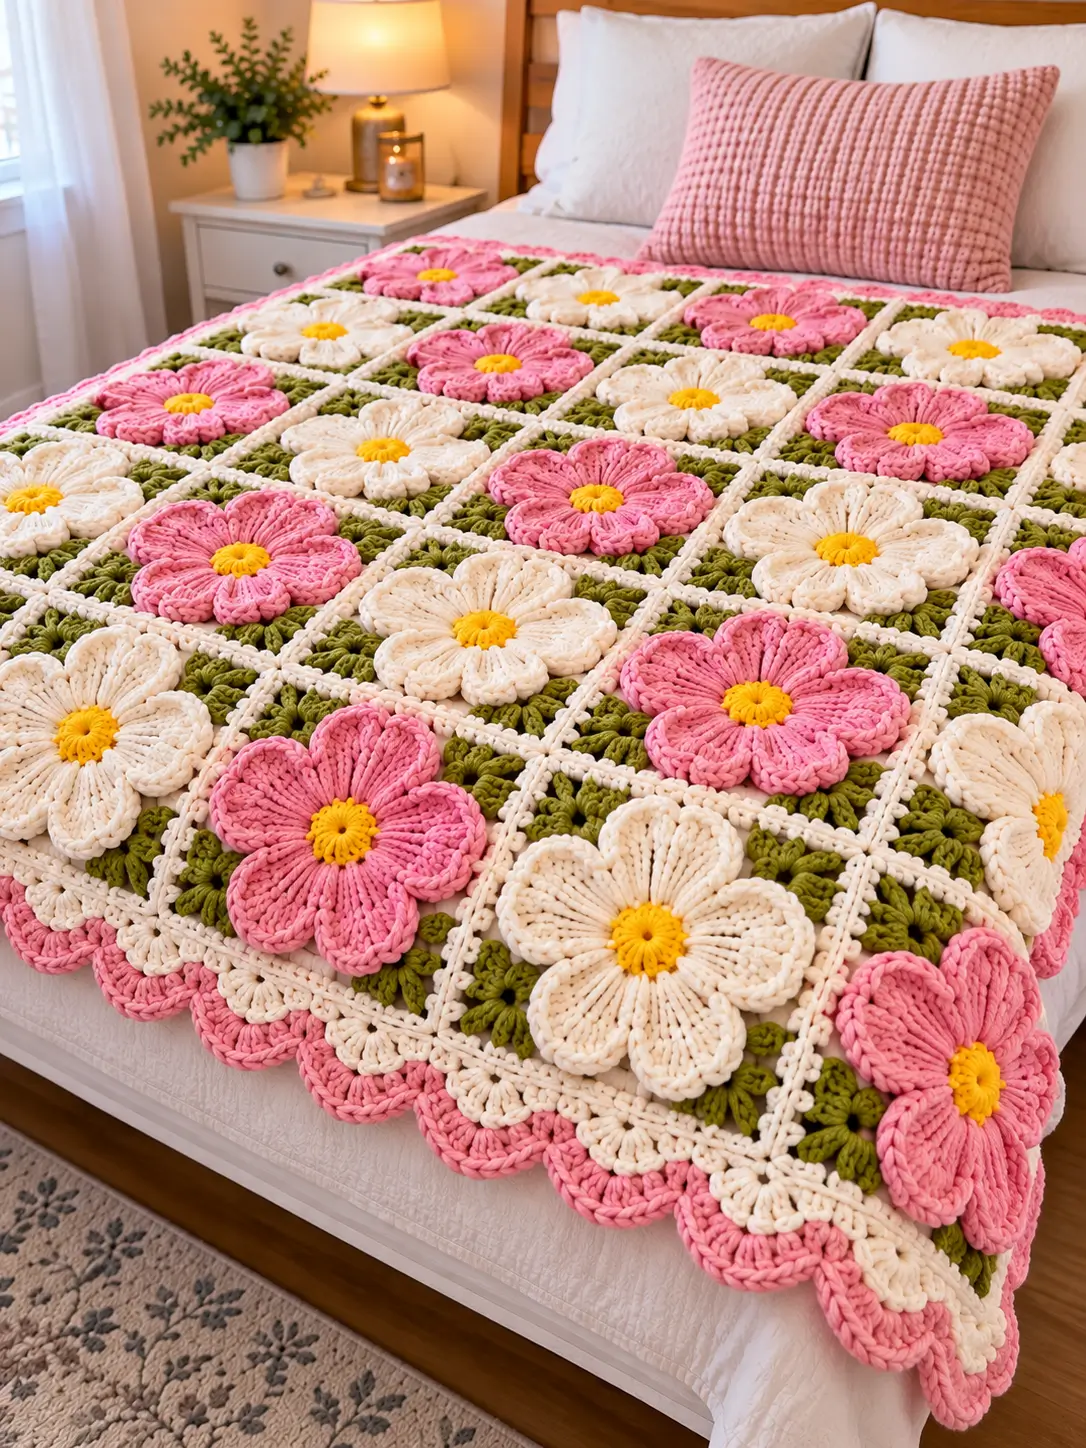
A flower blanket with raised petals needs enough clearance between neighboring blooms to prevent the petals from folding into the joining seams. This 3D crochet flower blanket pattern uses yellow centers, pink and ivory petals, olive-green square backgrounds, and cream borders. Designed for intermediate crocheters, the project uses worsted-weight yarn and a 5 mm hook to produce an estimated 120 × 150 cm blanket. Its modular construction allows individual squares to be repaired or replaced.
The Design: What Makes This Flower Blanket Different
The raised flowers are the defining feature of this blanket. Each motif has six rounded petals attached to a circular yellow center, creating a dimensional surface above a green crochet background.
Three construction decisions control the finished appearance.
First, the petals are attached through front loops while the background develops through the unused back loops. This separates the decorative surface from the supporting fabric.
Second, the green background expands into four corners. You can arrange alternating pink and ivory flowers without changing the structural instructions. Each raised flower crochet square therefore shares the same joining measurements.
Third, cream seams create a visible grid that separates neighboring flowers and help maintain consistent alignment.
A common mistake with a flower granny square blanket is making the petals too wide for the background. Oversized petals overlap adjacent motifs and distort the joining lines.
Project Info at a Glance
| Project Detail | Specification |
|---|---|
| Skill Level | Intermediate |
| Estimated Time | 45–65 hours |
| Finished Size | Approximately 120 × 150 cm |
| Crochet Hook | 5.0 mm |
| Yarn Weight | Category 4 worsted |
| Construction | 80 granny squares |
| Square Arrangement | 8 columns × 10 rows |
| Best For | Decorative bed throw |
Note: Finished dimensions, time, and yarn quantities are estimates for this original photo-inspired design. Make a sample square to confirm gauge before starting the full blanket.
Materials and Tools
Yarn
Use Category 4 worsted-weight yarn in coordinated colors. A consistent fiber and yarn thickness across all colors helps the motifs maintain equal dimensions.
- Rose pink – 350–450 g: Raised flower petals and outer scalloped edging. Suggested yarn: Stylecraft Special Aran or a comparable worsted-weight yarn.
- Ivory white – 350–450 g: Alternating flowers, joining seams, and inner edging.
- Olive green – 400–500 g: Granny-square backgrounds and textured areas around the flowers.
- Golden yellow – 80–100 g: Circular flower centers.
These are provisional purchasing allowances rather than measured yarn consumption. Make and weigh a sample square in each flower color before purchasing the full quantity.
Tools
- 5.0 mm crochet hook, or size needed to obtain the target square dimensions.
- Tapestry needle for weaving ends and joining.
- Locking stitch markers, preferably at least four.
- Sharp scissors for cutting yarn.
- Measuring tape for checking motif dimensions.
- Blocking mats and rust-resistant pins for shaping finished squares.
Stuffing and safety eyes are not required because this is a flat blanket with raised decorative petals.
Crochet Abbreviations
All instructions use US crochet terminology.
| Abbreviation | Meaning |
|---|---|
| MR | Magic ring |
| sc | Single crochet |
| hdc | Half double crochet |
| dc | Double crochet |
| tr | Treble crochet |
| inc | Two single crochet stitches in one stitch |
| dec | Single crochet two together |
| sl st | Slip stitch |
| ch | Chain |
| BLO | Back loop only |
| FLO | Front loop only |
| st / sts | Stitch / stitches |
| sp | Space |
| rep | Repeat |
For an invisible decrease, insert the hook through the front loops of two consecutive stitches, yarn over, pull through both loops, then finish one single crochet.
This blanket does not require decreases in its main motif.
3D Crochet Flower Blanket Pattern – Step by Step
This is an original photo-inspired pattern draft. The square uses joined rounds rather than a continuous spiral. Beginning chains do not count as stitches unless stated. Stitch counts exclude joining slip stitches and corner chains.
Color Arrangement and Square Count
Make 80 flower granny squares: 40 pink and 40 ivory.
Arrange the squares in eight columns and ten rows. Alternate flower colors horizontally and vertically to create a checkerboard layout.
Each motif should have a yellow center, six raised petals, and an olive-green square background.
Target a finished square measurement of approximately 15 × 15 cm before the outer border. Adjust the hook size or motif dimensions if necessary after making a sample.
Yellow Flower Center (Make 80)
Yarn: Golden yellow.
R1: Make 6 sc in MR. Join with sl st. (6)
R2: Ch 1, inc × 6. Join. (12)
R3: Ch 1, (1 sc, inc) × 6. Join. (18)
Pull the magic ring closed. Fasten off yellow and weave the starting tail into the reverse side.
The center should form a compact circular disc. Avoid tightening the final round so much that it cups upward.
Raised Flower Petals (Make 6 Per Square)
Yarn: Rose pink or ivory.
Work into the front loops of Round 3 of the yellow center. Each petal occupies three consecutive front loops.
Petal 1: Join petal yarn with sl st in the first front loop. Work (1 hdc, 3 dc, 1 hdc) into the second front loop. Sl st into the third front loop. (5 petal stitches)
Petal 2: Sl st into the next unused front loop. Work (1 hdc, 3 dc, 1 hdc) into the following front loop. Sl st into the next front loop. (5)
Petals 3–6: Repeat the same three-loop sequence until all 18 front loops have been used. (6 petals total)
Each petal contains five shaping stitches, plus anchoring slip stitches. The six petals therefore contain 30 shaping stitches altogether.
Fasten off after the sixth petal. Leave a 12 cm tail for securing the petal yarn on the reverse side.
The petals should sit above the center’s outer edge rather than lie completely flat. Their curved shape comes from placing five stitches into a single front loop.
For a fuller flower, a second decorative layer may be developed separately, but it is not included in the stitch arithmetic of this draft.
Olive-Green Square Background (Make 80)
Yarn: Olive green.
Work into the unused back loops of the yellow center, keeping the raised petals on the front.
The background begins as a circle before transitioning into a square.
R4: Join green in any unused back loop of Round 3. Ch 1, work 1 sc in each back loop around. Join. (18)
R5: Ch 1, (1 sc, inc, 1 sc) × 6. Join. (24)
R6: Ch 1, (2 sc, inc, 1 sc) × 6. Join. (30)
R7: Ch 1, (4 sc, inc) × 6. Join. (36)
R8: Ch 2, which does not count as a stitch. Work (2 dc, ch 2, 2 dc) in the first stitch, then 1 dc in each of the next 8 stitches. Repeat this sequence three more times, treating every ninth stitch as a corner stitch. Join to the first dc. (48 dc, four ch-2 corner spaces)
R9: Sl st to the first corner space. Ch 2, (2 dc, ch 2, 2 dc) in that space. Work 1 dc in each of the 12 dc along the next side. Repeat around, working the same corner group in each remaining corner space. Join. (64 dc, four ch-2 spaces)
R10: Repeat the corner treatment, working 1 dc in each of the 16 dc between corners. Join. (80 dc, four ch-2 spaces)
R11: Ch 1, work 1 sc in each dc and 3 sc in each corner ch-2 space. Join. (92 sc)
Fasten off and leave a 15 cm tail.
Counting checkpoint: After R11, place a marker in the middle stitch of each three-sc corner group. There should be 23 stitch advances from one marked corner stitch to the next.
The completed square should lie flat, with the flower centered above the green background.
If it curves inward, check the four corner groups and confirm that none were omitted.
Optional Raised Green Texture
The reference photograph contains pronounced olive-green texture around the flowers. To approximate this effect without changing the square’s outer stitch count, add surface crochet details after finishing the background.
Join green yarn to a visible stitch near the base of a petal. Ch 3 and sl st into the next available background stitch. Repeat around selected sections of the flower, keeping each chain arch loose.
These arches form small raised loops between the petals and the square’s outer border.
Do not attach the loops to the final joining round. Keeping the outer edge unobstructed makes the cream seams easier to work.
Fasten off and weave in the ends on the reverse side.
Cream Joining Seams
Yarn: Ivory.
Method: Flat single crochet joining.
Lay two squares side by side with the front surfaces facing upward.
Insert the hook through the corresponding edge stitches of both squares, join cream yarn, and work one single crochet through both layers at each matching position.
Continue from corner to corner, keeping the stitches relaxed enough to avoid gathering the edges.
Join the squares into eight vertical strips, each containing ten motifs. Then connect the strips horizontally.
Where four corners meet, keep the seam intersections flat and avoid stacking multiple bulky knots.
The cream joining lines should form a continuous grid across the blanket.
Outer Cream Border
Yarn: Ivory.
Work around the fully joined blanket.
Border R1: Join cream at any outer corner. Work 1 sc into each available edge stitch, adjusting stitch placement at seam intersections to maintain a flat perimeter. At each of the four corners, work 3 sc into the corner space.
Border R2: Ch 1, work 1 sc in each stitch around. Work 3 sc into the middle stitch of each corner group. Join.
Border R3: Ch 3, skip 2 stitches, sl st into the next stitch. Repeat along each side to form chain arches. At each corner, adjust the final spacing so that an arch sits symmetrically across the corner.
This openwork border creates the cream transition visible beneath the pink edging.
Because the number of perimeter stitches depends on joining tension and seam treatment, count the finished edge before starting R3.
Distribute any remaining stitches symmetrically rather than forcing a three-stitch repeat through a corner.
Pink Scalloped Edging
Yarn: Rose pink.
Join pink yarn in the first cream chain-3 arch.
Scallop 1: Work 7 dc into the chain space, then sl st into the next anchoring slip stitch.
Scallops 2 onward: Repeat 7 dc into each successive chain-3 arch, followed by a slip stitch into its next anchor.
At each corner, add extra stitches to the corner scallop only if required to keep the fabric flat. A corner shell of 9 dc is a possible adjustment.
Continue around the entire perimeter.
Join to the first stitch, fasten off, and leave a 15 cm tail for weaving.
The finished edging should form a repeated sequence of rounded pink shells outside the cream border.
Border testing note: The perimeter stitch total is not fixed. Joining methods, seam allowances, and corner placement affect the actual count. Test the scallop repeat on one short edge before completing the full blanket.
How to Assemble the Crochet Flower Blanket
- Complete the flower centers. Make 80 yellow centers and verify that each contains 18 stitches after Round 3.
- Add the petals. Work six raised petals around every center, making 40 pink flowers and 40 ivory flowers.
- Construct the green backgrounds. Work the expansion and square-shaping rounds, maintaining four corners on every motif.
- Check square dimensions. Measure each completed square and separate any that differ substantially from the target size.
- Arrange the color layout. Position eight squares across and ten squares down, alternating pink and ivory flowers.
- Pin the layout. Secure neighboring squares temporarily and check that the raised petals do not overlap the seam positions.
- Join the vertical strips. Use cream single crochet seams to connect ten squares in each column.
- Connect the strips. Join the eight columns into one rectangular blanket, keeping all intersections aligned.
- Finish the outer border. Work the cream rounds, openwork arches, and pink scalloped edging.
- Secure and shape. Weave in all yarn tails, lightly block the blanket according to its fiber care instructions, and allow it to dry flat.
The completed blanket consists of 80 raised-flower motifs joined into one rectangular fabric with a decorative scalloped perimeter.
7 Technical Tips for Better Results
- 1. Stitch marker placement: Missing a corner during R8 can produce a five-sided or uneven square. Mark the four corner stitches before working the first square-forming round.
- 2. Flower center tension: A loose magic ring can leave a visible hole wider than 5 mm. Tighten the starting tail before securing it on the reverse side.
- 3. Petal attachment: Working into both loops instead of the front loop can make the background difficult to attach. Leave all 18 back loops of the yellow center available for the green round.
- 4. Yarn tension: Switching to velvet or chenille yarn can alter petal size and obscure individual stitches. Make a complete sample with the selected yarn and adjust the hook rather than assuming worsted-weight measurements will transfer.
- 5. Square alignment: A difference of 5 mm per square can accumulate across eight columns. Pin and measure the motifs before joining to prevent a visibly slanted blanket edge.
- 6. Border spacing: Seven double crochets packed into a small chain arch may cause rippling. Test three adjacent scallops and reduce the shell size if the edge refuses to lie flat.
- 7. Tail weaving: Short tails can work loose at raised petal anchors and seam intersections. Leave approximately 12–15 cm, weave through several reverse-side stitches, and change direction before trimming.
Frequently Asked Questions
How many granny squares are needed for this blanket?
The proposed layout requires 80 squares arranged in eight columns and ten rows. This produces a rectangular format suitable for a decorative bed throw. The final dimensions depend on individual square measurements and the width of the outer border.
Can this blanket be made with chunky yarn?
Yes, but a larger hook and thicker yarn will increase both the dimensions and total weight. Chunky yarn may also make the raised petals bulkier, so a sample square is necessary before calculating how many motifs are required.
How do you keep raised crochet flowers from curling?
Maintain consistent tension and use the correct attachment loops. The petals should remain separate from the background, while the green square itself should lie flat. Blocking can improve shape but cannot correct missing increases or incorrect corner counts.
Is this flower blanket suitable for beginners?
It is better suited to intermediate crocheters familiar with magic rings, stitch increases, double crochet, working into separate loops, and joining granny squares. A beginner who already knows these techniques can practice on one motif before attempting the full blanket.
Can the blanket be machine washed?
That depends on the yarn fiber and manufacturer instructions. Choose washable yarn for a frequently used bed blanket, and test laundering on a sample square before washing the completed project.
Conclusion
The main construction challenge in this blanket is maintaining consistent square dimensions while preserving the height of the raised petals. Begin with one complete motif, measure its width, weigh the yarn used, and confirm that the green background remains flat. Then calculate the materials needed for all 80 squares.
Once the sample is approved, follow the alternating pink-and-ivory layout and complete the cream joining seams before adding the scalloped border.
Save this 3D crochet flower blanket pattern to Pinterest for project planning, and share finished blanket photographs on Instagram using #3DCrochetFlowerBlanket.
For this specific design, would you keep the olive-green background or replace it with sage green?









