Introduction
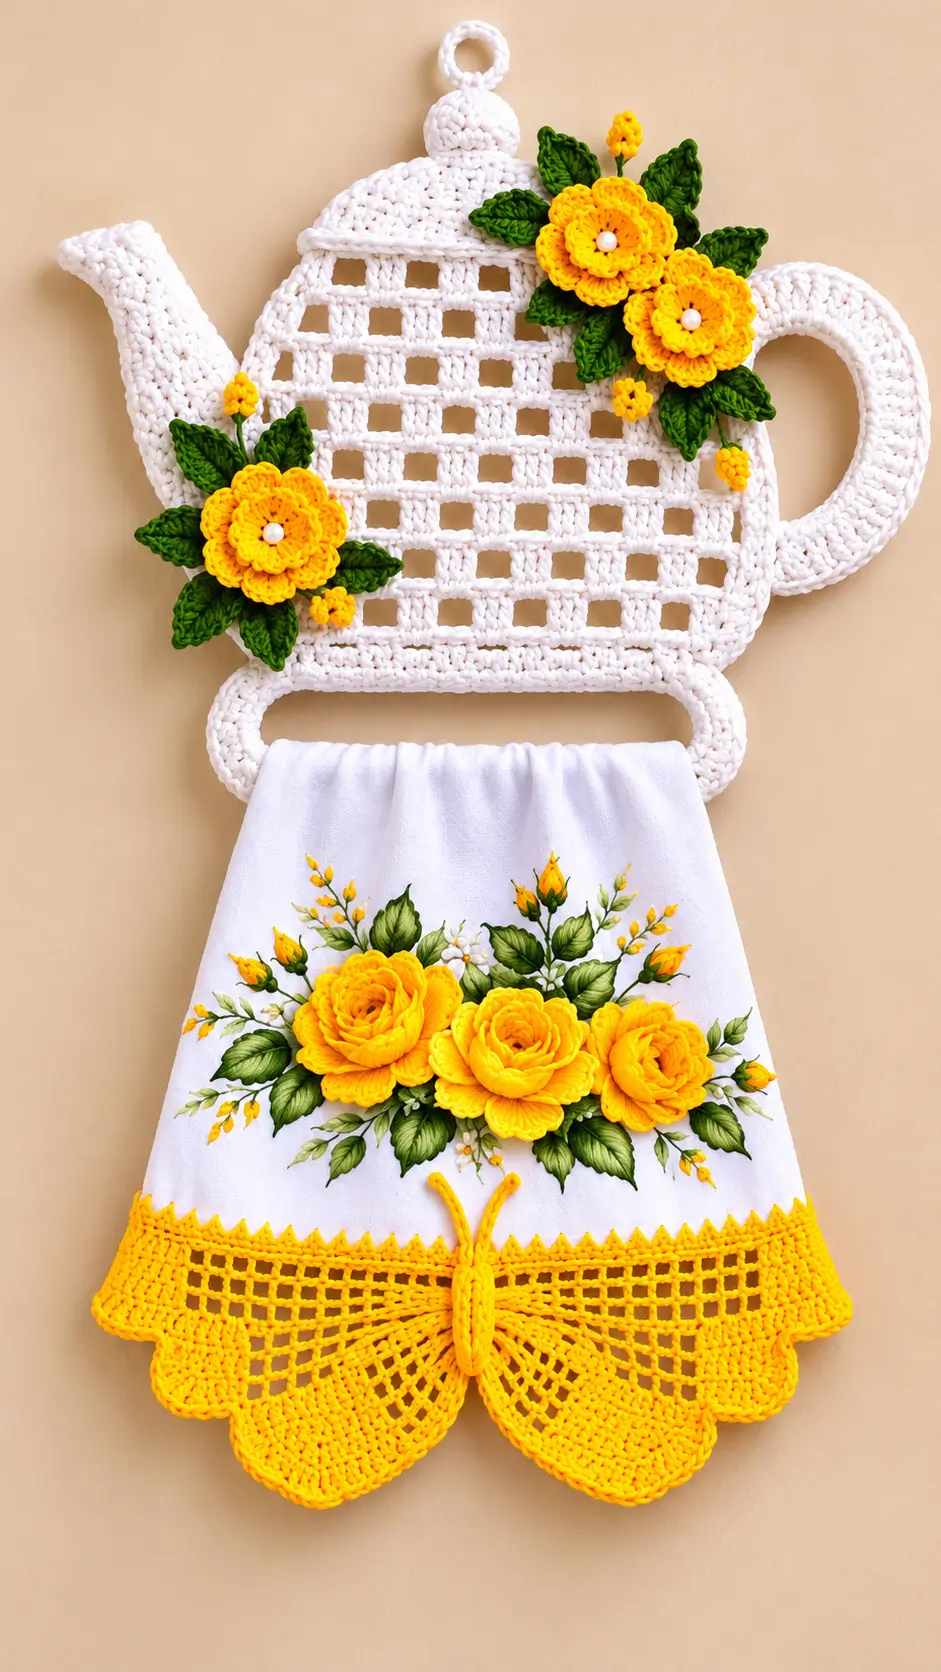
A teapot needs a spout that projects beyond the body, even when the pot is made entirely from flat crochet. This crochet teapot towel holder pattern combines an openwork white panel, a separate curved handle, three layered yellow flowers, and a suspended fabric towel. Use DK cotton and a 3 mm hook for a proposed 30–35 cm-wide display. Intermediate stitch skills are helpful. The towel slides out for laundering without dismantling the decoration.
The Design: What Makes This Teapot Different
A rectangular filet-style grid supplies the broad body without making it heavy. The shoulder rows narrow so the lid overlaps the rounded teapot outline and hides the upper join. You will crochet the spout and handle separately, then pin both before sewing. The spout must point upward at its tip, while the handle needs two attachment areas rather than one flexible connection. This combination distinguishes the piece from an ordinary crochet kitchen towel hanger.
The yellow crochet flower appliqué clusters are deliberately asymmetric: two sit beside the upper handle and one balances the spout. Leaves fill the gaps without covering the openings needed to see the mesh. A frequent mistake is pulling the handle inward while sewing, which distorts the body’s right edge. Pin its oval shape first, then anchor it through several stitches.
Project Info at a Glance
| Skill Level | Time | Finished Size | Hook | Best For |
|---|---|---|---|---|
| Intermediate | About 6–9 hours (estimate) | Target: 30–35 cm across the teapot | 3 mm | Lightweight kitchen tea towel |
The finished size and time are design targets, not measurements independently verified for this specific photo. Actual dimensions depend on gauge and yarn choice.
Materials and Tools
Yarn
- White or ivory — DK 100% cotton — allow 100 g — Rico Ricorumi DK or equivalent. For the body, lid, spout, handle, support, and hanging loop.
- Golden yellow and bright yellow — DK 100% cotton — allow 50 g total — Rico Ricorumi DK or equivalent. For the flower petals, buds, and lace band.
- Dark leaf green — DK 100% cotton — allow 25 g — Rico Ricorumi DK or equivalent. For leaves and embroidered stems.
- Small amount of white cotton — from the main allocation. For embroidered flower centers.
These quantities are purchase allowances for this original design adaptation. Actual yarn consumption has not been measured.
Tools
- 3 mm crochet hook
- Blunt yarn needle
- Scissors and measuring tape
- Stitch markers
- Rust-resistant sewing needle
- Three small white pearl-like beads, approximately 3–5 mm, optional
- White cotton tea towel, preferably with a yellow rose motif
- Matching sewing thread
- Blocking mat and pins
- Small non-rusting hanging ring, optional
- Wall hook suitable for the mounting surface
Embroidered flower centers are preferable when frequent laundering is expected. Avoid hanging a heavy wet towel from an unsupported crochet loop.
Abbreviations
- MR — Magic ring
- ch — Chain
- sc — Single crochet
- hdc — Half double crochet
- dc — Double crochet
- inc — Two single crochet stitches in one stitch
- dec — Single crochet two together
- sl st — Slip stitch
- BLO — Back loop only
- FLO — Front loop only
- RS — Right side
- st — Stitch
- sp — Space
All terms use US crochet terminology. For an invisible decrease, insert the hook under the front loops of the next two stitches before completing one single crochet.
Pattern — Step by Step
Work the teapot panel flat in turned rows, not in a continuous spiral. Small circular flower and finial components are worked in rounds. Chain-3 turning stitches count as the first double crochet where stated. Numbers in parentheses show stitch totals or the number of mesh units.
This is an original, mathematically checked draft based on the reference image. It has not been physically tested and is not the original designer’s pattern.
Teapot Body: Openwork Panel (Make 1)
Yarn: White — Construction: filet-style openwork.
Foundation: Ch 50.
R1: Sc in second ch from hook and each remaining ch. (49 sc)
R2: Ch 1, turn, sc across. (49 sc)
R3: Ch 1, turn, sc across. (49 sc)
R4: Ch 3, turn; ch 3, skip next 3 sc, dc in next sc; repeat the ch-3, skip-3, dc sequence 11 more times. (13 dc; 12 ch-3 spaces)
R5: Ch 3, turn; [ch 3, dc in next dc] × 12. (13 dc; 12 ch-3 spaces)
R6: Repeat R5. (13 dc; 12 ch-3 spaces)
R7: Repeat R5. (13 dc; 12 ch-3 spaces)
R8: Repeat R5. (13 dc; 12 ch-3 spaces)
R9: Repeat R5. (13 dc; 12 ch-3 spaces)
R10: Repeat R5. (13 dc; 12 ch-3 spaces)
R11: Repeat R5. (13 dc; 12 ch-3 spaces)
R12: Repeat R5. (13 dc; 12 ch-3 spaces)
R13: Repeat R5. (13 dc; 12 ch-3 spaces)
R14: Repeat R5. (13 dc; 12 ch-3 spaces)
R15: Repeat R5. (13 dc; 12 ch-3 spaces)
R16: Repeat R5. (13 dc; 12 ch-3 spaces)
R17: Ch 1, turn, sc in every dc and work 3 sc in every ch-3 sp. (49 sc)
R18: Ch 1, turn, dec × 2, sc 41, dec × 2. (45 sc)
R19: Ch 1, turn, dec × 2, sc 37, dec × 2. (41 sc)
R20: Ch 1, turn, dec × 2, sc 33, dec × 2. (37 sc)
R21: Ch 1, turn, dec × 2, sc 29, dec × 2. (33 sc)
R22: Ch 1, turn, dec × 2, sc 25, dec × 2. (29 sc)
R23: Ch 1, turn, dec × 2, sc 21, dec × 2. (25 sc)
R24: Ch 1, turn, dec × 2, sc 17, dec × 2. (21 sc)
R25: Ch 1, turn, sc across. (21 sc)
Fasten off, leaving a 30 cm tail. Add a separate single crochet edging along both shaped sides, spacing stitches to keep the fabric flat.
Block the panel before adding the projecting parts. If a mesh square contracts, check that each of the twelve ch-3 gaps remains open.
Spout (Make 1)
Yarn: White.
Foundation: Ch 7.
R1: Sc in second ch and across. (6 sc)
R2: Sc across. (6 sc)
R3: Inc in first and last st, sc in the four middle sts. (8 sc)
R4: Sc across. (8 sc)
R5: Inc at both ends, sc in the six middle sts. (10 sc)
R6: Sc across. (10 sc)
R7: Inc at both ends, sc in the eight middle sts. (12 sc)
R8: Sc across. (12 sc)
R9: Inc at both ends, sc in the ten middle sts. (14 sc)
R10: Sc across. (14 sc)
R11: Inc at both ends, sc in the twelve middle sts. (16 sc)
R12: Sc across. (16 sc)
Fasten off with a 25 cm tail. The narrow foundation forms the spout tip. Stretch that edge gently into a small outward lip.
Pin the wide base to the left body edge with the tip angled upward. Its curved appearance comes from blocking and placement, not from a stuffed tube.
Side Handle (Make 1)
Yarn: White.
Foundation: Ch 64 and join with a sl st without twisting.
R1: Sc in each ch around. (64 sc)
R2: Sc in each st around. (64 sc)
R3: Sc in each st around. (64 sc)
R4: Sc in each st around. (64 sc)
Fasten off with a 35 cm tail. Flatten the ring into a tall oval.
The handle should project to the right and remain open in the center. Stitch its upper-left and lower-left arcs to the teapot instead of sewing the entire ring edge down.
Teapot Lid and Brim (Make 1)
Yarn: White.
Foundation: Ch 35.
R1: Sc in second ch and across. (34 sc)
R2: Inc at each end, sc 32 between. (36 sc)
R3: Inc at each end, sc 34 between. (38 sc)
R4: Inc at each end, sc 36 between. (40 sc)
R5: Sc across. (40 sc)
Fasten off, leaving a 30 cm tail for sewing.
The 40-stitch edge overhangs the narrow upper body. Center its lower edge over the 21 stitches of R25 and sew down the overlap while leaving the brim visibly raised.
Lid Finial (Make 1)
Yarn: White — Standard six-stitch amigurumi construction.
R1: 6 sc in MR. (6)
R2: Inc × 6. (12)
R3: [Sc 1, inc] × 6. (18)
R4: Sc around. (18)
R5: Sc around. (18)
R6: [Sc 1, dec] × 6. (12)
R7: Dec × 6. (6)
Add a very small pinch of stuffing only if the knob collapses. Fasten off, close the remaining opening, and leave a 20 cm tail for sewing.
This finial is the only lightly stuffed element in the design.
Hanging Loop (Make 1)
Yarn: White.
R1: Ch 25; sl st in the second ch from the hook and in the remaining chains. (24 sl st)
R2: Work 1 sc around each of the 24 sl stitches. (24 sc)
Fasten off with two 20 cm ends. Bend into a ring and secure both ends through the lid, the finial base, and several stitches of the upper body.
For repeated use, sew a small hidden hanging ring behind the attachment point.
Lower Towel Support (Make 1)
Yarn: White.
Foundation: Ch 57.
R1: Sc in the second ch and across. (56 sc)
R2: Ch 1, turn, sc across. (56 sc)
R3: Ch 1, turn, sc across. (56 sc)
R4: Ch 1, turn, sc across. (56 sc)
R5: Ch 1, turn, sc across. (56 sc)
Fasten off, leaving a 30 cm tail at each end.
Curve the band into a broad U beneath the teapot and sew the first and last eight stitches securely to opposite ends of the lower panel. The free middle section creates the opening through which the fabric towel passes.
Layered Yellow Flowers (Make 3 Sets)
Yarn: Golden yellow outer layer and bright yellow inner layer.
Inner Flower (Make 3)
R1: 6 sc in MR. (6)
R2: Inc × 6. (12)
R3: [Sl st in next st; (sc, hdc, 3 dc, hdc, sc) in next st] × 6. (48 sts including slip stitches; six petals)
Fasten off with a 15 cm tail.
Outer Flower (Make 3)
R1: 6 sc in MR. (6)
R2: Inc × 6. (12)
R3: [Sc 1, inc] × 6. (18)
R4: [Sl st in next st; (sc, hdc, 4 dc, hdc, sc) in next st; sl st in next st] × 6. (60 sts including slip stitches; six petals)
Fasten off, leaving a 20 cm sewing tail.
Stack one small bloom over one large bloom. Rotate the petals so the upper and lower petals do not align exactly. Secure only the centers to preserve the raised effect.
Add a white embroidered knot or one small bead to each flower.
Green Leaves (Make 12)
Yarn: Dark green.
Foundation: Ch 12.
R1: Beginning in second ch, sc 1, hdc 2, dc 5, hdc 2, sc 1; turn around the end of the chain and repeat the same sequence into the free loops on the opposite side. (22 sts)
Sl st into the starting point and fasten off with a 20 cm tail.
Pinch the top of each leaf to create a pointed shape. Arrange six leaves around the upper flower pair and the remaining six around the lower-left flower cluster.
Small Yellow Buds (Make 5)
Yarn: Bright yellow.
R1: 6 sc in MR. (6)
R2: Sc around. (6)
R3: Dec × 3. (3)
Fasten off with a 20 cm tail. Pull the opening closed and sew each bud to a short green chain or embroidered stem.
Position two buds near the lower-left flower and three around the upper flower cluster.
White Flower Centers (Make 3, Optional)
Yarn: White.
R1: 6 sc in MR. (6)
R2: Sc around. (6)
Fasten off with a 15 cm tail. Stitch one disk to the center of each flower.
These crocheted centers replace the white pearl-like beads shown in the photograph and are suitable for a washable design.
Yellow Butterfly-Style Towel Edging (Make 1 Band)
Yarn: Bright yellow.
Foundation: Ch 82.
R1: Sc in second ch and across. (81 sc)
R2: Ch 3, turn; [ch 3, skip 3 sts, dc in next st] × 20. (21 dc; 20 ch-3 spaces)
R3: Ch 3, turn; [ch 3, dc in next dc] × 20. (21 dc; 20 ch-3 spaces)
R4: Ch 1, turn; sc in every dc and 3 sc in each ch-3 sp. (81 sc)
R5: Ch 1, turn; sc in first st; [skip 3, work 6 dc in next st, skip 3, sc in next st] × 10. (71 sts)
Fasten off with a 30 cm tail.
This foundation is a starting size rather than a confirmed fit for every towel. Adjust the width by adding or removing groups of four stitches and updating the mesh and shell repeat counts.
Attach the straight edge to the folded fabric hem using matching sewing thread.
Butterfly Lace Wings (Make 2)
Yarn: Bright yellow.
Foundation: Ch 34.
R1: Sc in second ch and across. (33 sc)
R2: Ch 3, turn, dc in each remaining st. (33 dc)
R3: Ch 3, turn; [ch 1, skip 1, dc in next st] × 16. (17 dc; 16 ch-1 spaces)
R4: Repeat R3 across the existing dc posts. (17 dc; 16 ch-1 spaces)
R5: Ch 3, turn; dc in each dc and each ch-1 sp. (33 dc)
R6: Ch 1, turn, sc in first st; [skip 3, 7 dc in next st, skip 3, sc in next st] × 4. (33 sts)
Fasten off with a 30 cm tail.
Mount the two panels below the towel hem with their inner upper corners touching. Angle each scalloped edge outward to form a butterfly-style silhouette.
This lace construction is a stylized interpretation rather than an exact reproduction of the photograph.
Butterfly Center and Antennae (Make 1)
Yarn: Golden yellow.
Foundation: Ch 16.
R1: Sc in second ch and across. (15 sc)
R2: Ch 1, turn, sc across. (15 sc)
R3: Ch 1, turn, sc across. (15 sc)
Fasten off with a 20 cm tail.
Sew the narrow strip vertically over the joining edges of the two butterfly wings.
First antenna: Attach yarn at the upper end, ch 9, and sl st back down the chain. (8 sl st)
Second antenna: Repeat the same sequence on the opposite side. (8 sl st)
Fabric Towel Preparation
The yellow roses on the white cloth are a fabric print or painted or embroidered decoration in the image. They are not part of the crochet stitch chart.
Choose an already decorated cotton towel, or create a separate embroidered floral motif before attaching the lace. Test fabric markers or paints for laundering according to the manufacturer’s directions. This crochet pattern does not include a rose-print template.
Measure the towel hem after washing. If the crochet band is shorter than the cloth, increase the grid foundation in four-stitch increments instead of stretching the cotton sideways.
Sew the lace through the folded hem at frequent intervals while leaving the lower scallops free. The finished towel can pass through the crochet support independently of the decorative edging.
Assembly
- Upper section: Block the tapered top of the teapot body flat, then center the lid over its 21-stitch upper edge.
- Body: Sew the lid overlap, check that the mesh remains square, and reinforce the bottom three solid rows.
- Front decoration: Lay two flowers at the upper right and one at the lower left. Check the center positions before stitching.
- Projections: Attach the spout at the left and the tall oval handle at the right. Use multiple yarn passes at both handle joins.
- Leaves: Pin six leaves around each flower grouping without completely covering the central mesh openings.
- Flower features: Attach five buds on green stems and secure the white embroidered or bead centers.
- Hanging feature: Sew the finial and hanging loop through the lid into the body. Add a hidden support ring if needed.
- Towel support: Secure the lower U-shaped band symmetrically to the bottom edge and test it with a lightweight dry towel.
- Accessories: Stitch the yellow band to the towel hem, position both lace wings, and attach the butterfly center and antennae.
- Finish: Weave in every tail, remove the pins, block flat, and hang the holder with the decorated tea towel.
The finished assembly consists of a separate crochet teapot support and a removable decorated fabric towel.
7 Technical Tips for a Better Crochet Teapot Towel Holder
- Grid alignment: If the filet lattice leans diagonally, check that each mesh row contains 13 double crochet posts and 12 chain-3 gaps. A missing gap shifts the upper outline and makes the lid sit off-center.
- Stitch markers: Place markers on the first and last stitches of R17 before beginning the shoulder decreases. Losing either edge stitch changes the sequence of 45, 41, 37, 33, 29, 25, and 21 stitches.
- Stuffing firmness: The lid finial needs only enough filling to hold its dome because excess stuffing can push through the small holes. The flat body, spout, handle, and leaves contain no stuffing.
- Flower center placement: Attach the three white centers after checking the petals, not before blocking. Embroidered centers avoid detached small parts and are preferable for a frequently washed towel holder.
- Cotton tension: If the handle ring curls sharply, compare the 64 stitches in every round and loosen the hook grip slightly. Velvet yarn is unsuitable for this mesh because the raised pile obscures the open squares.
- Pinning: Secure the spout at two points and the handle at two broader areas before sewing. A single attachment point lets the handle fold inward under even a light towel.
- Tail weaving: Leave at least 15–30 cm sewing tails on components that carry weight. Weave each structural tail through several changing stitch directions because a short single pass can work loose during washing.
Conclusion
A finished teapot hanger depends on three working connections: the upper suspension point, the handle’s double anchor, and the lower towel band. Check each with a lightweight dry cloth before placing the piece in a kitchen. The crochet teapot towel holder pattern also permits practical variations: replace beads with white embroidered centers, shorten the lace to fit another towel, or move the lower flower to expose more openwork. Photograph the completed display against a plain wall and share the result on Pinterest and Instagram with #FloralTeapotTowelHolder. Record the yarn and hook used so another maker can interpret the final size. Would you keep the spout angled upward or make its tip more pronounced?









