Introduction
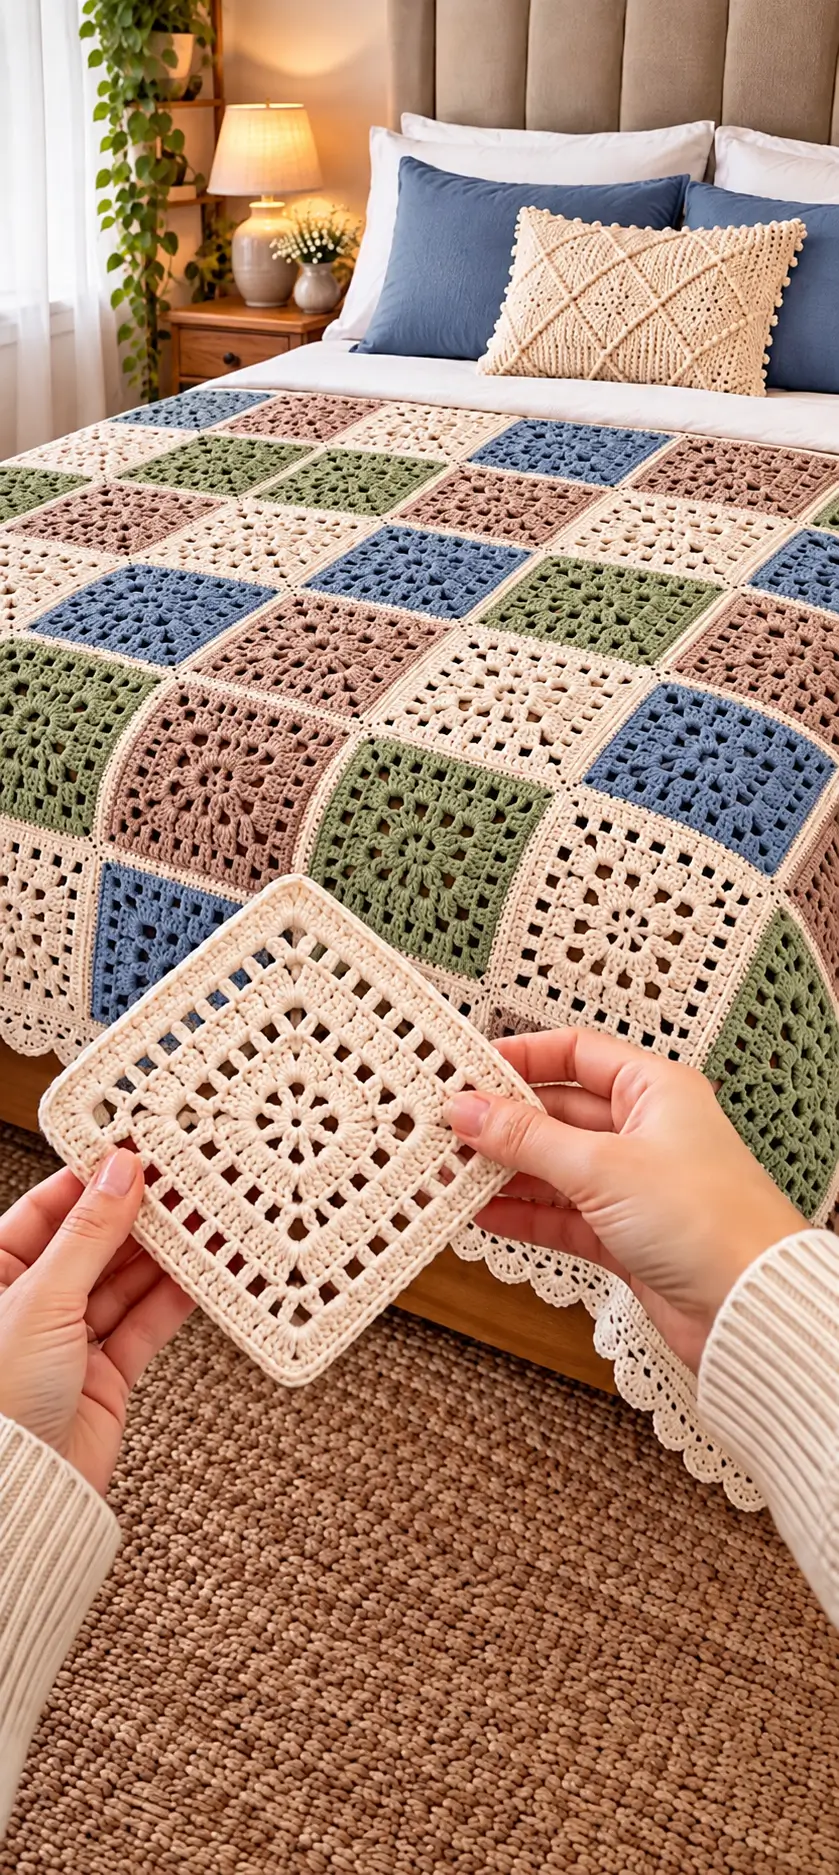
The flower center and filet corners have to reach the same blocked dimensions in four different colors or the entire patchwork grid begins to drift. This floral granny square crochet blanket combines cream, dusty blue, sage green, and muted taupe motifs with open geometric lace and a cream joining frame. The photo-inspired design uses DK or light worsted yarn with a 4.0 mm hook and suits intermediate crochet work.
The Design: What Makes This Blanket Different
Each square begins with an open floral center rather than a dense granny cluster. Petal-like groups radiate from a small central ring, then transition into chain spaces and geometric blocks. The outer rounds become progressively more square, creating straight joining edges without removing the lace character of the center.
Color placement does most of the visual work. Dusty blue, sage, taupe, and cream motifs are distributed across the blanket rather than arranged in strict stripes. A narrow cream joining line separates neighboring colors and gives the patchwork a consistent grid.
The border repeats the cream used between motifs. Its open arches and scallops are lighter than the square frames, which prevents the perimeter from becoming visually heavy. The most common construction problem is inconsistent blocking: even a 5 mm difference between motifs accumulates across a large bedspread.
Project Info at a Glance
| Skill Level | Construction | Square Size | Hook | Best For |
|---|---|---|---|---|
| Intermediate | Joined floral lace squares | Approx. 18–20 cm blocked | 4.0 mm | Throws, bedspreads and cushion covers |
Materials and Tools
Yarn
- Warm cream — DK #3 or light worsted — motifs, joining and border
- Dusty blue — DK #3 or light worsted — motifs
- Sage green — DK #3 or light worsted — motifs
- Muted taupe — DK #3 or light worsted — motifs
Use the same yarn line for all four colors when possible. Differences in fiber composition or yarn diameter can make one color block larger even when every motif contains the same stitch count.
Tools
- 4.0 mm crochet hook
- Yarn needle
- Scissors
- Locking stitch markers
- Tape measure
- Blocking mats
- Rust-resistant pins
Abbreviations
- MR — magic ring
- ch — chain
- sl st — slip stitch
- sc — single crochet
- hdc — half double crochet
- dc — double crochet
- tr — treble crochet
- sp — space
- st/sts — stitch/stitches
- RS — right side
- FO — fasten off
Pattern Construction
The blanket is assembled from one repeating square worked in a single color. Make the motif in cream, dusty blue, sage, and taupe, then block every square to one master measurement before joining.
The motif progresses through three structural stages: circular flower center, open transition rounds, and square filet frame.
Floral Granny Square — Make Required Quantity
Choose one motif color.
Round 1 — Center Ring
Make a MR.
Ch 1.
Work 8 sc into the ring.
Join with a sl st. (8)
Round 2 — Petal Foundations
Ch 1.
Repeat around:
sc in next st, ch 4.
Join to the first sc.
You should have 8 ch-4 spaces.
Round 3 — First Petal Layer
Sl st into the first ch-4 space.
Into each ch-4 space work:
(sc, hdc, 3 dc, hdc, sc).
Repeat in all eight spaces.
Join.
The center should now show eight compact petal sections.
Round 4 — Open Flower Ring
Work behind the petals.
Repeat:
sc between two neighboring petals, ch 5.
Continue around.
Join.
You should have 8 ch-5 spaces.
Round 5 — Radiating Clusters
Sl st into the first ch-5 space.
Into each space work:
(2 dc, ch 2, 2 dc).
Ch 1 between neighboring groups.
Repeat around.
Join.
Converting the Flower to a Square
The eight sections now need to become four corners and four sides.
Place a marker in every second ch-2 space. The four marked spaces become corners.
Round 6 — First Square Round
Sl st to the first marked space.
In each marked corner space work:
(3 dc, ch 3, 3 dc).
In each unmarked space work:
(2 dc, ch 2, 2 dc).
Ch 1 between neighboring groups.
Repeat around.
Join.
Round 7 — Open Geometric Round
Sl st to the corner ch-3 space.
Work:
(2 dc, ch 3, 2 dc)
in the corner.
Across each side, work:
ch 3, sc in next ch-space
until reaching the next corner.
Repeat on all four sides.
Round 8 — Filet Foundation
At each corner work:
(2 dc, ch 3, 2 dc).
Across each side, alternate:
2 dc in next space, ch 2.
Keep the sequence identical on all four sides.
Join.
Round 9 — Filet Grid
Sl st to the corner.
At each corner work:
(2 dc, ch 3, 2 dc).
Across each side, work dc over the solid sections.
Above each open space work:
ch 2.
This keeps the small square openings aligned vertically.
Round 10 — Outer Lace Frame
At each corner work:
(3 dc, ch 3, 3 dc).
Across each side alternate solid groups with open spaces:
3 dc, ch 2, skip corresponding space.
Repeat to the next corner.
Keep opposite sides identical.
Round 11 — Structural Edge
Ch 1.
Sc evenly around the complete motif.
Work 2 sc into each ch-2 side space.
At each corner work:
(2 sc, ch 2, 2 sc).
Join.
Round 12 — Final Joining Round
Ch 1.
Sc in every stitch around.
At each corner ch-2 space work:
(sc, ch 2, sc).
Join and FO.
Target Square Size
Block the completed master motif to approximately 18–20 cm.
The exact measurement is less important than consistency. Once the first square is blocked, use its measurement for every remaining motif.
Keep all completed squares within approximately 3–5 mm of the master size.
Checking Square Geometry
Measure the width and height through the center.
Then measure both diagonals.
The two diagonal measurements should remain within approximately 5 mm of each other.
If one diagonal is longer, check the corner chains and side tension before making additional motifs.
Color Distribution
The reference uses four muted colors without a rigid stripe sequence. A balanced arrangement works better than repeating the same four-color order on every row.
For example, use:
| Row | Suggested Sequence |
|---|---|
| 1 | Blue — Taupe — Cream — Sage — Blue — Taupe |
| 2 | Cream — Sage — Blue — Taupe — Cream — Sage |
| 3 | Sage — Cream — Taupe — Blue — Sage — Cream |
| 4 | Taupe — Blue — Sage — Cream — Taupe — Blue |
Continue rotating the colors rather than placing identical colors directly above one another.
Suggested Blanket Layouts
Calculate the finished blanket from the actual blocked square measurement.
If one motif measures approximately 19 cm:
| Layout | Approximate Motif Area | Use |
|---|---|---|
| 4 × 5 squares | 76 × 95 cm | Baby or small lap blanket |
| 5 × 7 squares | 95 × 133 cm | Lap throw |
| 6 × 8 squares | 114 × 152 cm | Sofa throw |
| 8 × 10 squares | 152 × 190 cm | Large throw |
| 9 × 11 squares | 171 × 209 cm | Bedspread |
| 10 × 12 squares | 190 × 228 cm | Large bedspread |
Joining and the final border add additional width and length.
Blocking Before Joining
Block every motif before assembly.
Pin the four corners first.
Measure the square horizontally and vertically.
Pin the midpoint of each side.
Adjust the lace openings only after the structural measurements match the master motif.
Allow the square to dry completely before removing it from the blocking surface.
Cream Joining Method
Use warm cream for the seams to reproduce the narrow light-colored grid between the colored motifs.
Place two squares side by side with right sides facing upward.
Insert the hook through corresponding inner loops along both edges.
Work relaxed sl sts across.
Do not tighten the seam.
Alternative Flat Single Crochet Join
Hold two motifs with wrong sides together.
Using cream, work sc through corresponding edge stitches.
The seam will form a narrow raised line on the right side.
Use the same joining method throughout the blanket.
Join Rows First
Arrange the complete color layout on a large flat surface.
Photograph or record the arrangement before moving the squares.
Join motifs into horizontal rows.
After all horizontal rows are complete, join the rows vertically.
Checking the Joined Grid
After joining the first two rows, place the work flat.
Check that the intersections form approximately 90-degree angles.
If the seam causes the motifs to buckle, the joining stitches are too tight.
Correct the seam before assembling the remaining rows.
First Border Round
Join cream yarn at any outer corner.
Ch 1.
Sc evenly around the complete blanket.
At each corner work:
(2 sc, ch 2, 2 sc).
Join.
Second Border Round
Ch 2.
Hdc in every stitch around.
At each corner work:
(2 hdc, ch 2, 2 hdc).
Join.
Openwork Border Round
Ch 1.
Sc in the first stitch.
Repeat:
ch 3, skip 2 sts, sc in next st.
At each corner use a ch-5 space.
Continue around.
Join.
Second Openwork Round
Sl st into the first ch-3 space.
Repeat:
ch 4, sc in next ch-3 space.
At each corner work a ch-6 arch.
Continue around.
Scalloped Border
Into each regular ch-4 arch work:
(sc, hdc, 3 dc, hdc, sc).
Into each corner ch-6 arch work:
(sc, hdc, 5 dc, hdc, sc).
Continue around.
Join and FO.
Optional Picot Detail
For a more decorative edge, add a picot at the center of every scallop.
Replace the middle dc with:
dc, ch 3, sl st into the first chain, dc.
Keep the picots relaxed and equal in size.
Border Tension Check
Lay the blanket flat after each border round.
If the edge begins to wave, reduce the number of chain spaces or stitches.
If the edge pulls inward, add slightly more spacing.
Do not rely on blocking to correct a severely distorted border.
Estimating Yarn for the Blanket
Make one complete motif in each color and weigh them after weaving in the tails.
Suppose one blocked motif weighs 45 g.
For a blanket containing 48 motifs:
45 × 48 = 2,160 g.
Add yarn for joining and the border, then add approximately 10% reserve.
The 45 g figure is only an example. Use the actual weight of your own master motif.
Estimating Yarn by Color
Count the number of motifs assigned to each shade.
If one square weighs 45 g and the layout contains 12 dusty-blue squares:
45 × 12 = 540 g of dusty blue.
Repeat the calculation for sage, taupe, and cream.
Purchase additional cream because it is also required for seams and the border.
Matching Cushion Cover
The same motifs can be used for a coordinating cushion.
For a 40–45 cm cushion, arrange four motifs in a 2 × 2 grid if the blocked dimensions suit the cushion form.
Join them with cream yarn using the same seam as the blanket.
Cushion Back
For a simpler back, crochet a solid cream panel.
Chain to the width of the blocked cushion front.
Hdc in the third chain from the hook and across.
Continue in hdc rows until the panel matches the front.
Assembling the Cushion
Place the front and back with wrong sides together.
Sc around three sides using cream.
Insert the cushion form.
Close the remaining edge or make an envelope-style back if the cover needs to be removable.
Dusty Blue Dominant Version
Use dusty blue for approximately half of the motifs.
Divide the remaining squares between cream, sage, and taupe.
Keep all seams and the outer border cream.
Sage Dominant Version
Use sage as the primary motif color.
Add smaller groups of cream, dusty blue, and taupe.
A cream joining grid keeps the darker sage squares visually separated.
Neutral Version
Replace dusty blue and sage with additional oatmeal, beige, and warm gray.
Keep cream for joining and the border.
The floral lace structure remains visible even without strong color contrast.
Autumn Version
Replace the original palette with terracotta, mustard, olive, and cream.
Use a warm oatmeal shade for the joining grid.
Maintain the same motif distribution rather than arranging colors in solid rows.
Coastal Version
Use dusty blue, pale aqua, sand, and ivory.
Join with ivory.
This variation keeps the open floral geometry while shifting the palette toward cooler tones.
Making the Blanket Larger
Add complete rows or columns of motifs rather than increasing the size of individual squares.
This keeps the floral proportions and filet openings consistent throughout the blanket.
Measure the bed or sofa before deciding how many additional motifs to make.
Making the Blanket Smaller
Remove complete rows or columns.
Do not omit the outer rounds from random motifs because all squares must have identical joining edges.
Using Worsted Yarn
Worsted #4 yarn produces larger and heavier squares.
Begin with a hook around 4.5–5.0 mm and make one complete test motif.
Record the blocked dimensions before calculating the number of squares required.
Using Cotton Yarn
Cotton gives the filet openings clear definition and responds well to blocking.
A large cotton bedspread can become heavy, so calculate the total project weight from one finished motif before making the complete set.
Using an Acrylic Blend
An acrylic or acrylic-cotton blend can reduce total weight and simplify washing.
Avoid aggressive heat blocking because synthetic fibers can change permanently when exposed to excessive heat.
Assembly
- Make one complete floral lace motif and block it to the chosen master measurement before starting the full batch.
- Crochet the required number of cream, dusty-blue, sage, and taupe squares, keeping the same hook size and stitch tension throughout.
- Block every square individually and keep width, height, and both diagonal measurements within approximately 3–5 mm of the master motif.
- Arrange all motifs on a flat surface, distribute the four colors across the grid, and record the final layout before joining.
- Join motifs into horizontal rows with cream yarn, checking the first 5 cm of each seam for contraction before continuing.
- Join the completed rows vertically and check each four-square intersection for approximately 90-degree alignment.
- Work the first cream structural border around the assembled blanket and correct any uneven stitch distribution along the seams.
- Add the hdc and openwork border rounds only after the first perimeter round lies flat on all four sides.
- Complete the cream scalloped edging, keeping corner shells larger than the regular side shells so the corners remain flat.
- Weave all yarn tails through 5–7 cm of dense crochet, complete a light final blocking, and allow the blanket to dry completely before use.
The completed blanket should form an even patchwork grid of floral lace squares with consistent cream seams, balanced color distribution, open geometric centers, and a light scalloped perimeter.
7 Technical Tips
- Keep every blocked square within approximately 3–5 mm of the master motif. A 5 mm error repeated across ten squares can alter a finished row by several centimeters.
- Measure both diagonals before joining. A difference greater than approximately 5 mm indicates that one corner or side contains tighter stitches.
- Use stitch markers at all four corners while working the square rounds. Accidentally shifting one corner space by a single repeat produces a visibly skewed filet frame.
- Test the first 5 cm of every joining method. Tight slip stitches shorten the seam and cause neighboring squares to form a ridge instead of lying flat.
- Check each four-square intersection before continuing the next seam. Misaligned intersections become increasingly difficult to correct after additional rows are attached.
- Inspect the border every 30–40 cm while crocheting. Too many stitches produce waves, while insufficient stitches pull the outer motifs inward.
- Weave tails through at least 5–7 cm of dense stitches. Avoid hiding structural yarn ends inside chain spaces because open lace provides too little friction to hold them securely.
Care and Final Blocking
Wash according to the care instructions for the selected yarn. Support the blanket fully when wet because a joined crochet bedspread can become substantially heavier after absorbing water.
Lay the blanket flat and align the joining grid first. Check the four corners, then straighten the outer edges and shape the scalloped border.
Do not stretch individual open cells independently. Adjust the complete motif so its geometry remains balanced. Allow the blanket to dry completely before folding or placing it on the bed.
Conclusion
The repeated flower center and open geometric frame give this floral granny square crochet blanket its distinctive patchwork structure. Begin with one master square, block it carefully, and record its final dimensions before producing the full set. Rotate cream, dusty blue, sage, and taupe across the layout rather than grouping identical colors into large sections, then use cream seams to create the continuous grid. Your next step is to crochet one complete motif and confirm its blocked width and diagonals before calculating the blanket dimensions. Save the finished project to Pinterest or share it on Instagram with #VintageFloralGrannyBlanket. Which color would you use most: dusty blue, sage, taupe, or cream?









