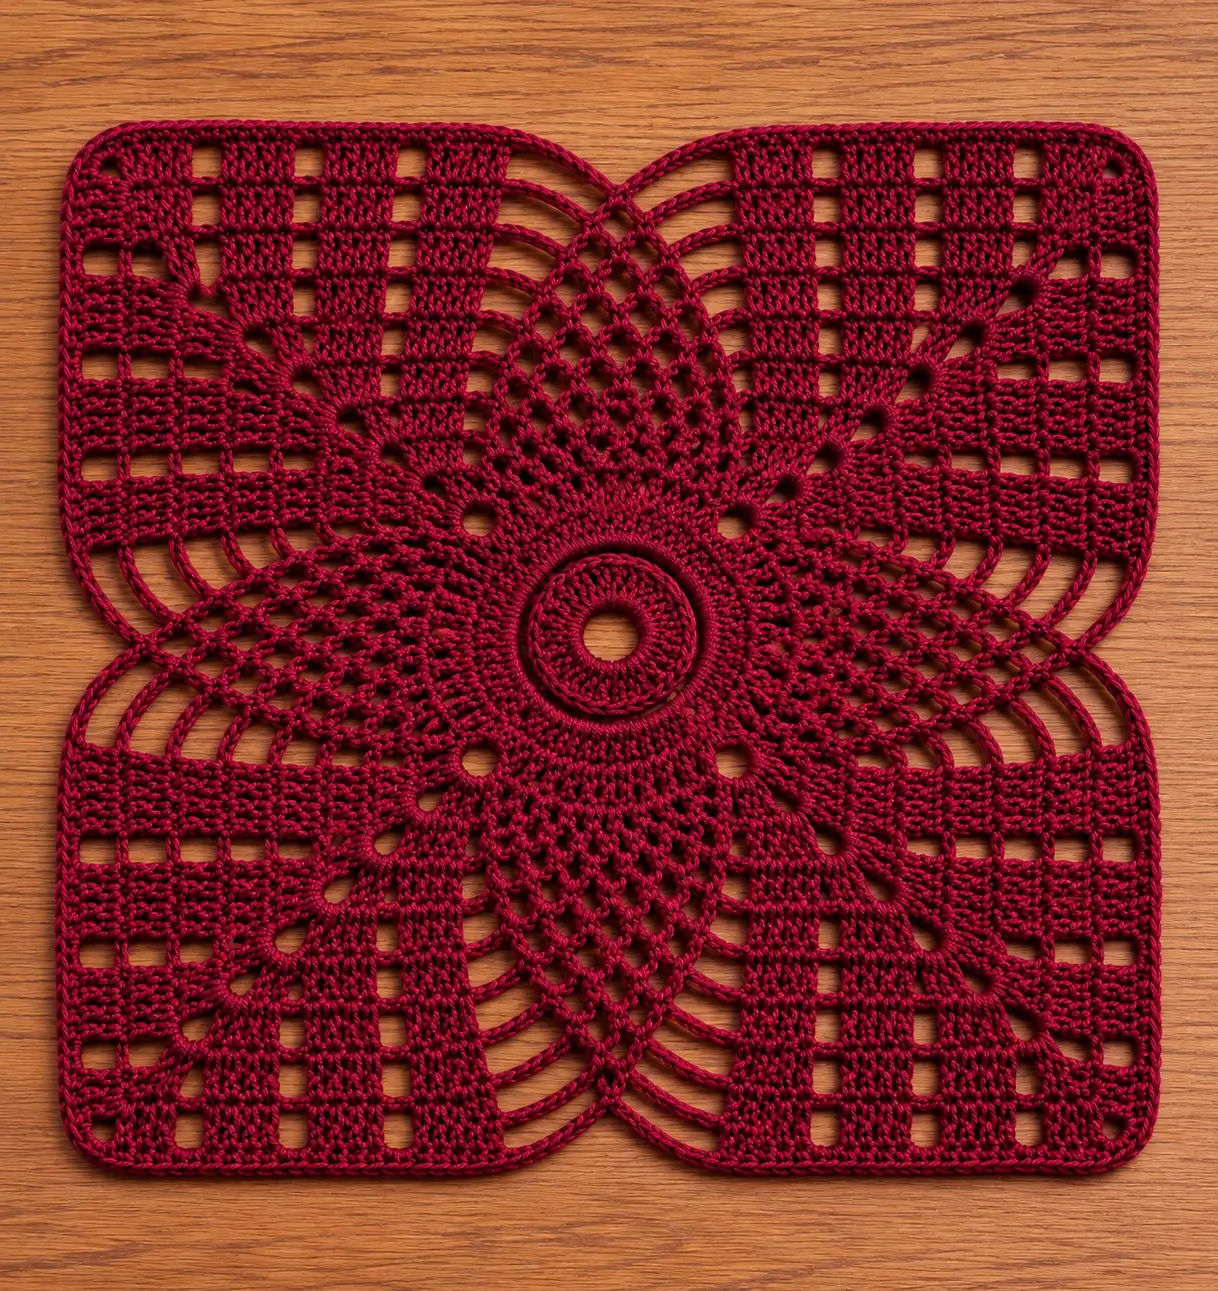
Burgundy Crochet Lace Square Pattern with Circular Center and Filet Corners
Introduction
The circular center has to become a square without closing the four large lace openings that define this motif. This burgundy crochet lace square pattern combines a ring-shaped center, radiating openwork, chain arches, filet-style corner grids, and rounded outer corners. Worked in smooth cotton or cotton-blend yarn with a 3.0–3.5 mm hook, it creates a structured decorative square suited to table mats, cushion panels, runners, or joined lace projects.
The Design: What Makes This Lace Square Different
The motif changes geometry several times. A compact circular ring forms the center. Radiating stitches expand that ring into four directional sections, while increasingly long chain spaces create the open lace areas between them. The final rounds establish four rectangular filet panels and convert the circular construction into a stable square.
The dense burgundy sections provide structure; the open chain arches prevent the motif from becoming visually heavy. Four diagonal lines running from the center toward the corners organize the design and help keep opposite sides symmetrical.
The main construction risk is adding too many stitches while converting the circle into four sides. Excess fabric produces rippled corners. Too few stitches pull the open arches inward and distort the central ring.
Project Info at a Glance
| Skill Level | Construction | Target Size | Hook | Best For |
|---|---|---|---|---|
| Intermediate | Center-out lace square | Approx. 28–32 cm | 3.0–3.5 mm | Table mats, runners, cushions and joined lace panels |
Materials and Tools
Yarn
- Burgundy — DK #3 cotton or cotton blend — approximately 70–100 g for one large motif, depending on yarn and finished size
A smooth yarn with visible stitch definition works better than fuzzy fibers for this design. The chain arches and filet openings depend on clean edges and consistent tension.
Tools
- 3.0–3.5 mm crochet hook
- Yarn needle
- Scissors
- 8 locking stitch markers
- Tape measure
- Blocking mat
- Rust-resistant pins
Abbreviations
- MR — magic ring
- ch — chain
- sl st — slip stitch
- sc — single crochet
- hdc — half double crochet
- dc — double crochet
- tr — treble crochet
- sp — space
- st/sts — stitch/stitches
- RS — right side
- FO — fasten off
Construction Notes
This is an original photo-inspired construction based on standard center-out lace and filet-crochet techniques. The exact appearance depends strongly on yarn diameter, hook size, and blocking.
Place four primary markers at 90-degree intervals as soon as the central circle is complete. These markers establish the four diagonal axes of the square.
Do not remove them until the outer frame has been established.
Central Ring
Ch 18.
Join with a sl st in the first chain, taking care not to twist the chain.
The opening should remain clearly visible after the surrounding rounds are completed.
Center Round 1
Ch 1.
Work 36 sc evenly around the chain ring.
Join with a sl st to the first sc. (36)
Center Round 2
Ch 3, counting as the first dc.
Dc in each stitch around.
Join to the top of the beginning ch-3. (36 dc)
Center Round 3
Ch 1.
Sc in each dc around.
Join. (36 sc)
This creates a firm circular frame around the central opening.
Raised Ring Detail
For the pronounced ring visible around the center, work one round of surface slip stitches over the outer edge of Round 3.
Keep the slip stitches relaxed.
FO.
The surface round is decorative and should not reduce the diameter of the central opening.
Establishing Four Axes
Divide the 36 stitches into four equal sections of 9 stitches.
Place one marker after every 9 stitches.
These four points represent the center lines leading toward the eventual corners.
Radiating Round 1
Join yarn at one marker.
Ch 4.
Work:
tr in next 2 sts, ch 3, skip 1 st, tr in next 2 sts.
Continue with dc and hdc stitches toward the center of the next section, then mirror the sequence as you approach the following marked axis.
Repeat the same construction four times around.
Join.
Radiating Round 2
Sl st to the first open space.
Ch 3.
Work groups of 3 dc into the solid sections.
Over each previous ch-3 opening, work:
ch 4.
Maintain the four marked axes.
The open areas should begin widening between the solid radiating sections.
Radiating Round 3
Work dc across each solid section.
Over each open section, increase the chain length to approximately ch 5.
At each marked axis, work:
(dc, ch 2, dc)
into the marked space.
This begins the transition from a circular shape toward four directional points.
First Large Lace Arches
Work toward the first diagonal section.
Across each open area, create a sequence of graduated arches:
ch 4, ch 5, ch 6, ch 5, ch 4.
Anchor each arch with sc into the corresponding space from the previous round.
Repeat the same arch sequence in all four quadrants.
Second Lace Arch Round
Work into the arches rather than into individual chains.
Across each quadrant, repeat:
sc in arch, ch 5.
At the central arch of each quadrant, use ch 7.
The longer central arch provides enough space for the lace to spread without pulling inward.
Diagonal Structural Bands
At each of the four marked axes, work a narrow solid band.
Use:
3 dc, ch 2, 3 dc.
On the following round, work dc into the dc stitches and repeat (2 dc, ch 2, 2 dc) into the ch-2 space.
These four bands divide the motif into four symmetrical quadrants.
Building the Open Diamond Areas
Between neighboring structural bands, work chain mesh.
Repeat:
ch 5, sc in next arch.
Continue toward the center of each quadrant.
Use one ch-7 arch at the widest point.
Mirror the sequence toward the next structural band.
Preparing the Square Shape
Place a second set of four markers midway between the existing diagonal markers.
The new markers indicate the centers of the future sides.
You should now have eight reference points:
- 4 diagonal or corner axes
- 4 side-center points
First Square-Shaping Round
Work dc along each dense diagonal section.
Across the open lace areas, alternate:
ch 3, sc in next arch.
At each corner axis work:
(2 tr, ch 3, 2 tr).
Repeat around.
Lay the motif flat before continuing.
Second Square-Shaping Round
Work dc across each developing side.
Maintain the existing open spaces with matching chains.
At each corner ch-3 space work:
(3 dc, ch 3, 3 dc).
Repeat around.
The motif should now have four identifiable sides.
Beginning the Filet Corner Panels
The outer portion of the motif uses alternating solid blocks and open filet cells.
A basic open cell is:
dc, ch 2, skip 2 sts, dc.
A solid block replaces the ch-2 opening with dc stitches.
Filet Round 1
Along each side, work a combination of solid dc sections and open cells.
For the open cells repeat:
ch 2, skip 2 sts, dc in next st.
At each corner work:
(2 dc, ch 3, 2 dc).
Repeat on all four sides.
Filet Round 2
Work dc over the solid sections.
Above each open cell, work:
ch 2, dc into the next dc.
Keep the open cells vertically aligned.
At each corner work:
(2 dc, ch 3, 2 dc).
Filet Round 3
Introduce additional solid blocks near the diagonal lace sections.
Maintain open cells toward the outer corner panels.
The transition should form a stepped geometric line rather than an abrupt solid wall.
Filet Round 4
Continue the established grid.
Check that each side has the same number of open cells.
Measure from the central ring to each outer corner.
All four measurements should remain within approximately 5 mm.
Creating the Large Side Arches
Where the filet sections meet the open central lace, create elongated chain arches.
Work:
ch 7, sc in next structural point.
On the following arch use ch 8, then return to ch 7.
Repeat symmetrically in all four quadrants.
Stabilizing the Long Arches
On the following round, work one sc into each long arch.
Ch 5 between anchors.
Do not fill the long arches with dense stitches. Their open shape is part of the motif.
Outer Solid Bands
Work dc across each solid filet section.
Maintain the open cells where indicated.
At the corners work:
(3 dc, ch 2, 3 dc).
This round begins stabilizing the outer perimeter.
Outer Grid Round
Repeat the filet sequence across each side:
dc, ch 2, skip 2 sts, dc.
Use solid dc blocks where additional support is required near the corner transitions.
Keep all four sides identical.
Rounded Corner Shaping
At each corner, replace the sharp corner point with a broader sequence:
2 hdc, 3 dc, ch 2, 3 dc, 2 hdc.
This produces the slightly rounded outer corners visible in the design.
Penultimate Structural Round
Ch 1.
Sc in every solid stitch.
Work 2 sc into each ch-2 filet space.
Across longer chain arches, distribute sc evenly without packing the stitches.
At each corner work:
(2 sc, ch 2, 2 sc).
Final Edging Round
Ch 1.
Sc in every stitch around.
At each corner ch-2 space work:
(sc, ch 1, sc).
Join with a sl st.
FO and weave in the tail.
Target Finished Size
With DK cotton and a 3.0–3.5 mm hook, target approximately 28–32 cm after blocking.
Changing yarn weight changes the finished dimensions considerably.
Use the motif measurement rather than the stated target when calculating a multi-square project.
Checking Symmetry
Place the motif on a flat surface before blocking.
Measure:
- Top edge
- Bottom edge
- Left edge
- Right edge
- Diagonal A
- Diagonal B
Opposite edges should be nearly identical.
Keep the difference between the two diagonals within approximately 5 mm.
Blocking the Lace Square
Dampen the finished motif according to the yarn care instructions.
Place it on a blocking mat.
Pin the four corners first.
Next pin the midpoint of every side.
Adjust the open chain arches only after the eight structural reference points are positioned.
Do not stretch individual filet openings wider than neighboring cells.
Maintaining the Central Ring
Place several pins around the central opening during blocking.
Target a smooth circular shape.
If the ring becomes oval, check the four diagonal axes before adjusting individual stitches.
Single Table Mat Version
Work one motif and block it to approximately 30 cm.
Add one additional round of sc if a firmer perimeter is required.
This produces a decorative centerpiece or large table mat.
Table Runner Version
Make 3–5 motifs.
Block every square to exactly the same measurement.
Arrange them in one straight row.
Join corresponding outer-edge stitches with relaxed slip stitches or a flat sewn seam.
Joining Multiple Squares
Place two blocked squares with right sides facing upward.
Align the corner spaces.
Using matching burgundy yarn, insert the hook through corresponding inner loops.
Work a relaxed sl st seam.
Stop after approximately 5 cm and check that the seam does not shorten the edges.
Four-Square Table Topper
Make four identical motifs.
Arrange them in a 2 × 2 grid.
Join the first two pairs horizontally.
Join both rows vertically.
Keep the center intersection compact so the four motifs meet cleanly.
Cushion Panel Version
One large motif can form the decorative front of a cushion.
After blocking, add extra outer rounds until the panel matches the cushion dimensions.
Mount the lace motif over a contrasting fabric insert if the open areas need additional definition.
Creating a Matching Back Panel
For a fully crocheted cushion, work a plain square in hdc or dc.
Match its blocked dimensions to the lace front.
Place both panels together and sc around three sides.
Insert the cushion form, then close the final side.
Bed Runner Version
Join several motifs in a single row for a narrow runner.
For a wider version, arrange motifs in a 2 × 5 or 2 × 6 grid.
Measure the blocked motif before deciding the final quantity.
Wall Panel Version
Block the motif firmly and mount it against a contrasting textile background.
Attach only around the structural outer frame.
Do not stitch through the long lace arches because this changes their geometry.
Using Thinner Thread
For a finer lace result, use crochet cotton thread and a hook matched to the thread size.
The finished square will be smaller and the filet details more compact.
Make a complete test motif before planning a multi-square project.
Using Thicker Yarn
Worsted yarn can produce a substantially larger motif.
Increase hook size only enough to keep the chain arches flexible.
Thick yarn may reduce the visual clarity of the smallest filet cells, so check the center and first grid section before continuing.
Alternative Colorway — Ivory
Work the entire motif in warm ivory for a traditional lace appearance.
The shadows created by the open arches provide enough contrast to show the geometric structure without additional colors.
Alternative Colorway — Forest Green
Deep forest green produces a strong botanical version.
Use smooth cotton to preserve the definition of the small filet openings.
Alternative Colorway — Navy
Navy emphasizes the geometric grid and makes the open spaces particularly visible against a pale table surface.
Alternative Colorway — Terracotta
Muted terracotta creates a warmer version while retaining the strong contrast between solid crochet and open lace.
Two-Color Variation
Work the central ring and radiating section in one color.
Change to a second color when the filet panels begin.
Return to the first color for the final edging if a stronger frame is required.
Make color changes at the beginning of a round rather than in the middle of an open arch.
Calculating Yarn for Multiple Motifs
Complete one square, weave in all tails, and weigh it.
For example, if one finished motif weighs 85 g and the project requires 8 squares:
85 × 8 = 680 g.
Add yarn for joining and approximately 10% reserve.
The 85 g value is only an example. Use the actual weight of your finished master motif.
Master Motif Record
Before beginning a batch, record:
- Finished width
- Finished height
- Diagonal A
- Diagonal B
- Central opening diameter
- Yarn weight used
- Hook size
Compare every new square with these measurements.
Assembly
- Make the central chain ring and work the dense circular rounds, keeping the center opening round and flat.
- Divide the circle into four equal sections and place markers at the four primary axes before beginning the radiating lace.
- Build the open arches symmetrically in all four quadrants and compare opposite sections after every major lace round.
- Establish four corner axes and four side centers before converting the circular construction into a square.
- Work the filet panels with identical open-cell counts on opposite sides and check the developing diagonals regularly.
- Add the long chain arches only after the solid structural sections lie flat without cupping around the center.
- Complete the outer grid and rounded corner shaping, keeping all four sides equal before working the final sc edging.
- Block each motif by pinning four corners and four side centers first, then shape the individual lace arches and filet openings.
- For a multi-motif project, join only fully blocked squares and test the first 5 cm of every seam for contraction.
- Weave all tails through dense sections rather than open chain mesh, then complete a light final blocking after assembly.
The finished motif should have a circular burgundy center, four symmetrical radiating lace sections, open diagonal arches, geometric filet panels, and a stable rounded square perimeter.
7 Technical Tips
- Keep the two diagonals within approximately 5 mm of each other. A larger difference indicates that one quadrant contains tighter arches or fewer effective stitches.
- Mark all four axes before beginning the radiating lace. Moving a corner position by only two or three stitches can make the final filet grid visibly asymmetric.
- Keep long chain arches relaxed but equal. One chain arch that is 8–10 mm shorter than its opposite partner can pull the central lace toward that quadrant.
- Check the motif on a flat surface after every two major rounds. Early rippling means too much fabric has been added, while cupping indicates insufficient expansion.
- Measure the central opening before and after blocking. Excessively tight surface slip stitches can reduce the ring diameter and distort the surrounding radiating stitches.
- Pin structural points before decorative openings. Pinning individual arches first can stretch the lace unevenly and hide errors in the underlying square geometry.
- Weave tails through at least 5–7 cm of dense stitches. Do not weave important ends through chain mesh because the yarn can remain visible and the open structure provides little friction.
Care and Final Blocking
Follow the care instructions for the selected yarn. Cotton lace usually benefits from careful blocking because the open cells and chain arches become more regular after the fabric is shaped.
Lay the motif flat and position the four corners first. Add pins at the midpoint of each side, then shape the diagonal lace sections and central opening.
Allow the piece to dry completely before removing the pins. Do not pull the motif from one corner when moving it; support the full square so the long chain arches are not stretched.
Conclusion
The transition from a circular ring to four geometric corner panels defines this burgundy crochet lace square pattern. Begin with one master motif and record its blocked dimensions, central opening, diagonals, and yarn weight before making additional squares. Keep the four axes marked throughout the radiating section, maintain equal chain arches, and establish the square geometry before expanding the filet panels. The next step is to make the central ring and test whether it remains flat through the first radiating rounds. Save the finished motif to Pinterest or share it on Instagram with #BurgundyLaceSquare. Would you use this motif as a single table centerpiece or join several squares into a runner?









