Introduction
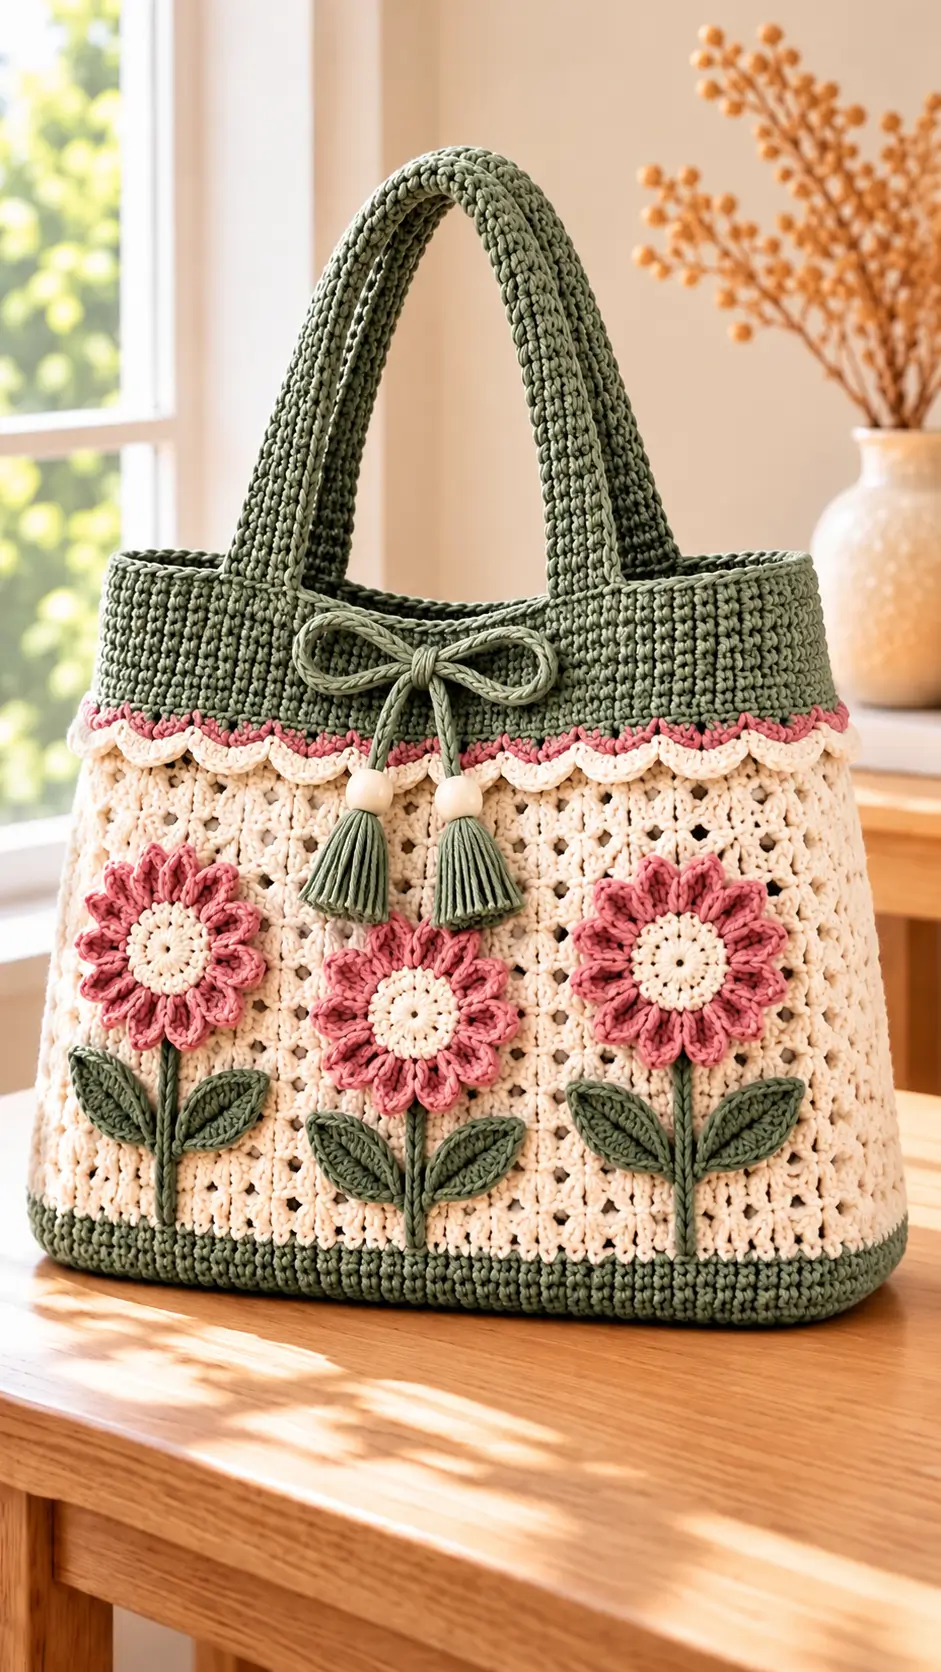
Three dusty-rose flowers rise from a sage-green hem, but their stems must cross an open ivory lace panel without leaning. This floral crochet tote bag pattern uses worsted cotton, a 5 mm hook, and a rectangular base to create a target size of approximately 34 × 30 × 10 cm. It is an intermediate project with two reinforced shoulder handles. Separate appliqués let you adjust the flower spacing before securing the motifs.
The Design: What Makes the Sage Garden Tote Different
The photograph combines two fabrics: a closed sage border and an open ivory floral field. The lower strip protects the base from wear, while the upper band keeps handle anchors away from lace openings. In this reconstruction, 116 stitches travel around a rectangular base. That number divides into 29 four-stitch repeats, preventing partial lace motifs along the sides. Each flower is layered instead of being built into the bag wall. You can pin all three stems before attaching the leaves; the maker can then change their placement without pulling the mesh out of shape. A common mistake with a crochet flower tote bag is sewing only through each blossom’s center. Unsupported petals may catch on clothing. This crochet bag with flower appliqués uses hidden anchoring stitches around the flower bases while allowing the outer petal tips to project.
Project Info at a Glance
| Skill Level | Time | Finished Size | Hook | Best For |
|---|---|---|---|---|
| Intermediate | Allow roughly 12–16 hours (planning estimate) | Target 34 cm wide × 30 cm tall × 10 cm deep, excluding handles | 5.0 mm | Light everyday items or a project bag |
Sizing status: These are design targets, not measured results from a completed sample. A published floral tote by Made by Gootie uses a 5 mm hook and worsted cotton, while the Red Heart Pastel Flowers Bag reports a single-crochet gauge of 13 stitches and 12 rows per 10 cm. Work and measure your own swatch. The finished width and height will change if its gauge differs.
Materials and Tools
Yarn
- Warm ivory — worsted-weight (#4) cotton — 220 g purchase allowance — consider Knit Picks Dishie in a natural shade; use for the lace, flower centers, and cream scallops.
- Sage green — worsted-weight (#4) cotton — 160 g purchase allowance — a coordinating Dishie-type cotton; use for the base, upper band, handles, stems, leaves, bow, and tassels.
- Dusty rose — worsted-weight (#4) cotton — 65 g purchase allowance — a compatible cotton with similar thickness; use for the three layered flowers and pink trim.
These amounts are conservative shopping allowances for this untested reconstruction, not verified consumption figures. For comparison, Gootie’s published tote specifies 200 g and 60 g in its two colors. Keep unused yarn for handle repairs or later size adjustments.
Tools
- 5.0 mm crochet hook for the bag and appliqués; an optional 4.0 mm hook may help with firmer decorative cords.
- Two smooth wooden beads, about 14–18 mm in diameter, with holes large enough for the tassel cords.
- Yarn needle, locking stitch markers, scissors, tape measure, rustproof pins, and a blocking surface.
- Optional cotton lining, matching thread, and cotton twill tape for stabilizing both handles.
This project uses no stuffing or safety eyes. Wooden beads are decorative attachments rather than safety-eye substitutes. Omit beads if the finished bag may be handled by infants or young children.
Abbreviations
US crochet terms: MR = magic ring; sc = single crochet; inc = two sc in one stitch; dec = single-crochet decrease; sl st = slip stitch; ch = chain; BLO = back loop only; FLO = front loop only; hdc = half double crochet; dc = double crochet; tr = treble crochet; sk = skip; st(s) = stitch(es); sp = space; RS = right side.
An invisible dec is worked through the front loops of the next two stitches before the final yarn-over and pull-through; no body decreases are required for this tote.
Construction rule: The bag uses joined, unturned rounds so the color boundary stays level; the foundation rectangle and handles use turned rows. Beginning chains and joining slip stitches do not count as stitches unless stated. Place a marker at the first stitch of each round. A count such as (29 sc, 29 ch-3 spaces) records both formed stitches and chain spaces, not 116 individual sc.
Pattern — Step by Step
Rectangular Base (Make 1)
Yarn: sage green. Original count design; rectangular-base construction is also documented by Viv Crochets.
Ch 45.
Row 1: Sc in second ch from hook and across. (44 sc)
Row 2: Ch 1, turn, sc across. (44 sc)
Row 3: Ch 1, turn, sc across. (44 sc)
Row 4: Ch 1, turn, sc across. (44 sc)
Row 5: Ch 1, turn, sc across. (44 sc)
Row 6: Ch 1, turn, sc across. (44 sc)
Row 7: Ch 1, turn, sc across. (44 sc)
Row 8: Ch 1, turn, sc across. (44 sc)
Row 9: Ch 1, turn, sc across. (44 sc)
Row 10: Ch 1, turn, sc across. (44 sc)
Row 11: Ch 1, turn, sc across. (44 sc)
Row 12: Ch 1, turn, sc across. (44 sc)
Do not fasten off. Lay the rectangle flat and mark its four corners. If its width differs from roughly 34 cm or depth from roughly 10 cm, adjust hook size or accept a different finished bag size before building the sides.
Perimeter and Solid Lower Band (Make 1)
Yarn: sage green. Source: original perimeter arithmetic.
Perimeter round P1: Ch 1; work 44 sc across the last row, 12 sc evenly along the first short side, 44 sc across the unused foundation-chain loops, and 12 sc evenly along the second short side. During that circuit add one extra sc at each of the four corners, taking care not to omit any of the planned side stitches. Join with sl st. (116 sc = 44 + 12 + 44 + 12 + 4)
Round 1: Ch 1, sc BLO in each stitch around, join. (116 sc)
Round 2: Ch 1, sc around, join. (116 sc)
Round 3: Ch 1, sc around, join. (116 sc)
Round 4: Ch 1, sc around, join. (116 sc)
Round 5: Ch 1, sc around, join. (116 sc)
The unused front loops in Round 1 form a base ridge. Keep the rectangle’s corners visible by placing four removable markers above them. The next color starts at the side seam.
Ivory Lace Body (Make 1)
Yarn: warm ivory. Source: original 29-repeat lace arithmetic; stitch vocabulary follows standard US crochet terms.
Round 6: Join ivory; [sc in next st, ch 3, sk next 3 sts] × 29; join. (29 sc, 29 ch-3 spaces)
Round 7: [Sc in next ch-3 space, ch 3] × 29; join. (29 sc, 29 ch-3 spaces)
Round 8: [3 dc in next ch-3 space, ch 1] × 29; join. (87 dc, 29 ch-1 spaces)
Round 9: [Sc in each of next 3 dc, sc in next ch-1 space] × 29; join. (116 sc)
Round 10: Repeat Round 6. (29 sc, 29 ch-3 spaces)
Round 11: Repeat Round 7. (29 sc, 29 ch-3 spaces)
Round 12: Repeat Round 8. (87 dc, 29 ch-1 spaces)
Round 13: Repeat Round 9. (116 sc)
Round 14: Repeat Round 6. (29 sc, 29 ch-3 spaces)
Round 15: Repeat Round 7. (29 sc, 29 ch-3 spaces)
Round 16: Repeat Round 8. (87 dc, 29 ch-1 spaces)
Round 17: Repeat Round 9. (116 sc)
Round 18: Repeat Round 6. (29 sc, 29 ch-3 spaces)
Round 19: Repeat Round 7. (29 sc, 29 ch-3 spaces)
Round 20: Repeat Round 8. (87 dc, 29 ch-1 spaces)
Round 21: Repeat Round 9. (116 sc)
After four complete repeats, the final round is solid and ready for the green upper band. Check that every group of three double crochets is followed by exactly one chain space before completing each solid transition. Fasten off ivory, leaving a 15 cm end to weave through the solid Round 21.
Sage Upper Band (Make 1)
Yarn: sage green. Source: standard even-round crochet construction.
Round 22: Join sage, ch 1, sc in each st, join. (116 sc)
Round 23: Ch 1, sc around, join. (116 sc)
Round 24: Ch 1, sc around, join. (116 sc)
Round 25: Ch 1, sc around, join. (116 sc)
Round 26: Ch 1, sc around, join. (116 sc)
Round 27: Ch 1, sc around, join. (116 sc)
Round 28: Ch 1, sc around, join. (116 sc)
Round 29: Ch 1, sc around, join. (116 sc)
Round 30: Ch 1, sc around, join. (116 sc)
Round 31: Ch 1, sc around, join. (116 sc)
Round 32: Ch 1, sc around, join. (116 sc)
Fasten off, leaving a 20 cm tail. The band has 11 dense rounds; do not attach the handles to the open lace below. If the opening flares, recheck the 116-stitch count rather than pulling the top edge tight with a shorter finishing round.
Shoulder Handles (Make 2)
Yarn: sage green. Source: original strap design.
Leave a 30 cm starting tail and ch 8.
Row 1: Sc in second ch from hook and across. (7 sc)
Rows 2–64: Ch 1, turn, sc in each stitch across. (7 sc per row; 63 additional rows)
Fasten off, leaving another 30 cm sewing tail. Each strap is 7 stitches wide and 64 rows long, with a planned length of approximately 53 cm at the reference row gauge. Measure both straps while unstretched. If one is longer, correct it before attachment; do not rely on sewing tension to compensate.
For greater stability, stitch cotton twill tape to the underside of the strap, stopping short of its attachment ends. Tape is optional but useful when the bag will hold books, groceries, or other objects heavier than a small personal kit.
Dusty-Rose Flower Bases and Petals (Make 3)
Yarn: dusty rose. Source: original 6-stitch magic-ring increase math; layered appliqué construction is a common technique in flower and leaf patterns.
Round 1: Work 6 sc into MR, join. (6 sc)
Round 2: Inc in every stitch, join. (12 sc)
Round 3: [Sc in next st, inc in next st] × 6, join. (18 sc)
Round 4: [Sc in next 2 sts, inc in next st] × 6, join. (24 sc)
Round 5, inner petals: Work in FLO of Round 4; [sl st in next loop, (hdc, 2 dc, hdc) in next loop] × 12. (12 petals; 24 front loops used)
Fasten off the first strand and rejoin dusty rose in any unused BLO of Round 4.
Round 6, outer petals: [Sl st in next back loop, (hdc, dc, tr, dc, hdc) in next back loop] × 12. (12 petals; 24 back loops used)
Fasten off and leave a 30 cm sewing tail. The pair of petal rounds produces two layers, not 24 petals around one outer circumference. Flatten each layer gently with your fingers and keep the long outer petal tips free of tight sewing stitches.
Ivory Flower Centers (Make 3)
Yarn: warm ivory. Source: standard six-increase circular crochet math.
Round 1: Work 6 sc in MR, join. (6 sc)
Round 2: Inc × 6, join. (12 sc)
Round 3: [Sc in next st, inc in next st] × 6, join. (18 sc)
Fasten off with a 25 cm tail. Sew one center over the middle of each pink flower base, catching the underlying disk at several evenly spaced points. The visible centers should stay flat rather than bulging above the raised petals.
Sage Leaves (Make 6)
Yarn: sage green. Source: original chain-oval construction; compare Crafting Happiness’s appliqué guide.
Ch 9.
Round 1: Sc in second ch from hook, hdc in next ch, dc in next 4 ch, hdc in next ch, 3 sc in last ch. Continue along the underside of the foundation chain: hdc in next loop, dc in next 4 loops, hdc in next loop, sc in final loop; sl st to first sc. (17 worked stitches; joining sl st not counted)
Fasten off, leaving a 25 cm tail. Keep the chain edge as the leaf’s center line. Pair two leaves beneath each flower, pointing their tips diagonally away from the stem. After attachment, add a short surface slip-stitch line along the middle if a stronger raised vein is wanted.
Straight Flower Stems (Make 3)
Yarn: sage green. Source: standard chain and slip-stitch cord construction.
Row 1: Ch 22, sl st in second ch from hook and in each remaining chain. (21 sl st)
Fasten off with a 25 cm tail at each end. Use these narrow cords as applied stems instead of stitching directly through individual open mesh holes. The stem ends should meet the solid lower band and the underside of a flower disk, making the three vertical lines visually continuous.
Cream Scalloped Border (Make 1)
Yarn: warm ivory. Source: original four-stitch scallop repeat.
Border round 1: With the outside facing, join cream to the exposed front of the last ivory round, Round 21. [Sl st at the next stitch position, work 4 dc at the following position, sk the next 2 positions] × 29; join. (29 shells of 4 dc, 29 anchoring sl st; 116 underlying positions consumed)
Fasten off with a 20 cm tail. Keep the shells outside the bag so they hang below the green band’s first round. This edging is decorative and must not replace any of the 116 stitches in the upper band.
Dusty-Rose Accent Line (Make 1)
Yarn: dusty rose. Source: standard surface slip-stitch technique.
Border round 1: Join pink on the outside at the base of sage Round 22. Surface-sl-st once around each of its 116 stitch positions, staying immediately above the cream scallops. (116 surface sl st)
Fasten off with a 20 cm tail. A separate accent line prevents the scallop edge from distorting the load-bearing rim.
Sage Bow Cord (Make 1)
Yarn: sage green. Source: standard cord construction.
Row 1: Ch 86, sl st in second ch from hook and each remaining ch. (85 sl st)
Fasten off and leave 25 cm at both ends. Tie a horizontal bow at the center front of the upper band, above the scallops. Anchor the knot to two solid green stitches so the bow does not shift when the bag is carried.
Tassels and Wooden Beads (Make 2 Tassels)
Yarn: sage green. Source: hand-wrapped yarn tassel technique; non-crocheted accessory.
Cut fourteen strands, each 15 cm long, for each tassel. Lay them together, tie the bundle securely at its midpoint with a separate 30 cm strand, then fold it in half. Wrap another strand around the bundle approximately 1.5 cm below the fold and knot firmly. Trim the hanging fibers to approximately 6 cm. Thread the tying cord through one wooden bead and attach it securely below the bow; repeat for the second tassel. Knot and conceal the ends behind solid crochet stitches. Beads must not be loose or removable by a light pull.
Assembly
- Block the base to a flat rectangle; let it dry before measuring the width, depth, and four marked corners.
- Shape the body by aligning the four lower corners with the lace and upper band. Smooth the fabric without stretching its open sections.
- Prepare the front layout by identifying the central front panel. Keep the side join and the two rear handle locations clear.
- Build the flower faces by centering each ivory disk on a dusty-rose base and sewing it firmly beneath the center stitches.
- Pin all three flowers across the lace field. Place the middle blossom slightly lower than the outer two, as in the photograph.
- Attach the stems and leaves under the corresponding flowers, running each stem toward the green hem. Catch solid stitch posts or use small stitches backed by a lining at openwork locations.
- Secure the raised petals with small, concealed stitches at four to six points around each flower base while leaving the projecting petal tips flexible.
- Sew on both handles: on the 44-stitch front span, cover stitch positions 8–14 and 30–36 with the two ends of one strap; repeat on the back span. Stitch each end through several upper-band rounds using a boxed or crossed reinforcement path.
- Attach the scallops, accent line, bow, beads, and tassels, checking that no decorative cord crosses the handle-attachment stitches.
- Finish the interior by weaving ends through at least 5 cm of dense fabric, trimming them, and adding an optional fabric lining with its top edge stitched below the handle anchors.
The completed tote has a rectangular lower structure, four handle attachment points, three raised flowers, six leaves, and two beaded tassels.
7 Technical Tips
- Marker drift: Place a contrasting marker at the first stitch of every joined round; a one-stitch shift can misalign all 29 lace repeats. Count the full 116-stitch solid transition after each fourth lace round.
- Base distortion: Check the 44-by-12 base before adding its perimeter, particularly if the corners curl upward by more than 1 cm. Blocking the rectangle after constructing tall sides will not correct an uneven foundation.
- Miscounted corners: The perimeter requires 44 + 12 + 44 + 12 + 4 = 116 stitches, including four extra corner stitches. Losing even one corner increase disrupts the four-stitch lace repeat.
- Overwide mesh: A chain-3 space pulled much wider than neighboring spaces produces large holes and weakens flower support. Keep the chain tension similar across all 29 spaces in a round.
- Flower placement drift: Pin the two outer centers at equal distances from the side edges before setting the lower middle flower. Sewing motifs individually without a three-flower layout can make the center stem appear crooked.
- Handle stretch: Make both handles 7 stitches wide and compare their length after 64 rows. Attach through several solid rows instead of a single edge loop, which can tear under load.
- Exposed tails and beads: Weave every structural yarn tail through at least 5 cm of dense stitches, reversing direction once. Tie bead supports with secure knots and omit the beads entirely for a bag likely to be handled by young children.
Related Patterns
- Floral Crochet Tote Bag by Made by Gootie — A round-base floral tote with textured stitch bands. [INTERNAL LINK NEEDED: textured crochet tote bag]
- Flower Granny Square Tote by Viv Crochets — A bag assembled from thirteen granny squares. [INTERNAL LINK NEEDED: flower granny square tote]
- Easy Crochet Bag with Flower Appliqué — A simpler bag with one applied bloom. [INTERNAL LINK NEEDED: beginner flower bag]
- Free Flower and Leaf Appliqué — Small motifs for customizing an existing bag. [INTERNAL LINK NEEDED: crochet flower and leaf appliqué]
Conclusion
The construction separates the strength of the sage-green bands from the decorative ivory lace and pink flower layers. Before carrying anything heavy, check all four handle anchor points and test the bag with a light load. A cotton lining is the next practical addition if small objects may pass through the openwork. Save a front-facing photograph and a close-up of the flower placement for your project notes. Share the finished floral crochet tote bag pattern on Pinterest or post your version on Instagram with #SageGardenFloralTote. Record your actual gauge and finished measurements so another maker can reproduce the same proportions. Would you keep the middle flower below its neighbors, or align all three blossoms in one straight row?









