Introduction
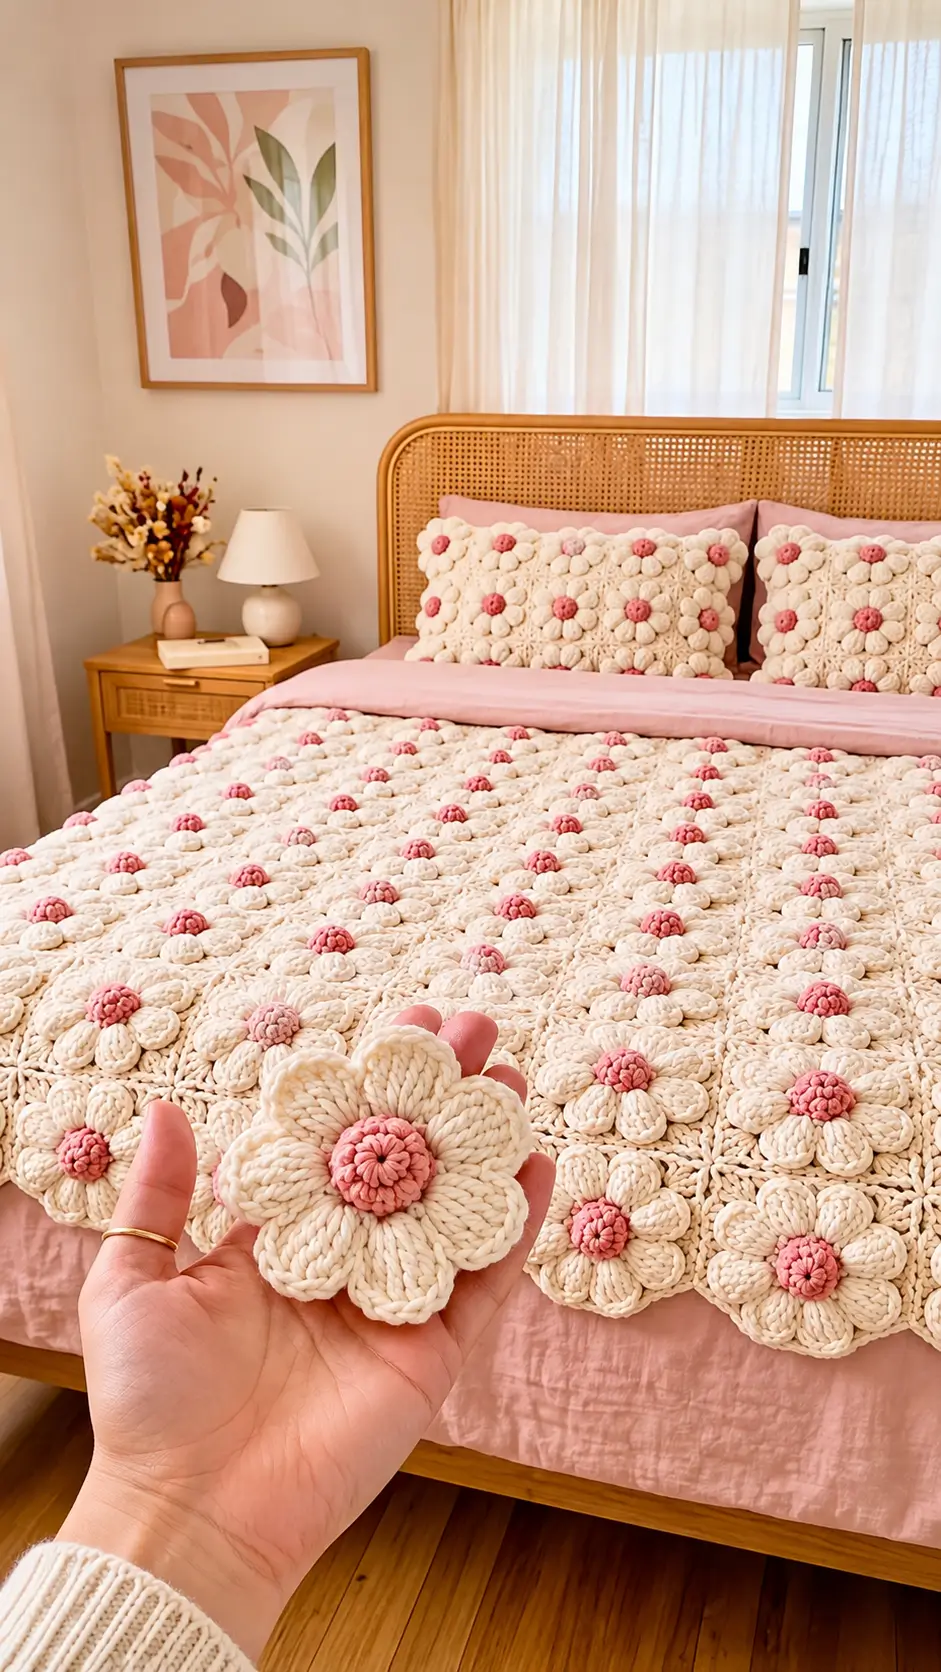
Each dusty-pink daisy center must sit above eight ivory petals without allowing their narrow ends to crowd the stitching. This 3D daisy crochet blanket pattern uses worsted-weight yarn, a 5.5 mm hook, a rectangular backing, and separately shaped flower components. Target dimensions are approximately 120 × 150 cm at the stated gauge. The skill level is intermediate. A continuous backing makes the finished bed covering more functional than a loosely joined collection of flowers.
The Design: What Makes This Daisy Blanket Different
The pink flower centers are lightly stuffed domes rather than flat discs. Their raised shape keeps the dusty-rose details visible after the petals are attached and distinguishes adjacent flowers in a dense layout. Each eight-petal ring uses a forty-eight-stitch base, divided into six-stitch sectors. You can align the pieces before sewing; the maker then distributes seam tension around the entire circle instead of pulling against a single anchor point.
A half-double-crochet backing sits beneath the flowers. This choice converts a group of appliqués into a usable pink and cream crochet blanket with fewer open gaps. It also creates a stable foundation for matching pillows. The raised daisy crochet motif can overlap its neighbors slightly. A frequent construction error is stuffing each petal; excess filling makes the petals stand upright, distorts the daisy outline, and substantially increases blanket weight.
Project Info at a Glance
| Skill Level | Time | Finished Size | Hook | Best For |
|---|---|---|---|---|
| Intermediate | Not measured; make one complete sample first | 120 × 150 cm target only if gauge is met | 5.5 mm working choice | Decorative bed throw and two optional pillows |
The dimensions above are a design target, not a measurement of the photograph or a physically tested sample. For comparison, Just Be Crafty reports a different 3D daisy throw measuring about 126 × 154 cm with a 5.5 mm hook and medium-weight yarn (source). The two patterns do not have interchangeable yarn requirements.
Materials and Tools
Yarn
- Warm ivory / cream — medium #4 worsted acrylic; grams to be calculated from the sample; suggested yarn: Loops & Threads Soft Classic or an equivalent smooth worsted acrylic.
- Dusty pink — same #4 worsted acrylic; grams to be calculated from the sample; use one uniform pink or alternate dusty rose and blush by flower.
- Optional surface-texture pink — same weight and fiber, taken from the pink allowance; used to embroider compact raised knots over the centers.
- Polyester fiberfill — a small quantity for centers only; never stuff the petals.
Published comparison, not an allowance for this design: Just Be Crafty’s different 99-square throw lists 1,188 g white, 396 g pink, and 396 g blush among its yarn colors (source). Those figures must not be copied into a shopping cart for the separate-petal construction below.
Determine actual grams by completing and weighing one ivory petal (p grams), one ivory circular base (b grams), and one pink center (c grams). Weigh a 10 × 10 cm half-double-crochet backing swatch (q grams). For the 80-flower blanket and 12 extra flowers on two pillows, estimate ivory yarn as 1.10 × [92 × (8p + b) + 234q] grams, and pink yarn as 1.10 × 92c grams. The factor 1.10 includes a ten-percent working allowance. Those 234 backing-swatch units represent 120 × 150 cm for the blanket plus four 45 × 30 cm pillow panels; check measurements after blocking.
Tools
- 5.5 mm crochet hook — select the hook that gives the measured sample gauge; a 5.0 mm hook is an alternative for tighter petals.
- Large-eye tapestry needle — for attaching 736 petals and weaving tails.
- Locking stitch markers — at least eight, including one for each six-stitch base sector.
- Digital scale — reading in 1 g increments for the yarn calculation.
- Measuring tape, scissors, blocking pins, and mats — for consistent positioning.
- Two optional 45 × 30 cm pillow inserts — check finished covers against the actual inserts before sewing.
The hook and medium-weight yarn combination is consistent with other published 3D floral motifs, although the fabric pictured may use a thicker yarn (The Purple Poncho; Just Be Crafty).
Abbreviations
MR = magic ring; sc = single crochet; inc = two sc in one stitch; dec = single crochet decrease; sl st = slip stitch; ch = chain; BLO = back loop only; hdc = half double crochet; dc = double crochet; st / sts = stitch / stitches; R = round; Row = flat row; FO = fasten off.
For an invisible decrease, draw up the front loops of the next two stitches together and complete one single crochet through both.
All instructions use US crochet terms. Spiral rounds are not joined unless indicated; flat backing rows turn at the end. A beginning ch 2 on flat hdc rows does not count as a stitch.
Pattern — Step by Step
Construction plan: Make 80 flower sets for the blanket, arranged in 8 columns × 10 rows. Each set contains one pink dome, one ivory circular base, and eight ivory petals. For the optional matching pillows, add 12 more flower sets, six per pillow in 3 columns × 2 rows. Full project total: 92 centers, 92 bases, and 736 petals. Assemble and weigh one sample before making the remaining pieces.
Pink Textured Flower Center (Make 92)
Yarn: dusty pink — original construction using standard six-stitch increase and decrease arithmetic.
R1: 6 sc in MR (6).
R2: inc × 6 (12).
R3: (1 sc, inc) × 6 (18).
R4: (2 sc, inc) × 6 (24).
R5: (3 sc, inc) × 6 (30).
R6: sc in BLO around (30).
R7: sc around (30).
R8: (3 sc, dec) × 6 (24).
R9: (2 sc, dec) × 6 (18).
Add a small pinch of fiberfill. Leave the face rounded but compressible.
R10: (1 sc, dec) × 6 (12).
R11: dec × 6 (6).
FO, leave a 25 cm tail, and draw it through the six remaining front loops to close. Use a second length of pink yarn to embroider six to eight compact raised French knots on the outward-facing surface. For each knot, wrap the working yarn twice around the needle and reinsert it about 1 mm from the exit point. Keep these knots away from the lower sewing edge; that contact surface must lie flat against the ivory base.
The highest circumference is 30 stitches, the small-component plateau in this design. Pink centers should be uniform before the cream petals are attached.
Ivory Circular Flower Base (Make 92)
Yarn: warm ivory — original base; increases follow standard six-stitch circular crochet arithmetic.
R1: 6 sc in MR (6).
R2: inc × 6 (12).
R3: (1 sc, inc) × 6 (18).
R4: (2 sc, inc) × 6 (24).
R5: (3 sc, inc) × 6 (30).
R6: (4 sc, inc) × 6 (36).
R7: (5 sc, inc) × 6 (42).
R8: (6 sc, inc) × 6 (48).
R9: sc around (48).
R10: sc in BLO around (48).
Join with sl st, FO, and leave a 30 cm tail. Do not stuff the base. Mark the outer round after every six stitches; eight equal anchor sectors should be visible. Keep the exposed front loops available as light-duty positioning guides, and pass the final attachment stitches through the base fabric rather than relying on one loop alone.
If the base cups strongly, check yarn tension and use the completed sample to adjust hook size before continuing. A mildly curved perimeter is acceptable because the petal seams will sit above it.
Rounded Ivory Petals (Make 736)
Yarn: warm ivory — original, hollow petal construction with six-stitch multiples.
R1: 6 sc in MR (6).
R2: inc × 6 (12).
R3: (1 sc, inc) × 6 (18).
R4: sc around (18).
R5: sc around (18).
R6: sc around (18).
R7: (1 sc, dec) × 6 (12).
R8: sc around (12).
R9: dec × 6 (6).
FO, leaving a 25 cm sewing tail. Do not cinch the last six stitches closed. Flatten the narrow end slightly and sew it across one marked six-stitch sector of the ivory base. Work around the circle until eight petal ends are evenly distributed. The rounded MR ends point outward, while the open narrow ends remain hidden under the pink center.
Flatten rather than stuff. This preserves the broad, ribbed outline seen in the reference and prevents 736 separate petal interiors from making the blanket excessively rigid. If the petals curl, block one sample flower and inspect the outline before changing all remaining pieces.
Cream Blanket Backing (Make 1)
Yarn: warm ivory — original flat-panel sizing calculation. Target gauge after washing and drying: 15 hdc × 13 rows = 10 × 10 cm.
Foundation: ch 182.
Row 1: hdc in the third ch from hook and each following ch (180).
Rows 2–195: ch 2, turn, hdc in every stitch (180 per row).
FO, leaving a 30 cm tail. At the target gauge, 180 hdc span about 120 cm and 195 rows span about 150 cm. These dimensions are conditional, so do not continue to Row 195 if the blocked gauge differs materially. Adjust the number of rows and starting stitches to the measured fabric before attaching flowers.
Spread the panel flat, then mark eight equal columns and ten equal rows. Center the daisies at the intersections of the resulting 15 cm grid. Check that neighboring petal tips meet or overlap slightly without folding.
Plain Backing Edge (Optional, Make 1)
Yarn: warm ivory — calculated for the 180-stitch, 195-row panel only.
R1: Work 180 sc across the first edge, ch 2 at the corner; 195 sc down the row ends, ch 2; 180 sc across the opposite edge, ch 2; 195 sc up the remaining side, ch 2. Join with sl st (750 sc and four ch-2 corner spaces).
R2: sc in every sc, and (2 sc, ch 2, 2 sc) in each corner space. Join with sl st (766 sc and four ch-2 corner spaces).
FO, leaving a 20 cm tail. These counts assume exactly one sc in each of the 195 row ends along both long sides. If a sample shows rippling or tightness, modify side pickups, recount the border, and record the revised count rather than forcing the specified number.
Rectangular Pillow Front and Back (Make 4 Panels)
Yarn: warm ivory — two fronts and two backs for two optional 45 × 30 cm pillows.
Foundation: ch 70.
Row 1: hdc in the third ch from hook and each following ch (68).
Rows 2–39: ch 2, turn, hdc in every stitch (68 per row).
FO with a 35 cm sewing tail. At the stated backing gauge, each panel is approximately 45.3 × 30 cm before any seam allowance or adjustment. Measure the pillow insert and the blocked panels together. If the actual fabric differs, change the row count or starting chain and remake paired panels to the same dimensions.
Arrange six flowers on each front in a three-by-two grid; keep the pillow backs plain. Sew the flowers to the front before joining it to the back. A pillow insert can make unattached petals lift, so secure the underside of each flower base at four evenly spaced points.
Assembly
- Check the sample. Complete one center, one circular base, and eight petals; record its diameter and the yarn weight of each component.
- Prepare the flower sets. Repeat the validated sample until 80 sets are ready for the blanket, with another 12 for two optional pillows.
- Shape the centers. Add minimal stuffing and close their final six stitches; work the visible pink surface knots before assembly.
- Attach the petals. Sew eight petal ends to the eight marked six-stitch sectors on every ivory base, keeping the rounded ends outward.
- Add the face of each flower. Center a pink dome above the petal junctions, then sew around its lower edge without crushing the raised top.
- Prepare the body of the blanket. Block the continuous cream backing to the measured target and mark the eight-by-ten placement grid.
- Pin the complete flowers. Start at the blanket center and work outward, checking the 15 cm spacing and the direction of all petal tips.
- Sew the blanket motifs. Stitch each flower base securely to the backing at four or more evenly spaced points; add small petal-tip tacks only where needed.
- Assemble the pillows. Attach six daisies to each front panel, place the matching back against it, sew three sides, insert the pillow form, and close the final side.
- Finish and inspect. Add the optional blanket border, weave in tails through several stitch directions, and inspect every raised center and attachment point.
The finished set consists of one cream floral throw and, if selected, two rectangular daisy pillows.
7 Technical Tips
- Stitch-marker drift: Move the spiral marker after every round, particularly on the 48-stitch bases. An unnoticed one-stitch shift makes the eight six-stitch petal sectors unequal.
- Stuffing firmness: Use only enough filling to round the 30-stitch pink dome. A hard-packed center pulls the surrounding petals upward and produces a raised lump instead of a shallow flower.
- Invisible decreases: Work decreases through the front loops on R8–R11 of the pink center to limit visible gaps. Catching only one loop accidentally can leave an opening that exposes the filling.
- Eye-placement timing is not relevant: This flower has no eyes or facial features, so no eye spacing or hardware is required. Position the pink center after all eight cream petals are pinned, not before.
- Velvet or chenille tension: If replacing the specified worsted acrylic with velvet, make one complete 48-stitch base in the new yarn. Poor visibility of the loops can hide an accidental increase and distort the circular outline.
- Pinning accuracy: Mark a 15 cm grid on the blocked throw before sewing the 80 flowers. Even a cumulative 5 mm error per column can noticeably shift the outermost petals away from the border.
- Tail weaving: Leave at least 25 cm on petal seams and take each tail through several changes of direction on the wrong side. A short straight tail can work loose when the blanket is folded or laundered.
Related Patterns
- Crochet Puff Flower Blanket — strip-based, join-as-you-go construction without separate sewn flower petals; see Hooked by Robin. [INTERNAL LINK NEEDED: puff flower blanket tutorial]
- 3D Daisy Granny Square Blanket — raised floral centers incorporated into modular squares; see Just Be Crafty. [INTERNAL LINK NEEDED: daisy granny square blanket]
- 3D Crochet Flower Motif — smaller appliqué worked in rounds for accessories or motif assemblies; see The Purple Poncho. [INTERNAL LINK NEEDED: crochet flower appliqué]
- Crochet Daisy Blanket with Appliqués — a flat blanket base with puffy flowers sewn on afterward; see Hooked by Robin. [INTERNAL LINK NEEDED: daisy appliqué blanket]
Conclusion
The raised centers, eight-part ivory petal rings, and continuous backing define this flower-covered design. Complete the sample first, confirm the gauge, and calculate yarn grams before committing to all 92 motifs. The photographed bedspread may use different yarn or joining techniques, so treat these written rounds as an independent, untested interpretation. Once assembled, check the underside seams and wash a swatch according to the yarn label before laundering the full piece. Share a clear overhead image of the completed 3D daisy crochet blanket pattern on Pinterest and an assembly close-up on Instagram using #PinkCreamDaisyBlanket. Would you keep every daisy center dusty rose, or alternate dusty rose and pale blush across the eight blanket columns?









