Introduction
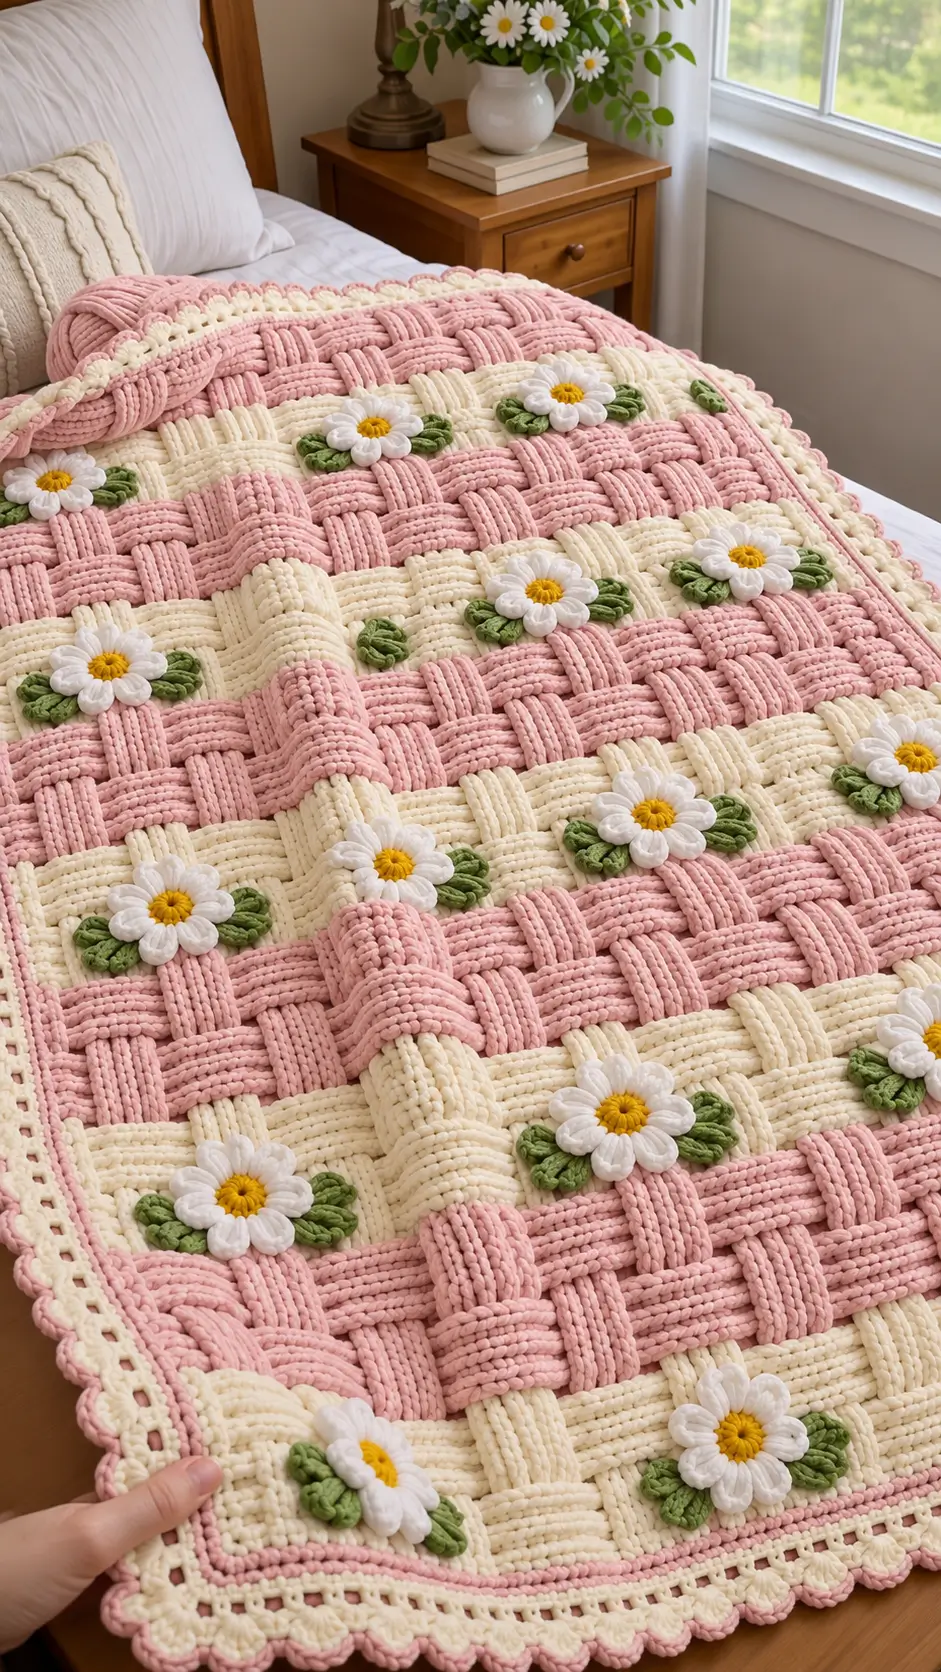
The raised bands in this blanket cross like woven ribbons, so their width has to remain consistent wherever pink meets cream. This pink and cream basket weave crochet blanket combines thick textured panels with white 3D daisies, yellow centers, and small green leaves. The photo-inspired construction works best with bulky yarn and a 6.0–7.0 mm hook, producing a substantial decorative bedspread for intermediate crocheters.
The Design: What Makes This Blanket Different
The main surface imitates an oversized woven basket. Instead of relying on color changes alone, alternating raised bands create the illusion that one strip passes above another. Dusty pink and warm cream make that structure easier to read.
The second feature is dimensional appliqué. Small white daisies with yellow centers and paired green leaves are positioned at selected intersections rather than covering every block. This leaves enough uninterrupted basket texture to keep the geometric pattern visible.
The border changes construction again. A narrow structural frame stabilizes the heavy body, followed by an open cream round and a scalloped pink-and-cream finish. The main failure mode is inconsistent band width. If one raised section is even 5–8 mm wider than its neighbors, the woven illusion begins to shift across the blanket.
Project Info at a Glance
| Skill Level | Construction | Target Size | Hook | Best For |
|---|---|---|---|---|
| Intermediate | Textured basket-weave panels with appliqués | Approx. 120 × 160 cm | 6.0–7.0 mm | Bed throws and decorative blankets |
Materials and Tools
Yarn
- Dusty pink — bulky #5 — main basket-weave sections
- Warm cream — bulky #5 — contrasting basket sections and border
- White — bulky #5 or compatible worsted held double — daisy petals
- Golden yellow — worsted #4 — daisy centers
- Leaf green — worsted #4 — leaves
Use pink and cream yarns with nearly identical thickness. The flower yarn may be slightly lighter because the appliqués do not carry structural load.
Tools
- 6.0–7.0 mm crochet hook for the blanket body
- 4.5–5.0 mm crochet hook for flowers and leaves if using worsted yarn
- Yarn needle
- Scissors
- Locking stitch markers
- Tape measure
- Blocking mats
Abbreviations
- MR — magic ring
- ch — chain
- sl st — slip stitch
- sc — single crochet
- hdc — half double crochet
- dc — double crochet
- tr — treble crochet
- FLO — front loop only
- BLO — back loop only
- st/sts — stitch/stitches
- sp — space
- FO — fasten off
Construction Overview
The blanket is built as a flat textured field first. Raised horizontal and vertical-looking sections create the basket effect. The flowers and leaves are made separately and sewn on only after the main blanket is complete.
Make a test section before calculating the final foundation chain. Bulky yarn varies significantly between brands, so finished measurements are more reliable than a fixed stitch count.
Basket-Weave Test Swatch
Make a swatch containing at least three complete basket blocks across and three blocks vertically.
Target each visual block at approximately 8–10 cm wide.
The individual raised bands should measure approximately 2–3 cm wide.
Wash or block the swatch according to the yarn instructions before calculating the full blanket.
Foundation Chain
Chain to the required blanket width using a multiple that accommodates your chosen basket-block width.
For a sofa throw, target approximately 115–125 cm.
For a larger bed throw, target approximately 140–160 cm.
Keep the foundation chain loose. Use a hook 0.5–1.0 mm larger for the chain if necessary.
Foundation Row
With dusty pink or cream, hdc in the third chain from the hook.
Hdc in every remaining chain.
Turn.
This solid foundation supports the raised basket sections.
Basic Raised Band
Ch 2 and turn.
Work hdc across the assigned band width.
For additional relief, work the stitches BLO.
Repeat the same section for several rows until the band measures approximately 2–3 cm in height.
Creating the Basket-Weave Effect
Divide the blanket width into equal visual blocks.
Across one section, work the raised texture so the lines appear horizontal.
In the neighboring section, change the texture direction by using vertical-looking ridges or separately defined raised columns.
Alternate the treatment across the row:
Horizontal — Vertical — Horizontal — Vertical.
On the next major section, reverse the sequence:
Vertical — Horizontal — Vertical — Horizontal.
This alternating arrangement creates the woven appearance.
Pink Basket Section
With dusty pink, work a dense rectangle using hdc.
For each ridge row:
Ch 2, turn, hdc BLO across.
Repeat until the section reaches the planned block height.
The unused front loops form parallel raised lines.
Cream Basket Section
Change to warm cream.
Work the same number of stitches and rows used for the pink section.
Maintain identical tension.
The cream block must finish at the same measurement as the pink block before the next section begins.
Creating Raised Cross Bands
For a stronger woven effect, work narrow raised strips over the completed background.
Join matching yarn at one edge of a block.
Surface crochet or work slip stitches along the marked line.
Return across the same line with hdc or sc.
The resulting band should appear to pass over the neighboring textured section.
Alternative Separate-Strip Method
For very thick chenille or blanket yarn, separately crocheted strips can give cleaner geometry.
Chain to the required strip length.
Work 4–6 rows of BLO hdc.
FO.
Make identical strips in pink and cream.
Arrange the strips in alternating over-and-under positions and sew them securely to a flat crocheted foundation.
This method uses more yarn but produces pronounced woven relief.
Changing from Pink to Cream
Complete the final yarn-over of the last stitch with the new color.
Carry the unused yarn only across very short transitions.
For larger blocks, cut the previous color and weave its tail into the dense section.
Avoid carrying pink behind large cream areas because it may show through the stitches.
Maintaining Equal Block Width
Place a stitch marker at every major basket division.
Measure between markers after each complete textured section.
Keep the difference between neighboring blocks below approximately 5 mm.
Repeating the Blanket Body
Continue alternating pink and cream basket sections until the blanket reaches the required length.
Reverse the visual direction of neighboring blocks as the pattern develops.
Lay the blanket flat after every 20–25 cm of progress.
Correct any narrowing before adding additional rows.
Suggested Blanket Sizes
| Project | Approximate Finished Size |
|---|---|
| Baby Blanket | 75 × 95 cm |
| Lap Blanket | 90 × 120 cm |
| Sofa Throw | 120 × 160 cm |
| Large Throw | 140 × 180 cm |
| Bed Throw | 160 × 200 cm |
3D Daisy — Make as Many as Required
The flowers are attached after the basket-weave field has been completed.
Use golden yellow for the center.
Daisy Center — Round 1
Make a MR.
Work 8 sc into the ring.
Join with a sl st. (8)
Daisy Center — Round 2
Work 2 sc in every stitch.
Join. (16)
FO yellow.
White Petal Foundation
Join white yarn in any stitch.
Repeat around:
sl st in next st, ch 5, skip 1 st.
Continue until 8 petal loops have been formed.
White Daisy Petals
Into each ch-5 loop work:
sc, hdc, 3 dc, hdc, sc.
Repeat around.
Join.
FO, leaving approximately 20 cm for sewing.
More Dimensional Daisy Petals
For thicker petals, work:
sc, hdc, 2 dc, 2 tr, 2 dc, hdc, sc
into each foundation loop.
This version creates a fuller flower for chunky blanket yarn.
Target Daisy Size
For a medium bed throw, target approximately 8–10 cm across each complete flower.
Keep all flowers within approximately 5 mm of the master flower diameter.
Green Leaf — Make 2 per Flower
With green, ch 8.
Starting in the second chain from the hook, work:
sl st, sc, hdc, dc, dc, hdc, sc.
Ch 2.
Work down the opposite side of the foundation chain:
sc, hdc, dc, dc, hdc, sc, sl st.
FO, leaving a sewing tail.
Leaf Vein
For additional definition, surface crochet a line of sl sts from the leaf base toward the point.
Keep this line relaxed.
A tight vein will curl the leaf.
Leaf Size
Target approximately 5–7 cm for each leaf.
The leaves should remain smaller than the flower diameter.
Arranging the Flower Appliqués
Lay the completed blanket flat.
Do not place a flower at every basket intersection.
Alternate the positions so the appliqués form a loose diagonal or staggered arrangement.
This keeps large areas of the woven texture visible.
Sample Flower Layout
For the first flower row, place a daisy approximately every 2–3 basket blocks.
On the next flower row, offset the placement by one block.
Continue the staggered arrangement across the blanket.
Pinning the Flowers
Pin each daisy at its yellow center first.
Add two green leaves beneath or beside the flower.
Check the complete blanket from a distance before sewing.
Move any appliqués that create an overly dense cluster.
Attaching the Leaves
Sew each leaf through its center vein and lower edge.
Leave the outer edges slightly free.
This creates a small amount of relief without allowing the leaf to fold completely upward.
Attaching the Daisies
Position the daisy over the inner ends of the leaves.
Sew securely around the yellow center.
Add one or two small anchoring stitches near the base of each white petal.
Leave the outer half of each petal free.
Controlling Flower Relief
For a functional blanket, keep the flower relief below approximately 1.5 cm.
If the blanket is primarily decorative, the petals may remain more raised.
Structural Border — Round 1
Join cream yarn at any corner.
Ch 1.
Sc evenly around the complete blanket.
At each corner work:
(2 sc, ch 2, 2 sc).
Join.
Border Round 2 — Pink
Join dusty pink.
Ch 1.
Sc in every stitch.
At each corner work:
(2 sc, ch 2, 2 sc).
Join.
Border Round 3 — Cream
Join cream.
Ch 2.
Hdc in every stitch.
At each corner work:
(2 hdc, ch 2, 2 hdc).
Join.
Openwork Border Round
Ch 1.
Sc in the first stitch.
Repeat:
ch 3, skip 2 sts, sc in next st.
At each corner work a larger ch-5 space.
Join.
Cream Lace Round
Sl st into the first ch-3 space.
Into each ch-3 space work:
(sc, hdc, 2 dc, hdc, sc).
At each corner ch-5 space work:
(sc, hdc, 4 dc, hdc, sc).
Continue around.
Join.
Pink Scalloped Edge
Join dusty pink.
Work a sl st to the center of the first cream shell.
Repeat:
5 dc into the center of the next shell, sl st between shells.
At each corner work 7 dc instead of 5.
Continue around.
Join and FO.
Border Tension Check
Lay the blanket flat after every border round.
If the edge begins to ripple, reduce the number of stitches or open spaces.
If it pulls inward, increase spacing slightly.
Correct distortion before beginning the scalloped round.
Yarn Estimation
Basket-weave texture and bulky yarn consume more material than a flat openwork blanket. Make and weigh a measured swatch before purchasing yarn for a large project.
For example, crochet a 25 × 25 cm basket-weave sample.
Suppose the blocked sample weighs 90 g.
A 120 × 160 cm blanket has an area of:
120 × 160 = 19,200 cm².
The sample area is:
25 × 25 = 625 cm².
Divide:
19,200 ÷ 625 = 30.72.
Multiply by the sample weight:
30.72 × 90 = approximately 2,765 g.
Add yarn for flowers, leaves, border, swatching, and approximately 10% reserve.
The 90 g swatch is an example only. Use the measured weight of your own blocked sample.
Estimating the Number of Flowers
A 120 × 160 cm throw can use approximately 15–24 daisies, depending on spacing.
A larger bedspread may use 25–40 daisies.
Lay paper circles or completed test flowers over the blanket before deciding the final quantity.
Pink-Dominant Version
Use approximately two pink basket sections for every cream section.
Keep the daisies white with yellow centers and green leaves.
This creates a warmer overall blanket while preserving the floral contrast.
Cream-Dominant Version
Reverse the color balance.
Use cream for most of the woven field and dusty pink only for selected raised bands.
Finish with a pink outer scallop.
Sage Alternative
Replace dusty pink with muted sage green.
Keep cream as the second structural color.
Use slightly darker leaves so they remain visible against the sage background.
Dusty Blue Alternative
Replace pink with dusty blue.
Keep the cream basket sections and white daisies.
Use golden yellow centers and sage leaves.
Terracotta Alternative
Use muted terracotta in place of pink.
Pair it with oatmeal rather than bright cream.
Keep the flowers ivory and use olive-green leaves.
Making a Matching Pillow
Use the same basket-weave texture to crochet a square approximately 45 × 45 cm.
Work alternating pink and cream sections.
Attach one daisy with two leaves near the center or one corner.
Pillow Back
For a simpler back panel, use hdc.
Chain to the width of the blocked front.
Hdc in the third chain from the hook and across.
Continue in rows until the back matches the front.
Assembling the Pillow
Place the front and back with wrong sides together.
Sc around three sides.
Insert the cushion form.
Close the remaining edge, or create an envelope-style back for removal.
Baby Blanket Version
Target approximately 75 × 95 cm.
Use fewer raised bands and approximately 6–10 flowers.
Keep the appliqués firmly attached and avoid loose decorative elements.
Sofa Throw Version
Target approximately 120 × 160 cm.
This size provides enough surface area for the alternating basket pattern and a staggered daisy arrangement.
Bed Throw Version
Target approximately 160 × 200 cm before adding a deep border.
Calculate yarn from a blocked swatch because the dense raised texture can make a large version particularly heavy.
Assembly
- Make a basket-weave test swatch and record the blocked width, height, weight, band width and yarn consumption before calculating the full blanket.
- Crochet the complete pink-and-cream blanket field, checking the width after every 20–25 cm and keeping neighboring basket sections within approximately 5 mm of one another.
- Lay the finished body flat and correct any major edge distortion before beginning the border or attaching decorative elements.
- Make all white daisies with yellow centers and compare every fifth flower with the master flower for consistent diameter.
- Crochet two green leaves for each flower, keeping the leaves approximately 5–7 cm long and smaller than the daisy diameter.
- Arrange the flowers in staggered rows, pin every appliqué and inspect the full layout before sewing the first flower permanently.
- Sew the leaves through their central veins, then position each daisy over the leaf bases and secure the center plus the inner portion of every petal.
- Work the cream and pink structural border rounds around the complete blanket and check the perimeter for waves after each round.
- Add the openwork cream edging and final pink scallops only after the structural border lies flat on all four sides.
- Weave all tails through at least 6–8 cm of dense crochet, complete a light final blocking and reshape every daisy and leaf after drying.
The completed blanket should show a regular pink-and-cream woven field with raised white daisies, compact yellow centers, paired green leaves and a flat scalloped perimeter.
7 Technical Tips
- Keep neighboring basket bands within approximately 5 mm of the same width. Unequal bands break the over-and-under illusion and gradually shift the pattern across the blanket.
- Check the blanket width every 20–25 cm. Dense textured crochet can narrow as hand tension increases during a long project.
- Keep daisy diameter within approximately 5 mm of the master flower. Different petal sizes become obvious when several flowers appear in the same visual row.
- Limit flower relief to approximately 1.5 cm for an everyday blanket. Taller appliqués are more likely to fold, snag, or create uneven pressure during use.
- Pin every flower before sewing. A misplaced appliqué is much more noticeable against a repeating geometric basket pattern than against a random textured background.
- Check the border every 30–40 cm. Excess stitches produce waves along the openwork round, while insufficient stitches make the corners curl inward.
- Weave structural tails through at least 6–8 cm of dense fabric. Avoid hiding important yarn ends beneath flower appliqués, where movement can loosen them without being noticed.
Care and Final Blocking
Follow the washing instructions supplied with the selected yarn. Thick basket-weave crochet absorbs substantial water, so support the entire blanket when moving it while wet.
Lay the blanket flat and align the structural edges first. Measure the upper, center, and lower widths and compare both long sides.
Shape the border while damp, but do not press the 3D daisies flat. Allow the blanket to dry completely before lifting the white petals and arranging the green leaves by hand.
Conclusion
The alternating raised bands create the main structure of this pink and cream basket weave crochet blanket, while the white daisies and green leaves provide controlled dimensional detail. Start with a measured basket-weave swatch before calculating the foundation, then keep every visual band within roughly 5 mm of the master width. Add the flowers only after the full blanket body lies flat, and finish the project with a structural border followed by openwork and scallops. Your next step is to crochet one pink-and-cream test section large enough to measure three complete basket blocks. Save the finished project to Pinterest or share it on Instagram with #PinkDaisyBasketWeaveBlanket. Would you keep the dusty pink or replace it with sage green?









