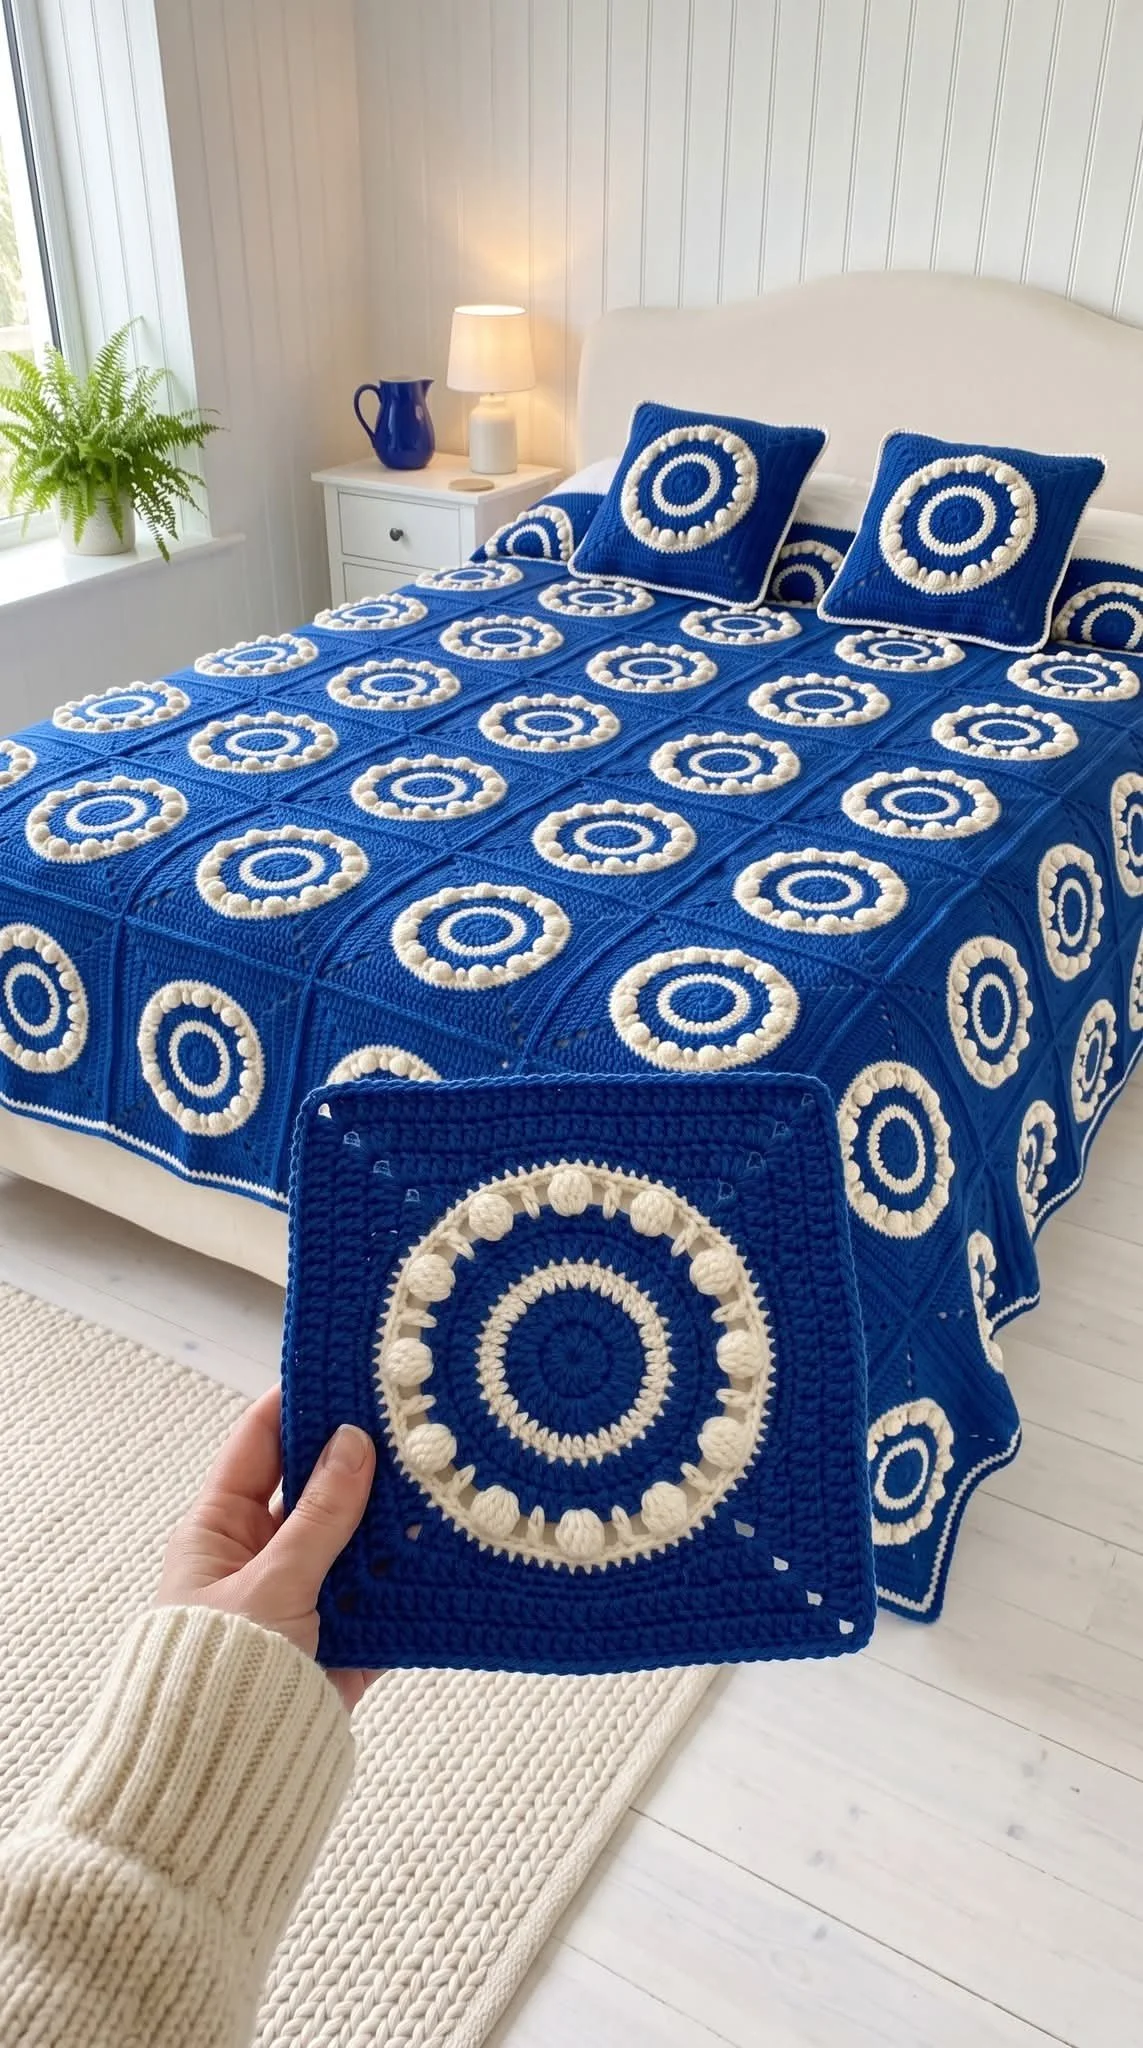
This bedspread is built from repeated medallion squares: each begins as a royal-blue circle, gains a slim ivory ring and a raised ring of ivory bobbles, then grows into a square with blue double-crochet rounds. The finished motifs create a rhythmic, geometric cover with texture concentrated near the center of each square.
The project is worked in US crochet terms and assembled from separate squares. Make one sample first to check the motif’s size and shape; once you are happy with it, repeat the same square for the bedspread, join the motifs in blue, and finish the outside edge with two simple rounds. Matching pillow fronts can be made by continuing the square rounds until they fit the inserts.
Pattern at a Glance
- Skill level: Confident beginner to intermediate. The stitches are familiar, but the bobble round, shaping the circle into a square, and joining many motifs call for careful counting.
- Terminology: US crochet terms.
- Construction: Identical circular medallions are worked in joined rounds, then shaped into squares and joined.
- Finished bedspread size: Approximately 72–80 × 90–100 in, based on about 8 columns × 10 rows of squares measuring 9–10 in each. The exact overall size will depend on your blocked motif size and joining.
- Yarn weight: Worsted weight (#4) cotton or acrylic.
- Hook: 4.5–5.0 mm.
- Main stitches: Chain, slip stitch, single crochet, double crochet, and a five-double-crochet bobble.
- Gauge: No separate gauge is supplied. Use the first square as your gauge and sizing check.
- Motifs: Make identical squares, measuring each after blocking.
- Joining: Join the squares with royal blue using a neat, flat join.
- Border: One round of blue single crochet followed by one round of ivory single crochet.
Materials
- Worsted (#4) yarn
- Royal blue: approximately 3,000–4,200 yd (2,740–3,840 m)
- Ivory: approximately 650–950 yd (595–870 m)
- Amounts are approximate and should be adjusted for bed size, yarn choice, and your individual tension.
- 4.5–5.0 mm crochet hook
- Yarn needle for weaving in ends
- Scissors
- Stitch markers for identifying the four future corners
- Optional: two 18-in pillow inserts for matching pillows
Cotton and acrylic are both listed yarn options. Choose a yarn with a smooth, even strand so the round stitch counts and the bobble texture remain easy to see. A very fuzzy or highly textured yarn may soften the definition of the ivory rings.
Yarn and Color Notes
Royal blue forms the main body of each square and the flat join, while ivory creates two distinct accents: the narrow single-crochet ring and the raised bobble ring. Keep the colors consistent across all motifs. Even subtle differences in shade or yarn thickness can make a large bedspread look less uniform when the squares are assembled.
The source calls the light color ivory; white or another pale shade may be used if you want a different contrast, but it will change the finished appearance. Solid yarns show the circular bands and bobbles clearly. Variegated yarn can obscure the medallion design, especially around the textured ring, so it is less suited to the photo-inspired look.
Because the project uses many motifs, check that both colors have a similar yarn thickness and fiber behavior. If one color is noticeably thinner or stretches more, the medallion may not lie evenly when the square is joined to its neighbors.
Finished Measurements and Sizing
The bedspread plan is about 8 columns × 10 rows of 9–10 in squares, for an approximate finished cover of 72–80 × 90–100 in. Those dimensions reflect the square layout before any size changes caused by joining or blocking. They are approximate rather than guaranteed: your yarn, hook, tension, and finishing method all affect the final measurements.
Measure a completed square from edge to edge after it has been gently blocked and dried. Make several squares before committing to the full layout, then compare them. Small differences repeated across many motifs can add up across the width and length of the bedspread.
For a different bed size, plan the number of columns and rows around the dimensions you want. The layout is modular: more columns increase the width, and more rows increase the length. The squares should remain the same size if you want their edges to align cleanly.
Gauge
A separate numerical gauge is not provided. Use the first square as a practical gauge swatch:
- Work the motif through its circular rounds and begin the square shaping.
- Continue until the motif reaches the intended 9–10 in width.
- Fasten off, block gently, and measure it when dry.
If your sample is larger than the desired size, try the smaller hook in the supplied range; if it is smaller, try the larger hook. The stitch fabric should be even, the bobbles should stand out, and the square should lie flat. Once you have chosen your hook, use it consistently for every bedspread motif.
Abbreviations
- ch: chain
- dc: double crochet
- sc: single crochet
- sl st: slip stitch
- st(s): stitch(es)
Important Pattern Notes
- The chain 3 at the beginning of Round 1 counts as a double crochet. It is included in the starting total of 12 dc.
- The first eight rounds are worked in joined rounds. Join at the end of the rounds where specified; do not treat the instructions as a continuous spiral.
- The ivory single-crochet ring is joined and fastened off before changing back to blue.
- The five-dc bobbles are worked in ivory and closed together at the top.
- Place the four markers in the blue single-crochet round at stitches 1, 16, 31, and 46. These identify the stitches used to begin the corners.
- After the motif becomes a square, work double crochet along each side and the same corner increase into each corner space on every following square round.
- The instructions do not specify a special right-side or wrong-side rule. Keep the visible face of every motif oriented consistently when you join the bedspread.
- Count stitches carefully in the circular rounds. The intended totals after Rounds 1–6 are 12, 24, 36, 48, 48, and 60, respectively. Round 7 contains 20 bobbles, each followed by two single crochets.
Special Techniques
Magic ring
Make an adjustable loop, work the starting stitches into it, and pull the yarn tail to close the center. A snug center helps prevent a hole at the beginning of the medallion. Avoid pulling so tightly that the first round puckers.
Five-double-crochet bobble
For one bobble, work five incomplete double crochets into the same stitch: yarn over, insert the hook into the stitch, yarn over and pull up a loop, yarn over and pull through two loops, leaving the unfinished stitch on the hook. Repeat this process four more times in the same stitch. When the five incomplete double crochets are on the hook, yarn over and draw through all the remaining loops to close the bobble.
The pattern’s Round 7 repeat is one bobble in the next stitch, then one single crochet in each of the following two stitches. The bobbles should appear raised on the face of the work.
Flat joining
Use royal blue to join the finished squares. Work with a steady, moderate tension: a join that is too tight can draw the edges inward, while a loose join may look bulky or wavy. The source specifies a neat, flat join but does not prescribe a particular joining stitch, so keep the chosen join consistent throughout.
Understanding the Construction
Each motif starts as a blue circle. Four blue double-crochet rounds widen the circle, with ivory introduced for a narrow single-crochet ring and then for the bobble ring. A blue single-crochet round follows the bobbles and provides the transition into the square shaping.
The next round establishes four corners at the marked stitches. From then on, the motif grows as a square: double crochet along each side and the same group of stitches into each corner space. Once every square is the same size, lay them out in the planned grid, join them in blue, and add the two-round border.
The pillow version uses the same medallion and square shaping for the front. Continue the square rounds until the front fits the pillow insert, then join it to a plain crocheted back.
Full Pattern Instructions
Before You Begin
Make one complete sample square first. Use the yarn and hook you intend to use for the bedspread, and check that the motif grows evenly from a circle into a square. The sample helps you confirm both the finished width and the amount of fabric needed to reach the intended size.
In the instructions below, BLUE means royal blue and IVORY means ivory.
Round 1: Blue Center
With BLUE, make a magic ring. Ch 3; this counts as 1 dc. Work 11 dc into the ring and join.
Stitch count: 12 dc, including the beginning ch-3.
Pull the center ring closed. Check that it is snug but not puckered.
Round 2: Blue Increase
Work 2 dc in each stitch around. Join.
Stitch count: 24 dc.
Count the stitches before moving on. Each stitch from the previous round should receive two double crochets.
Round 3: Blue Increase
Repeat [dc in the next stitch, 2 dc in the next stitch] 12 times around. Join.
Stitch count: 36 dc.
The circle should be widening evenly. If it begins to cup or ripple noticeably, check that each repeat is worked across exactly two stitches.
Round 4: Blue Increase
Repeat [dc in the next 2 stitches, 2 dc in the next stitch] 12 times around. Join.
Stitch count: 48 dc.
The increase pattern now places an increase after every two regular double crochets.
Round 5: Ivory Ring
Join IVORY. Ch 1 and work 1 sc in each stitch around. Join and fasten off IVORY.
Stitch count: 48 sc.
This single-crochet round forms the narrow light ring between the blue circle and the bobble detail. Keep the stitches even so the round does not draw the circle inward.
Round 6: Blue Increase
Join BLUE. Repeat [dc in the next 3 stitches, 2 dc in the next stitch] 12 times around. Join.
Stitch count: 60 dc.
The round adds another increase after each group of three regular double crochets.
Round 7: Ivory Bobble Ring
Join IVORY. Repeat the following sequence 20 times around:
- Work one five-dc bobble in the next stitch.
- Work 1 sc in each of the next 2 stitches.
Join when the repeat is complete.
Each repeat uses three stitches from the previous round, so the round works across all 60 stitches and creates 20 ivory bobbles. Make sure each bobble is closed by drawing the yarn through all the remaining loops on the hook.
Round 8: Blue Transition Round
Join BLUE and work 1 sc in every stitch around. Join.
Stitch count: 60 sc.
Place markers at stitches 1, 16, 31, and 46. These markers identify the four future corner stitches. Check that the markers are evenly spaced around the round before beginning the square shaping.
Round 9: Establish the Corners
At each marked stitch, work (2 dc, ch 2, 2 dc) to form a corner. Work 1 dc in every other stitch around. The marked stitches are the corner positions; remove or reposition each marker as you reach it if that makes the corner easier to work.
The pattern establishes the corners by placing the increase group into each marked stitch. Keep the ch-2 spaces visible, since they become the corner spaces used in later rounds.
Following Square Rounds
On each following round:
- Work dc along each side.
- In each corner space, work (2 dc, ch 2, 2 dc).
- Continue until the motif is square and measures 9–10 in wide.
The source does not specify a fixed number of square rounds because the finished width depends on yarn, hook, and tension. Measure the motif as you work, and stop when it reaches the intended size. Use the same stopping point for every bedspread square.
Motif Checkpoint
Before making the rest of the motifs, confirm that the sample:
- Lies flat without pronounced waves or a curled center.
- Has four clear, evenly spaced corners.
- Shows 20 ivory bobbles around the center.
- Measures 9–10 in across when gently blocked.
- Has the same color sequence and overall appearance you want for the finished cover.
If the motif does not lie flat, review the stitch counts and corner placement before changing hook size or tension.
Making the Bedspread
Once the sample square is satisfactory, make enough identical squares for the bedspread. The suggested layout is about 8 columns × 10 rows. Keep every motif the same size and use the same number of square rounds in each one.
Lay the squares out before joining. Arrange them so the medallions face the same direction, then check the overall proportions and make any layout decisions before attaching the motifs. If you want a longer or wider cover, decide on that change at this stage rather than adding uneven extensions after the squares are joined.
Assembly and Joining
Use BLUE to join the squares with a neat, flat join. Align the edges carefully, matching corner to corner and keeping the motifs in the planned grid. Joining one row at a time can make it easier to keep the layout organized; then join the completed rows together.
As you work:
- Keep the same visible face of each motif facing outward.
- Match the edges without stretching one square to fit another.
- Keep the joining tension even. Tight joins can make the cover pucker; loose joins can create slack or gaps.
- Check each intersection where four squares meet. Their corners should align without bunching.
- Pause after joining a few squares to lay the work flat and check the developing fabric.
The source calls for a flat blue join but does not specify a particular joining stitch. Choose one consistent method that produces a smooth seam and use it for every edge.
Border
After all squares are joined, work the outside edge in two rounds:
- Join BLUE and work 1 sc around the outside edge.
- Join IVORY and work 1 sc around the outside edge.
Keep the corners flat as you turn around the bedspread. Work evenly along the outer edges, paying attention to the junctions between squares. The border should lie smoothly against the joined motifs: if it pulls inward, the tension may be too tight; if it waves, check for uneven stitch placement or overly loose tension. The source specifies one round in each color and does not give a separate corner stitch count, so use a consistent corner treatment that keeps the fabric flat.
Pillow Version
For each pillow, make a matching square front using the same medallion rounds. After the motif has been squared, continue the square rounds until the front fits the 18-in pillow insert. The source does not provide a fixed stitch count or number of extra rounds for this size, so use the insert as your guide and compare the front’s dimensions as you work.
Make a plain crocheted back for each pillow. Join the front to the back around the edges, placing the right sides consistently and leaving an opening large enough to insert the pillow. Insert the pillow, then finish closing the opening. The source does not specify a closure type, so use a closure method that suits your preference while keeping the pillow securely enclosed.
Finishing and Blocking
Weave in all yarn ends with a yarn needle, securing them on the wrong side and trimming only after they are held securely. Pay particular attention to color-change ends around the ivory rings and to the ends at the motif joins.
Block the motifs gently before joining if they need help reaching an even square shape. You may also block the assembled bedspread lightly after joining. Shape the edges and corners without stretching them out of proportion, and allow the work to dry fully before placing it on the bed.
For acrylic yarn, avoid high heat. Follow the care guidance for your chosen yarn and use a method appropriate to its fiber.
How to Resize the Bedspread
The project is resized through the number of squares in the layout and, if desired, the size of each square.
- To change the overall width: adjust the number of columns.
- To change the overall length: adjust the number of rows.
- To use the suggested layout: make about 8 columns × 10 rows of 9–10 in squares for an approximate 72–80 × 90–100 in cover.
- To make larger squares: continue the square rounds until each motif reaches your chosen width, then make every motif to that same size.
- To make smaller squares: stop the square shaping at a smaller, consistent width. Recheck the number of squares needed to cover your target dimensions.
Do not rely on the nominal square measurement alone. Joining and blocking affect the final size, so measure a joined sample or a small group of squares before completing the entire bedspread. If you alter the motif size, the supplied yarn amounts may no longer be sufficient.
Variations
- Pale accent color: Keep the construction unchanged and replace ivory with another light shade for the narrow ring, bobbles, and outer border.
- Seasonal palette: Use the same two-color arrangement with colors suited to the room or season, while retaining the contrast between the main color and the bobble rings.
- Single-color version: Work the rounds in one color for a more subtle surface texture. The bobbles will still stand out in relief, but the concentric color bands will be less visible.
- Matching pillows: Continue the square rounds on two fronts until they fit the optional 18-in inserts, then join each to a plain crocheted back.
- Different bedspread proportions: Keep the squares the same size and change the grid by adding or removing columns and rows.
Troubleshooting
Why Is My Circle Ruffling?
Check the increase pattern and stitch counts first. The intended totals are 12 dc after Round 1, 24 after Round 2, 36 after Round 3, 48 after Round 4, and 60 dc after Round 6. Extra stitches can cause the circle to flare. Also confirm that each increase is worked into the intended stitch rather than into the joining stitch or an unintended loop.
Why Is My Circle Cupping?
A cupped circle may result from missed stitches, skipped increases, or tension that is too tight. Count the stitches at the end of each increase round and make sure the round is not being pulled tight when you join. If the counts are correct, test the larger hook within the supplied 4.5–5.0 mm range on a new sample square.
Why Is My Edge Wavy?
Waves may appear when a round contains more stitches than intended or when the square-round sides are worked unevenly. Recheck the round counts and make sure the corner increase is worked only at each marked corner position or corner space. Keep the side stitches even and do not add extra stitches outside the specified corner shaping.
Why Is My Square Curling or Bowing?
Confirm that all four corners are made in the same way: (2 dc, ch 2, 2 dc). Check that the corners are evenly spaced and that the corner spaces remain open enough to identify in later rounds. If the work is consistently tight, loosen your tension slightly or test a larger hook; if it is consistently loose, test the smaller hook.
Why Don’t My Motifs Match?
Compare the blocked dimensions and the number of square rounds. A difference of even a small amount can become obvious when many squares are joined. Use the same yarn, hook, color sequence, round counts, and tension for each motif. If a square is noticeably different, correct or remake it before assembly rather than stretching it to fit.
Why Are My Bobbles Hard to See?
Make sure the five incomplete double crochets are all worked into the same stitch and are closed together through every remaining loop on the hook. The bobble should be worked as a single raised unit, with one single crochet in each of the next two stitches. Smooth yarn and a contrasting ivory color also help the texture read clearly.
Why Does My Ivory Ring Look Uneven?
Check that Round 5 contains 48 sc and Round 7 contains 20 bobbles, each followed by two single crochets. Fasten off the ivory after Round 5 as instructed, then rejoin it for the bobble round. Inconsistent tension or missed stitches can make the pale rings look irregular from square to square.
Why Is My Join Pulling the Bedspread Out of Shape?
A join that is too tight can draw the square edges inward and make the whole cover pucker. Keep the blue joining tension steady and avoid stretching one motif to match another. Align the corners first, then join the intervening edge evenly.
Why Is My Border Ruffling?
The border may have too many stitches or uneven placement along the outside edge, or the working tension may be too loose. Keep the single crochets evenly spaced and use the same approach on each side. If the border draws inward instead, loosen the tension and recheck that it lies flat around the corners.
Frequently Asked Questions
Can I use a different yarn weight?
The pattern specifies worsted (#4) cotton or acrylic. A different weight will change the square dimensions, texture, and yarn requirements. If you choose another weight, make and block a sample first, then use its measurements to plan the layout.
Can I use cotton?
Yes. Cotton is one of the specified fiber choices. Its weight and drape can differ from acrylic, so check the size and flatness of the sample square before making the rest.
Can I use acrylic?
Yes. Acrylic is also listed. Choose a yarn that produces an even fabric and follow its care instructions when finishing and blocking.
Can I make the bedspread larger?
Yes. Add columns to increase the width or rows to increase the length. You can also continue the square rounds to make larger motifs, but make all motifs to the same size and recalculate the layout from your measured squares.
Is a gauge swatch necessary?
A numerical gauge is not supplied, but making one complete square as a sample is important. It confirms the motif size, helps you check that the square lies flat, and gives you a reliable basis for planning the bedspread.
Are the bobbles made with five separate stitches?
No. Each bobble is made from five incomplete double crochets worked into the same stitch and closed together at the top. The completed bobble occupies one stitch in the round, followed by single crochets in the next two stitches.
Can I make the pillows without an insert?
Yes. The source includes optional pillow inserts, but the matching square front can be made without them. If you use an insert, make the front to fit it and join it to a plain crocheted back.
Is the bedspread reversible?
The source does not specify a reversible finish. The raised bobbles have a distinct face, and the joins and yarn ends will also affect the back, so treat one side as the intended display side.
How should I block the squares?
Block gently to even the edges and corners without stretching the motifs. Let them dry fully before joining. Use a method suitable for the fiber, and avoid high heat with acrylic yarn.
Final Construction Recap
Work each medallion from the blue magic-ring center, add the ivory single-crochet ring and bobble ring in their specified rounds, then shape the motif into a square with four marked corners. Make the squares uniform, arrange them in the chosen grid, join them in blue, and finish with one blue and one ivory single-crochet border round. Weave in the ends and block gently so the completed cover lies evenly.









