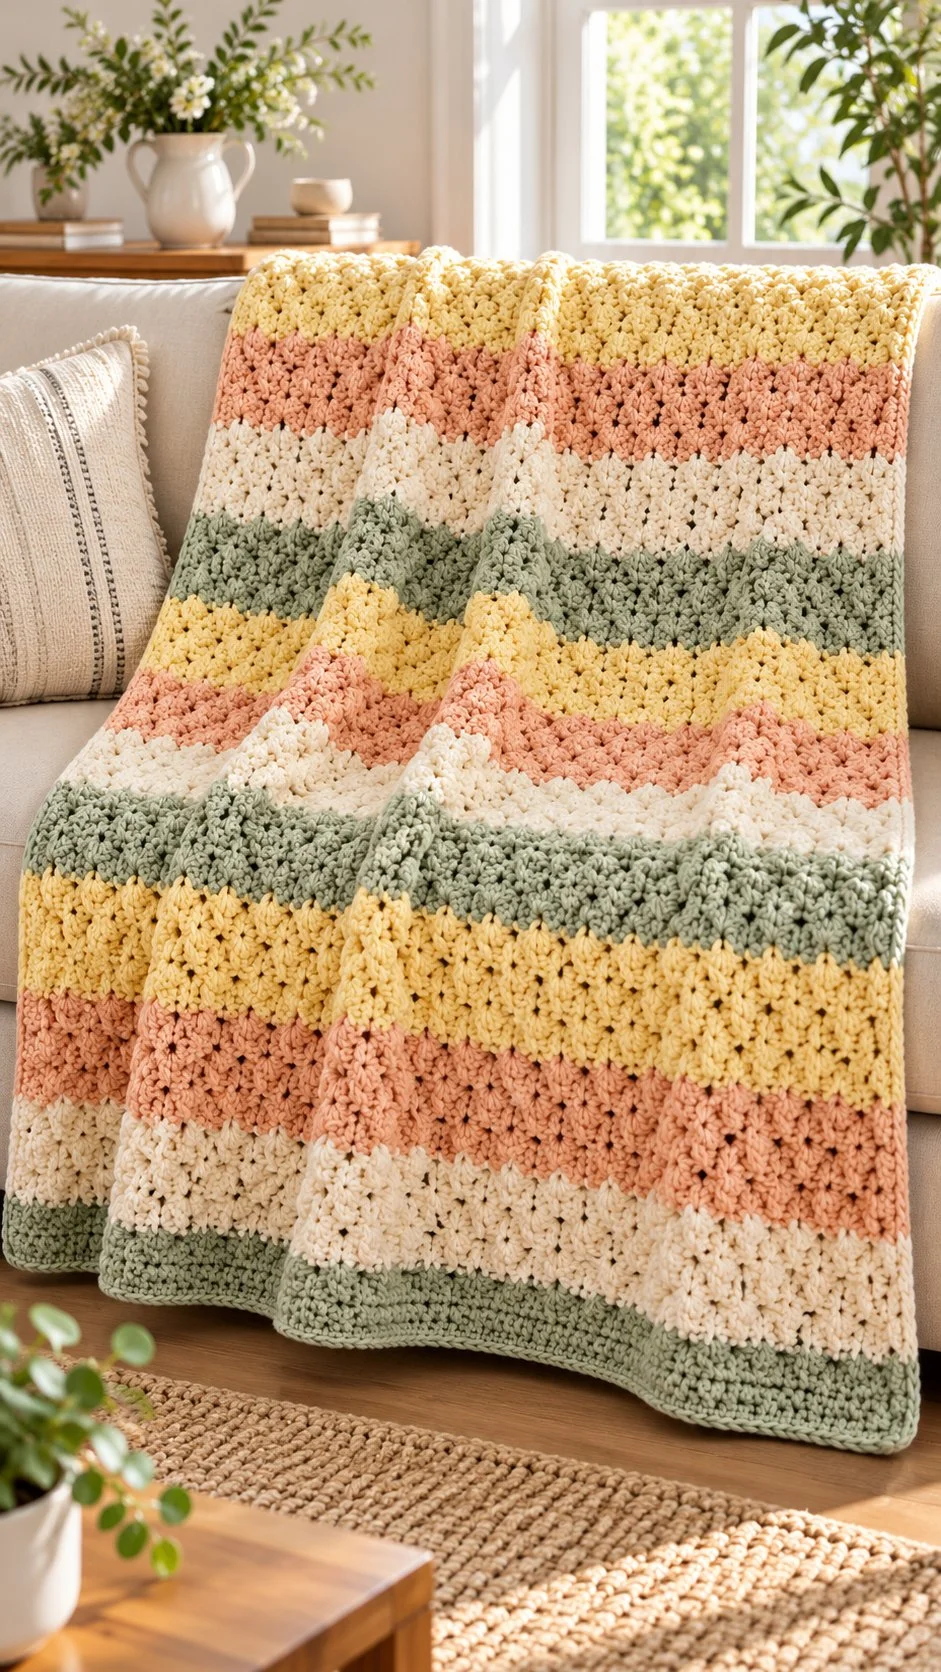
This horizontal-stripe blanket combines soft sage, warm ivory, peach pink, and pale yellow in a relaxed granny-cluster texture. It is worked flat in rows, so there are no separate motifs to assemble: a foundation row establishes the width, then clusters are worked into the spaces between clusters below.
The repeating stitch pattern is approachable for a beginner who is comfortable with basic crochet stitches and turning rows. Short color bands give the blanket its gentle striped look, while a simple single-crochet border helps tidy the edges. Use the suggested measurements as a target, then let your gauge and preferred drape guide the finished size.
Pattern at a Glance
- Skill level: Beginner-friendly; familiarity with chains, double crochet, and turning rows is helpful.
- Terminology: US crochet terms.
- Construction: One piece worked flat in horizontal rows.
- Finished size: Approximately 46 × 60 in (117 × 152 cm).
- Yarn weight: Bulky (#5) or thick worsted.
- Yarn amount: Approximately 1,300–1,900 yd (1,190–1,740 m) total.
- Hook: 6.0–6.5 mm, or a size suited to your yarn and desired fabric.
- Main stitch: Three-double-crochet granny clusters, worked in the gaps between clusters from the previous row.
- Gauge: Not specified. Make and measure a test swatch before beginning.
- Color sequence: Pale sage, then ivory, peach, and pale yellow; work 3–5 rows per color band.
- Border: One or two rounds of loose single crochet, with 3 sc in each corner.
Materials
- Bulky (#5) or thick worsted yarn in:
- Soft or pale yellow
- Peach pink
- Warm ivory
- Pale sage
- Approximately 1,300–1,900 yd (1,190–1,740 m) total across the four colors. The source does not specify how much to use of each shade, so the exact allocation will depend on how many rows you work in each band and how much yarn your gauge uses.
- 6.0–6.5 mm crochet hook, or a size that produces a fabric you like after swatching.
- Yarn needle for weaving in ends.
- Scissors.
- Stitch markers for marking the first and last stitch or tracking color changes.
- Measuring tape for checking the swatch, width, and length.
Yarn and Color Notes
The yarn weight is given as bulky (#5) or thick worsted. Since yarn thickness can vary between brands and fibers, swatch with the yarn and hook you plan to use. A smooth yarn makes it easier to see the spaces where the clusters go; a highly textured or fuzzy yarn may make those gaps harder to identify.
The suggested colors form a soft, low-contrast palette. Ivory separates the stronger peach and sage tones, while pale yellow adds warmth. For a balanced stripe sequence, keep the colors in the given order: pale sage → ivory → peach → pale yellow, then repeat.
A solid or gently heathered yarn will show the cluster texture and stripe changes clearly. Strongly variegated yarn can compete with the regular color bands, but it can still be used if you prefer a more blended, less defined look. If substituting yarn, choose a similar thickness and check the fabric after washing or blocking according to the yarn’s care instructions.
Finished Measurements
The target finished size is approximately 46 × 60 in (117 × 152 cm). The width is established by the foundation chain; the length is built by adding rows until the blanket measures about 60 inches.
These are approximate dimensions, not a guaranteed result. The final size depends on your yarn, hook, tension, cluster spacing, and finishing. Measure the work on a flat surface without stretching it. If your blanket is wider or narrower than intended, adjust the foundation chain before continuing. If it is shorter or longer, continue or stop the row repeat based on the measured length.
Gauge
No exact stitch or row gauge is supplied for this pattern. Make a small test swatch first, using the same yarn, hook, color-change approach, and cluster pattern planned for the blanket. The swatch should help you judge both the fabric’s drape and whether the sides stay flat.
For a blanket, matching an exact gauge is less critical than it would be for a fitted garment. Gauge still matters because it affects the finished dimensions and yarn use:
- If your swatch is wider or denser than you want, try a larger hook.
- If it is too open or loose, try a smaller hook.
- If the clusters pull the sides inward, use a larger hook or add a loose edge stitch, as suggested in the pattern notes.
- If the test swatch ripples or the edges flare, check your stitch placement and tension before starting the full width.
Once you are satisfied with the swatch, measure it and use it as a reference while you work. No exact conversion from swatch measurements to a foundation-chain count is provided, so establish your chosen width by testing rather than relying on an invented stitch count.
Abbreviations
- ch — chain
- dc — double crochet
- sc — single crochet
- st(s) — stitch(es)
Important Pattern Notes
- The blanket is worked flat in rows, from the foundation edge toward the finished length.
- The foundation chain should use a multiple of 3, plus the turning chains needed for your chosen edge treatment.
- The exact number of turning chains and whether they count as a stitch are not specified. Decide on a consistent turning-chain and edge-stitch method while swatching, then use it throughout.
- Maintain one dc at each outer edge when working the cluster rows. Consistent edge stitches help keep the sides straight.
- In the first cluster row, work clusters at regular intervals across the foundation row, skipping the two intervening foundation stitches as described. The source does not provide an exact cluster count or a more detailed foundation-row stitch map, so use the swatch to establish spacing and confirm that the edges lie flat.
- From the following cluster rows onward, place each 3-dc cluster in the gap between clusters in the row below.
- Work 3–5 rows per color band. You can choose a consistent band height within that range, then repeat it throughout.
- Change colors by completing the final yarn-over of the previous row with the next shade.
- Carry yarn only across short distances. For longer transitions, cut the yarn and weave in the ends to keep the back neat.
- The finishing row may be dc or sc. The border is worked in loose sc, with 3 sc in each corner.
- Use pale sage for the border if you want the subtle edge described in the source.
Special Stitches and Techniques
Three-Double-Crochet Granny Cluster
A granny cluster in this pattern consists of 3 dc worked into one gap between clusters from the previous row. The three stitches form a group, and the open space around the group is where the next row’s clusters will be placed.
For the first cluster row, use the regular positions established across the foundation row, skipping the two intervening foundation stitches as directed. On later rows, locate the visible gaps between the previous row’s clusters and work one 3-dc group into each appropriate gap, keeping the edge stitches consistent.
Changing Colors at the Row End
At the end of the row, begin the final dc as usual. When two loops remain on the hook, use the next color to complete the last yarn-over and pull through. The new shade is then ready for the next row. Keep the change snug but not tight so the edge does not draw inward.
Carrying Yarn
If the next color is used again after only a short distance, you may carry it along the edge or across a short span, taking care not to trap it so tightly that the fabric puckers. For a longer interval, cut the yarn and weave in the ends later. A tidy back is especially useful for a blanket that may be turned or folded often.
Understanding the Construction
This is a single-piece blanket, not a collection of squares. The foundation chain sets the width, and the foundation row of dc gives the first edge a stable base. The next row introduces the granny-cluster texture. After that, the repeated clusters sit in the gaps between those below, creating the characteristic horizontal stripe effect.
The color bands run across the width of the blanket. You will work several rows in one shade, change colors at the row end, and continue through the four-color sequence. The number of bands is determined by the finished length: keep repeating the texture and color order until the blanket measures about 60 inches.
At the end, a straightening row helps prepare the top edge for the border. The single-crochet rounds go around the entire perimeter, including the side edges, with three stitches worked into each corner to help the border turn cleanly.
Full Pattern Instructions
Before You Begin
Make a small swatch using the planned yarn and hook. Check that the clusters are easy to place, that the edge stitches remain consistent, and that the fabric sits flat. Measure the swatch and note the hook size and tension you used.
Choose a turning-chain and edge-stitch approach before starting the blanket. The source does not specify whether turning chains count as stitches, so the key is to use the same method throughout and preserve one dc at each outer edge of the cluster rows.
Foundation
With pale sage, make a foundation chain to the desired blanket width. The chain should use a multiple of 3 plus the turning chains needed for your edge treatment.
Because the source does not give an exact starting-chain number, set the width from your swatch rather than using an unsupported stitch count. Keep the chain relaxed; a tight foundation can make the bottom edge narrower than the rest of the blanket.
Foundation Row
Work a foundation row of dc across the chain, following the turning-chain and edge treatment you established in your swatch. Check that the row lies flat and that the edge stitches are clear.
First Cluster Row
Turn and work the next row in the established granny-cluster arrangement. Make 3-dc clusters at regular intervals, skipping the two intervening foundation stitches as directed. Maintain one dc at each outer edge.
Use your test swatch to confirm how the clusters and skipped stitches line up across your chosen foundation. Keep the spacing regular, and check that the last cluster leaves room for the edge stitch.
Subsequent Cluster Rows
For each following row:
- Turn and follow the same turning-chain method.
- Work the first edge stitch consistently.
- Place each 3-dc cluster in the gap between clusters from the previous row.
- Continue across the row, keeping the groups evenly spaced.
- Maintain the edge stitch at the opposite side.
Repeat this granny-stripe texture throughout the blanket. Before moving on, look across the row to make sure each cluster is centered in a gap rather than placed on top of a cluster below.
Color Bands
Begin in pale sage, then follow this sequence:
- Pale sage
- Ivory
- Peach
- Pale yellow
Work 3–5 rows in each color. After pale yellow, return to pale sage and continue repeating the same order. Use the same number of rows per band whenever possible for a regular stripe rhythm.
When changing colors, complete the final yarn-over of the previous row with the next shade. Carry yarn only across short distances; cut and weave in longer transitions. Continue the row pattern and color sequence until the blanket measures about 60 in (152 cm) long.
Checkpoints While Working
- After the foundation row: The bottom edge should lie flat, without pulling tightly or flaring.
- After the first cluster row: The groups should be spaced consistently, with one dc at each outer edge.
- After several rows: The clusters should nest in the gaps below and form a regular stripe texture.
- At each color change: The new shade should sit at the edge without a loose loop or tight draw-in.
- During the color sequence: Check the band height and order before beginning each new shade.
- As the blanket grows: Lay it flat and measure the width and length without stretching. Correct any edge pulling early rather than waiting until the border.
Straightening Row
When the blanket reaches the desired length, work a final row of dc or sc to straighten the last edge. Choose the stitch that gives you a stable, even edge and continue with it consistently across the row. The source allows either stitch; no specific stitch count is provided.
Border
Using pale sage for a subtle finish, work 1–2 rounds of loose sc all around the blanket. Place 3 sc in each corner to allow the border to turn without pulling.
Work evenly along the side edges. The source does not give a set number of sc for each side row, so use a spacing that keeps the blanket flat. If the border pulls the sides inward, add enough stitches along the edge to relax it; if it waves or ruffles, reduce excess fullness by spacing the side stitches more evenly. Keep the border loose rather than tightening each stitch.
Finishing
Fasten off and use the yarn needle to weave in all tails. Work each tail through several nearby stitches, changing direction where practical so it is secure without forming a bulky knot. Avoid drawing the fabric together as you weave.
Lay the blanket flat to dry after gently blocking or shaping it. Follow the care guidance for your yarn, and avoid stretching the blanket beyond its intended dimensions. Smooth the edges and corners into shape while damp, then allow it to dry fully before folding or using it.
How to Resize the Blanket
Changing the Width
The foundation chain controls the width. To make the blanket wider or narrower, adjust the chain while preserving the multiple of 3 plus the turning chains needed for the edge treatment. The exact chain number depends on your swatch and is not specified here. Work a short test piece before committing to the full foundation.
Keep the outer edge stitches in mind when checking the width. The cluster pattern needs regular spacing, and the first cluster row must fit between the two edge stitches without crowding the final group.
Changing the Length
The length is controlled by the number of rows. For a shorter or longer blanket, work fewer or more rows while retaining the same cluster-row method and color order. Continue using 3–5 rows per color band, and stop when the measured length reaches your chosen target.
Adjusting the Fabric
If the sides pull inward, try a larger hook or add a loose edge stitch, as suggested in the pattern. If a different yarn weight changes the drape or scale, swatch again before deciding on the foundation width or the number of rows. Do not assume the original yardage will produce the same dimensions with a different yarn.
Useful Variations
- One-color version: Keep the same row construction and work the whole blanket in one shade. The cluster texture remains visible without color changes.
- Two-color version: Alternate two shades while retaining the same row count per band. This reduces the number of color transitions while preserving horizontal stripes.
- Scrap-yarn version: Use compatible yarns of a similar thickness. Arrange the shades in a planned sequence, and weave in ends from longer color changes.
- Seasonal palette: Keep the four-color band structure but choose a coordinated palette of your own. Similar-value shades create a softer effect; stronger contrast makes each band more distinct.
- Different band heights: Choose three, four, or five rows per color band, then use that choice consistently. The source supports 3–5 rows per band; a consistent repeat makes the stripe layout easier to follow.
- Larger or smaller throw: Adjust the foundation width using the stitch multiple and change the length by working more or fewer rows.
Troubleshooting
Why Are the Sides Pulling In?
Clusters can draw the fabric inward if the hook is too small, the stitches are tight, or the edge stitches are being missed. Check the outer dc at both sides of every cluster row. Try a larger hook or add a loose edge stitch, then compare the swatch before continuing.
Why Is the Foundation Edge Narrower Than the Blanket?
A tightly chained foundation can contract. Keep the chain relaxed and compare its width with the first completed rows. If the difference is substantial, make a new foundation with a looser chain or use a foundation method consistent with your swatch.
Why Do My Clusters Look Uneven?
Check that each 3-dc group is worked into a gap—not into the tops of the clusters below—and that the first cluster row follows the same spacing across the foundation. Marking the first and last edge stitches can help you keep the row layout consistent.
Why Are the Edges Uneven?
The source calls for one dc at each outer edge. If an edge slopes, you may be skipping that stitch, adding an extra stitch, or changing how you treat the turning chain. Recheck the edge at the start and end of each row and keep the same turning-chain rule throughout.
Why Is the First Cluster Row Difficult to Space?
The foundation row and the first cluster row establish the pattern’s rhythm. The source does not provide an exact cluster count, so rely on a test swatch: set the regular cluster spacing, leave the two intervening foundation stitches as directed, and make sure one dc remains at each outer edge. Once the spacing works on the swatch, carry it across the blanket consistently.
Why Is the Fabric Wavy or Rippling?
Ripples may come from too many stitches, loose edge placement, or uneven spacing along the side edges. Check that clusters are placed in the correct gaps and that the edge stitches are consistent. If the waves appear only after adding the border, use fewer or more evenly spaced sc along the sides as needed, keeping the corner treatment at three sc per corner.
Why Does the Border Pull or Flare?
A border that pulls usually has too few stitches along an edge or is being worked too tightly. A border that flares may have too many stitches along the sides. Adjust the spacing of the sc along the side edges, keep the stitches loose, and retain 3 sc in each corner.
Why Do the Color Changes Look Bulky?
Carrying yarn across long spans can leave visible floats or a bulky edge. Carry it only across short distances; cut the yarn for longer transitions and weave in the ends. At a color change, complete the final yarn-over of the previous row with the new shade to make the transition neat.
Frequently Asked Questions
Can I use a different yarn weight?
The pattern specifies bulky (#5) or thick worsted yarn. A different weight may change the blanket’s scale, drape, and yarn requirements. If you substitute, make a new swatch and adjust the hook to suit the yarn rather than expecting the original finished measurements automatically.
Can I use a different hook size?
Yes. The listed hook is 6.0–6.5 mm, or a size suited to your yarn. Swatch with the hook you plan to use and choose one that gives a fabric that lies comfortably flat. If the clusters pull the sides inward, the pattern specifically suggests trying a larger hook.
Is an exact gauge required?
No exact gauge is supplied. A swatch is still important because it shows whether your stitch pattern and edges sit flat and helps you judge the finished scale and drape.
Can I make the blanket wider?
Yes. Adjust the foundation chain while preserving the multiple of 3 plus the turning chains needed for your edge treatment. Use a swatch to determine a suitable width; no exact starting-chain count is provided.
Can I make it longer or shorter?
Yes. The length comes from the number of rows. Repeat the granny-cluster rows and four-color sequence until the blanket reaches your preferred length, keeping each color band within the specified 3–5 rows.
Can I make it in one color?
Yes. The color sequence is a design choice, while the row construction remains the same. Work continuously in one shade and use the same cluster placement and edge stitches.
Is this blanket made from squares?
No. It is worked as one piece in horizontal rows. There are no separate motifs to join.
How many rows should I make?
The source does not specify an exact row count. Work until the blanket measures about 60 in (152 cm) long, checking the length as the project grows.
How should I block it?
Gently block or lay the blanket flat to dry, following the yarn’s care guidance. Shape the edges without stretching the fabric, and make sure it is completely dry before storing or using it.
Final Thoughts
This blanket is built in three main stages: establish the width with a foundation chain and dc row, repeat the granny-cluster rows while working the sage–ivory–peach–yellow stripe sequence, then straighten and border the edge with loose sc. A swatch helps confirm the cluster spacing and fabric behavior; regular measurements, consistent edge stitches, and tidy color changes keep the finished throw looking even.









