Introduction
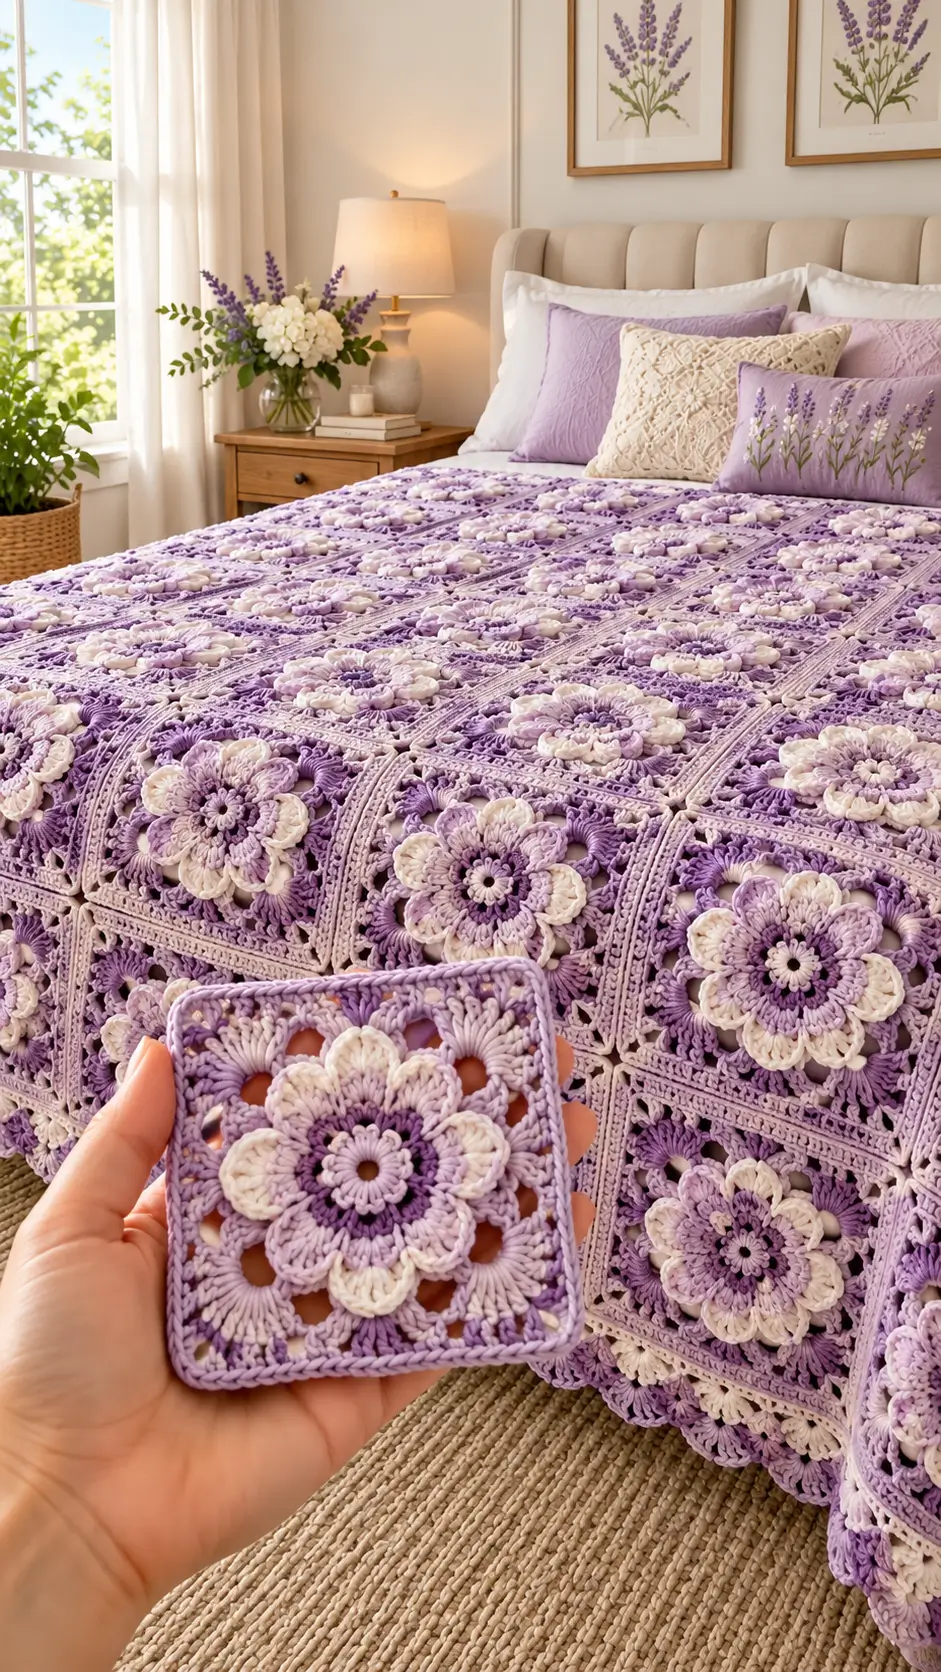
Eight cream petals rise above eight lavender petals in this square, so flattening the flower into an ordinary granny motif removes its defining structure. This 3D flower granny square blanket pattern uses DK yarn, a 4 mm hook, layered petals, open corner fans, and a structured lavender frame. The intermediate motif targets 15–16 cm after blocking and is designed for modular throws, bedspreads, cushions, or decorative panels.
The Design: What Makes This Flower Square Different
The flower is built in levels rather than one flat round. A compact violet center establishes eight-fold symmetry, lavender petals form the first substantial layer, and broad cream petals overlap them from a separate anchor round. That separation matters because the petals need independent movement to create the relief visible in a layered flower granny square. Long lavender clusters then convert the circular flower into a square without filling every opening. The final frame is comparatively flat, giving the dimensional crochet flower square a stable edge for joining. A common construction error is attaching both petal layers to the same loops. They spread sideways instead of stacking vertically, leaving a wide flat flower with little depth.
Project Information at a Glance
| Skill Level | Time | Finished Size | Hook | Best For |
|---|---|---|---|---|
| Intermediate | 45–70 minutes per motif | Approx. 15–16 cm blocked | 4 mm | Throws, bedspreads, cushions and floral panels |
The 15–16 cm measurement is the target for this photo-inspired construction. Published 3D flower granny squares range from approximately 10 cm to 16 cm and beyond depending on yarn, hook, flower depth, and the number of outer rounds.
Materials and Tools
Yarn
- Light lavender DK cotton or cotton blend — square frame, openwork transition and joining.
- Medium lilac DK cotton or cotton blend — inner flower petals.
- Warm ivory DK cotton or cotton blend — large outer petals and flower highlights.
- Deep violet DK cotton or cotton blend — flower center and contrast ring.
Published dimensional squares vary too much in yarn consumption to assign a reliable blanket quantity from size alone. Make one complete motif, weigh each color used, and calculate the full bedspread from that sample.
Tools
- 4 mm crochet hook
- Tapestry needle
- Sharp scissors
- Locking stitch markers
- Flexible measuring tape
- Blocking mats
- Rustproof pins
Abbreviations
- MR — magic ring
- ch — chain
- sl st — slip stitch
- sc — single crochet
- hdc — half double crochet
- dc — double crochet
- tr — treble crochet
- cl — cluster
- sp — space
- st/sts — stitch/stitches
- BLO — back loop only
- FLO — front loop only
For any shaping decrease, insert the hook through the front loops of the next two stitches before completing the decrease to reduce visible bulk.
Pattern — Step by Step
Work the flower and square in joined rounds. Keep the right side facing unless a section specifically instructs otherwise.
Deep Violet Flower Center
Yarn: deep violet.
R1: Make an MR. Ch 1, work 8 sc into MR. Join with sl st. (8)
R2: Ch 1. Work 2 sc in each stitch around. Join. (16)
Fasten off.
Pull the starting ring closed firmly but do not distort the second round.
Small Cream Center Ring
Yarn: warm ivory.
Join ivory in any stitch of R2.
R3: Ch 3, 2 dc in same stitch, remove hook from loop, insert into top of beginning ch-3, pull working loop through to close the cluster; ch 1.
Skip one stitch.
In the next stitch work a 3-dc cluster, ch 1.
Repeat around until 8 small raised clusters are established.
Join to first cluster.
Fasten off.
Lavender Petal Anchor Round
Yarn: medium lilac.
Turn the flower slightly and work behind the cream center clusters.
Join lilac around the base between two neighboring clusters.
R4: Ch 4, sl st around the next space between clusters.
Repeat around.
You should have 8 ch-4 loops.
Join with sl st.
Inner Lavender Petals — Make 8
Work into each ch-4 loop:
(sc, hdc, 3 dc, hdc, sc)
Repeat in all 8 loops.
Join with sl st.
Fasten off.
Push each petal gently toward the front before starting the next layer.
Cream Outer-Petal Anchor Round
Yarn: warm ivory.
Join behind the lavender petal layer at the base between two petals.
Ch 6.
Sl st around the next petal junction.
Repeat around to form 8 ch-6 loops behind the lavender petals.
Join with sl st.
Large Cream Petals — Make 8
Into each ch-6 loop work:
(sc, hdc, 2 dc, 3 tr, 2 dc, hdc, sc)
Repeat around.
Join with sl st.
Fasten off.
The cream petals should project beyond the lavender layer while remaining individually movable.
Cream Petal Edge Detail
Join cream yarn at the lower edge of one large petal.
Work surface slip stitches along the outer edge to the petal tip and down the opposite side.
Fasten off.
Repeat only if a heavier raised outline is wanted.
For a softer bedspread, omit this additional edge because eight outlined petals add considerable thickness.
Second Lavender Petal Layer
The photographed motif has visible lilac sections between the broad cream petals.
Join medium lilac behind the cream petal layer.
Work one ch-5 loop between every pair of cream petals.
Into each loop work:
(sc, hdc, 3 dc, hdc, sc)
Repeat 8 times.
Fasten off.
Pull the lilac petals gently outward so approximately one-third of each remains visible between neighboring cream petals.
Flower Stabilizing Round
Yarn: light lavender.
Work behind all completed petals.
Join yarn at one petal junction.
R1: Ch 3, dc around the base of the next petal junction, ch 3.
Repeat around.
Join.
This hidden round provides attachment points for the square transition without sewing through the visible petal surfaces.
Squaring Round — Four Corner Foundations
Mark every second ch-3 space.
Four marked positions become corners.
Join light lavender at the first marked space.
Work:
(3 dc, ch 3, 3 dc) in the marked corner space.
Ch 2.
Work 4 tr in the next unmarked space.
Ch 2.
Work (3 dc, ch 3, 3 dc) in the next marked space.
Repeat around.
Join with sl st.
Elongated Side Fans
The reference square contains long lavender stitch groups radiating outward around the flower.
Sl st into the first corner space.
Ch 3.
Work:
(2 dc, ch 2, 3 dc) in the corner.
Across the side, work a graduated group into the next large space:
2 dc, 3 tr, 2 dc
Ch 2.
Repeat the graduated group where required before the next corner.
In each corner work:
(3 dc, ch 2, 3 dc)
Continue around.
Open Corner Detail
Keep the corner spaces visible rather than filling them with dense stitches.
The photograph uses negative space around the flower to separate the raised petals from the square frame.
At each corner, maintain a ch-2 space.
Do not substitute multiple solid stitches into that opening.
First Square Frame Round
Yarn: light lavender.
Join in any corner.
Ch 1.
Work sc evenly across the first side.
In the corner work:
(2 sc, ch 2, 2 sc)
Continue around all four sides.
Join with sl st.
Raised Frame Round
Ch 2.
Work hdc BLO in every stitch across.
In each corner space work:
(2 hdc, ch 2, 2 hdc)
Continue around.
Join with sl st.
The unused front loops create a subtle line around the square.
Final Square Round
Ch 1.
Sc in every stitch around.
In each corner work:
(sc, ch 2, sc)
Join.
Fasten off.
Weave the tail through lavender stitches rather than crossing an open corner.
Blocking One Master Square
Block one completed motif before making the blanket quantity.
Pin all four corners to approximately 15–16 cm.
Measure both diagonals.
The measurements should differ by no more than approximately 5 mm.
Pin each side midpoint.
Do not pin the flower petals flat.
Only the square frame and openwork transition should contact the blocking mat firmly.
Reshaping the Flower After Blocking
Once the foundation is dry, lift each cream petal away from the lavender petals underneath.
Pull the lilac secondary petals gently into the spaces between cream petals.
Rotate the center clusters if necessary so all eight are visible.
The flower should remain dimensional while the surrounding square lies flat.
Making a Full Bedspread
Measure the blocked master motif rather than relying on the target measurement.
If one square finishes at exactly 16 cm, eight motifs produce approximately 128 cm before joining and the external border.
Nine produce approximately 144 cm.
Ten produce approximately 160 cm.
Eleven produce approximately 176 cm.
Twelve produce approximately 192 cm.
Calculate the required length using the same method.
Joining the Flower Squares
Use light lavender yarn to retain the tonal effect shown in the reference blanket.
Place two blocked squares with right sides facing.
Insert the hook through the corresponding back loops of both squares.
Work a slip stitch.
Continue across the entire side.
Fasten off at the opposite corner.
Join complete rows of squares before joining the rows to one another.
Decorative Raised Joining Method
For more visible seams, place both squares right side up.
Hold them side by side.
Insert the hook through the back loop of one square and the corresponding back loop of the neighboring square.
Pull light-lavender yarn through both loops and work a slip stitch.
Continue across.
The chain-like joining ridge remains visible on the front.
Controlling Join Tension
Measure 10 cm of square edge before joining.
After working the seam, measure the same section again.
If it contracts by more than approximately 5 mm, undo the seam and use a 4.5 mm hook for joining.
A tight joining row can distort an entire bedspread even when every individual motif is correctly blocked.
Blanket Border — Round 1
Join light lavender at one outer corner.
Ch 1.
Sc evenly around the complete blanket.
At each corner work:
(2 sc, ch 2, 2 sc)
Join with sl st.
Blanket Border — Round 2
Ch 2.
Hdc in each stitch around.
At each corner work:
(2 hdc, ch 2, 2 hdc)
Join.
Scalloped Floral Border
Change to medium lilac.
Skip 2 stitches.
Work 7 dc in the next stitch.
Skip 2 stitches.
Sl st in the next stitch.
Repeat around.
Adjust spacing near each corner so one scallop is centered over the corner rather than forcing an incomplete repeat.
Fasten off.
Optional Cream Scallop Accents
For a border closer to the alternating flower colors, add cream to selected scallops.
Join cream at the first dc of a lavender shell.
Surface sl st across the seven dc stitches.
Fasten off.
Repeat on every second or third scallop rather than every shell.
Why the Petal Layers Need Separate Anchors
A dimensional flower depends on vertical separation.
If cream and lilac petals are worked into the same loops, they compete for horizontal space and spread outward.
Placing later anchor chains behind the earlier petals shifts the next layer backward at its base while allowing its upper edge to rise forward.
This creates depth without stuffing or internal supports.
Making the Flower Flatter for Everyday Bedding
Omit the optional surface edge around the cream petals.
After completing the square, add one hidden tack near the base of every second cream petal.
Do not tack the petal tips.
The flower will retain visible layering while reducing the amount of loose fabric that can catch during daily use.
Increasing the Flower Relief
Use the same hook for the foundation but move down 0.5 mm for the flower center and petal anchor rounds.
The tighter bases cause the upper petal fabric to project more strongly.
Do not reduce the hook for the square frame because that can cause cupping around the flower.
Fixing a Cupped Flower Center
Place the unfinished motif on a flat surface after every petal layer.
If the center rises like a bowl before the square transition begins, the anchor chains are probably too short.
Remove the affected anchor round.
Add one chain to each loop and remake the petals.
Do not attempt to force severe cupping flat during blocking.
Fixing Flat Petals
Check which loops were used for the later petal layer.
If both layers share the same attachment points, separate them.
The cream petals should have an independent anchor round behind the lavender petals.
Lift each completed petal forward before continuing to the square transition.
Fixing an Eight-Petal Flower That Looks Uneven
Mark all eight anchor loops before crocheting the petals.
Each petal must occupy exactly one loop.
If two petals share an anchor or one loop remains empty, the flower loses radial symmetry.
Correct the mistake before beginning the squaring round because the corner placement depends on the eight-fold structure.
Fixing Rounded Square Corners
Check the corner chain spaces first.
Each of the four corners needs its own increase group.
If a corner remains rounded after blocking, add one additional stitch on each side of its ch-2 space in the next frame round.
Do not add stitches along the entire side because that produces ruffling.
Fixing a Wavy Outer Frame
A wavy frame contains too many stitches relative to its circumference.
Remove the affected round.
Reduce unnecessary stitches along the straight sides while preserving the four corner increases.
Blocking can correct minor irregularity but should not be used to hide a substantial stitch-count problem.
Yarn Planning
Do not multiply a published 10 cm motif quantity directly when making this larger layered square. Flower depth, petal count, joining style, border width, and fiber all change consumption.
Make one complete 3D flower granny square blanket pattern sample.
Weigh it after blocking.
For more accurate color planning, weigh the yarn balls before and after making the motif.
Record the consumption of cream, medium lilac, light lavender, and deep violet separately.
Multiply each figure by the required number of squares.
Add yarn for seams and the external border.
Keep approximately 10–15 percent additional yarn for swatching, tails, tension variation, repairs, and border adjustments.
Choosing Yarn
Smooth DK cotton or a cotton-rich blend gives the flower edges clear definition while keeping the openwork square readable.
Published 3D flower blankets successfully use DK with a 4 mm hook, making that combination a practical starting point for this adaptation.
Use yarns from the same product line when possible.
Different fibers can shrink or stretch at different rates, which is especially visible when one color forms the structural frame and another forms the raised petals.
Color Placement
Use deep violet only in the smallest center area.
Move outward to medium lilac.
Place warm ivory on the broadest petal layer.
Return to light lavender for the squaring rounds and frame.
This sequence creates enough value contrast for each layer to remain readable.
For a quieter blanket, replace deep violet with the same medium lilac used in the secondary petals.
Care and Storage
Follow the washing instructions supplied with the selected yarn.
Support a wet bedspread from underneath rather than lifting it by one corner or flower.
Reshape the square frames while damp.
Lift the cream petals away from the lilac layer before drying.
Dry flat when required by the fiber label.
Store the blanket loosely folded and avoid placing sustained weight directly over the raised flowers.
Assembly
- Make the deep-violet center and establish eight evenly spaced cream center clusters.
- Add eight lavender petals from their own anchor loops and bring each petal toward the front.
- Work the separate rear anchor round and make eight larger cream petals without attaching their upper edges.
- Add the secondary visible lilac sections between cream petals and check that all eight divisions remain symmetrical.
- Work the hidden stabilizing round behind the flower before placing four equally spaced corner markers.
- Convert the round flower into a square using lavender corner groups, elongated side fans, and open chain spaces.
- Add the three structural square-frame rounds and block the motif to approximately 15–16 cm.
- Repeat the motif, checking every finished square against the blocked master before blanket assembly.
- Join complete rows with light-lavender slip stitches, then connect those rows and add the outer blanket rounds.
- Finish with the scalloped border, weave all tails into matching colors, and lift the petal layers back into position.
The completed blanket should have flat modular frames, consistent joining seams, open spaces around each flower, eight-fold floral symmetry, and clearly separated cream and lavender petal levels.
7 Technical Tips
- Keep all eight petal anchor loops the same size. A loop differing by more than approximately 5 mm produces one visibly larger or smaller petal.
- Measure both blocked diagonals. A difference greater than about 5 mm means the motif needs reshaping before it is joined to neighboring squares.
- Do not attach the cream petal tips. Sewing the upper third flat removes the relief that distinguishes the dimensional flower.
- Check the flower after every petal round for cupping. If the center rises more than approximately 1 cm before squaring, remake the anchor loops with additional length.
- Test 10 cm of joining seam before assembling a full row. More than approximately 5 mm of contraction indicates that the joining tension is too tight.
- Pin only the structural frame during blocking. Flattening the flower under pins can permanently reduce the separation between its cream and lilac layers.
- Compare every tenth motif with the original master square. A repeated 3 mm gauge increase becomes 30 mm across ten motifs and can shift the dimensions of an entire bedspread.
Calculating Blanket Size
Use the actual blocked measurement of your sample.
At 16 cm per motif, eight squares span approximately 128 cm before the outer border.
Nine span approximately 144 cm.
Ten span approximately 160 cm.
Eleven span approximately 176 cm.
Twelve span approximately 192 cm.
For a bedspread with substantial side drop, measure the mattress width and add the desired drop on both sides before deciding how many motifs to make.
Repeat the calculation for length and include the border only after measuring a completed test section.
Conclusion
This 3D flower granny square blanket pattern depends on separation: eight-fold center symmetry, independent lavender and cream petal anchors, open transition spaces, and a flatter structural frame. Complete one 15–16 cm master square before calculating the bedspread, then record its blocked size and actual yarn consumption by color. Keep the flower free during blocking, use consistent corner increases, and test the joining tension before assembling full rows. Save the finished version to Pinterest or share it on Instagram with #Lavender3DFlowerBlanket. For this specific flower, would you keep the largest petals cream or reverse the layers so lavender becomes the dominant outer petal color?









