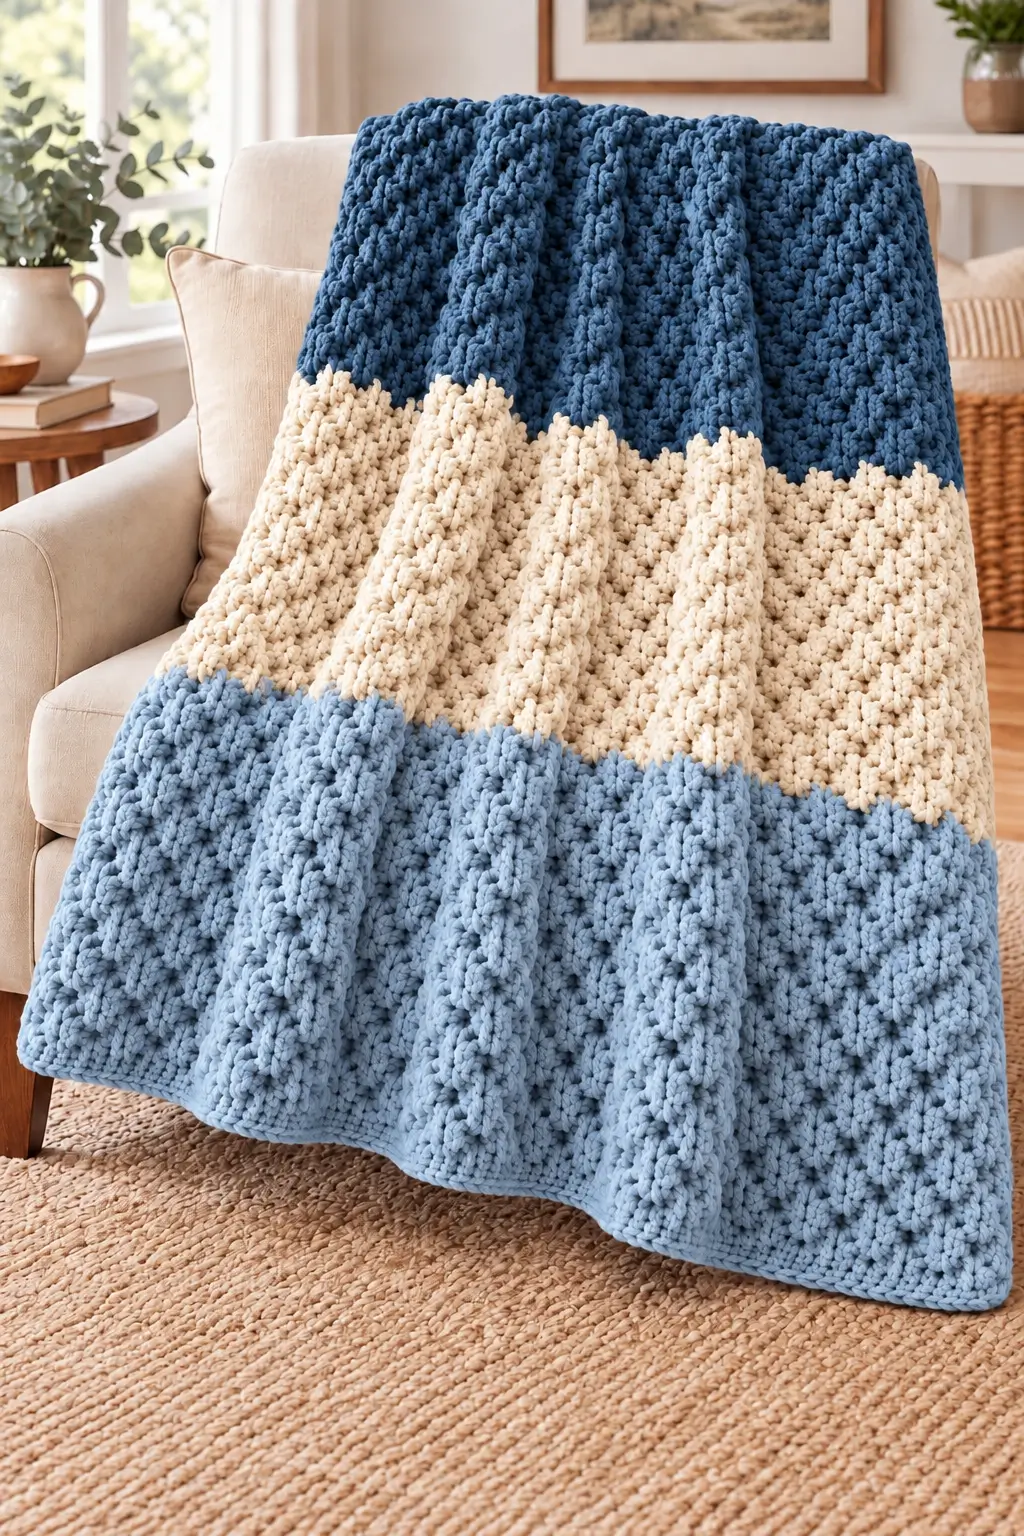
Three horizontal bands of navy, cream, and dusty blue divide this blanket, while raised crochet columns run across all three colors. This chunky crochet blanket pattern uses super bulky chenille yarn, a 9 mm crochet hook, and a repeating front-post stitch design. The proposed finished size is approximately 120 × 150 cm, subject to gauge. It is an intermediate project designed for a sofa throw with substantial surface texture.
The Design: What Makes This Three-Color Blanket Different
The blanket combines three structural features: broad horizontal color blocks, raised vertical columns, and a continuous rectangular construction. The color bands separate the navy, cream, and dusty blue sections without interrupting the rib pattern.
Front-post double crochet stitches create the raised columns. Unlike standard double crochet, a post stitch wraps around the body of a stitch from the preceding row. This produces a three-dimensional ridge that remains visible across the fabric.
The textured crochet throw uses alternating raised and recessed columns to reproduce the general appearance of the photographed blanket. A consistent repeat also makes the ribbed crochet blanket easier to resize.
One common mistake is placing post stitches around the wrong row or changing the repeat after a color transition. Either error interrupts the vertical alignment. Mark the first pattern repeat and count each completed row.
Project Info at a Glance
| Detail | Specification |
|---|---|
| Skill Level | Intermediate |
| Estimated Time | 12–20 hours (untested estimate) |
| Target Size | 120 × 150 cm (47 × 59 inches) |
| Crochet Hook | 9 mm |
| Yarn Weight | Super Bulky #6 Chenille |
| Construction | Flat turning rows |
| Best For | Sofa throw or bed accent |
| Stitch Multiple | 4 + 2 working stitches |
| Border | Single crochet |
Pattern note: This is an original interpretation of the photographed blanket, not an exact reconstruction of its unknown stitch pattern. Finished measurements and yarn quantities must be checked with a physical gauge swatch.
Materials and Tools
Yarn
Choose a super bulky chenille yarn such as Bernat Blanket, a category 6 polyester yarn. A standard 300 g skein contains approximately 201 meters (220 yards).
- Navy Blue (Color A): Super bulky #6 chenille, approximately 600–900 g. Suggested yarn: Bernat Blanket in a dark navy shade.
- Warm Cream (Color B): Super bulky #6 chenille, approximately 600–900 g. Suggested yarn: Bernat Blanket in an ivory or cream shade.
- Dusty Light Blue (Color C): Super bulky #6 chenille, approximately 900–1,200 g. Suggested yarn: Bernat Blanket in a pale blue shade.
These yarn quantities are provisional allowances rather than measured consumption. Purchase matching dye lots and use a weighed swatch to calculate the amount needed for your actual gauge.
Tools
- 9 mm crochet hook for a flexible textured fabric
- Four stitch markers for marking edges and stitch repeats
- Large-eye tapestry needle for weaving chenille yarn tails
- Sharp scissors
- Measuring tape
- Digital kitchen scale for estimating yarn consumption
- Clean flat surface or blocking mat for measuring and finishing
The yarn manufacturer’s standard hook recommendation is 8 mm. This pattern proposes 9 mm to provide additional room for the raised post stitches. Check the fabric after completing your swatch.
Crochet Abbreviations
| Abbreviation | Meaning |
|---|---|
| ch | Chain |
| sc | Single crochet |
| dc | Double crochet |
| FPdc | Front-post double crochet |
| BPdc | Back-post double crochet |
| sl st | Slip stitch |
| st(s) | Stitch(es) |
| RS | Right side |
| WS | Wrong side |
| rep | Repeat |
| BLO | Back loop only |
All instructions use US crochet terminology. An invisible decrease is not required because the blanket is worked flat without shaping.
Understanding the Textured Stitch Pattern
The primary texture consists of raised post stitches separated by ordinary double crochet stitches. Working around the stitch posts rather than through their top loops produces continuous vertical ribs.
Front-Post Double Crochet (FPdc)
Yarn over and insert the hook from front to back, then back to front around the post of the indicated stitch. Yarn over, draw up a loop, and finish the double crochet normally.
This stitch projects toward the front of the fabric and creates a raised ridge.
Back-Post Double Crochet (BPdc)
Yarn over and insert the hook from back to front, then front to back around the post of the indicated stitch. Complete the double crochet.
When worked on the reverse side, a back-post stitch maintains the raised appearance on the blanket’s front face.
How the Rib Pattern Works
Every fourth interior working stitch forms a raised column, with three ordinary double crochets between the columns.
The right-side rows use FPdc, while the wrong-side rows use BPdc. Both types of post stitches are worked around the corresponding columns from the previous row.
This creates repeating vertical texture without requiring separate panels or sewn-on ribs.
Chunky Crochet Blanket Pattern – Step by Step
Construction: Work in flat turning rows. The sample instructions use 82 working stitches. Adjust the starting chain after checking your gauge if you need a specific finished width.
Step 1: Make a Gauge Swatch
Before starting the full blanket, make a swatch using 18 working stitches of the same rib pattern. Work at least 12 rows.
Measure a central 10 cm section without stretching the fabric. Record the number of stitches and rows.
Wash and dry the swatch according to the yarn label, then measure it again. Use the washed measurements for the final blanket calculations.
To estimate the number of working stitches required for a 120 cm width, multiply the measured stitches per 10 cm by 12. Round to a number that fits the 4 + 2 working-stitch repeat.
For the sample pattern, 82 working stitches would produce approximately 120 cm at a gauge of 6.8 stitches per 10 cm. This is a design target, not a tested gauge.
Step 2: Foundation Chain
Yarn: Navy Blue (Color A)
Foundation: Chain 84.
Row 1 (RS): Work 1 dc into the fourth chain from the hook. Work 1 dc into each remaining chain. Turn. (82 sts, including the initial skipped three chains counted as the first dc.)
The row contains 20 complete four-stitch repeats plus two edge stitches.
Place a stitch marker at each end. The turning chains in subsequent rows do not count as additional stitches.
Step 3: Establish the Raised Ribbing
Row 2 (WS): Ch 2 (does not count as a stitch). Work 1 dc into the first stitch. Repeat [1 BPdc around the next stitch, 1 dc in each of the next 3 stitches] 20 times. Work 1 dc into the final stitch. Turn. (82 sts)
Row 3 (RS): Ch 2. Work 1 dc into the first stitch. Repeat [1 FPdc around the next stitch, 1 dc in each of the next 3 stitches] 20 times. Work 1 dc into the final stitch. Turn. (82 sts)
Row 4 (WS): Repeat Row 2. (82 sts)
Row 5 (RS): Repeat Row 3. (82 sts)
The 20 raised columns should remain evenly spaced. Check that each post stitch is worked around the corresponding post from the preceding row.
If a raised column shifts sideways, inspect the preceding row before continuing.
Step 4: Crochet the Navy Blue Section
Continue alternating Row 2 and Row 3 until the navy section measures approximately 45 cm.
Measure vertically along a flat side edge instead of following the raised ribs.
Keep the stitch count at 82 throughout the section. Record the final row number to maintain the correct stitch sequence after changing colors.
For a clean transition, introduce the cream yarn during the final pull-through of the last navy stitch.
Leave approximately 20 cm of navy yarn for weaving in later. Avoid tying a bulky knot between the two colors.
Step 5: Crochet the Cream Section
Yarn: Warm Cream (Color B)
Continue the established stitch pattern without changing the positions of the raised columns.
If the first cream row is a wrong-side row, follow Row 2. If it is a right-side row, follow Row 3.
Work until the cream section measures approximately 40 cm.
Maintain the same tension used for the navy section. A tighter middle band may pull the sides inward and distort the rectangular shape.
Measure the width after approximately every six rows. If the width changes by more than 2 cm, inspect the stitch count and tension.
Change to dusty light blue on the final pull-through of the last cream stitch.
Step 6: Crochet the Dusty Light Blue Section
Yarn: Dusty Light Blue (Color C)
Continue the established alternating row repeat.
Work until the light-blue section measures approximately 65 cm, or until the entire blanket reaches the intended length.
The proposed color distribution is:
- Navy blue: 45 cm
- Warm cream: 40 cm
- Dusty light blue: 65 cm
This arrangement places the largest color section at the bottom, following the general proportions of the reference photograph.
After the final pattern row, work one row of single crochet across the top edge, maintaining 82 stitches.
Fasten off and leave a 20 cm tail for finishing.
How to Add a Clean Crochet Border
A single-crochet border creates a defined edge and helps control minor irregularities along the sides of the blanket.
Choose dusty light blue for a matching lower edge or cream for a contrasting frame.
Border Round 1
Join yarn at a corner.
Work one single crochet into each stitch along the top and bottom edges.
Along the side edges, distribute single crochet stitches evenly according to the height of the rows. Do not automatically place one stitch into every row if this causes the border to ripple.
At each corner, work three single crochets into the same corner space.
Join with a slip stitch to the first single crochet.
Border Round 2
Chain one and work one single crochet into each stitch around the blanket.
At each corner, work three single crochets into the center corner stitch.
Join with a slip stitch and fasten off.
A border that is too tight can cause the blanket edges to curl. Too many border stitches can create waves. Adjust the side-edge stitch spacing if necessary.
For a thicker finish, add one additional round of single crochet using the same corner treatment.
Finishing the Crochet Blanket
- Lay the completed blanket on a clean, flat surface with the right side facing upward.
- Check that the raised columns remain aligned through all three color sections.
- Measure the width at the top, middle, and bottom.
- Inspect both color transitions for gaps, loose loops, or bulky knots.
- Thread the navy yarn tails into a large-eye tapestry needle.
- Weave each tail through the reverse side for approximately 10–15 cm, changing direction at least once.
- Repeat the process for the cream and light-blue yarn tails.
- Inspect the border corners and correct any sections that curl or flare.
- Wash a sample swatch first, then clean the completed blanket according to the yarn label.
- Lay the blanket flat, shape the edges without stretching the ribs, and record the final dimensions.
The finished project is a rectangular three-color crochet throw with continuous raised vertical texture.
7 Technical Tips for a Better Chunky Crochet Blanket
- Prevent missed edge stitches. Place markers in the first and last working stitches of each row. Confirm that the sample-width pattern maintains 82 stitches.
- Control raised-column tension. A tight front-post stitch can shorten the row compared with its neighboring double crochets. Draw the post loop to a consistent height before completing the stitch.
- Keep color changes level. Change colors on the final pull-through of a completed stitch. Avoid introducing a new color halfway through a post stitch.
- Check width regularly. Measure the blanket after every 10 rows. Investigate a width difference greater than 2 cm before beginning another color section.
- Prevent chenille ends from loosening. Leave yarn tails approximately 15–20 cm long. Weave them through multiple stitches and change direction rather than relying on a single short pass.
- Avoid a wavy border. Work a 10 cm test section along the side edge. Adjust the spacing of the single crochet stitches if the edge begins to ripple.
- Measure after laundering. Compare the washed swatch with its original dimensions. A 5% gauge change can alter a planned 150 cm blanket by approximately 7.5 cm.
How to Resize the Blanket
This free crochet throw pattern can be adapted to different blanket dimensions. The stitch repeat remains the same; only the starting chain and the number of rows change.
| Blanket Size | Target Dimensions | Suggested Starting Chain |
|---|---|---|
| Small Lap Blanket | 90 × 120 cm | 64 chains |
| Medium Throw | 120 × 150 cm | 84 chains |
| Large Throw | 140 × 180 cm | 100 chains |
| Oversized Throw | 160 × 200 cm | 112 chains |
These foundation counts are examples based on the proposed gauge. Confirm your actual measurements before starting.
For a wider blanket, add four working stitches per repeat. Each additional repeat adds one raised column and three ordinary double crochet stitches.
For a longer blanket, continue alternating the established rows until the required measurement is reached.
Adjust the navy, cream, and light-blue sections proportionally if you want to maintain the original three-color composition.
Estimating Yarn Requirements
Yarn consumption depends on the hook size, stitch height, tension, and number of raised columns.
Post stitches may consume more yarn than ordinary double crochet stitches because the working yarn travels around the stitch post.
For a reliable estimate, make a measured swatch and weigh it on a digital scale.
Yarn needed (g) = (Blanket area ÷ Swatch area) × Swatch weight
For example, if a 20 × 20 cm swatch weighs 60 g, a 120 × 150 cm blanket would require approximately 2,700 g before a separate border allowance.
This is an illustrative calculation, not measured yarn consumption for the photographed blanket.
Add approximately 10–15% to the calculated amount for the border, yarn tails, and differences in tension.
How to Wash and Care for a Chenille Crochet Blanket
Chenille yarn requires attention to stitch security and laundering. Polyester fibers are generally washable, but loose cut ends can work free if they have not been woven securely.
Bernat Blanket yarn is labeled machine washable and dryable. Always follow the instructions on the label of the specific yarn used.
Wash the blanket separately or with similar soft textiles. Avoid garments with exposed zippers or hook-and-loop closures that may catch the raised stitches.
Use a gentle cycle and avoid excessive agitation. After washing, inspect the color transitions and border corners.
Do not press the raised stitches with a hot iron. Direct heat can damage polyester fibers and flatten the textured columns.
Frequently Asked Questions
Can beginners make this chunky crochet blanket?
A crocheter who already understands double crochet and basic turning rows can learn the post-stitch repeat. The main challenge is maintaining the alignment of the raised columns across the full width. Practice on a small swatch before starting the full blanket.
What is the best yarn for a chunky crochet blanket?
Super bulky chenille yarn is a suitable choice for a thick blanket with pronounced texture. Bernat Blanket is one option with documented yarn weight, skein size, and care instructions. Other category 6 yarns may produce a different gauge and drape.
Can I use a 10 mm crochet hook?
Yes, provided the swatch produces acceptable stitch definition. A larger hook may increase flexibility and width, but it can also reduce the definition of the raised ribs. Recalculate the foundation count after measuring the swatch.
How do I prevent the blanket from becoming narrower?
Count the working stitches on every row and identify the first and last stitch before turning. Maintain consistent yarn tension, particularly after joining a new skein. Check that each raised column is worked around the intended post.
Why does my textured blanket curl at the edges?
Uneven tension, tight turning chains, and an overly restrictive border can cause curling. Compare the width of the first five rows with the center of the blanket. If the foundation is significantly narrower, remake it with a larger hook or a looser chain.
Can I make this blanket without a border?
Yes. The border is optional if the edges are even and the fabric lies flat. A single-crochet border is useful when you want a more defined rectangular outline.
How many skeins do I need for a three-color blanket?
The total depends on the size of the blanket and the weight of each skein. For standard 300 g chenille skeins, a provisional planning range of 2,100–2,700 g corresponds to approximately seven to nine skeins. The final amount must be calculated from the actual gauge and swatch weight.
Can I change the order of the blanket colors?
Yes. The stitch pattern remains unchanged when the colors are rearranged. You can place dusty blue at the top, cream in the middle, and navy at the bottom, or use three different shades with similar contrast.
Conclusion
The finished design combines three horizontal color blocks with continuous raised crochet columns. Before making the full blanket, complete a textured gauge swatch, wash it, and use the measurements to calculate the correct foundation chain and yarn quantity. Record the row count at both color transitions so the proportions remain consistent.
Save this chunky crochet blanket pattern to a Pinterest crochet board, or share a photograph of your completed project on Instagram with #ThreeColorChunkyBlanket. Include your yarn weight, hook size, and final dimensions so other makers can compare results.
Which color arrangement would you choose: navy at the top and light blue at the bottom, or the reverse?









