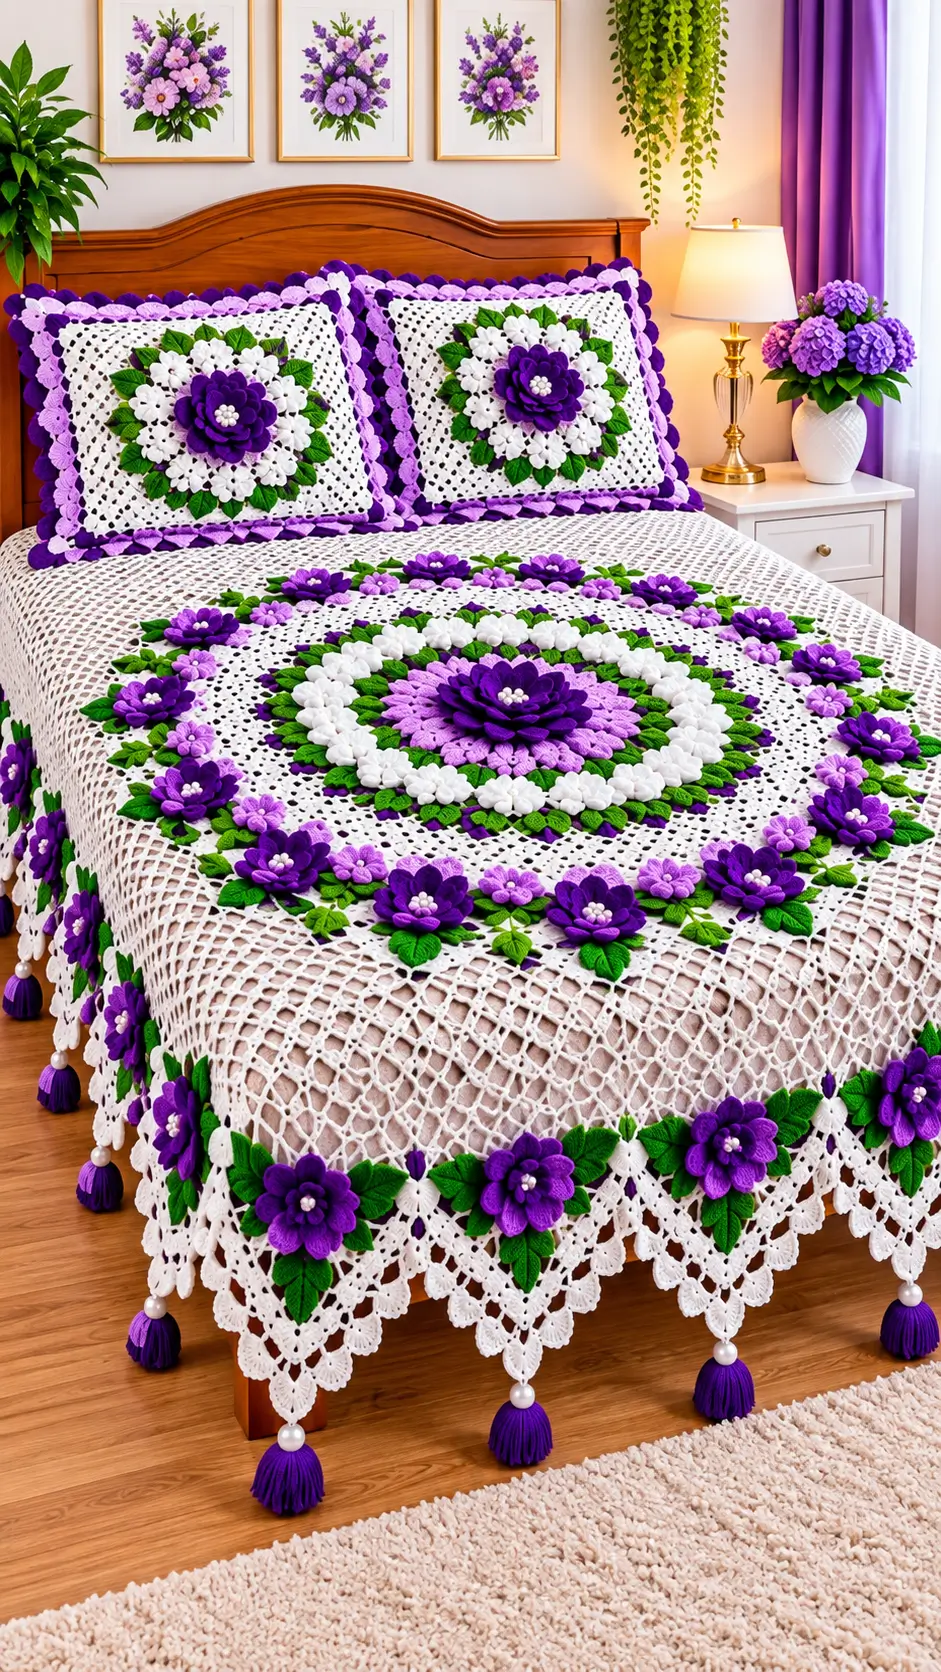
A raised violet flower anchors the center of this white crochet bedspread, while smaller blossoms form a second decorative ring. This 3D purple flower crochet bedspread pattern uses DK cotton yarn, a proposed 4 mm hook, layered petals, openwork mesh, and matching pillow panels. Designed for advanced crocheters, the project targets approximately 210 × 240 cm. Its modular appliqué construction allows individual flowers to be replaced without rebuilding the lace foundation.
The Design: What Makes This Floral Bedspread Different
The bedspread combines a continuous white mesh foundation with separately crocheted dimensional flowers. This construction matters because the lace must support the weight of the appliqués without stretching unevenly. Large flowers are placed near the center, while smaller blossoms distribute visual weight toward the sides.
Green pointed leaves extend beyond the flower bases, separating the purple petals from the white background. They also conceal some sewing points used to attach the appliqués.
The decorative lower edge uses scallops and hanging tassels rather than a plain rectangular hem. A common mistake when making a floral crochet bedspread is attaching heavy flowers before blocking the foundation, which can distort the mesh and shift the motif placement. The matching crochet pillow covers repeat the floral design on a smaller scale.
Project Information
| Skill Level | Advanced |
|---|---|
| Finished Size | Target 210 × 240 cm; adjust by gauge |
| Hook | 4 mm proposed |
| Yarn | DK cotton or cotton blend |
| Construction | Openwork mesh with 3D floral appliqués |
| Time | Varies with size and motif count |
Materials and Tools
Yarn
- White or ivory DK cotton — 1,800–2,400 g: mesh foundation, pillow panels, white flowers and border.
- Deep purple DK cotton — 350–500 g: central flower, smaller flowers, edging and tassels.
- Lavender DK cotton — 200–350 g: outer petals and secondary blossoms.
- Leaf green DK cotton — 200–300 g: leaves and floral accents.
These quantities are preliminary estimates, not tested yarn consumption. Weigh representative swatches and motifs before purchasing the complete quantity.
Tools
- 4 mm crochet hook, adjusted to gauge
- 3.5 mm hook for flower centers, optional
- Tapestry needle and scissors
- Locking stitch markers
- Measuring tape and blocking mats
- Pillow inserts sized to the covers
- Pearl-like beads, optional
Gauge and Sizing
Crochet a mesh swatch at least 12 spaces wide and 12 rows high. Wash and block the swatch before measuring. Measure ten complete spaces horizontally and ten rows vertically, then divide each measurement by ten to calculate the mesh pitch.
For example, if each blocked mesh space measures 1 cm across, a 200-space foundation measures approximately 200 cm before the border. To reach a finished width of 210 cm with a 5 cm border on both sides, the foundation should measure 200 cm.
Actual sizing must come from the blocked swatch. Measure both directions because width and row height may differ.
Crochet Abbreviations
- MR: Magic ring
- ch: Chain
- sc: Single crochet
- hdc: Half double crochet
- dc: Double crochet
- tr: Treble crochet
- sl st: Slip stitch
- st: Stitch
- sp: Space
- sk: Skip
- inc: Increase
- dec: Decrease
- BLO: Back loop only
- FLO: Front loop only
US crochet terminology is used throughout. An invisible decrease works through the front loops of the next two stitches before completing one single crochet.
3D Purple Flower Crochet Bedspread Pattern — Step by Step
This is an original photo-inspired interpretation, not the original designer’s verified pattern. The mesh is worked in turned rows, while the flowers are worked in joined rounds.
Part 1: White Openwork Mesh Foundation
Yarn: white DK cotton.
Choose the number of mesh spaces, N, from the blocked gauge. Chain 3N + 5. For 12 mesh spaces, chain 41.
Row 1: Dc in the 8th chain from the hook. [Ch 2, skip 2 chains, dc in next chain] across. (12 mesh spaces for the sample)
Row 2: Ch 5, turn. Dc in the next dc. [Ch 2, dc in next dc] across, working over each intervening chain-2 space. (12 mesh spaces)
Rows 3 onward: Repeat Row 2 until the foundation reaches the required length minus the border allowance. Maintain the same mesh-space count on every row.
For a foundation with 200 spaces, chain 605. This is a calculation example based on an illustrative 1 cm mesh pitch, not a verified gauge.
Block the finished foundation, check the width and length, and compare the diagonals before attaching flowers. Fasten off with a 25 cm tail.
Part 2: Large Central Purple Flower (Make 1)
Yarn: deep purple and lavender.
R1: 6 sc in MR. Join. (6)
R2: Inc × 6. Join. (12)
R3: [Sc 1, inc] × 6. Join. (18)
R4: [Sc 2, inc] × 6. Join. (24)
R5: [Sc 3, inc] × 6. Join. (30)
R6: In BLO, [sc 4, inc] × 6. Join. (36)
R7: In BLO, [sc 5, inc] × 6. Join. (42)
R8: In BLO, sc around. Join. (42)
Fasten off, leaving a 40 cm sewing tail.
Inner Petals
Join deep purple into a free front loop of R6. [Sl st in next front loop, ch 2, 3 dc in next front loop, ch 2] × 18. Join and fasten off. (18 petal groups)
Outer Petals
Join lavender into a free front loop of R7. [Sl st in next front loop, ch 3, 4 tr in next front loop, ch 3] × 21. Join and fasten off. (21 petal groups)
Embroider white French knots in the flower center or add a securely sewn decorative cluster.
Part 3: Medium Purple Flowers (Make 12)
Yarn: deep purple.
R1: 6 sc in MR. Join. (6)
R2: Inc × 6. Join. (12)
R3: [Sc 1, inc] × 6. Join. (18)
R4: [Sc 2, inc] × 6. Join. (24)
R5: In BLO, sc around. Join. (24)
Petals: In the free front loops of R5, repeat [sl st in next loop, ch 2, 3 dc in each of the next 2 loops, ch 2, sl st in next loop] six times. (6 petals)
Fasten off, leaving a 30 cm sewing tail. Position these flowers in a balanced ring around the central motif.
Part 4: Small Lavender Flowers (Make 12)
Yarn: lavender.
R1: 6 sc in MR. Join. (6)
R2: Inc × 6. Join. (12)
R3: [Sc 1, inc] × 6. Join. (18)
R4: Sc around. Join. (18)
Petals: [Sl st in next st, ch 2, 3 dc in next st, sl st in next st] × 6. (6 petals)
Fasten off with a 25 cm tail. Place the lavender flowers between the larger purple blossoms.
Part 5: White Floral Accents (Make 16)
Yarn: white.
R1: 6 sc in MR. Join. (6)
R2: Inc × 6. Join. (12)
R3: [Sc 1, inc] × 6. Join. (18)
Petals: [Sl st in next st, ch 2, 3 hdc in next st, sl st in next st] × 6. (6 petals)
Fasten off with a 25 cm sewing tail. Arrange these accents around the large central flower.
Part 6: Pointed Green Leaves (Make 60)
Yarn: leaf green.
Foundation: Ch 10.
R1: Sc in second chain from hook, hdc in next chain, dc in next 5 chains, hdc in next chain, 3 sc in last chain. Work along the opposite side: hdc in next chain, dc in next 5 chains, hdc in next chain, sc in last chain. Join. (19)
R2: Ch 1, sc in next 9 sts, 3 sc in next st at the tip, sc in next 9 sts. Join. (21)
Fasten off with a 25 cm tail. Block the leaf with a defined point. Attach leaves in groups of two or three beneath the flowers.
Part 7: Matching Crochet Pillow Covers (Make 2)
Yarn: white.
Measure the pillow inserts and determine the mesh-space count using the blocked gauge. For a 45 × 45 cm insert, test a cover width of approximately 43–45 cm depending on stretch.
Foundation: Ch 3N + 5.
Row 1: Dc in 8th chain from hook; [ch 2, skip 2 chains, dc in next chain] across.
Row 2: Ch 5, turn; dc in next dc, then [ch 2, dc in next dc] across.
Remaining rows: Repeat Row 2 to the desired panel height.
Make a matching back panel or attach a fabric backing with an envelope opening. Decorate each front with one medium purple flower, several white accents, and four to six green leaves.
Part 8: Scalloped White Crochet Border
Yarn: white.
Work a foundation round of sc around the entire bedspread, distributing stitches evenly along the row ends. Work 3 sc into each corner.
For each straight side, adjust the foundation stitch count to support six-stitch repeats.
Shell repeat: [Skip 2 sts, 5 dc in next st, skip 2 sts, sc in next st] across.
Work a seven-dc fan into each corner space. Continue around the remaining sides, join and fasten off.
This simplified scalloped border is inspired by the photographed edging, not an exact reproduction of its pointed lace.
Part 9: Purple Tassels (Make 12)
Yarn: deep purple.
- Cut a 15 × 10 cm cardboard template.
- Wrap yarn around the 15 cm direction approximately 35 times.
- Thread a separate strand beneath the upper fold and tie tightly.
- Cut the lower loops.
- Wrap a strand around the bundle about 2 cm below the top knot.
- Trim the fringe to an even length.
- Attach tassels at selected scallop points.
Decorative beads are optional. Secure them firmly and avoid loose beads on bedding accessible to young children.
Assembly Instructions
- Block the foundation: Pin the washed mesh to its intended dimensions.
- Mark the center: Fold lengthwise and widthwise and identify the midpoint.
- Attach the central flower: Sew through the circular base, leaving the petals raised.
- Add white floral accents: Pin and sew them evenly around the central motif.
- Position medium flowers: Arrange the twelve purple flowers in a balanced ring.
- Place lavender flowers: Alternate them between the larger purple flowers.
- Attach green leaves: Secure their bases while leaving the tips free.
- Complete pillow covers: Add flowers, join panels, and finish openings.
- Finish border and tassels: Maintain even spacing around the lower and side edges.
- Inspect and finish: Weave in tails, check attachments, measure, and block as needed.
The completed set consists of one floral lace bedspread and two matching decorative pillow covers.
7 Technical Tips
- Stitch markers: Place a marker every 20 mesh spaces. Losing one space can shift the foundation width and decorative alignment.
- Foundation tension: Measure the first 20 cm after five rows. Tight edges can produce a trapezoidal panel.
- Petal stability: Sew through the flat flower base rather than the petal tips. Stitching petals down reduces their raised appearance.
- Flower placement: Measure the central flower’s distance to both long edges. A difference exceeding 2 cm may be visible on the bed.
- Leaf attachment: Secure the base and central vein only. Sewing the whole perimeter flattens the pointed leaf.
- Border counting: Match each straight edge to the six-stitch shell repeat. Incorrect spacing can cause bunching at corners.
- Tassel security: Tie the neck approximately 2 cm below the attachment. Loose wraps may unravel during laundering.
Customizing the Floral Crochet Bedspread
For smaller beds, reduce the number of mesh spaces and rows while keeping the central flower aligned with the midpoint. Reduce the number of surrounding flowers if the outer ring becomes crowded.
For larger beds, increase the foundation dimensions using the measured mesh pitch. Add smaller flowers around the perimeter rather than making the central motif disproportionately large.
Deep violet, lavender, and green provide the reference color scheme. Other color combinations can be used, although contrasting petal layers help the dimensional structure remain visible.
The border can also be simplified. A single round of sc followed by shells produces a lighter finish than hanging pointed lace and tassels.
Washing and Maintenance
Check the selected yarn’s care label before laundering. A wet cotton bedspread can become heavy, so support the fabric when lifting it to avoid stretching the mesh.
Wash gently and dry flat where practical. Avoid hanging a saturated lace panel from a single edge. Inspect the flower seams, leaf attachments, tassel knots, and optional beads periodically.
For storage, fold the bedspread loosely so the raised flowers are not permanently compressed.
Frequently Asked Questions
Can beginners crochet this bedspread?
The complete project is best suited to advanced crocheters. A smaller sample with one flower and four leaves is a useful way to practice the construction.
How much yarn is needed?
The listed quantities are estimates. Weigh a blocked mesh swatch and representative motifs to calculate actual consumption for the chosen size.
Can acrylic yarn replace cotton?
Yes, after testing gauge, drape, stretch, and blocking behavior. Yarn weight alone does not guarantee identical results.
How are the 3D flowers attached?
Sew through the flat circular bases while leaving the raised petals free.
Can the tassels be omitted?
Yes. Tassels are decorative and are not required for the structural integrity of the bedspread.
Related Crochet Patterns
- 3D Flower Granny Square — layered flower and leaf construction.
- Floral Lace Blanket — repeating floral blanket motifs.
- Mosaic Lace Bedspread — vintage openwork construction.
- Spider Lace Bedspread — bedspread sizing reference.
Internal links needed: flower granny squares, floral lace blanket, vintage bedspread, crochet sizing guide.
Conclusion
The 3D purple flower crochet bedspread pattern combines a white mesh foundation, layered purple flowers, pointed green leaves, scalloped edging, and matching pillow covers. Its modular construction allows the lace and decorative pieces to be measured independently before assembly. The next step is to make a 20 × 20 cm mesh swatch, block it, and record the yarn consumption and stitch pitch. Use those measurements to calculate the full foundation dimensions and material requirements. Share your finished floral arrangement on Pinterest or Instagram with #PurpleFlowerCrochetBedspread. Would you arrange the small lavender flowers in a continuous ring or distribute them across the outer corners?
Pattern note: This is an original photo-inspired, untested design. Verify gauge, stitch placement, yarn quantities, and finished dimensions with a sample before making the full bedspread.









