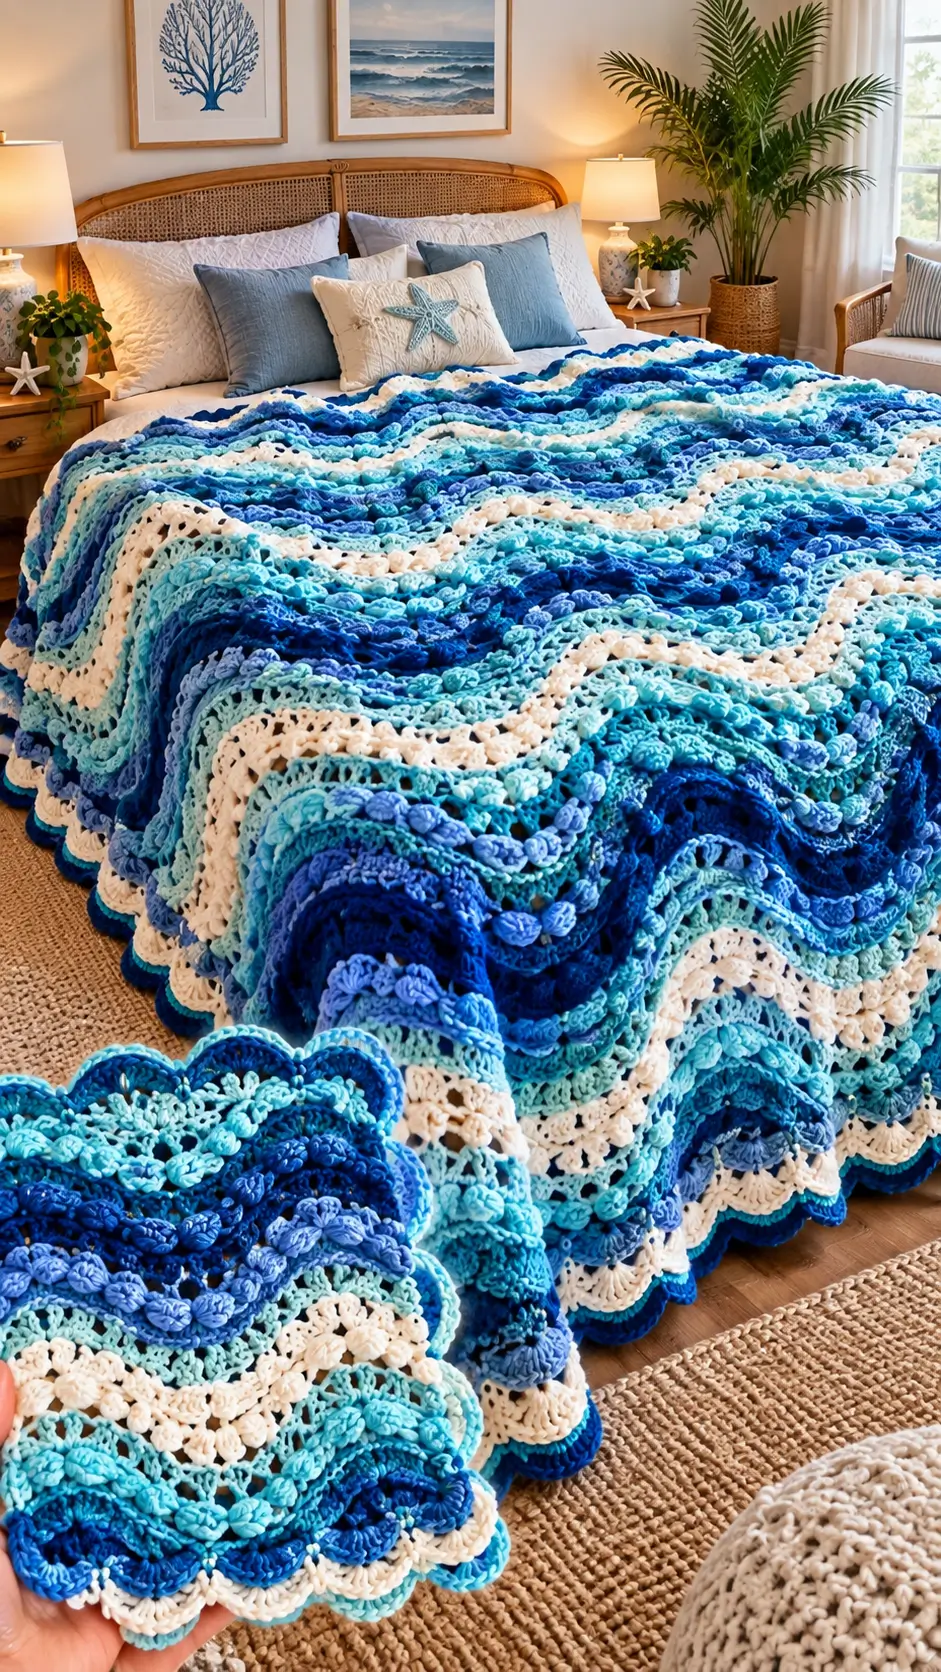
Ocean waves rise into crests, collapse into troughs, and leave irregular bands of foam—the three structural details this blanket translates into crochet. This Ocean Waves Crochet Blanket Pattern combines ripple rows, raised bobble stitches, and a scalloped border in six coastal colors. Worked with worsted-weight yarn and a 6 mm hook, the proposed design targets a large throw measuring approximately 122 × 152 cm. Intermediate crocheters can adapt its repeat to different bed sizes.
The Design: What Makes This Ocean Waves Blanket Different
The design relies on three structural decisions. First, paired increases create raised crests while paired decreases form valleys. You maintain the same stitch count across rows, preventing the blanket from growing wider with every repeat.
Second, raised bobbles interrupt selected rows to suggest scattered sea foam. Their spacing is controlled because excessive bobbles can make a textured crochet blanket stiff and heavy.
Third, the colors alternate between dark and light bands rather than following a continuous gradient. The coastal crochet blanket gains stronger wave definition because ivory and pale aqua contrast with navy and royal blue.
A common mistake is placing increases at different positions on successive rows. This shifts the peaks sideways and distorts the ripple structure. Keep increases aligned with the preceding crest.
Project Info at a Glance
| Skill Level | Intermediate |
|---|---|
| Estimated Time | 35–55 hours |
| Target Finished Size | 122 × 152 cm |
| Hook Size | 6.0 mm |
| Yarn Weight | Worsted / Aran |
| Construction | Flat ripple rows with decorative edging |
| Best For | Large throws and coastal bedroom decor |
Dimensions, working time, and yarn requirements are planning estimates for this original pattern draft, not measurements from a completed sample.
Materials and Tools
Yarn
- Deep navy blue: 400 g worsted-weight yarn
- Royal blue: 350 g worsted-weight yarn
- Turquoise: 300 g worsted-weight yarn
- Seafoam aqua: 250 g worsted-weight yarn
- Pale blue: 200 g worsted-weight yarn
- Ivory white: 250 g worsted-weight yarn
Estimated total: 1,750 g. Actual consumption depends on gauge, fiber, dimensions, and bobble frequency. Caron One Pound or another washable worsted-weight acrylic is a possible yarn choice.
Tools
- 6.0 mm crochet hook
- 6.5 mm hook for a tight foundation chain, optional
- Tapestry needle
- Locking stitch markers
- Scissors and measuring tape
- Blocking mats and rust-resistant pins, optional
Crochet Abbreviations
| Abbreviation | Meaning |
|---|---|
| ch | Chain |
| sc | Single crochet |
| dc | Double crochet |
| inc | Increase |
| dec | Decrease |
| dc2tog | Double crochet two together |
| sl st | Slip stitch |
| st(s) | Stitch(es) |
| BLO | Back loop only |
| RS / WS | Right side / Wrong side |
| rep | Repeat |
| bobble | Five partially completed double crochets joined at the top |
Ocean Waves Crochet Blanket Pattern: Step by Step
Step 1: Make a Gauge Swatch
Work a sample using 31 foundation chains and the same 14 + 3 ripple formula. Crochet at least eight rows, then measure the fabric without stretching it.
Wash and dry the sample according to the yarn label before measuring again. Use the result to determine your actual repeat width and row height. Finished dimensions cannot be predicted reliably from chain count alone.
Step 2: Foundation Chain
Yarn: Deep navy blue.
Foundation: Chain 171.
The foundation follows the formula (14 × 12) + 3 = 171. The working rows contain 168 stitches, counting the turning chain as one double crochet.
Place temporary stitch markers to help track the repeats. Reposition the markers after completing the first row.
Step 3: Establish the Ripple Pattern
Row 1: Work 1 dc in the fourth chain from the hook and 1 dc in each of the next 4 chains. Work dc2tog twice. Repeat across the central sections: dc in each of the next 4 chains, 2 dc in each of the next 2 chains, dc in each of the next 4 chains, dc2tog twice. At the final five chains, dc in each of the next 4 chains and 2 dc in the final chain. Turn.
Row 2: Ch 3, counting as the first dc. Work 1 dc at the base of the turning chain and 1 dc in each of the next 4 stitches. Work dc2tog twice. Repeat the central crest-and-valley sequence, using paired increases at the crests and paired decreases at the valleys. At the final five stitches, dc in each of the next 4 stitches and 2 dc in the top of the turning chain. Turn.
Rows 3–6: Repeat Row 2.
Stitch-count checkpoint: 168 stitches per completed row, including the turning chain.
The ripple construction is based on established 14 + 3 stitch methods. This full pattern combination has not been physically tested.
Technical reference: Clover Ripple Stitch Tutorial.
Step 4: Create the Ocean Color Sequence
| Rows | Color |
|---|---|
| 1–4 | Deep navy |
| 5–8 | Royal blue |
| 9–12 | Turquoise |
| 13–16 | Seafoam aqua |
| 17–18 | Ivory white |
| 19–20 | Pale blue |
| 21–22 | Royal blue |
| 23–24 | Deep navy |
Repeat the proposed 24-row sequence five times for 120 rows, or adjust the number of cycles according to your measured length.
Change yarn colors on the final yarn-over of the preceding stitch. Leave approximately 15 cm of yarn tail for weaving.
Step 5: Add Raised Sea-Foam Bobbles
Raised bobbles represent the whitewater texture visible in the reference photograph. This is an optional original modification.
- Yarn over and insert the hook into the designated stitch.
- Pull up a loop, yarn over, and draw through two loops.
- Repeat the partially completed double crochet four more times in the same stitch.
- Yarn over and draw through all six loops on the hook.
- Work the next stitch normally.
Replace one regular dc with each bobble. Do not add extra stitches.
For controlled texture, place bobbles on selected Rows 10, 18, and 22 of each color cycle, near the center of full crests. Avoid decreases and paired increase stitches. Check which side the bobble projects toward before completing each row.
Step 6: Continue the Blanket Body
Continue the established ripple and color sequences until the blanket reaches the desired length. For the proposed large throw, aim for approximately 152 cm.
Measure along the center rather than from a peak to a valley. Check the width periodically, especially after changing yarn brands or tension.
For a bed-sized blanket, add complete color cycles and increase the yarn budget. Finish the final row and leave a 15 cm tail.
Step 7: Prepare the Blanket Edges
Inspect the long edges formed by row ends and the shorter ripple-shaped edges. Work an evenly distributed foundation round of single crochet around the perimeter.
At squared corners, place three single crochets in the corner space. Follow the natural ripple contour where appropriate.
If the edge ruffles, reduce stitch density. If it pulls inward, add stitches or test a larger hook. Count the straight-edge stitches before working the shell border.
Step 8: Crochet the Scalloped Ocean Border
Round 1 — Ivory: Work sc evenly around the perimeter, placing three sc at squared corners. Join with a sl st.
Round 2 — Turquoise: Work sc in each stitch, adjusting the spacing where necessary to keep the border flat. Join.
Round 3 — Royal blue: On a straight section, repeat: skip 2 stitches, work 5 dc into the next stitch, skip 2 stitches, sl st into the next stitch.
Round 4 — Ivory: Add a narrow slip-stitch or single-crochet accent along the shell outlines.
Round 5 — Deep blue: Add a final slip-stitch accent where the shell edges permit. Fasten off.
Each basic shell consumes six foundation stitches. Adjust spacing at corners and irregular wave edges. Test a short section before working the full perimeter.
The photographed blanket has deeper layered scallops. This five-round border is a simplified proposed interpretation, not an exact reconstruction.
Step 9: Weave in Yarn Ends
Thread each tail through a tapestry needle and weave through the backs of nearby stitches for approximately 8–10 cm. Reverse direction and pass through another set of loops.
Keep dark tails behind dark stitches and light tails behind light stitches. Trim only after checking both sides of the fabric.
Step 10: Block and Finish
Lay the blanket flat and measure its width, length, and diagonal corners. If the yarn label permits, block gently to settle uneven sections.
Do not apply direct high heat to acrylic yarn. Shape the scallops evenly and allow the fabric to dry completely before folding.
How to Resize the Ocean Wave Crochet Blanket
Use the foundation formula 14n + 3, where n is the number of complete ripple repeats.
| Repeats | Foundation Chains | Working Stitches |
|---|---|---|
| 6 | 87 | 84 |
| 8 | 115 | 112 |
| 10 | 143 | 140 |
| 12 | 171 | 168 |
| 14 | 199 | 196 |
| 16 | 227 | 224 |
These numbers describe the stitch structure, not guaranteed finished widths. Measure a gauge swatch to estimate the actual width of each repeat.
7 Technical Tips for Better Results
- Stitch-marker drift: Mark every crest after the first row. Recount if a marker shifts by one stitch.
- Uneven tension: Compare the width after Rows 6, 12, and 24. A change greater than approximately 2 cm across the same measured section may indicate a tension problem.
- Flattened bobbles: Work all five partial double crochets into one designated stitch. Using fewer partial stitches reduces the raised effect.
- Misplaced decreases: Each dc2tog consumes two stitches and produces one. An incorrectly positioned decrease can shift the entire valley.
- Color-change gaps: Leave approximately 15 cm tails. Very short tails may work loose after laundering.
- Ruffling scallops: Test three consecutive shells before continuing around the blanket. Adjust the foundation stitch density if the edge waves excessively.
- Uneven blocking: Measure before and after drying. Pin scallops at consistent intervals instead of stretching individual shells unevenly.
Common Problems and Corrections
Why are the ripple edges curling?
Tight foundation chains, inconsistent decreases, or overly tight border stitches may cause curling. Try a foundation hook 0.5 mm larger than the main hook and test the border separately.
Why does the blanket look striped instead of wavy?
Very narrow color bands can reduce the visual impact of the ripple. Increase the dark blue sections and reserve ivory for shorter accents.
Can chunky yarn replace worsted-weight yarn?
Yes, but the stitch scale, thickness, finished dimensions, and yarn requirement will change. Make a new gauge swatch before purchasing the full quantity.
Can the blanket be made without bobbles?
Yes. Replace each proposed bobble with one regular dc. The stitch count stays unchanged and the fabric becomes flatter.
Is the pattern suitable for beginners?
The basic ripple can be learned after mastering double crochet, increases, decreases, and turning chains. The full combination of texture and decorative edging is an intermediate project.
Related Crochet Patterns
- Classic Ripple Crochet Blanket: Learn the ripple stitch. [INTERNAL LINK NEEDED: ripple crochet blanket]
- Ocean Waves Crochet Blanket by Yarnspirations: View the free blanket pattern. [INTERNAL LINK NEEDED: ocean crochet blanket]
- V-Stitch Ripple Baby Blanket: See the V-stitch variation. [INTERNAL LINK NEEDED: crochet baby blanket]
- Fan Ripple Crochet Blanket: View the fan ripple pattern. [INTERNAL LINK NEEDED: crochet shell blanket]
Conclusion
The finished design combines twelve ripple repeats, a six-color stripe sequence, optional raised bobbles, and a scalloped perimeter. Before making the full blanket, complete a gauge swatch, confirm the foundation count, and test the border on a short section. Record the actual yarn consumption so future versions can be planned more accurately.
Save this Ocean Waves Crochet Blanket Pattern to Pinterest for later reference, or share a photograph of your finished project on Instagram using #OceanWavesCrochetBlanket. Include the hook size and finished dimensions so other crocheters can compare their results.
Which color creates the clearest wave crests in your sample: ivory, turquoise, or pale blue?
Pattern References
- Yarnspirations Ocean Waves Crochet Blanket
- B.Hooked Ripple Stitch Tutorial
- Clover Ripple Stitch Instructions
- Ravelry Ocean Waves Crochet Blanket
Editorial note: This is an original, untested pattern draft inspired by the reference photograph. Verify the stitch sequence, bobble placement, edging, gauge, and yarn requirements with a physical sample before publishing it as a tested pattern.









