Introduction
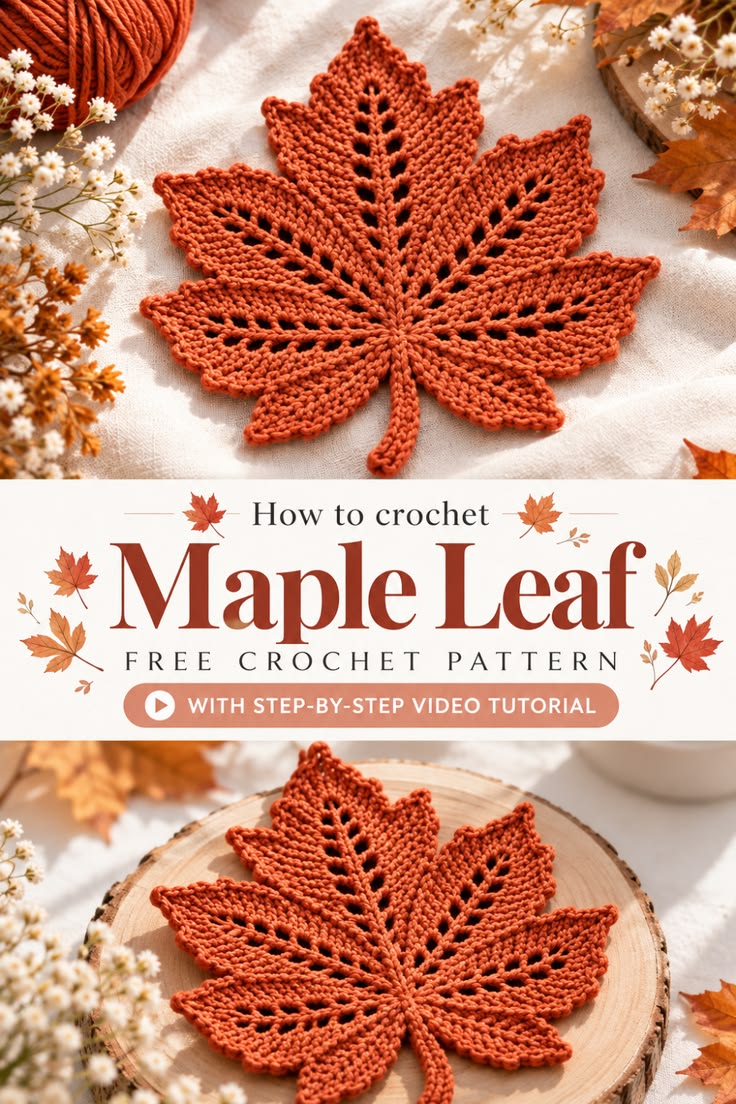
A maple leaf loses its identity when the five lobes are given equal length. This crochet maple leaf pattern uses a tall central point, two substantial side lobes, two smaller lower lobes, openwork vein lines and a narrow stem to reproduce the structure visible in the reference. Work it in burnt-orange DK or light worsted yarn with a 3.5–4.0 mm hook for an intermediate autumn motif.
The Design: What Makes This Maple Leaf Different
The leaf is built around five deliberately unequal lobes. The center lobe extends farthest from the base, the upper side lobes provide most of the width, and the two lower lobes remain shorter. That hierarchy prevents the motif from turning into a five-point star.
A second feature is the open vein running through each major lobe. Rather than embroidering every vein afterward, chain spaces are incorporated into the lobe construction to produce narrow openings that point back toward the center. Dense stitches around those openings give the fabric enough stability for blocking.
The final structural decision is the stem. It grows directly from the lower center, keeping it aligned with the longest lobe. A common failure is widening the lower lobes too aggressively; this removes the characteristic tapered maple-leaf base.
Project Info at a Glance
| Skill Level | Time | Target Size | Hook | Best For |
|---|---|---|---|---|
| Intermediate | 45–75 minutes | Approx. 15–18 cm plus stem | 3.5–4.0 mm | Table décor, garlands, appliqués and autumn displays |
Materials and Tools
Yarn
- Burnt orange / rust — DK #3 or light worsted #4 — approximately 10–20 g per leaf
Cotton or a cotton-rich blend gives the points and open veins stronger definition after blocking. Acrylic can also be used, but the final shape depends more heavily on tension and finishing.
Tools
- 3.5–4.0 mm crochet hook
- Yarn needle
- Scissors
- Stitch markers
- Blocking mat
- Rust-resistant pins
- Tape measure
Abbreviations
- ch — chain
- sl st — slip stitch
- sc — single crochet
- hdc — half double crochet
- dc — double crochet
- tr — treble crochet
- dtr — double treble crochet
- sp — space
- st/sts — stitch/stitches
- RS — right side
- FO — fasten off
Pattern — Step by Step
This is an original photo-inspired construction using standard crochet leaf-shaping techniques. The five lobes are worked from a compact central base and then refined with a continuous edging.
Central Base
With burnt-orange yarn, ch 4.
Sl st into the first chain to form a small ring.
Round 1: Ch 1, work 10 sc into the ring. Sl st to the first sc. (10 sc)
Place markers so the 10 stitches can be divided into five attachment zones around the ring.
Center Lobe
The center lobe is the longest section of the leaf.
Join yarn at the upper attachment point.
Ch 16.
First Side
Starting in the second ch from the hook, work:
sl st, sc, hdc, dc, dc, tr, tr.
Ch 2, skip 1 foundation ch.
Continue:
tr, tr, dc, dc, hdc, sc, sl st.
Sl st into the central base.
The ch-2 opening forms the first section of the center vein.
Second Side
Rotate the work and crochet into the unused loops on the opposite side of the foundation chain.
Work the stitch heights in reverse order so the lobe remains balanced:
sl st, sc, hdc, dc, dc, tr.
Work around the vein opening without closing it.
Continue toward the point with:
tr, dc, dc, hdc, sc, sl st.
At the tip work:
ch 2, sl st into the first ch
to create a compact point.
FO if working each lobe separately, or sl st back toward the center if continuing directly.
Right Upper Lobe
Join at the next attachment zone clockwise from the center lobe.
Ch 13.
Starting in the second chain from the hook, work:
sl st, sc, hdc, dc, tr.
Ch 2, skip 1 chain.
Continue:
tr, dc, dc, hdc, sc, sl st.
Work around the opposite side of the foundation chain using corresponding stitch heights.
Make a small ch-2 point at the outer tip.
Return to the central base.
Left Upper Lobe
Repeat the right upper lobe at the corresponding attachment point on the opposite side.
Keep both upper lobes within approximately 5 mm of the same length.
Do not pull the foundation chains tightly; unequal chain tension is one of the main causes of asymmetric leaves.
Right Lower Lobe
Join at the lower-right attachment point.
Ch 10.
Starting in the second chain from the hook, work:
sl st, sc, hdc, dc.
Ch 2, skip 1 chain.
Continue:
dc, hdc, sc, sl st.
Work back along the opposite side with corresponding stitches.
Add a small ch-2 point at the tip.
Return to the center.
Left Lower Lobe
Repeat the lower-right lobe on the opposite side.
The two lower lobes should remain visibly smaller than the upper pair.
They should also angle downward slightly rather than extending horizontally.
Checking the Five-Lobe Structure
Place the unfinished leaf flat.
The lobe hierarchy should read:
Small → Medium → Large Center → Medium → Small.
The center lobe must remain the longest.
Both upper side lobes should provide most of the leaf’s horizontal width.
The lower lobes should taper toward the stem area.
Adding the Stem
Join yarn at the lower center of the base.
Ch 13.
Starting in the second chain from the hook, sl st in each chain back toward the leaf.
For a slightly thicker stem, turn and work one sc into each unused foundation loop back toward the stem tip.
Sl st into the final stitch.
FO.
Longer Stem Option
For table decorations or garlands, begin with ch 16–18 instead.
Keep the stem narrow. Increasing its width too much makes the lower portion of the leaf visually heavy.
Continuous Outer Edging
Join burnt orange at the base beside the stem.
Work sc evenly along the edge of the first lower lobe.
At its point work:
(sc, ch 2, sc).
Continue toward the valley between the lower and upper lobes.
Shaping the Valleys
At each deep valley between lobes, work one sl st into the lowest available stitch.
If the valley remains too shallow, use:
sl st, ch 1, sl st
around the lowest attachment point.
Do not add multiple stitches inside the valley because extra fabric rounds off the separation between lobes.
Edging the Upper Side Lobes
Continue with sc along the first upper lobe.
At the tip work:
(sc, ch 2, sc).
Work down toward the center-lobe valley.
Use one tight sl st at the deepest point.
Edging the Center Lobe
Work sc evenly toward the top.
At the center point work:
(sc, ch 3, sl st in second ch from hook, sc).
This creates a slightly longer point than those used on the side lobes.
Continue down the opposite edge.
Complete the Opposite Side
Repeat the same edging sequence across the remaining upper and lower lobes.
Keep the valleys narrow.
Finish at the stem base and join with a sl st.
FO.
Creating the Open Center Vein
The center lobe already contains a line of chain-space openings.
To extend the vein toward the leaf base, join yarn near the lower center.
Ch 2.
Sl st into the next structural point along the center line.
Repeat:
ch 2, sl st into the next center point.
Stop before reaching the top point.
FO.
Side Veins
Repeat the same principle inside the two upper side lobes.
Use shorter ch-1 or ch-2 spaces depending on the distance between attachment points.
Keep the openings aligned toward the central base.
The side veins should terminate before the outermost point.
Lower-Lobe Veins
The smaller lower lobes require fewer openings.
Two or three open sections are usually sufficient.
Adding too many chain spaces weakens these smaller lobes and makes their edges curl.
Optional Raised Veins
For stronger definition, add surface crochet beside the openwork vein.
Insert the hook from the front of the leaf.
Bring up a loop of burnt-orange yarn near the base.
Work relaxed surface sl sts along the center line toward the upper point.
FO before reaching the pointed edging.
Surface Veins for the Side Lobes
Begin near the center of the leaf.
Work surface sl sts toward the right upper lobe.
Repeat toward the left upper lobe.
Keep the stitches relaxed enough that the leaf remains flat.
Target Finished Size
With DK yarn and a 3.5 mm hook, target approximately 15–17 cm from the top point to the leaf base, excluding the stem.
Light worsted or worsted yarn with a 4.0 mm hook can produce a larger motif around 17–20 cm, depending on tension.
Exact size is less important than keeping the five lobes proportional.
Width-to-Height Check
Measure from the tip of the left upper lobe to the tip of the right upper lobe.
Compare this with the distance from the center point to the base.
The reference leaf is broad but still has a dominant vertical center lobe.
If the width greatly exceeds the height, the side lobes are too long.
Blocking the Maple Leaf
Place the completed motif on a blocking mat.
Pin the central point first.
Next pin the two upper side points.
Pin the two lower points last.
Do not stretch the stem yet.
Blocking the Valleys
Place one pin into each valley between lobes.
Pull the valley slightly toward the center rather than outward.
This increases the visual separation between adjacent lobes.
Adjust the openwork veins so they form clean lines toward the center.
Blocking the Stem
Align the stem with the center lobe.
Pin the stem tip last.
A slight natural curve is acceptable, but an accidental sharp bend should be corrected while the motif is damp.
Using Cotton Yarn
Cotton is a practical choice for placemats, table decorations and appliqués because the points respond well to wet blocking.
Use a hook that creates dense fabric without making the stitches rigid.
For DK cotton, begin testing around 3.5 mm.
Using Worsted Yarn
Worsted #4 yarn produces a larger leaf with stronger visual texture.
Begin around 4.0 mm.
If the fabric becomes loose enough that the veins lose definition, move down one hook size.
Small Maple Leaf Version
To make a smaller motif, reduce each lobe foundation proportionally:
- Center lobe: ch 12
- Upper lobes: ch 10 each
- Lower lobes: ch 8 each
- Stem: ch 10
Use DK yarn with approximately a 3.0–3.5 mm hook.
Large Maple Leaf Version
For a centerpiece-sized motif, use worsted yarn and increase the foundations:
- Center lobe: ch 20
- Upper lobes: ch 16 each
- Lower lobes: ch 12 each
- Stem: ch 16
Redistribute the stitch heights gradually rather than simply filling every extra chain with dc.
Autumn Color Variations
The same construction can be repeated in several colors:
- Burnt orange — closest to the reference
- Deep burgundy — dark autumn version
- Mustard gold — high-contrast table décor
- Olive green — early-season leaf
- Rust brown — neutral autumn arrangement
- Brick red — garland accent
Two-Tone Maple Leaf
Work all five lobes in burnt orange.
Use dark brown or burgundy for the surface veins and stem.
Keep the final outer edging in the main orange color so the silhouette remains continuous.
Contrast Edge Version
Complete the entire leaf in burnt orange.
Work the final outer sc edging in dark rust.
Use the contrast color only once around the perimeter; multiple rounds make the points too rounded.
Maple Leaf Coaster Version
Use cotton yarn.
Keep the motif approximately 13–15 cm wide.
Omit bulky raised surface veins if cups need to sit directly on the leaf.
Block firmly so all five lobes remain flat.
Maple Leaf Placemat Version
Use worsted cotton and a larger hook.
Target approximately 25–30 cm across.
Additional rows can be added inside each lobe, but maintain the same hierarchy between center, upper and lower sections.
Maple Leaf Garland
Make multiple leaves in rust, mustard, burgundy, olive and cream.
Block every motif before joining.
Chain a cord to the required length.
Attach each leaf through the stem base rather than through a pointed lobe.
Leave approximately 8–12 cm between motifs.
Autumn Table Runner
Make leaves in two or three sizes.
Arrange the large motifs along the center line of the table.
Place smaller leaves between them at alternating angles.
Sew only at overlapping edges so the individual maple silhouettes remain visible.
Wreath Application
Block the leaves more firmly than motifs intended for a blanket.
Attach each leaf near its center and stem base.
Leave the pointed lobes free so they project from the wreath rather than lying completely flat.
Appliqué Application
For bags, cushions or blankets, sew around the central body first.
Add one anchoring stitch approximately 1 cm below each lobe point.
Do not sew directly through every outer edging stitch unless a completely flat appliqué is required.
Correcting a Rounded Center Point
If the top lobe looks rounded, remove the edging at its tip.
Replace the existing tip with:
(sc, ch 3, sl st in second ch from hook, sc).
Block the point vertically after finishing.
Correcting Weak Valleys
If two lobes merge visually, tighten the valley.
Work one sl st at its lowest point and avoid increases there.
During blocking, pin the valley approximately 5–10 mm inward toward the leaf center.
Correcting Curling Lobes
Curling usually indicates excessive edge tension or insufficient stitches around the lobe perimeter.
Lay the leaf flat before adding more stitches.
If the center lies flat but only one lobe curls, add one or two evenly distributed sc along that lobe edge rather than altering the complete motif.
Correcting Wavy Edges
Waves indicate excess fabric.
Remove the outer edging from the affected area.
Skip an occasional edge position when replacing the sc round.
Do not attempt to force severe waves flat with blocking alone.
Assembly and Finishing
- Complete the central base and mark five evenly distributed lobe attachment areas before beginning the shaped sections.
- Make the center lobe first and confirm that it remains longer than every other point before continuing.
- Work the two upper side lobes and compare their lengths, keeping the difference within approximately 5 mm.
- Add the two smaller lower lobes and check that they taper toward the stem rather than widening the base excessively.
- Crochet the narrow stem directly from the lower center and align it visually with the center lobe.
- Work the continuous outer edging, using compact slip stitches in the valleys and pointed chain details at the five tips.
- Add or refine the openwork center and side veins without filling the chain spaces that create the characteristic leaf structure.
- Weave each yarn tail through at least 4–5 cm of dense crochet on the wrong side rather than carrying it across an open vein.
- Block the five points and four valleys individually, then align the stem after the main body has reached the required shape.
- Allow the motif to dry completely before removing the pins and measure the finished leaf before producing additional matching pieces.
The finished motif should show five clearly separated points, a dominant center lobe, graduated side lobes, visible openwork veins and a narrow stem aligned with the central axis.
7 Technical Tips
- Keep the upper side lobes within approximately 5 mm of one another. A larger difference shifts the apparent center line even when the stem and top point are correctly aligned.
- Make the center lobe at least 15–20% longer than the lower lobes. Equal-length points produce a star-like outline instead of a maple-leaf silhouette.
- Use only one compact slip stitch at each deep valley. Extra stitches there fill the notch and visually merge neighboring lobes.
- Keep surface slip stitches relaxed. Tight raised veins shorten the center line and cause the leaf body to cup upward after blocking.
- Pin every point and every valley separately. Pinning only the five outer tips leaves the inner notches rounded and weakens the maple shape.
- Keep the stem approximately 4–6 mm wide on a medium leaf. A much wider stem makes the lower lobes appear undersized and changes the overall proportions.
- Weave tails through 4–5 cm of dense fabric. Do not carry a yarn end across an open vein because it will remain visible from the right side.
Care and Final Blocking
Follow the care instructions for the selected yarn. Cotton leaves can usually be damp-blocked effectively, while acrylic requires finishing appropriate to that fiber.
Lay the motif flat and establish the center axis from the top point through the stem. Shape the upper lobes next, followed by the smaller lower pair.
Pin the four valleys inward enough to separate the lobes without stretching the center ring. Arrange the vein openings in straight or gently angled lines. Allow the leaf to dry completely before removing the pins.
Conclusion
The proportions matter more than the number of decorative stitches in a crochet maple leaf pattern. Keep the central lobe longest, graduate the side lobes downward, preserve narrow valleys and use the open chain spaces to direct every vein toward the base. Start with one burnt-orange sample and block it before changing hook size or producing a full set. Once the proportions are established, repeat the motif in mustard, burgundy, olive and rust for a coordinated autumn display. Save the finished leaf to Pinterest or share it on Instagram with #BurntOrangeMapleLeaf. Your next practical step is to make the center and first upper lobe, then compare their lengths before completing the opposite side.









