Introduction
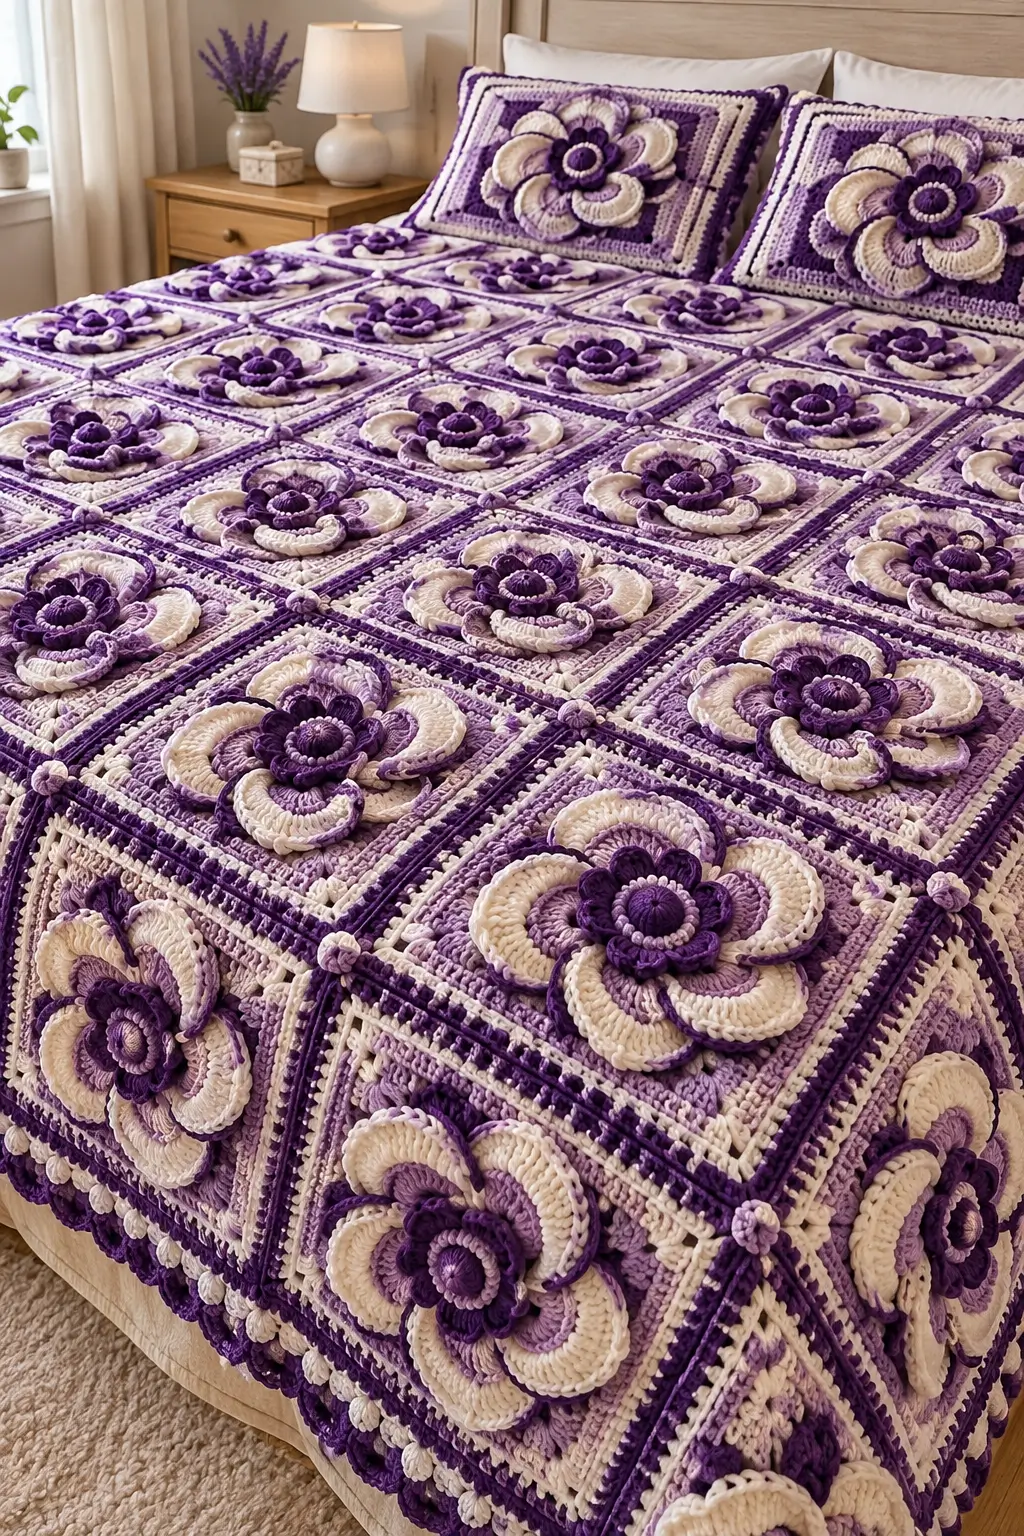
The oversized cream petals in this flower must curve above the lavender square without becoming part of its joining seam. This purple 3D flower granny square crochet bedspread pattern uses plum, lavender and ivory yarn to build a dimensional bloom over a separate structural square. With worsted-weight yarn and a 5.0 mm hook, the design can be repeated for a full bedspread and coordinated floral pillow shams.
The Design: Building Dimension Without Distorting the Square
The photographed block combines a dark plum center, a ring of smaller purple petals, broad ivory outer petals, lavender background rounds and contrasting cream-and-purple framing. The flower projects substantially above the square, so the decorative layers should not carry joining tension.
The construction below treats the bloom and background as related but structurally independent sections. Petals are attached inside the square, while the outer 2 cm of each block remains relatively flat for joining. Raised flower granny squares are commonly used for blankets and cushions, and published dimensional examples range from approximately 11.5 cm to 15 cm depending on construction. This photo-inspired version targets a larger 20–22 cm square to reproduce the oversized bedspread proportions.
Project Info at a Glance
| Skill Level | Construction | Target Square | Hook | Best For |
|---|---|---|---|---|
| Intermediate–Advanced | Layered flower over structural square | 20–22 cm | 5.0 mm | Bedspreads, throws and pillow shams |
Materials and Tools
Yarn
- Deep plum — worsted #4 — flower centers, inner petals and accent edging
- Medium purple — worsted #4 — secondary petals and frame details
- Light lavender — worsted #4 — flower accents and square background
- Warm ivory — worsted #4 — large outer petals and frame contrast
Use yarns from the same range when possible. Significant differences in fiber, twist or elasticity can make identical stitch counts produce different square dimensions.
Tools
- 5.0 mm crochet hook
- 4.5 mm crochet hook for firmer dimensional petals if required
- Yarn needle
- Scissors
- Stitch markers
- Tape measure
- Blocking mats and pins
- Digital scale for yarn calculations
Abbreviations
- MR — magic ring
- ch — chain
- sl st — slip stitch
- sc — single crochet
- hdc — half double crochet
- dc — double crochet
- tr — treble crochet
- BLO — back loop only
- FLO — front loop only
- sp — space
- st/sts — stitch/stitches
- FO — fasten off
Pattern — Purple Dimensional Flower Square
This is an original construction inspired by the visible structure of the photographed bedspread rather than a transcription of a published pattern. Complete and block one master square before making the remaining motifs.
Flower Center
With light lavender, make a MR.
Round 1
Ch 2.
Work 12 hdc into the ring.
Join with sl st. (12)
Round 2
Change to deep plum.
Ch 1.
Work 2 sc in every stitch around.
Join. (24)
Round 3 — Raised Center Ridge
Work this round in BLO.
Ch 1.
Sc in every stitch around. (24)
Join.
Working BLO leaves a visible unused front loop around the center. That line will support the first petal layer.
Inner Plum Petals — Make 8 Around the Center
Join deep plum to one of the unused front loops from Round 3.
Work:
ch 4, 2 tr in the same loop, 2 tr in the next loop, ch 4, sl st in the same loop.
Sl st into the next unused loop.
Repeat around, spacing 8 petals evenly.
FO.
The first petal ring should stand close to the center rather than lying completely flat.
Medium Lavender Petals — Make 8
Join medium purple behind the first petal layer.
For each petal work:
ch 5, 2 dc, 3 tr, 2 dc, ch 5, sl st
across the allocated attachment area.
Repeat eight times.
Offset each medium petal so its center appears between two inner plum petals.
FO.
Large Ivory Petals — Make 8 Separately
The outer petals are made separately because their size and curvature create most of the flower’s visible relief.
With ivory yarn, ch 13.
Starting in the second chain from the hook work:
sc, hdc, 2 dc, 5 tr, 2 dc, hdc.
Work 5 sc into the final chain.
Rotate the work.
Along the unused side of the foundation chain work:
hdc, 2 dc, 5 tr, 2 dc, hdc, sc.
Join at the base.
FO leaving a 25–30 cm sewing tail.
Make eight.
Ivory Petal Edge
For the contrasting outline visible around the large petals, join medium purple at the base of one ivory petal.
Work loose sl sts around the complete outer edge.
At the petal tip work:
(sl st, ch 1, sl st).
Continue down the opposite side.
FO.
Repeat on all eight ivory petals.
Shaping the Large Petals
Place each petal on a blocking mat.
Pin the base.
Curve the two sides outward.
Do not stretch the petal completely flat.
The finished petal should retain a shallow cup after drying.
This controlled curvature creates the overlapping appearance of the flower without stuffing.
Lavender Structural Square
With light lavender, make a MR.
Round 1
Ch 3, counting as the first dc.
Work 2 dc, ch 3.
Then work:
(3 dc, ch 3) ×3.
Join.
You now have four 3-dc groups and four corners.
Round 2
Sl st into the first corner.
Work:
(3 dc, ch 2, 3 dc)
in the corner.
Ch 1.
Repeat in every corner.
Join.
Round 3
Work:
(3 dc, ch 2, 3 dc)
in each corner.
Work 3 dc in each side ch-1 space.
Ch 1 between groups.
Join.
Round 4
Continue the same granny-square expansion.
Keep (3 dc, ch 2, 3 dc) at each corner and one 3-dc group in every side space.
Join.
Round 5
Repeat the established expansion.
Check the square against the flower components.
The large ivory petals should fit inside the perimeter without covering the future joining edge.
First Ivory Frame
Round 6
Change to ivory.
Ch 1.
Sc in every stitch and chain space.
At each corner work:
(2 sc, ch 2, 2 sc).
Join.
Round 7 — Openwork
Ch 1.
Sc in the first stitch.
Work:
ch 2, skip 1 st, sc in next st.
Repeat across each side.
At every corner work:
(sc, ch 3, sc).
Join.
Purple Accent Frame
Round 8
Change to deep plum.
Work 2 hdc into every ch-2 space.
At each corner ch-3 space work:
(2 hdc, ch 2, 2 hdc).
Join.
Round 9
Change to medium purple.
Ch 1.
Sc in each stitch.
At each corner work:
(sc, ch 2, sc).
Join.
Final Ivory Structural Frame
Round 10
Change to ivory.
Hdc in every stitch.
At each corner work:
(2 hdc, ch 2, 2 hdc).
Join.
Round 11
Ch 1.
Sc in every stitch.
At each corner work:
(sc, ch 2, sc).
Join and FO.
Adjusting the Square to 20–22 cm
Measure the block after Round 11.
If it is smaller than the target measurement, add another hdc round followed by one sc round.
Maintain the same corner formula.
Do not enlarge the square by stretching the chain spaces during blocking.
Blocking the Structural Square
Block the background before attaching the flower.
Pin all four corners first.
Measure the horizontal and vertical dimensions.
Measure both diagonals.
Keep the diagonal difference within approximately 5 mm.
Pin the side midpoints only after the basic geometry is correct.
Arranging the Eight Ivory Petals
Position the petals around the center.
The narrow bases point inward.
Overlap neighboring petals slightly.
Keep each outer petal tip approximately 1.5–2 cm away from the structural edge.
Pin all eight petals before sewing any of them.
Attaching the Ivory Petals
Using the long sewing tail, secure only the lower 2–3 cm of each petal.
Add one small anchoring stitch near each side of the petal if necessary.
Leave the upper half free.
This allows the ivory layer to lift above the lavender background.
Attaching the Purple Flower Center
Place the layered purple flower over the bases of the ivory petals.
Measure from the flower center to all four corners.
Adjust until centered.
Sew through the foundation of the flower and the lavender background.
Do not sew through the tips of the plum or medium-purple petals.
Optional Raised Center Ring
The reference shows a pronounced circular detail around the flower center.
With ivory yarn, make a chain long enough to wrap around the inner plum center.
Join the chain into a ring.
Work one round of sc around the chain ring.
FO leaving a sewing tail.
Place the small ring around the center and stitch it down at four evenly spaced points.
Optional Center Button Motif
For a fully crocheted center instead of a raised ring, make a MR with lavender.
Work 12 hdc into the ring.
Join.
Change to ivory and work one surface-sl-st circle near the edge.
Sew the disk over the central opening.
Checking Flower Relief
Place the finished square on a flat table.
The structural frame should remain in contact with the surface.
The flower may rise approximately 2–4 cm above it.
If the corners lift, one or more petal attachment stitches are too tight.
Making the Master Square
Finish one complete square before producing the remaining blocks.
Record:
- Blocked square width
- Blocked square height
- Diagonal measurements
- Flower diameter
- Flower height
- Total square weight
Use these measurements as production specifications for the remaining motifs.
Planning the Bedspread
If the blocked master square measures 21 cm, example layouts are:
| Grid | Number of Squares | Approximate Size Before Border |
|---|---|---|
| 5 × 6 | 30 | 105 × 126 cm |
| 6 × 8 | 48 | 126 × 168 cm |
| 8 × 10 | 80 | 168 × 210 cm |
| 9 × 11 | 99 | 189 × 231 cm |
| 10 × 12 | 120 | 210 × 252 cm |
Add the outer border measurement separately. For a bedspread that drops over the sides and foot of the mattress, include that drop when choosing the final grid.
Estimating Yarn
Weigh one completed master square.
Suppose it weighs 85 g.
For an 80-square bedspread:
85 g × 80 = 6,800 g
This figure covers the example motifs only.
Add the yarn required for joining and the outer border, then add approximately 10% for gauge variation, sampling and repairs.
Replace the 85 g example with the actual weight of your finished master square.
Calculating Yarn by Color
For a more useful estimate, weigh each yarn ball before and after making one complete block.
For example, suppose a square consumes:
- Deep plum — 20 g
- Medium purple — 18 g
- Light lavender — 22 g
- Ivory — 25 g
For 80 squares, the sample calculation becomes:
Deep plum: 1,600 g
Medium purple: 1,440 g
Light lavender: 1,760 g
Ivory: 2,000 g plus joining and border
These numbers demonstrate the calculation method and are not fixed yarn requirements.
Bedspread Layout
Place every blocked square on a large flat surface before joining.
Orient the petals consistently.
Check that the deep-plum centers create straight horizontal and vertical lines.
Also inspect the alternating ivory and purple frame rounds.
A rotated square can interrupt the frame pattern even when the flower itself appears symmetrical.
Flat Slip-Stitch Join
Use ivory or deep plum depending on the seam effect you want.
Place two squares side by side with right sides facing upward.
Insert the hook through corresponding edge loops.
Work loose slip stitches along the seam.
Open the joined squares after every 5–7 cm.
The seam should lie flat without forming a ridge that pulls the flower blocks together.
Decorative Purple Join
For the stronger grid effect shown in the reference, use deep plum.
Join matching edge loops with slip stitches.
At each four-square intersection, work one small decorative knot or bobble.
Keep the embellishment compact so it does not become thicker than the surrounding flowers.
Small Intersection Bobble
At a four-square intersection, join medium purple.
Ch 2.
Work 4 incomplete dc into the intersection.
Yarn over and pull through all loops.
Ch 1 to close.
FO and secure the tails beneath the joining seam.
Joining Complete Rows
Join the squares into horizontal rows first.
Measure each completed row.
Rows containing the same number of squares should differ by no more than approximately 1 cm.
Join the horizontal rows vertically only after correcting any larger difference.
Outer Border — Foundation Round
Join ivory yarn at one corner.
Work sc evenly around the complete bedspread.
At each corner work:
(2 sc, ch 2, 2 sc).
Join.
Border Round 2 — Plum Stripe
Change to deep plum.
Hdc in every stitch.
At each corner work:
(2 hdc, ch 2, 2 hdc).
Join.
Border Round 3 — Ivory Openwork
Change to ivory.
Sc in the first stitch.
Work:
ch 3, skip 2 sts, sc in next st.
Repeat around.
At each corner work one larger ch-5 space.
Border Round 4 — Lavender Fans
Change to light lavender.
In each ch-3 space work:
(sc, hdc, 3 dc, hdc, sc).
At the corners work:
(sc, hdc, 5 dc, hdc, sc).
Border Round 5 — Deep Plum Scallops
Change to deep plum.
Work sc between adjacent lavender fans.
At the center of each fan work:
5 dc.
Use 7 dc in the larger corner scallops.
Continue around and FO.
Optional Bobble Border
The lower edge of the photographed bedspread includes small raised details between larger scallops.
For a similar effect, add a bobble between selected scallops.
Work five incomplete dc into one stitch.
Yarn over and pull through all loops.
Ch 1.
Continue to the next scallop.
Matching Floral Pillow Sham
The pillow design enlarges the same dimensional flower rather than changing to an unrelated motif.
Make one structural square and continue the lavender, ivory and purple frame rounds until the panel reaches the required pillow dimensions.
For a standard decorative pillow, a finished front around 45–50 cm square works well.
Enlarging the Pillow Flower
Increase the ivory outer petal foundation from ch 13 to approximately ch 16.
Distribute the additional length through the tr section.
Make eight enlarged petals.
Arrange them around the standard layered purple center.
Block the petal ring before attaching it to the pillow background.
Rectangular Pillow Option
For a rectangular sham, make two or three smaller flower blocks.
Join them horizontally.
Add framing rounds around the complete rectangle until the panel reaches the pillow measurement.
Keep the purple frame sequence consistent with the bedspread.
Solid Pillow Back
With light lavender or ivory, chain to the required width.
Row 1: Hdc in the third chain from hook and across.
Row 2: Ch 2, turn, hdc across.
Repeat Row 2 until the back matches the blocked front.
FO.
Assembling the Pillow
Place the front and back with wrong sides together.
Sc through both layers around three sides.
Insert the pillow form.
Close the fourth side or add a buttoned opening.
Keep all raised petals clear of the seam.
Lower-Relief Version for Daily Use
Large dimensional flowers create substantial texture.
For a bedspread intended for frequent sleeping use, omit the medium petal ring or reduce the large ivory petals from eight to six broader petals.
Secure each ivory petal at one additional point approximately halfway toward the tip.
This limits movement while retaining the layered appearance.
Maximum-Relief Decorative Version
Use all three flower layers.
Work the flower with the 4.5 mm hook and the background with the 5.0 mm hook.
Attach only the lower third of each ivory petal.
Allow the upper sections to curve freely.
No stuffing is required.
Keeping the Joining Zone Clear
Maintain a flat area approximately 1.5–2 cm wide around the complete square.
No ivory petal should enter this area.
Do not carry flower-sewing tails into it.
The joining zone should consist primarily of structural frame stitches.
This is particularly important where four blocks meet.
Assembly
- Crochet the plum center and its first raised petal ring, then add the medium-purple layer without flattening the inner petals.
- Make eight large ivory petals, add their contrasting purple edging and block them with a shallow curved profile.
- Crochet the lavender structural square and continue the ivory, plum and purple framing rounds until it reaches the required size.
- Block the structural square to approximately 20–22 cm and keep the two diagonal measurements within about 5 mm.
- Arrange all eight ivory petals with their tips at least 1.5–2 cm inside the structural edge and sew only their lower sections.
- Center the layered purple flower over the ivory petal bases and attach through the flower foundation rather than the free petal edges.
- Complete one master square, record its measurements and weight, then make the remaining blocks to the same specifications.
- Arrange all blocked squares in the final bedspread grid and check both flower orientation and frame-strip alignment before joining.
- Join horizontal rows first, connect those rows vertically, and add any small decorative intersection bobbles after the structural seams are complete.
- Work the multi-round outer border, make the matching pillow shams, weave all tails through dense stitches and finish with light blocking.
The completed bedspread should have a flat geometric grid supporting deeply layered purple-and-ivory flowers without raised petals entering the structural seams.
7 Technical Tips
- Keep every blocked square within 5 mm of the master measurement. Repeating a 5 mm width difference across ten motifs can shift the opposite edge by approximately 5 cm.
- Reserve at least 1.5–2 cm around each square for joining. A large ivory petal entering that zone creates a thick seam and prevents neighboring blocks from lying flat.
- Keep both diagonals within approximately 5 mm. Equal side lengths alone do not detect a square that has been blocked into a diamond or parallelogram.
- Attach only the lower 2–3 cm of each large ivory petal. Sewing farther toward the tip removes the relief that distinguishes the flower from a flat appliqué.
- Check the flower center against all four corners before sewing. An offset of more than about 5 mm becomes conspicuous once the centers form long rows across the bed.
- Open a slip-stitch seam every 5–7 cm while joining. If the seam contracts the square edge, remove those stitches immediately rather than trying to correct the distortion during final blocking.
- Weave every structural tail through at least 5 cm of dense crochet. Avoid hiding ends beneath free petal edges because repeated movement can expose them.
Care and Final Blocking
Follow the care instructions supplied with the selected yarn.
Support the entire bedspread when wet. The dimensional flowers contain considerably more yarn than a flat granny-square blanket of the same dimensions.
Lay the piece flat and align the square grid first.
Shape the border second.
Arrange the dimensional petals only after the background is positioned correctly.
Avoid pressing the flowers flat. If the yarn permits steaming, keep the heat source above the fabric and reshape the ivory and purple petals by hand.
Conclusion
The success of this purple 3D flower granny square crochet bedspread pattern depends on separating decorative relief from structural joining. Make one 20–22 cm master block first, verify both diagonals, and weigh that sample before calculating yarn for the full bedspread. Keep a flat 1.5–2 cm joining zone around every motif, then attach the ivory petals only through their bases so the large flower retains its depth. Test four joined squares before producing the complete grid. Add the striped scalloped border and matching floral pillows after assembly. Save the project to Pinterest or share the finished version on Instagram with #Purple3DFlowerBedspread. Would you keep all the outer petals ivory, or alternate ivory and lavender petals?









