Introduction
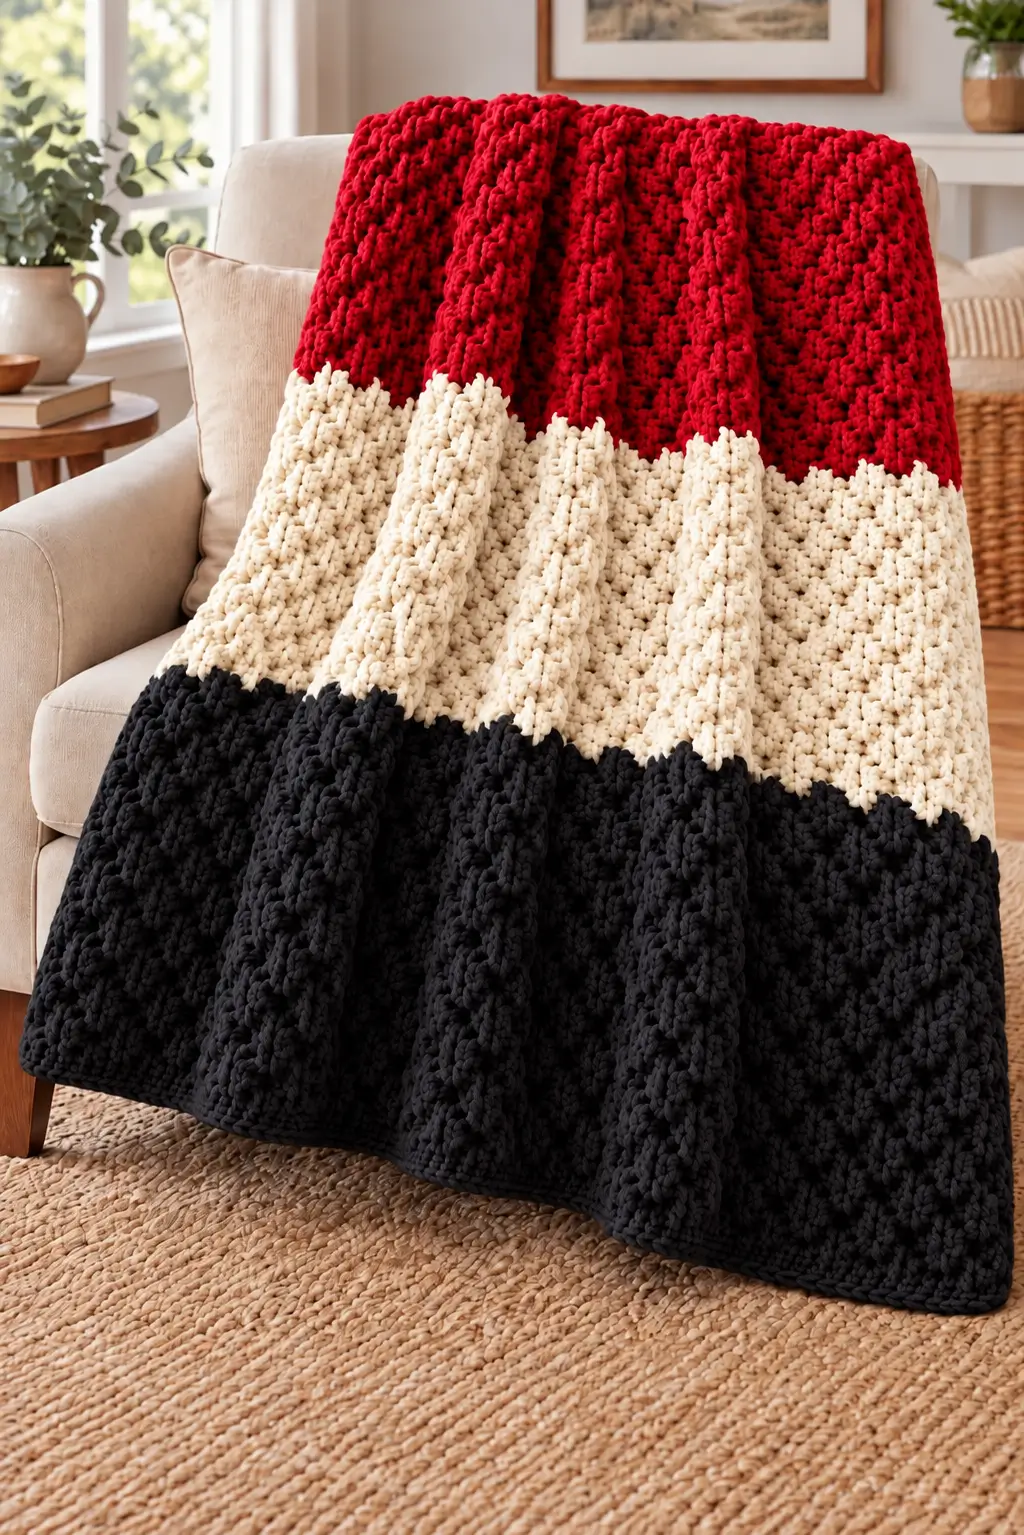
Black anchors the lower third, ivory cuts through the center, and saturated red finishes the top of this three-band throw. This chunky color block crochet blanket uses super bulky chenille yarn, an 8 mm hook, and a repeated post-stitch rib. The proposed finished size is approximately 123 × 150 cm after checking gauge. Advanced beginners who know double crochet can use the pattern to make a single-piece sofa throw without joining squares.
The Design: What Makes This Three-Color Blanket Different
Three decisions control the appearance. First, black, cream, and red bands span the full width, so each transition needs one yarn change. Second, pairs of front-post and back-post double crochet stitches create vertical relief by wrapping around the posts below rather than entering their top loops. This chunky ribbed crochet throw gains depth without separate panels. Third, half-double-crochet edge stitches prevent exaggerated side columns and provide stable finishing points. The photo shows no contrasting perimeter, so this three-color crochet blanket omits a heavy border. A common mistake is to choose post stitches solely by their appearance after turning; that can flatten ribs or shift columns. The repeat is written for turned rows and remains identical in both directions. Vertical ribs also disguise small shifts in chenille tension.
Project Info at a Glance
| Skill Level | Time | Finished Size | Hook | Best For |
|---|---|---|---|---|
| Advanced beginner / intermediate | Allow several sessions; not timed | Target ~123 × 150 cm; gauge-dependent | 8 mm | Sofa throw and textured home décor |
Sizing note: The published Bernat Here & There comparison blanket measures 137 × 157.5 cm and uses Bernat Blanket yarn. That is an independently documented reference size, not a measurement of this image or a test of the instructions below.
The 123 × 150 cm target assumes about 6 stitches and 4 rows per 10 cm in the completed rib pattern, a planning gauge that must be checked on your own swatch. By comparison, the manufacturer lists 7 single crochets and 8 single-crochet rows per 10 cm at 8 mm; that is a different stitch gauge, not a substitute for a ribbed swatch.
Materials and Tools
Yarn
Use a consistent #6 super bulky polyester chenille yarn with approximately 201 m per 300 g skein. Bernat Blanket is a documented reference brand; use comparable shades if a clear primary red or near-black is unavailable. The amounts below are purchasing allowances for the proposed version, not weights measured from the photograph.
- Charcoal black — #6 super bulky chenille — 900 g (three 300 g skeins), approximately 603 m; suggested shade family: Coal or equivalent.
- Warm cream — #6 super bulky chenille — 600 g (two skeins), approximately 402 m; suggested shade family: Vintage White or equivalent.
- Strong red — #6 super bulky chenille — 600 g (two skeins), approximately 402 m; choose a solid true-red shade from the same yarn line or a gauge-matched alternative.
Total shopping allowance: 2,100 g / approximately 1,407 m. Seven skeins allow some flexibility for this dense texture; actual usage can be lower or higher. Compare lot numbers before cutting the first skein, particularly in the cream and red bands.
Tools
- 8 mm crochet hook (US L/11), or the size needed to meet your rib-pattern swatch.
- Two locking stitch markers, one at each end of a row.
- Large-eye blunt yarn needle for chenille ends.
- Tape measure, scissors, and a kitchen scale for monitoring yarn usage.
- Smooth waste yarn for temporarily holding loops when measuring.
No stuffing, safety eyes, separate motifs, or sewing pins are required. The fabric is worked flat in one piece and turned at the end of each row.
Abbreviations
ch = chain; st/sts = stitch/stitches; dc = double crochet; hdc = half double crochet; FPdc = front-post double crochet; BPdc = back-post double crochet; sl st = slip stitch; RS = right side; WS = wrong side; rep = repeat; BLO = back loop only, not used here; sc = single crochet, optional for repair work.
For FPdc, work a double crochet around the vertical post from front to back to front; for BPdc, approach the post from the back. The turning chain on textured rows does not count as a stitch. Invisible decreases are used in three-dimensional crochet, not in this rectangular throw.
Pattern — Step by Step
Construction: Worked flat in turned rows using US crochet terms. No increases or decreases. The front-facing ribs run from the black edge, through cream, to red.
Work a 14-stitch-wide sample for at least 8 rows in the stated post-stitch repeat before making the full foundation; if its measurement differs, adjust your foundation in groups of four interior stitches.
Foundation and Black Lower Band (Rows 1–24)
Yarn: charcoal black. Counts and repeat structure are original pattern math; post-stitch technique: Knotions.
Foundation: Ch 76 loosely, without twisting the chain.
Row 1 (RS): Dc in the fourth chain from the hook and dc in each remaining chain. The three skipped chains form the first counted dc. (74 sts) Turn.
Row 2 (WS): Ch 2 (does not count), hdc in first st, [FPdc around each of next 2 sts, BPdc around each of next 2 sts] × 18, hdc in final st. (74 sts: 2 hdc + 36 FPdc + 36 BPdc) Turn.
Rows 3–24: Repeat Row 2 exactly, keeping one hdc at either edge and 18 complete four-stitch groups between them. (74 sts each row) Turn after every row, including Row 24.
Counting check: Two edge stitches plus 18 groups of four equals 2 + 72 = 74. You must still have 74 stitches after Row 24; extra turning chains are never counted. The repeated FPdc/BPdc order keeps the raised columns aligned as the blanket turns.
Shape check: Lay the bottom section flat after Row 8, then again after Row 16. If the edges bow inward sharply, the post stitches may be pulled too tight; remake the sample with a slightly larger hook rather than adding random increases.
For the pictured look, the black area is the deepest band. Finish the last black stitch of Row 24 by drawing the cream yarn through its final two loops, leaving a 15–20 cm black tail.
Cream Middle Band (Rows 25–42)
Yarn: warm cream. Color-change method follows common crochet practice; see this color-block crochet reference.
Row 25 (RS): With cream now active, ch 2, hdc in first st, [FPdc × 2, BPdc × 2] × 18 around the next 72 posts, hdc in last st. (74 sts) Turn.
Rows 26–42: Repeat Row 25. (74 sts each row) Turn after each row.
The cream posts are built around black posts in Row 25, so a fine dark line can remain visible along one side of the color junction. This is normal for post-stitch construction.
To minimize the effect, keep the new yarn behind the work until its first turning chain is formed and avoid stranding black across the back of the cream stitches.
Band check: Eighteen cream rows should form a continuous center strip without a vertical seam. Count from the first full cream row rather than from the change in the final loop of Row 24.
Measure both outside edges before changing to red; if one edge has an extra row, correct it now. On the final hdc of Row 42, pull red through the last two loops and leave a 15–20 cm cream tail.
Red Upper Band (Rows 43–60)
Yarn: solid red. Post-stitch placement follows the documented FPdc/BPdc rib method.
Row 43 (RS): Ch 2 with red, hdc in first st, [FPdc × 2, BPdc × 2] × 18, hdc in last st. (74 sts) Turn.
Rows 44–59: Repeat Row 43, turning after each row. (74 sts each row)
Row 60: Repeat Row 43 one final time. (74 sts) Fasten off, leaving a 20 cm tail for weaving through the red edge.
This band finishes the upper edge with the same two stable hdc edge stitches used throughout. The final row should not flare beyond the width of the black foundation.
If it does, compare the tension of the red yarn against the original swatch; different dye shades can behave differently, even in the same yarn line.
There are 24 black rows, 18 cream rows, and 18 red rows, for a total of 60 rows and 74 stitches per row.
Optional Edge Treatment (Not Shown)
Yarn: matching color along each band; optional method, not required by the image.
The photo suggests a clean edge without a separate border. For a more controlled finish, work one sl st loosely into each visible row-end along the sides, changing colors where the bands meet; do not add stitches across the top and bottom edges.
Count the side placements by row, with 60 positions on each long edge, and keep the slip stitches relaxed. This edge treatment is optional because tight slip stitches can contract the fabric. Fasten off with a 20 cm tail after the final side.
Assembly and Finishing — 10 Steps
- Place the blanket on a clean, flat surface with the raised rib face upward and black at the bottom.
- Verify that the foundation edge and final red edge each contain 74 stitches, counting the original chain-3 edge correctly.
- Count the bands separately: 24 black rows, 18 cream rows, and 18 red rows.
- Measure the top and bottom widths; a difference greater than 3 cm indicates edge tension that needs review.
- Check both long edges from corner to corner before trimming any loose tails.
- Thread the black tail through a blunt yarn needle and weave it through the back of at least 8–10 cm of matching stitches.
- Reverse the needle direction through another nearby path so the chenille tail is less likely to slip free.
- Repeat the same weaving method with the cream and red color-change tails, keeping each tail inside its own color band.
- Lay the fabric flat to check that the cream-to-red and black-to-cream lines span the full width without puckering.
- Follow the yarn label’s wash and drying instructions; if washing before use, check the finished measurements again afterward.
The completed project is one ribbed rectangle with three horizontal blocks and no sewn joins.
7 Technical Tips
- Stitch-marker drift: Move a marker at the first and last stitch of every fourth row. A misplaced edge marker can disguise a 73- or 75-stitch row until several rows later.
- Rib contraction: Post stitches may draw the panel inward compared with an ordinary dc foundation. Compare the width at Rows 1, 8, and 16 and investigate any change exceeding 3 cm.
- Turning-chain inflation: Ch 2 at the start of each textured row is a height adjustment, not stitch 75. Counting it creates extra edge stitches and a visibly slanted side.
- Color bleeding at transitions: A black post can show through the first cream row if the yarn is pulled thin. Keep the cream loops relaxed and test the boundary on your swatch before working all 74 stitches.
- Chenille tension: A sharp tug on fuzzy yarn can strip or loosen its pile. Pull through individual loops gently, and test a larger hook if repeated posts resist movement.
- Uneven band lengths: Missing one cream row shifts the color junction by approximately one quarter of a 4-row, 10 cm target gauge. Record Rows 24, 42, and 60 on a counter before beginning each band.
- Tail security: Short chenille ends can work loose after laundering. Leave 15–20 cm tails at each color change and weave them through a reversing 8–10 cm path.
Conclusion
Before treating the measurements as final, crochet the full ribbed swatch, wash it according to the selected yarn label, and recalculate the foundation if the width differs from the target. The main structural checks are a constant 74-stitch row count, equal-length outside edges, and aligned vertical columns across two yarn changes. Save this chunky color block crochet blanket pattern to Pinterest with the red, cream, and black color order visible, or share a finished photo on Instagram using #RedCreamBlackBlanket. For the next sample, test the cream section at both 16 and 18 rows to compare how the middle band changes the proportions. Which cream-band width more closely matches the original photograph?