Introduction
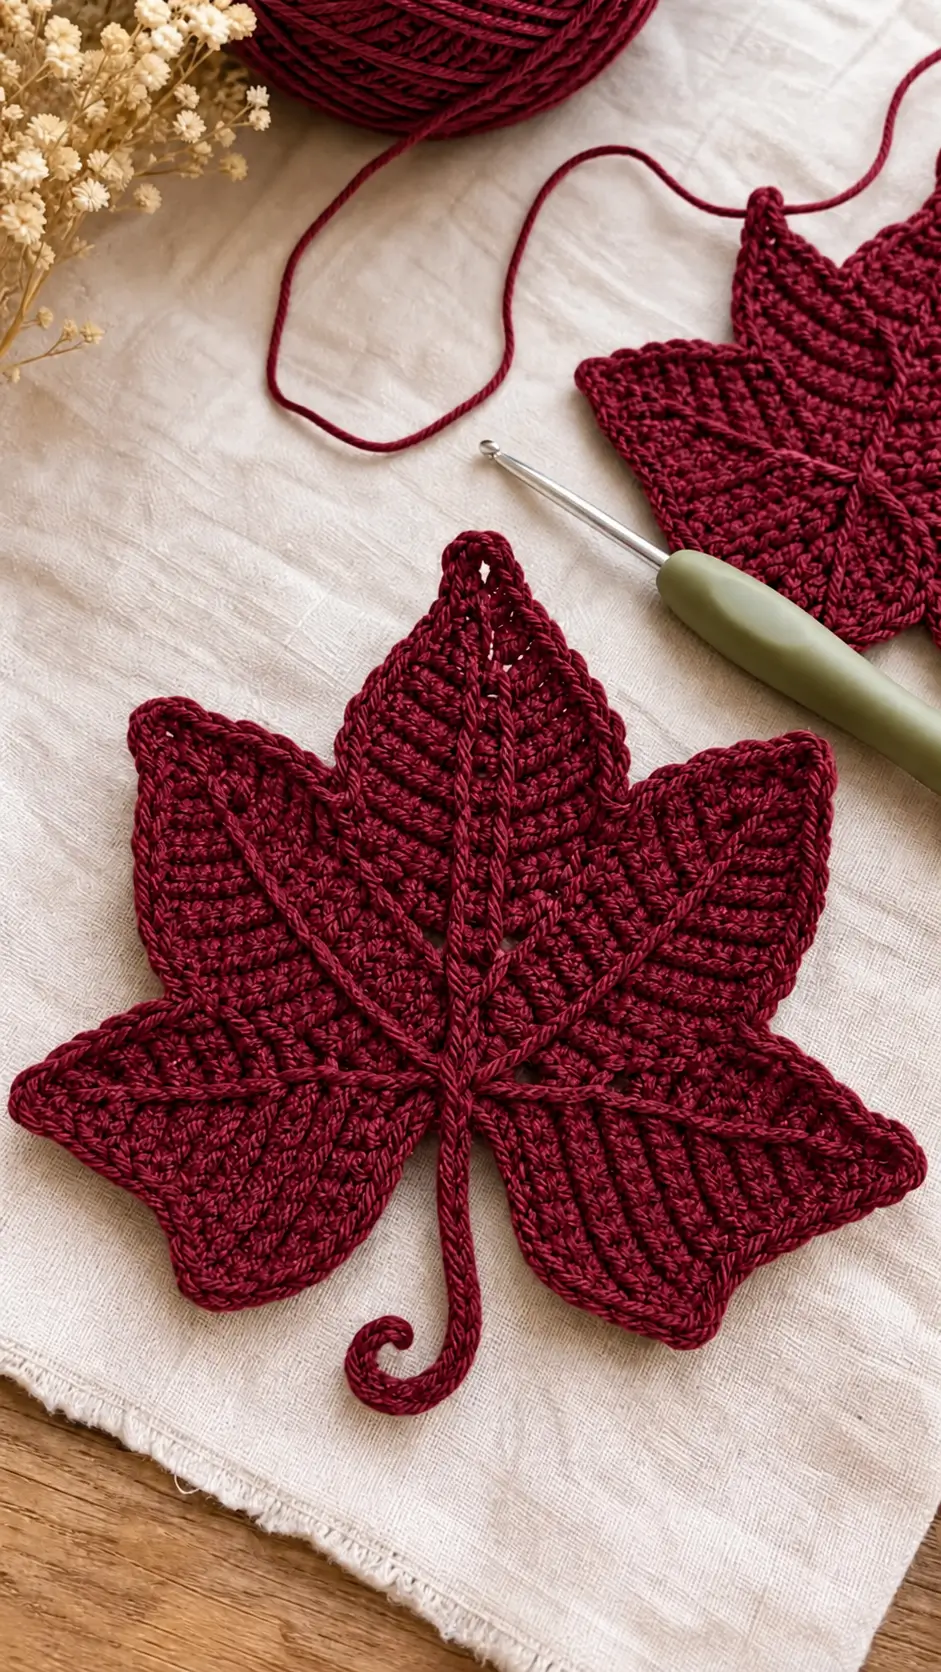
Five lobes are not enough here; the long center point and curled stem have to share one continuous visual axis. This burgundy crochet maple leaf pattern recreates the photographed motif with broad shaped lobes, deep valleys and raised same-color veins. Use smooth worsted cotton with a 3.5 mm hook for a structured decorative leaf approximately 20–25 cm across. The construction is best suited to intermediate crochet skills.
The Design: What Makes This Maple Leaf Different
The photographed leaf uses five substantial lobes rather than a ring of small decorative points. Its center lobe is tallest, two upper side lobes angle outward, and two broad lower lobes create most of the width. That proportion matters because equal lobes would produce a star instead of a maple silhouette.
The second structural decision is the vein system. A thick central ridge runs from the stem toward the top point, with four diagonal ribs branching toward the side lobes. Working those ribs as relaxed surface slip stitches gives the leaf the dimensional texture visible in the image without introducing a second color. A crochet maple leaf with raised veins must be blocked after the veins are added. Tight surface stitches are the main failure mode: they shorten the fabric and make the lobes cup.
Project Info at a Glance
| Skill Level | Construction | Target Size | Hook | Best For |
|---|---|---|---|---|
| Intermediate | Five shaped lobes with surface veins | Approx. 20–25 cm | 3.5 mm | Table decor, placemats, wall decor and autumn displays |
Published maple-leaf patterns demonstrate a wide scale range. Sport-weight versions can measure about 11.4 × 5 cm, while a worsted-weight design using a 3.5 mm hook is approximately 25.5 × 23 cm. The larger reference is a useful scale target for the substantial motif shown in the photograph.
Materials and Tools
Yarn
- Deep burgundy — worsted weight #4 cotton or cotton blend — approximately 30–40 g
A smooth plied cotton or cotton blend works well because the photograph depends on clearly visible rows and raised vein lines. The yarn amount above is a working allowance for this photo-inspired version rather than a measured quantity from the photographed motif.
Tools
- 3.5 mm crochet hook
- Worsted weight #4 yarn
- Yarn needle
- Scissors
- Locking stitch markers
- Blocking mat
- Rust-resistant pins
- Tape measure
Abbreviations
- MR — magic ring
- ch — chain
- sl st — slip stitch
- sc — single crochet
- hdc — half double crochet
- dc — double crochet
- tr — treble crochet
- dtr — double treble crochet
- inc — two stitches worked in one stitch
- st/sts — stitch/stitches
- sp — space
An invisible decrease is worked through the front loops of two adjacent stitches before completing one single crochet, reducing the visible bump created by a conventional decrease.
Burgundy Crochet Maple Leaf Pattern
This is an original construction developed from the visible features of the uploaded photograph rather than a transcription of a published pattern. The five lobes are built outward from a compact center, widened with shaped rows and finished with a separate raised-vein pass.
Central Base
Yarn: deep burgundy.
Round 1: Make a MR. Work 6 sc into the ring. Join with sl st. (6)
Round 2: Work 2 sc in each stitch around. Join. (12)
Round 3: (Sc in next st, 2 sc in next st) ×6. Join. (18)
Round 4: (Sc in next 2 sts, 2 sc in next st) ×6. Join. (24)
Mark five evenly distributed attachment zones. The remaining stitches form the lower junction where the stem will begin.
Center Lobe
The center section must be visibly longer than the other four lobes.
Row 1: Join yarn across 8 center stitches. Ch 1, sc across. (8)
Row 2: Ch 1, 2 sc in first st, sc across to final st, 2 sc in final st. (10)
Row 3: Ch 2, hdc across. (10)
Row 4: Ch 2, 2 hdc in first st, hdc across, 2 hdc in final st. (12)
Rows 5–8: Ch 2, hdc across. (12)
Row 9: Ch 2, hdc2tog, hdc across to final 2 sts, hdc2tog. (10)
Row 10: Repeat the reduction. (8)
Row 11: Hdc2tog, hdc across, hdc2tog. (6)
Row 12: Hdc2tog, hdc in next 2 sts, hdc2tog. (4)
Row 13: Hdc2tog twice. (2)
Row 14: Ch 1, sc2tog. (1)
Ch 2 and sl st into the second chain from the hook to form a small pointed tip. Fasten off.
Upper Left Lobe
Join yarn at the marked upper-left section of the center.
Row 1: Ch 1, 7 sc across. (7)
Row 2: Increase at both ends. (9)
Row 3: Ch 2, hdc across. (9)
Row 4: Increase at both ends. (11)
Rows 5–7: Hdc across. (11)
Row 8: Hdc2tog at both ends. (9)
Row 9: Reduce at both ends. (7)
Row 10: Reduce at both ends. (5)
Row 11: Hdc2tog, hdc, hdc2tog. (3)
Row 12: Work the three stitches together or taper them with sc and sl st to create the point.
Fasten off.
Upper Right Lobe
Work as for the upper-left lobe.
Check the two side lobes against each other before fastening off. Their outer points should finish at approximately the same horizontal level when the leaf lies flat.
Lower Left Lobe
The lower lobes are broader at their bases but shorter than the upper pair.
Row 1: Join yarn and work 7 sc. (7)
Row 2: Increase at both ends. (9)
Row 3: Hdc across. (9)
Row 4: Increase at both ends. (11)
Rows 5–6: Hdc across. (11)
Row 7: Reduce at both ends. (9)
Row 8: Reduce at both ends. (7)
Row 9: Reduce at both ends. (5)
Row 10: Hdc2tog, hdc, hdc2tog. (3)
Row 11: Taper to one pointed tip.
Fasten off.
Lower Right Lobe
Repeat the lower-left lobe instructions.
The leaf now has five major points: one tall center, two medium upper lobes and two shorter lower lobes.
Filling the Spaces Between Lobes
The photograph has dense fabric between the veins rather than five disconnected petals. Join burgundy yarn in the first valley.
Work sc evenly along the side of one lobe.
At the lower part of the valley use sl st to keep the indentation deep.
Continue up the neighboring lobe.
Where a gap is too wide, use hdc or dc stitches anchored into both adjacent edge rows to bridge it.
Repeat between all five lobes.
Keep each valley clearly visible. Filling it completely produces a fan-shaped motif rather than a maple leaf.
Shaping the Pointed Perimeter
Work one continuous border around the entire leaf.
Use sc along relatively straight sections.
At a small secondary point work:
(sc, ch 2, sl st into second ch from hook, sc)
At a major lobe tip work:
(hdc, ch 3, sl st into second ch, sl st into next ch, hdc)
Work a tight sl st in each deep valley.
Add one or two secondary points on each side of the center lobe and at least one on each upper side lobe.
Do not distribute picots mechanically. The photograph has a botanical, irregular perimeter rather than identical teeth around a circle.
Raised Central Vein
The center rib is the strongest surface detail in the reference image.
Place the leaf right side up.
Join burgundy yarn at the lower center where the stem meets the leaf.
Insert the hook through the fabric and work surface slip stitches directly toward the tallest lobe.
Follow the central line of stitches.
Stop approximately 5–8 mm before the top point.
Fasten off on the wrong side.
Each surface loop should rest on the fabric without compressing it. Surface-slip-stitch maple-leaf patterns use the same principle: the vein should be raised but loose enough that the underlying leaf does not pucker.
Upper Side Veins
Join yarn close to the lower third of the central vein.
Work surface slip stitches diagonally toward the left upper lobe.
Stop before reaching the point.
Fasten off.
Repeat toward the right upper lobe.
Both branches should originate close enough to the center line that the finished structure resembles natural leaf venation.
Lower Side Veins
Join burgundy yarn near the base of the center vein.
Surface slip stitch toward the lower-left lobe.
Repeat toward the lower-right lobe.
The completed motif now has five main raised veins.
Do not pull the branches tight when fastening off. Even a small amount of contraction can lift one lobe away from the table.
Adding Secondary Veins
The reference photograph shows smaller raised lines branching from the main ribs.
Start approximately halfway along one major vein.
Work three to five surface slip stitches diagonally toward the outer edge.
Stop approximately 1–1.5 cm before the perimeter.
Fasten off on the wrong side.
Add one or two short branches to each large vein.
Keep them shorter than the five structural ribs. Too many full-length lines make the surface visually heavy and can distort the leaf.
Long Crochet Stem
The stem in the photograph extends well beyond the lower lobes and ends in a distinct curl.
Join burgundy yarn at the lower center.
Foundation: Ch 24.
Beginning in the second chain from the hook, work one sl st into each of the first 18 chains.
For the final section, work:
2 sc in each of the next 5 chains.
The increases force the end of the stem to curl.
Sl st into the base of the leaf.
For a thicker stem, rotate the work and crochet back along the opposite side of the foundation chain with sc.
Fasten off, leaving a 15 cm tail.
Controlling the Stem Curl
The photographed stem finishes with approximately one open hook-shaped curl rather than a tight spiral.
If the stem coils too tightly, replace the five doubled sc stitches with:
2 sc, sc, 2 sc, sc, 2 sc
If it remains almost straight, work 3 sc into each of the final three chains.
Block the stem curve at the same time as the main leaf rather than trying to reshape it after the motif dries.
Blocking the Maple Leaf
Blocking is essential after the surface veins are complete.
Dampen the motif according to the yarn care instructions.
Place it right side up on a blocking mat.
Pin the central top point first.
Pin the left and right upper lobes at matching angles.
Pull the two lower lobes outward and slightly downward.
Push each major valley toward the center and pin it separately.
Pin every secondary point individually.
Arrange the long stem and secure its curled end.
Target approximately 20–25 cm across for the substantial decorative scale visible in the photograph.
Allow the motif to dry completely before removing the pins.
Checking the Vein Tension
Place the dried leaf on a flat table.
All five lobes should touch or sit very close to the surface.
If the center rises while the points remain flat, the central vein is too short.
If one lobe curls upward independently, inspect its branch vein.
A tight vein can sometimes be corrected by gently redistributing its surface loops. Severe puckering is better corrected by removing and reworking that vein.
Do not rely on aggressive blocking to compensate for tight surface crochet. The contraction usually returns after the motif is washed.
Making the Leaf Smaller
A smaller appliqué can be produced with sport-weight yarn and approximately a 3.0 mm hook.
A published sport-weight maple leaf using a 3 mm hook measures approximately 11.4 × 5 cm, demonstrating how dramatically yarn and construction can reduce the finished scale.
For this particular five-lobe construction, shorten the center lobe by two rows and each side lobe by one row.
Reduce the stem foundation from 24 chains to approximately 16–18 chains.
Keep the relative lobe proportions unchanged.
Making a Large Maple Leaf Placemat
For a substantial table mat, use worsted cotton with a 3.5 mm hook and retain all rows in the pattern.
A published worsted maple-leaf design using a 3.5 mm hook measures approximately 25.5 cm tall × 23 cm wide, which is close to the visual scale suggested by the uploaded photograph.
Make one blocked sample before producing a matching set.
For placemat use, check that the raised center veins remain low enough that tableware can sit securely. If necessary, omit the secondary veins while retaining the five main ribs.
Using the Leaf as a Coaster
For coaster scale, reduce both yarn weight and overall lobe length.
Published examples include a 4.5 mm cotton maple-leaf coaster around 14 × 11.5 cm and another approximately 15.2 × 8.9 cm.
At that scale, shorten the decorative stem to approximately 2–3 cm. The long curled stem shown in the photograph is more appropriate for a decorative mat than for a drink coaster.
Use cotton if absorbency is required.
Making a Set in Autumn Colors
The monochrome burgundy version emphasizes texture because every vein is created by shadow rather than color contrast.
The same construction can be repeated in:
- Deep burgundy
- Burnt orange
- Golden ochre
- Muted olive
- Warm cream
Keep the same yarn line and hook size across the set. Different yarn brands labeled as worsted can still produce noticeably different blocked dimensions.
Assembly and Finishing
- Crochet the compact circular base and mark the five lobe attachment areas.
- Work the long center lobe first so it establishes the overall vertical proportion.
- Add the matching upper side lobes and check their symmetry before continuing.
- Crochet the two shorter lower lobes and fill only the necessary gaps between sections.
- Work a continuous pointed perimeter while preserving deep valleys between the five major lobes.
- Add the central surface-slip-stitch vein from the lower junction toward the top point.
- Work four main branch veins followed by shorter secondary veins where additional texture is required.
- Crochet the long stem from the lower center and increase near its end to form the curved tip.
- Weave all yarn tails through matching stitches on the wrong side without pulling the vein lines tighter.
- Wet-block the finished leaf, pinning every major point, valley and the curved stem before allowing it to dry completely.
The finished motif should lie flat with five distinct lobes, a dominant center point, raised branching veins and a long stem ending in an open curl.
7 Technical Tips for a Better Crochet Maple Leaf
- Keep the center lobe approximately 15–20% longer than the upper side lobes. Equal-length lobes change the outline from a maple leaf into a symmetrical star.
- Stop each main surface vein 5–8 mm before its point. Carrying a raised vein completely into the tip can thicken the point and make it curl.
- Use a tight slip stitch at every major valley. Filling those valleys with hdc or dc stitches removes the deep indentations that identify the maple silhouette.
- Leave secondary veins 1–1.5 cm short of the perimeter. Longer branches crowd the edge and can pull individual sections inward during blocking.
- Pin all five major points separately. Pinning only the top and two widest points leaves the lower lobes free to contract as the cotton dries.
- Check the leaf after every completed surface vein. If a lobe begins lifting more than about 5 mm from the work surface, loosen or redo that vein before adding another branch.
- Weave vein tails through at least 5 cm of stitches on the wrong side. Short tails can migrate toward the front when the leaf is repeatedly blocked, washed or handled.
Why Surface Crochet Works for the Veins
Surface slip stitches create a chain-like ridge without requiring separate cords to be sewn onto the motif. The technique is also documented in published maple-leaf projects specifically for central and branching veins.
The important variable is loop length. Each surface loop must span the natural distance between its insertion points. Pulling the loop shorter than the fabric underneath creates contraction.
Work with the motif lying flat rather than holding it vertically. After every four or five surface stitches, place the fabric down and check that it has not started to curve.
The result should look structural while remaining flexible.
Choosing Yarn for Defined Veins
A smooth cotton or cotton blend produces the clearest raised lines. Mercerized cotton creates especially sharp stitch definition, while matte cotton gives a softer appearance closer to the reference photograph.
Highly textured yarn is less suitable because the surface chain can disappear into the underlying stitches.
The burgundy shade should also be consistent throughout the project. Using exactly the same yarn for the leaf and veins creates the monochromatic relief effect visible in the photograph.
If the yarn splits during surface crochet, use a hook with a smoother, slightly more tapered head rather than tightening the stitch.
Keeping the Five Lobes Symmetrical
Symmetry should be checked before the border and veins are added.
Fold the leaf lightly along its central axis without pressing it.
The left and right upper points should align approximately with one another. Repeat the comparison with the lower pair.
A difference of a few millimeters can be corrected during blocking. A difference of an entire row should be corrected in the crochet itself.
Do not force an undersized lobe outward with extreme blocking. The resulting tension can distort the center after the leaf is released from the pins.
Finishing the Burgundy Leaf
Inspect the wrong side for loose surface-crochet tails before blocking.
Secure each tail through matching stitches while avoiding the front loops that form the visible vein ridge.
Check the perimeter next. Every major point should remain distinct, and the five valleys should be visibly lower than their neighboring tips.
Shape the stem last. Its curved end should remain open rather than forming a tight spiral.
If the finished leaf will be displayed on a table, allow it to rest flat for several hours after blocking. This reveals any remaining vein-tension problems before making additional motifs.
Conclusion
The center rib controls the proportions of this burgundy crochet maple leaf pattern, from the long upper point to the curled stem below the lower lobes. Make one complete 20–25 cm sample before producing a set, then check that all five lobes remain flat after the raised veins are added. Deep valleys, restrained secondary points and relaxed surface slip stitches create the strongest match to the photographed motif. Your next step is to crochet and block one burgundy test leaf, then record its final width and yarn weight. Save the finished project to Pinterest or share it on Instagram with #BurgundyMapleLeaf. Would you keep the stem curled or block it into a straighter botanical shape?