Introduction
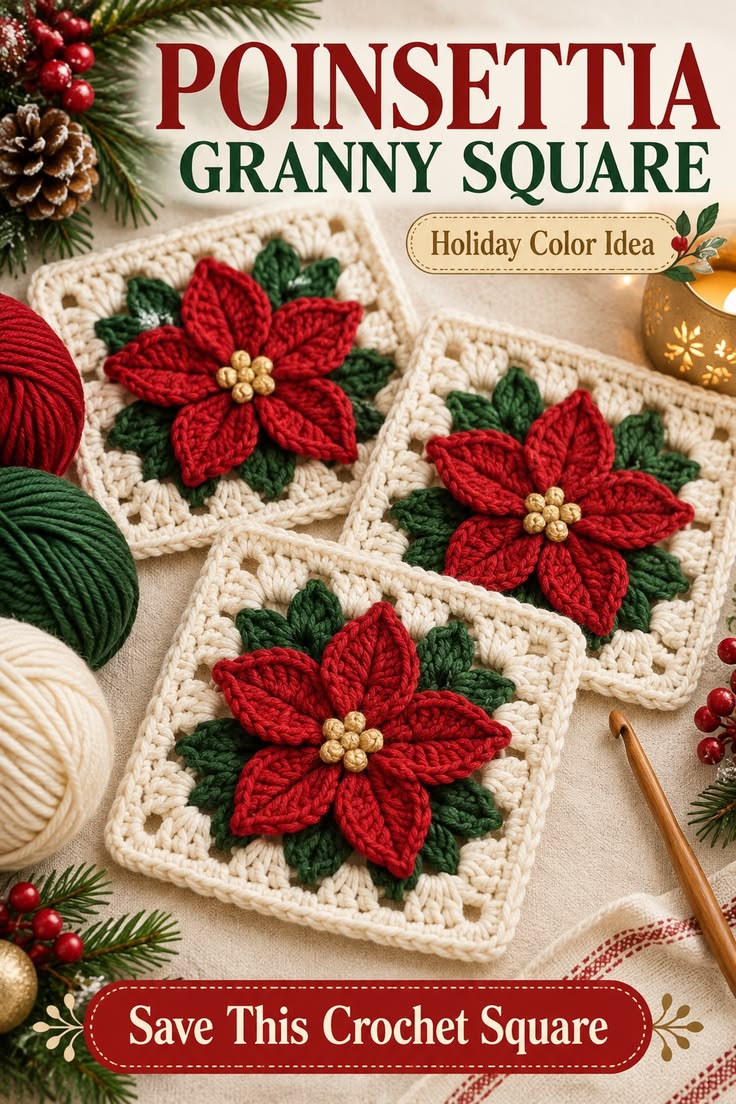
A poinsettia needs pointed red bracts radiating beyond its green leaves; rounded petals immediately turn the motif into a generic flower. This poinsettia granny square crochet pattern builds that structure with six dimensional red petals, dark-green leaves, a gold center, and an ivory square background. Using medium yarn and a 3.5–4 mm hook, one motif makes a Christmas coaster or becomes a building block for blankets, pillows, bags, and table runners.
The Design: What Makes This Poinsettia Square Different
The flower sits above the square instead of being visually absorbed into its background. Six pointed red bracts form the dominant layer, while shorter dark-green leaves appear between them and create a second silhouette underneath. A compact gold center provides contrast without covering the inner ends of the red sections.
The ivory background performs the structural work. Open corner spaces convert the circular flower into a square while leaving enough negative space around the leaves to keep their points visible. This construction makes the motif suitable for a Christmas granny square blanket as well as smaller decorations.
A frequent error with a crochet poinsettia motif is making every red section too round. The petal sequence needs progressively taller stitches toward its midpoint, followed by a mirrored decrease toward the base.
Project Information
| Detail | Specification |
|---|---|
| Skill Level | Intermediate |
| Estimated Time | About 2 hours per detailed square |
| Finished Size | Approximately 15 × 15 cm |
| Hook | 3.5 mm |
| Yarn | Medium cotton cord or comparable yarn |
| Approx. Square Weight | About 30 g in a comparable published pattern |
| Construction | Dimensional flower followed by leaves and square background |
| Best For | Christmas blankets, pillows, bags, table decor and individual motifs |
The 15 cm measurement, 3.5 mm hook, approximately 30 g square weight, and two-hour working estimate are documented specifications from a published poinsettia granny square. Different yarns will change all four measurements.
Materials and Tools
Yarn
- Christmas red yarn — approximately 8–10 g for the poinsettia
- Dark forest-green yarn — approximately 5–7 g for the leaves
- Ivory or natural yarn — approximately 12–15 g for the square background
- Gold or mustard yarn — approximately 1–2 g for the flower center
The individual color quantities above are planning estimates for this photo-inspired version. For a large project, make and weigh one completed motif before calculating total yarn requirements.
Tools
- 3.5 mm crochet hook
- Tapestry needle
- Scissors
- Stitch markers
- Measuring tape
- Blocking mat
- Rustproof pins
Abbreviations
- MR — magic ring
- ch — chain
- sc — single crochet
- hdc — half double crochet
- dc — double crochet
- tr — treble crochet
- sl st — slip stitch
- st/sts — stitch/stitches
- sp — space
- BLO — back loop only
- FLO — front loop only
All instructions use US crochet terminology. Keep slip stitches loose around dimensional sections because excessive tension can pull the flower or leaves out of alignment.
Poinsettia Granny Square Crochet Pattern — Step by Step
This is an original photo-inspired construction. Make one complete sample before producing multiple squares for a blanket or other large project.
Gold Flower Center
Yarn: gold or mustard.
Round 1: Make an MR and work 6 sc into the ring. Join with a sl st. (6)
Round 2: Work 2 sc into each stitch around. Join. (12)
Fasten off with a long tail.
For the raised center visible in the reference image, embroider six small French-knot-style yarn bumps or make six tiny surface knots around the center after the flower is assembled.
Red Poinsettia Foundation
Yarn: Christmas red.
Join red yarn behind the gold center.
Round 1: Ch 4 and sl st into the next suitable attachment point. Repeat around until 6 evenly spaced ch-4 loops have been formed.
These six loops form the foundations for the six red poinsettia sections.
Red Poinsettia Petals — Make 6 Around the Center
Work the following sequence into each ch-4 loop:
(sc, hdc, dc, 2 tr, ch 2, sl st into first ch, 2 tr, dc, hdc, sc)
Sl st between petals.
Repeat the sequence in all six loops.
The ch-2 point at the center of each sequence creates the sharp tip required for the poinsettia silhouette.
Fasten off after the sixth petal.
Adding Definition to the Red Petals
The reference flower has pronounced center ridges running toward the tip of each red section. Surface crochet can reproduce that structure without adding another full layer.
Join red yarn at the base of one petal.
Work loose surface slip stitches along its center toward the point.
Stop one stitch before the tip and fasten off.
Repeat for all six petals.
Do not tighten these stitches. A surface line that is shorter than the underlying petal causes the point to curl upward.
Green Poinsettia Leaves
Yarn: dark forest green.
The green sections should sit behind the red flower and extend through the gaps between its petals.
Leaf — Make 6
Ch 8.
Starting in the second ch from the hook, work:
sc, hdc, dc, tr, dc, hdc, sc.
Ch 2 to create the pointed end.
Working down the opposite side of the foundation chain:
sc, hdc, dc, tr, dc, hdc, sc.
Sl st at the base.
Fasten off with approximately 15 cm of yarn for attachment.
Make six leaves.
Leaf Veins
Thread the green yarn tail through a tapestry needle.
Run one line of small stitches along the foundation chain from the leaf base toward the point.
Keep the embroidered vein relaxed so the leaf remains flat.
Positioning the Leaves
Place the poinsettia face up.
Slide one green leaf beneath each gap between neighboring red petals.
The green tips should remain visible outside the red flower.
Pin all six leaves before sewing.
Sew only the lower third of each leaf to the back of the flower. Leaving the outer section free preserves the layered construction.
Check the flower from the front before weaving in the green tails.
Ivory Square Foundation
Yarn: ivory or natural.
The flower can now be mounted over a separate granny-square background. Working the square separately makes gauge correction easier and prevents the raised petals from interfering with the structural rounds.
Round 1: Make an MR. Ch 3, work 2 dc into ring, ch 2. Work (3 dc, ch 2) three more times. Join with a sl st.
You should have four 3-dc groups and four ch-2 corners.
Round 2: Sl st to the first corner. In each corner work (3 dc, ch 2, 3 dc). Ch 1 between corners. Join.
Round 3: In each corner work (3 dc, ch 2, 3 dc). Work 3 dc into each side ch-1 space, with ch 1 between groups. Join.
Round 4: Repeat the established granny-square expansion. Add one 3-dc group to each side while retaining (3 dc, ch 2, 3 dc) in every corner.
Round 5: Continue in the established pattern until the square approaches the required dimensions.
Open Christmas Corner Round
The photographed squares contain visible openings near the four corners rather than a completely solid background.
Join ivory yarn in any corner.
Work:
(2 dc, ch 3, 2 dc)
in the corner.
Across each side, work dc stitches while leaving a ch-2 opening approximately 2–3 stitches from each corner.
Repeat on all four sides.
At the next corner work:
(2 dc, ch 3, 2 dc)
Continue around and join.
These small openings visually lighten the square and resemble the corner treatment visible in the image.
Final Square Border
Ch 1.
Work sc in each stitch around.
At every corner work:
(2 sc, ch 2, 2 sc)
Join with a sl st.
Fasten off.
Block the square to approximately 15 × 15 cm before attaching the flower.
Attaching the Poinsettia to the Granny Square
Place the blocked ivory square on a flat surface.
Center the poinsettia over the square.
Rotate the flower until the red petals and green leaves are balanced relative to the four corners.
Measure from the gold flower center to each corner. Matching measurements prevent an off-center flower from becoming obvious after multiple blocks are joined.
Pin the flower in position.
Using green yarn, attach the lower portions of the leaves to the background.
Use red yarn to secure the inner bases of the red petals.
Do not sew the pointed ends flat.
Finally, secure the gold center through the middle of the ivory square.
Alternative Integrated Construction
A poinsettia can also be crocheted directly into its square rather than sewn onto a separate background. Published versions commonly build the flower first, add leaves behind it, then transform the circular floral construction into a square.
That method reduces sewing and creates a more integrated motif. The separate-background method used here is easier to adjust from a photograph because flower size and square size can be corrected independently.
If the flower measures too large after blocking, enlarge the ivory background by one additional granny round. If it looks too small, remove one background round rather than enlarging every red petal.
Color Placement for a Christmas Poinsettia Square
The reference palette uses four sharply separated colors.
- Deep Christmas red — six dominant poinsettia petals
- Forest green — six secondary leaves
- Warm ivory — square background and border
- Antique gold — compact flower center
Use the darkest green available within the chosen palette. A pale green reduces the contrast between the leaves and ivory background.
The red should also be deeper than the gold center. Strong value differences make the flower readable even when several squares are joined into a blanket.
Turning the Motif into a Christmas Blanket
One square works as a coaster-sized decorative motif, but repeated blocks can form a Christmas throw or bed blanket.
With a blocked size of approximately 15 cm, the following layouts provide useful planning dimensions before borders are added:
| Layout | Motifs | Approximate Motif Area |
|---|---|---|
| 4 × 4 | 16 | 60 × 60 cm |
| 6 × 8 | 48 | 90 × 120 cm |
| 8 × 10 | 80 | 120 × 150 cm |
| 10 × 12 | 120 | 150 × 180 cm |
| 12 × 14 | 168 | 180 × 210 cm |
Measure an actual blocked sample before purchasing blanket quantities. Even a 5 mm difference per square becomes significant across ten or twelve motifs.
Joining Poinsettia Granny Squares
For a Christmas blanket, ivory joining yarn keeps the seams visually connected to the background.
Place two blocked squares side by side with right sides facing upward.
Insert the hook through corresponding outer loops along both edges.
Pull up a loop of ivory yarn.
Work relaxed slip stitches across the complete edge.
Join squares into horizontal rows first.
Connect the completed rows using the same method.
Check each intersection before continuing. Four corners should meet without a large center opening or bulky knot.
Christmas Pillow Layout
Four poinsettia squares arranged in a 2 × 2 grid create a compact decorative panel. With 15 cm blocks, the motif area measures approximately 30 × 30 cm before an additional border.
Nine squares arranged 3 × 3 produce approximately 45 × 45 cm, a useful starting dimension for a standard decorative cushion.
For the back, crochet a plain ivory panel or use two overlapping rectangles to form an envelope closure.
Keeping the back flat prevents the dimensional poinsettias on the front from being compressed unnecessarily.
Christmas Table Runner Layout
A narrow arrangement works particularly well because the poinsettia repeats can run along the center of a table.
Join squares in a 2 × 6, 2 × 8, or 3 × 8 layout depending on the table dimensions.
Use ivory for the joining seams.
Add one round of forest-green sc around the perimeter followed by one red decorative round.
Keep the border relatively shallow so the raised poinsettias remain the primary feature.
Assembly
- Crochet and block one ivory granny-square background to establish the finished dimensions.
- Make the gold center and six pointed red poinsettia petals.
- Add loose surface stitches along the red petals if raised center veins are required.
- Crochet six dark-green leaves and arrange them between the red sections.
- Sew the lower third of every leaf to the back of the poinsettia.
- Center the completed flower over the blocked ivory square.
- Secure the flower center and inner petal bases without flattening the pointed ends.
- Repeat the same measurements for every additional square.
- Join completed blocks with relaxed ivory seams if making a larger project.
- Weave in the remaining tails and perform a final light blocking around the square edges rather than over the dimensional flower.
The completed block should remain square while the red petals and green leaves project visibly above the ivory background.
7 Technical Tips for Poinsettia Granny Squares
- Keep all six red points consistent. A petal that finishes even 1 cm shorter than its neighbors disrupts the radial structure of the flower.
- Do not sew the full petal perimeter down. Attaching only the inner portion prevents the dimensional poinsettia from becoming a flat appliqué.
- Measure from the gold center to all four corners. A flower shifted 5–10 mm off center becomes more visible after neighboring squares create straight seam lines.
- Block the ivory square before attaching the flower. Stretching the completed block afterward can distort the red petals and pull the green leaves away from their intended angles.
- Keep surface veins loose. Tight slip stitches shorten the center of a red petal and cause its pointed end to curl upward.
- Check all four corners after every square round. Missing one corner increase changes the block geometry and produces a trapezoid instead of a square.
- Weigh one finished motif before buying blanket yarn. A documented 15 cm poinsettia square can use around 30 g, but your fiber and tension can change that figure substantially.
Blocking the Finished Square
Blocking should concentrate on the ivory background rather than the flower.
Dampen the square according to the care instructions for the selected yarn.
Place it on a blocking mat.
Pin the four corners first at approximately 15 × 15 cm.
Add pins along the straight sides if required.
Arrange the red petals and green leaves by hand without pinning them completely flat.
Allow the motif to dry before removing the pins.
Once dry, lift the pointed ends of the petals slightly and arrange the leaves so green remains visible between the red sections.
How to Resize the Square
Changing yarn weight changes both flower and background dimensions. A published DK/sport-wool poinsettia square made with a 3 mm hook measures about 4.21 inches, or roughly 10.7 cm, while another published design reaches 15 cm with a 3.5 mm hook.
For a larger motif, add another granny round to the ivory background rather than increasing only the flower.
For a smaller ornament or coaster, use lighter yarn and a smaller compatible hook.
Always make the flower first when changing yarn weight. Its blocked diameter determines how many background rounds are needed to maintain balanced proportions.
Conclusion
This poinsettia granny square crochet pattern depends on three structural details: pointed red sections, visible green leaves, and enough ivory background to separate the dimensional flower from the square edges. Make one complete 15 cm sample first, record its actual weight, and use that measurement to calculate yarn for a blanket, pillow, or table runner. Keep the red petal tips free during assembly so the finished poinsettia retains its raised profile.
Save the finished square to Pinterest or share your Christmas project on Instagram with #PoinsettiaGrannySquare. For your next block, would you keep the antique-gold center shown here or replace it with a cluster of yellow crochet bobbles?









