SEO META
Title: Ribbed Crochet Pumpkin Pattern in 5 Fall Colors
Description: Make a ribbed crochet pumpkin pattern with deep vertical grooves, five fall color options, stuffed shaping, and a narrow brown crochet stem.
Keywords: crochet pumpkin, ribbed crochet pumpkin, pumpkin amigurumi, fall crochet pattern, crochet pumpkin decor
Introduction
A pumpkin loses its silhouette when its grooves stop before reaching the crown. This ribbed crochet pumpkin pattern builds those channels directly into the fabric with back-loop-only half double crochet, then gathers the rectangle into a compact stuffed pumpkin. Use DK or light worsted yarn, a 3.5 mm hook, and fiberfill for an intermediate beginner project measuring roughly 10–13 cm wide. Make several colors for reusable tabletop autumn decorations.
The Design: What Makes These Pumpkins Different
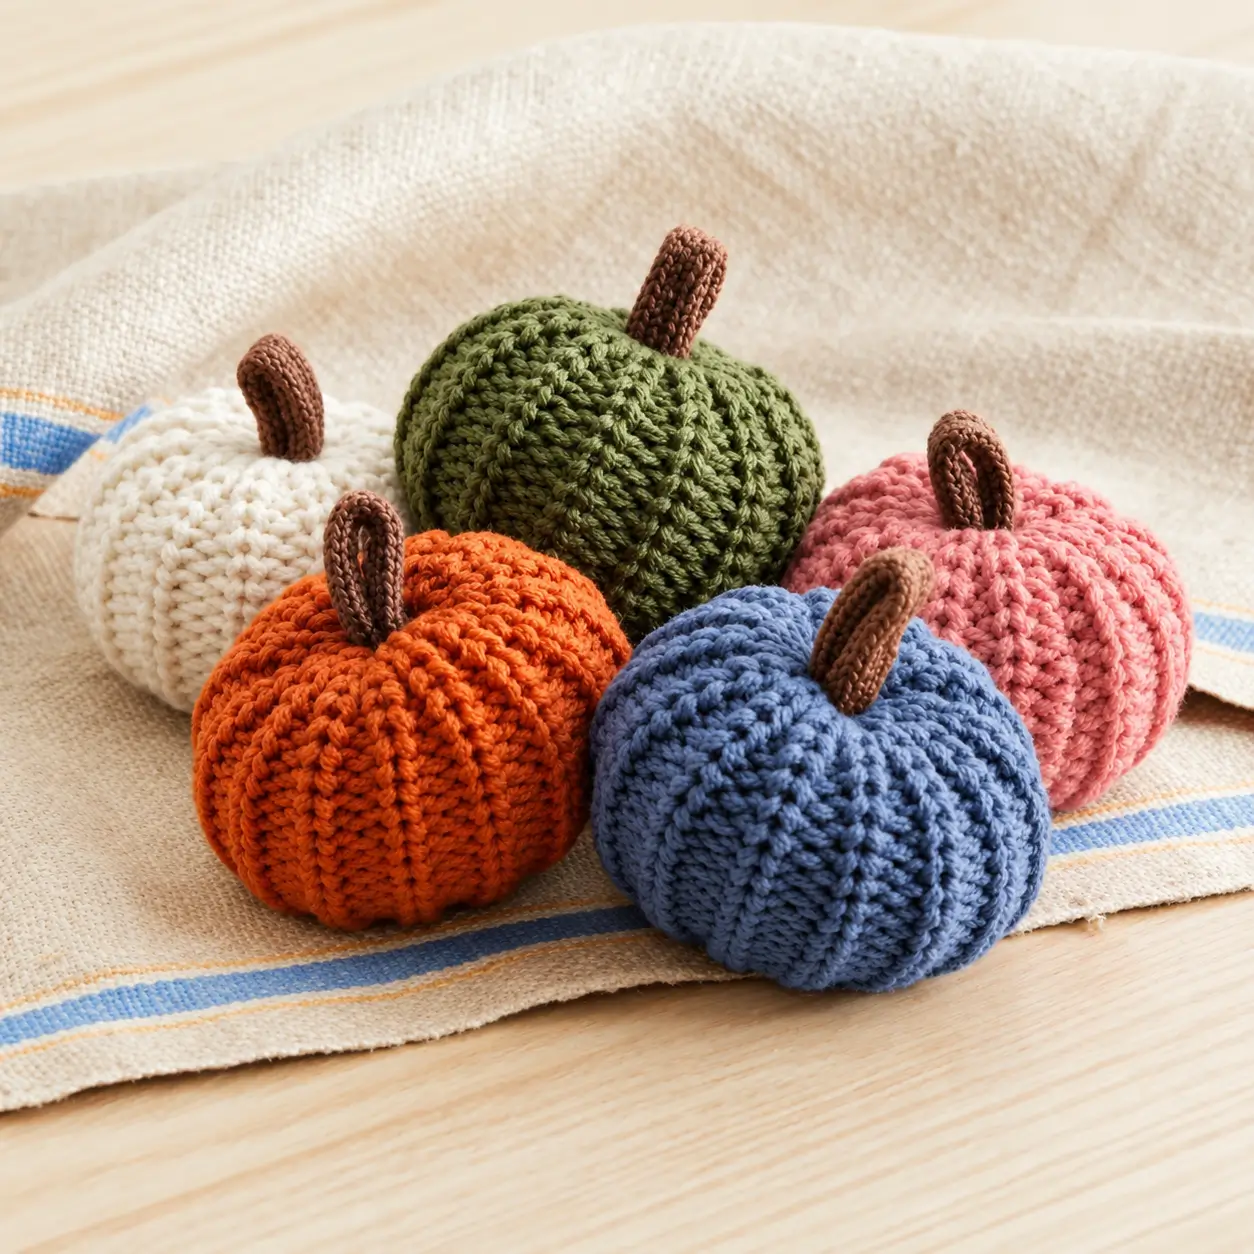
The photographed pumpkins depend on structural ribbing rather than embroidered segment lines. Working half double crochet through the back loop leaves the unused front loops visible, producing raised channels that travel continuously from top to bottom. Second, the body is wider than it is tall. That proportion matters because an overstuffed sphere quickly loses the compressed pumpkin profile. Finally, the narrow brown stem provides vertical contrast without dominating the body. The same construction works as a small crochet pumpkin or a coordinated set of crochet pumpkin decor simply by changing yarn color. One common failure is making the ribbed rectangle too short: after seaming, the stuffing stretches the ribs apart and exposes noticeable gaps.
Project Info at a Glance
| Skill Level | Time | Finished Size | Hook | Best For |
|---|---|---|---|---|
| Confident beginner / intermediate | 1–2 hours each | Approx. 10–13 cm wide | 3.5 mm | Autumn table, shelf, mantel, gift sets |
The finished measurement above is a target for this reconstruction rather than a measurement taken from the photograph. Published pumpkin patterns vary from approximately 8 cm to more than 13 cm depending on yarn and construction.
Materials and Tools
Yarn
- Burnt orange DK/light worsted yarn — pumpkin body.
- Denim blue DK/light worsted yarn — pumpkin body.
- Olive green DK/light worsted yarn — pumpkin body.
- Dusty pink DK/light worsted yarn — pumpkin body.
- Natural cream DK/light worsted yarn — pumpkin body.
- Chocolate brown DK yarn — stems.
For a five-pumpkin set, make one complete sample and weigh it before purchasing the remaining yarn. Published pumpkin requirements vary substantially because some patterns use fine cotton while others use category-4 or super-bulky yarn.
Tools
- 3.5 mm crochet hook
- Polyester fiberfill
- Yarn needle
- Scissors
- Locking stitch marker
- Tape measure
Abbreviations
- MR — magic ring
- ch — chain
- sc — single crochet
- hdc — half double crochet
- inc — two stitches in one stitch
- dec — decrease
- sl st — slip stitch
- BLO — back loop only
- st/sts — stitch/stitches
An invisible decrease is made through the front loops of two adjacent stitches; it is used in the stem but is unnecessary in the rectangle-style pumpkin body.
Pattern — Step by Step
The body is worked flat rather than in a continuous spiral. That choice is deliberate: the photograph shows repeated raised vertical ribs consistent with back-loop-only rows.
Pumpkin Body — Make 1
Yarn: orange, blue, olive, pink, or cream — photo-inspired construction informed by published BLO pumpkin methods.
Foundation: Ch 20.
Row 1: Hdc in second ch from hook and in each remaining ch. (19)
Ch 1, turn.
Row 2: Hdc BLO in each st across. (19)
Ch 1, turn.
Rows 3–30: Repeat Row 2. (19)
Do not fasten off after Row 30.
The rectangle now contains thirty horizontal crochet rows. Once the short ends are joined, those ridges rotate into the vertical orientation visible on the finished pumpkin.
Check the proportions before seaming. The rectangle should be long enough to wrap into a broad tube without stretching.
Body Seam
Fold the rectangle so Row 1 meets Row 30.
Keep the right sides together.
Sl st through corresponding loops along the complete short edge. (19 joining sts)
Fasten off, leaving a tail approximately 40 cm long.
Turn the tube right side out.
Bottom Closure
Thread the long tail onto a yarn needle.
Run the needle through the end of every rib around one open edge.
Do not skip large sections; evenly spaced gathering creates a flatter base.
Pull the yarn until the opening closes.
Pass the needle across the opening several times.
Knot securely on the inside.
Do not cut the tail until the closure has been checked under tension.
Stuffing the Pumpkin
Add polyester fiberfill in small portions.
Push stuffing toward the outside wall first, then fill the center.
The body should feel firm enough to retain its ribs but should remain slightly compressed vertically.
Do not pack the crown completely solid. A small amount of flexibility is required when the second opening is gathered.
Check the silhouette from the side.
The width should exceed the body height.
Top Closure
Cut a matching length of body-color yarn approximately 50 cm long.
Thread the needle.
Work a running stitch around the remaining opening, catching every rib.
Pull gradually.
Redistribute the stuffing before completely closing the crown.
Pull the opening shut.
Secure the yarn with several passes through opposite sides of the crown.
Leave a small central attachment area for the brown stem.
Optional Rib Sculpting
The BLO construction already creates visible channels. Additional shaping can deepen them if the stuffing has made the pumpkin too round.
Thread a long length of matching yarn.
Insert the needle through the bottom center and bring it out at the crown.
Carry the yarn down one existing groove.
Insert through the bottom center again.
Pull only until the groove becomes more distinct.
Repeat around selected channels.
Avoid excessive tension. Deep external shaping combined with BLO ribbing can collapse the body.
Brown Stem — Make 1
Yarn: chocolate brown — stem structure adapted from published amigurumi pumpkin stem mathematics.
R1: 6 sc in MR. (6)
R2: Inc ×6. (12)
R3: Sc around. (12)
R4: (dec) ×6. (6)
R5: Sc around. (6)
R6: Sc around. (6)
R7: Sc around. (6)
R8: Sc around. (6)
Fasten off. Leave a 25 cm sewing tail.
For the photographed appearance, do not heavily stuff the stem. A small strand of fiberfill in its lower half is enough to prevent complete collapse.
Attaching the Stem
Position the open stem end directly over the gathered crown.
Thread its sewing tail onto the yarn needle.
Sew through one stem stitch and one body stitch at a time.
Continue around the entire six-stitch stem base.
Pass the needle through the pumpkin once and return to the attachment point.
Secure the tail beneath the stem.
The stem should stand approximately upright with a slight natural bend.
Burnt Orange Pumpkin
Use a saturated rust or burnt-orange body yarn with the same chocolate-brown stem.
Keep all thirty rib rows at identical tension. The orange pumpkin in the photograph is broad and low, so resist adding extra stuffing simply to make the body firmer.
After closing the crown, press the pumpkin lightly against a flat surface. Redistribute the stuffing until the base remains stable.
Denim Blue Pumpkin
The blue pumpkin demonstrates that this construction does not depend on conventional autumn colors.
Choose a muted medium blue rather than a very dark navy because the rib shadows need enough contrast to remain visible.
Work the same nineteen-stitch rows and thirty-row body.
Match its final dimensions to the orange sample before attaching the stem.
Olive Green Pumpkin
The green pumpkin appears slightly larger in the photograph.
To reproduce that variation without rewriting the pattern, move up one yarn thickness while keeping the same construction, or increase the foundation and row count proportionally.
Do not enlarge only the number of rows. That creates a wider circumference without increasing the pumpkin height.
Dusty Pink Pumpkin
Use a muted coral-pink or dusty rose.
Work the body exactly as written.
Because lighter colors reveal gaps more readily, inspect the stuffed body under normal room lighting before closing the crown.
If fiberfill is visible, a smaller hook is preferable to excessive stuffing.
Natural Cream Pumpkin
Cream yarn displays the stitch structure clearly.
Keep the hands relaxed when working BLO rows so every ridge has similar depth.
Dark brown provides enough contrast for the stem while maintaining the same construction used on the other four pumpkins.
How to Resize the Pumpkin
The rectangle controls two different dimensions.
The number of stitches in each row primarily affects the height of the finished pumpkin. The number of rows controls the circumference.
For a smaller pumpkin, try 14–16 hdc per row and approximately 22–26 rows.
For a larger version, try 22–26 hdc and approximately 34–40 rows.
Those numbers are resizing starting points rather than verified finished-size formulas because stitch gauge varies with yarn and hook choice.
Make a rectangle sample before committing to a large set.
Why Back Loop Only Creates the Ribs
A conventional half double crochet row works through both upper loops of the previous stitch.
BLO crochet leaves the front loop unused.
That unused loop creates a visible ridge between rows.
When the completed rectangle is rotated and seamed into a tube, the horizontal row ridges become vertical pumpkin channels.
This is why the orientation of the seam matters.
Joining the wrong pair of edges rotates the texture and produces horizontal stripes instead of crown-to-base ribs.
Stuffing Density
Fiberfill controls more than firmness.
It also controls how clearly the ribs remain visible.
Understuffing leaves the pumpkin wrinkled and unstable. Overstuffing pushes the channels apart and produces a nearly spherical body.
Add stuffing gradually.
Rotate the pumpkin after every few handfuls.
Press the center downward while redistributing fiberfill toward the outer circumference.
Stop before the ribbing becomes stretched flat.
Making a Five-Color Pumpkin Set
Complete the orange sample first.
Record the rectangle dimensions before assembly.
Then record the finished width and height after stuffing.
Use those measurements rather than relying only on row count when making the other colors.
Small differences between yarn brands can alter the finished dimensions even when their labels identify the same nominal yarn weight.
For the closest match to the photograph, use all five colors from one yarn family.
Assembly — 10 Steps
- Crochet a 19-stitch-wide body rectangle for thirty total rows.
- Join Row 1 to Row 30 so the ribbing runs vertically around the resulting tube.
- Gather the lower opening evenly and secure it before adding stuffing.
- Add fiberfill gradually while maintaining a low, broad pumpkin silhouette.
- Gather the crown and redistribute any stuffing trapped against the opening.
- Add optional shaping strands only where existing BLO grooves need more definition.
- Crochet the brown stem from its twelve-stitch base into a six-stitch tube.
- Position the stem over the center of the gathered crown and pin it if necessary.
- Sew around the complete stem base and conceal every yarn tail inside the body.
- Repeat the construction in orange, blue, olive, pink, and cream, checking each pumpkin against the first sample.
The completed set contains five ribbed stuffed pumpkins with matching brown crochet stems.
7 Technical Tips
- Count 19 hdc at the end of every body row. A dropped edge stitch creates a tapered rectangle and an uneven seam after stuffing.
- Check that all thirty ridges run from crown to base after seaming. Joining the incorrect edges produces horizontal ribbing and changes the entire pumpkin structure.
- Keep the seam tension equal to the surrounding fabric. A seam pulled more than about 5 mm shorter than the neighboring ribs creates a visible flat channel.
- Add fiberfill in small portions around the circumference. A dense central lump creates a spherical pumpkin and flattens the BLO grooves.
- Gather through every rib at both openings. Skipping several rows produces a pleat large enough for stuffing to become visible at the crown.
- Keep external sculpting strands inside existing channels. A strand crossing the center of a raised rib divides one segment into two narrow, uneven sections.
- Sew through all six stem-base stitches at least twice. A stem attached through only two or three points tilts under handling and enlarges the crown opening.
Related Patterns
- Mini Crochet Pumpkin — A smaller version for garlands and bowl fillers. [INTERNAL LINK NEEDED: mini crochet pumpkin]
- Crochet Pumpkin Garland — Repeated small pumpkins joined for autumn decorating. [INTERNAL LINK NEEDED: pumpkin garland]
- Amigurumi Acorn Pattern — A compact stuffed autumn motif with a textured cap. [INTERNAL LINK NEEDED: crochet acorn]
- Crochet Fall Leaves — Flat botanical motifs for pairing with pumpkin displays. [INTERNAL LINK NEEDED: crochet autumn leaves]
Conclusion
The vertical channels are the critical feature of this ribbed crochet pumpkin pattern, so make the first rectangle and confirm the BLO texture before producing the complete five-color set. Stuff the sample until it remains broad rather than spherical, record its final dimensions, and weigh the remaining yarn before calculating materials for additional pumpkins. Orange, denim blue, olive green, dusty pink, and cream can all use the same brown stem construction. Share the finished set on Pinterest and Instagram with #FiveColorCrochetPumpkins. For this specific group, would you keep all five stems chocolate brown or give the olive pumpkin a darker stem?









