SEO META
Title: Two Color Crochet Spiral Doily Pattern
Description: Make a two color crochet spiral doily pattern with a swirling pink center, radial openwork, and a wide scalloped lace border.
Keywords: crochet spiral doily, pink crochet doily, spiral placemat, two color crochet, crochet lace doily
Introduction
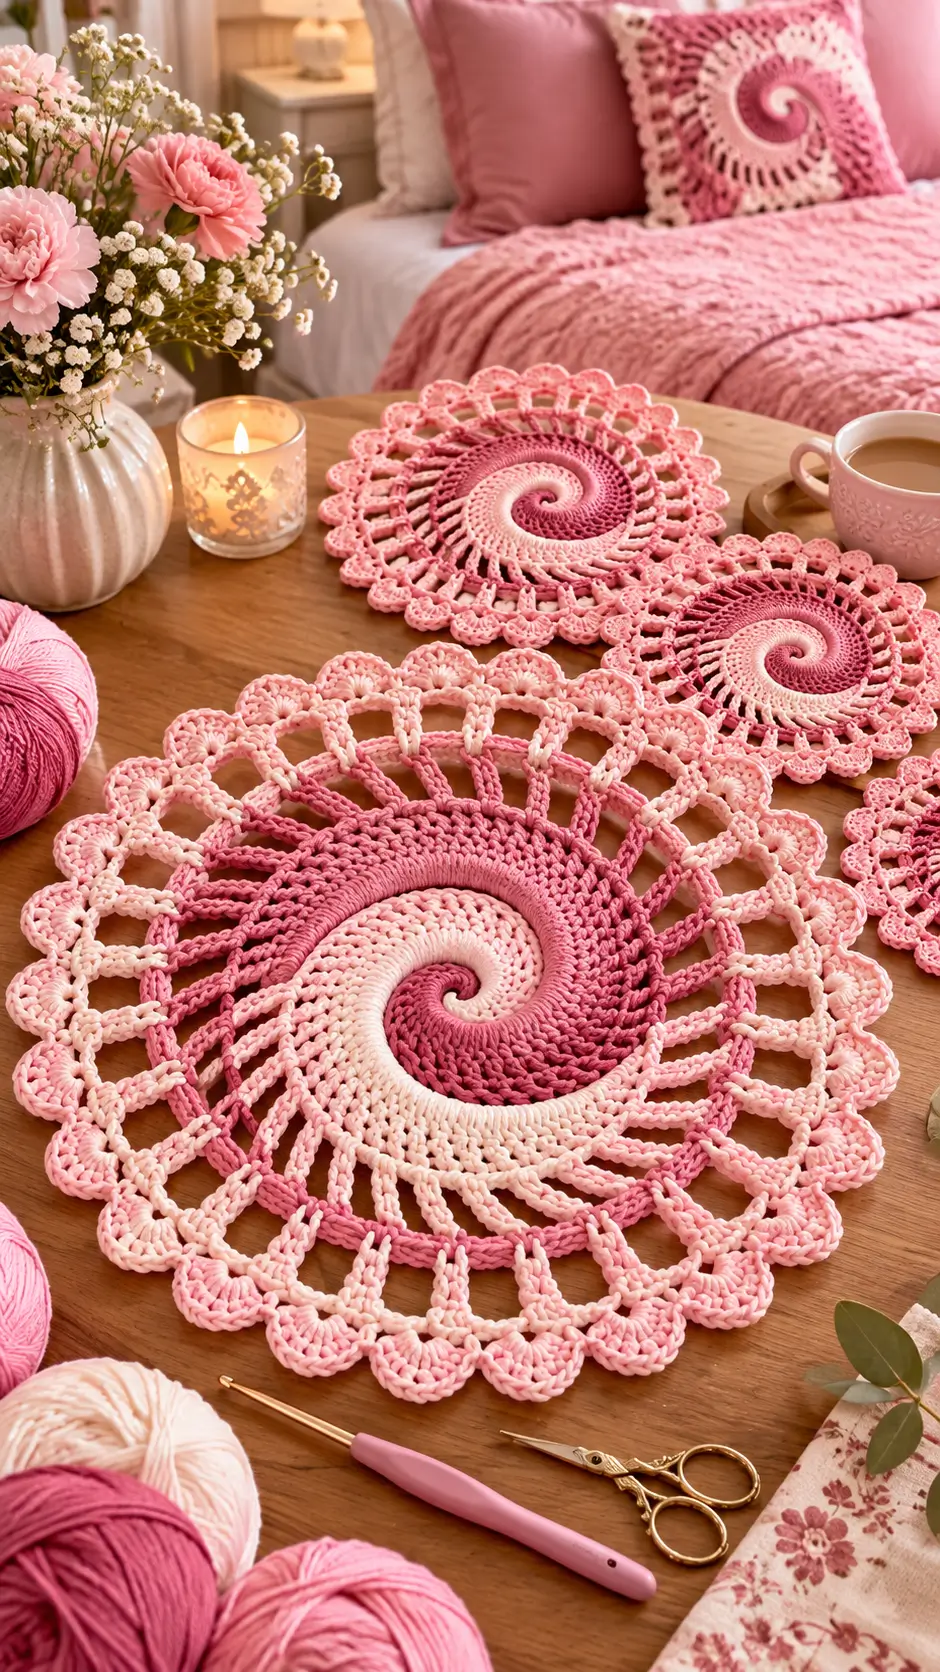
Two pink bands curl around the same center before separating into twenty-four open lace spokes. This two color crochet spiral doily pattern recreates that structure with a dense spiral core, radial chain spaces, and a scalloped outer border. Use sport or DK cotton with a 3 mm hook for an intermediate project. Make one large placemat or reduce the lace rounds to produce coordinating coasters.
The Design: What Makes This Spiral Doily Different
The central spiral carries most of the visual movement. Two contrasting pinks begin at the same point and expand together, so neither color reads as a conventional stripe. The second structural change occurs where the dense center opens into long radial spaces. Those gaps reduce weight while increasing diameter, which is important in a large pink crochet doily pattern. A final shell border adds enough fabric at the circumference to keep the openwork from looking unfinished. The photographed version also repeats the construction at smaller sizes, making the design suitable for a coordinated spiral crochet placemat and coaster set. A frequent failure occurs when increases are stacked in identical positions: the center develops visible corners instead of remaining circular.
Project Info at a Glance
| Skill Level | Construction | Published Size Reference | Hook Reference | Best For |
|---|---|---|---|---|
| Intermediate | Two-color spiral with radial lace | 17–25.4 cm in comparable published designs | 3 mm for sport/DK | Doilies, placemats, coasters, table décor |
The photograph suggests a larger finished diameter than the published references. Make one complete sample before assigning a final measurement to this reconstruction.
Materials and Tools
Yarn
- Dusty rose sport/DK cotton — Color A — approximately 35–50 g for a large sample.
- Pale blush sport/DK cotton — Color B — approximately 35–50 g for a large sample.
- Optional medium pink sport/DK cotton — border accent if a three-tone version is preferred.
The gram amounts above are sampling estimates, not published consumption for the photographed object. A published 25.4 cm worsted-weight spiral lace doily uses approximately 120 yards total, so yarn requirements change substantially with diameter, yarn weight, and lace density.
Tools
- 3 mm crochet hook
- Locking stitch markers
- Yarn needle
- Scissors
- Tape measure
- Blocking mats
- Rustproof pins
Abbreviations
- MR — magic ring
- ch — chain
- sl st — slip stitch
- sc — single crochet
- hdc — half double crochet
- dc — double crochet
- tr — treble crochet
- inc — two stitches in one stitch
- sp — space
- st/sts — stitch/stitches
- RS — right side
An invisible decrease is worked through the front loops of two adjacent stitches; this flat pattern does not require decreases in its main circular body.
Pattern — Step by Step
The photographed center appears to use a sophisticated spiral construction that cannot be reverse-engineered exactly from one image. The following pattern is an original reconstruction based on established two-color spiral mathematics.
Do not cut either color while forming the spiral center. Each color remains attached and is picked up when its section becomes active.
Spiral Center — Color A and Color B
Yarn: dusty rose and pale blush.
Round 1
With Color A, make an MR.
Ch 3 and work 4 dc into the ring.
Drop Color A without fastening off.
Join Color B into the same ring.
Ch 3 and work 4 dc into the ring.
Pull the ring closed.
R1: 10 dc-equivalent stitches total — 5 in each color (10).
Do not join the round in the conventional manner.
Round 2
Continue with Color B.
Work 2 dc into each of the five Color A stitches.
Drop Color B.
Pick up Color A.
Work 2 dc into each of the five Color B stitches.
R2: 20 dc (20).
Round 3
Continue the spiral by alternating the active color after each half-round.
Across each color section repeat:
1 dc in next stitch, 2 dc in next stitch.
Each color contributes 15 stitches after its section is completed.
R3: 30 dc (30).
Round 4
Across each color section repeat:
1 dc in each of next 2 stitches, 2 dc in next stitch.
Maintain the two-color spiral without joining.
R4: 40 dc (40).
Round 5
Across each color section repeat:
1 dc in each of next 3 stitches, 2 dc in next stitch.
R5: 50 dc (50).
Round 6
Across each color section repeat:
1 dc in each of next 4 stitches, 2 dc in next stitch.
R6: 60 dc (60).
Round 7
Across each color section repeat:
1 dc in each of next 5 stitches, 2 dc in next stitch.
R7: 70 dc (70).
Round 8
Across each color section repeat:
1 dc in each of next 6 stitches, 2 dc in next stitch.
R8: 80 dc (80).
At the end of the final Color A section, taper the color with hdc, sc, then sl st.
Repeat the same taper with Color B when it reaches the corresponding position.
Fasten off both colors.
The center should now form a flat two-color disk with the color boundary curling outward from the middle.
Checking the Spiral Before Adding Lace
Place the center on a flat table.
The disk should remain flat without a raised bowl shape.
A slight wave can usually be corrected during blocking, but pronounced ruffling indicates too many increases for the yarn and hook combination.
Measure across the center in two directions.
The measurements should be close.
If the center has developed obvious polygonal corners, shift the positions of several increases rather than stacking them directly above earlier increases.
Transition Round
Yarn: dusty rose.
Join Color A in any stitch.
Ch 1.
Work one sc in each stitch around.
Round 9: 80 sc (80).
Join with sl st.
This round stabilizes the edge before the openwork begins.
Openwork Foundation
The photograph changes from a dense spiral to long, evenly spaced radial openings.
For this reconstruction, the openwork is distributed around twenty sections.
Round 10
Ch 1.
Repeat around:
sc in next 2 stitches, ch 3, skip 2 stitches.
Repeat the sequence twenty times.
Join with sl st.
Round 10: 20 solid groups and 20 ch-3 spaces.
Round 11
Sl st to the first ch-3 space.
Ch 1.
In each ch-3 space work:
(sc, ch 5, sc).
Move directly to the next ch-3 space.
Repeat around.
Join with sl st.
Round 11: 20 ch-5 arches.
Round 12
Sl st into the first ch-5 arch.
Work:
(sc, ch 7, sc) in the same arch.
Repeat in each remaining arch.
Join with sl st.
Round 12: 20 ch-7 arches.
The longer chains expand the diameter without filling the spaces with dense fabric.
Radial Spoke Round
Change to pale blush.
Round 13
Join Color B in any ch-7 arch.
Work:
sc, ch 9, sc into the same arch.
Repeat in every ch-7 arch.
Join with sl st.
Round 13: 20 ch-9 arches.
Round 14
Move to the center of the first ch-9 arch.
Work:
sc, ch 5, sc in the same arch, ch 5.
Move to the next arch and repeat.
Continue around.
Round 14: 40 ch-5 spaces.
This doubling stage provides enough attachment points for a fuller outer lace border.
Outer Lace Band
Round 15
Join dusty rose in any ch-5 space.
Work:
(sc, ch 5, sc) into the space.
Repeat in every ch-5 space around.
Round 15: 40 ch-5 arches.
Round 16
Continue with dusty rose.
In each ch-5 arch work:
5 dc.
Work one sc between neighboring arches.
Repeat around.
Round 16: 40 five-dc shell groups.
Join with sl st.
Scalloped Petal Edge
The photographed doily finishes with broad rounded scallops. This reconstruction uses one shell for every two smaller shell groups to create a larger outer rhythm.
Round 17
Change to pale blush.
Join yarn at the center dc of any shell.
Ch 1 and sc in the same stitch.
Ch 4.
Sc in the center dc of the next shell.
Repeat around.
Round 17: 40 ch-4 arches.
Round 18
Sl st into the first ch-4 arch.
In the first arch work:
7 dc.
In the next arch work:
1 sc.
Alternate a seven-dc shell and one sc around.
Round 18: 20 large scallops.
Round 19 — Picot Finish
Continue with pale blush.
Across each seven-dc scallop work:
sc in first dc, sc in second dc, (sc, ch 3, sl st in first ch) in fourth dc, sc in sixth dc, sc in seventh dc.
Sl st into the sc between scallops.
Repeat around.
Fasten off.
Leave a 15 cm tail and weave it through stitches of the same color.
Making the Smaller Matching Coasters
The photograph includes smaller spiral pieces using the same palette.
Begin with the two-color center exactly as written.
For a compact coaster, stop the dense spiral after Round 6 rather than Round 8.
Work one stabilizing sc round.
Add a shortened openwork band using ch-3 and ch-5 arches.
Finish with five-dc shells.
Block the coaster before evaluating its final diameter.
If the center is too thick for a drinking glass, use sport cotton rather than a heavy worsted yarn.
Making a Medium Spiral Doily
A medium version can be made by completing the dense center through Round 7.
Add the transition round.
Work the openwork through the ch-7 arches.
Skip the longest spoke section.
Proceed to the outer lace band.
This creates a coordinated set in which every piece retains the same spiral center but uses a different lace diameter.
Record the changes after making the first sample so every matching piece follows the same sequence.
Color Placement
The photograph uses several related pink values rather than high-contrast colors.
For a similar result, pair dusty rose with pale blush.
Use the darker shade for one spiral arm and the lighter shade for the second.
Repeat those colors in alternating lace rounds.
A cream-and-rose version will show the spiral boundary more strongly.
Two neighboring pink values create a softer transition but require clearly defined stitch texture.
Do not switch yarn weights between colors.
Different yarn diameters can pull one spiral arm tighter than the other.
How to Keep the Spiral Flat
A flat center depends on the relationship between stitch height, yarn diameter, hook size, and increase frequency.
Check the piece after every round.
If the outer edge curls upward, the circle may need additional increases or looser tension.
If the edge ripples heavily, the round has too much circumference.
Changing hook size halfway through the center is usually more disruptive than correcting the increase distribution.
Use a stitch marker to identify each color transition.
Count before moving to the next round.
Blocking the Lace
Blocking controls the final geometry of the openwork.
Dampen the finished doily according to the yarn manufacturer’s instructions.
Place it on a blocking mat.
Pin the center first so it remains circular.
Measure from the center to several opposite scallops.
Adjust the outer edge until those radii are similar.
Pin every large scallop separately.
Open the chain arches without stretching them into narrow triangles.
Allow the piece to dry fully before removing the pins.
Using the Spiral as a Placemat
A sport or DK cotton version can function as a decorative placemat when the finished diameter is large enough for the intended table setting.
Test a dinner plate on the blocked sample.
The plate should sit mainly on the dense center rather than balancing on the outer lace.
For cups and mugs, the smaller matching pieces are more practical.
Keep highly dimensional picots away from the central area because they can make cups unstable.
The photographed arrangement uses the spiral motifs primarily as decorative tabletop pieces.
Adapting the Spiral for a Pillow
A coordinating spiral cushion is visible in the background of the photograph.
To create a related design, make a spiral disk large enough for the intended cushion front.
Stop before the widest lace rounds.
Convert the circular motif to a square using progressively taller stitches at four evenly spaced corner positions.
Add plain framing rounds until the panel matches the cushion insert.
Make a solid crochet or fabric back.
Join the front and back around three sides.
Insert the cushion and close the final edge, or construct an envelope opening for removal.
Yarn Requirement Planning
Do not calculate a complete set from the photograph alone.
Instead, weigh one blocked sample.
Record Color A and Color B separately if possible.
Multiply those figures by the number of pieces required.
Add approximately one additional motif’s worth of yarn as a practical buffer for gauge variation and finishing.
A published 10-inch spiral lace doily uses approximately 120 yards of worsted cotton, while fine-thread designs use different yardages and produce different diameters.
Your sample remains the relevant measurement for this reconstruction.
Assembly — 10 Steps
- Choose two sport or DK cotton colors with matching yarn thickness.
- Start both colors in the same center and establish the ten-stitch two-color foundation.
- Expand the spiral while maintaining the calculated increase sequence.
- Taper both color sections and work the stabilizing single-crochet round.
- Establish evenly spaced openings around the dense center.
- Lengthen the chain arches to create the radial lace section.
- Double the attachment points before beginning the outer lace band.
- Work the shell rounds and finish with twenty large scallops.
- Weave all yarn tails through matching-color stitches and inspect the center for distortion.
- Block the doily to a circular outline and pin each outer scallop separately.
The finished piece has a two-color spiral center, radial openwork, and a broad scalloped lace perimeter.
7 Technical Tips
- Mark both active yarn positions during the spiral center. Picking up the wrong working loop shifts the color boundary and breaks the continuous spiral.
- Count 10, 20, 30, 40, 50, 60, 70, and 80 stitches through the dense expansion. A missing increase becomes progressively harder to conceal as the diameter grows.
- Stop after any round that produces more than about 10 mm of edge ruffling. Continuing over excess circumference compounds the wave in every later lace round.
- Keep all twenty first-stage chain arches approximately equal in length. One tight arch pulls two neighboring spokes inward and makes the border visibly eccentric.
- Pin every large scallop during blocking. Skipping alternate scallops produces inconsistent outer diameters and compressed shell shapes.
- Keep surface tension equal when changing between the two pinks. A tighter second color makes the spiral center twist upward instead of remaining flat.
- Weave each tail through at least 4–5 cm of same-color stitches. Carrying dusty-rose tails through pale-blush lace makes the finishing ends visible from the front.
Related Patterns
- Spiral Crochet Coaster — A reduced two-color spiral for cups and small table settings. [INTERNAL LINK NEEDED: spiral crochet coaster]
- Round Crochet Placemat — A larger flat circular motif with an open lace border. [INTERNAL LINK NEEDED: crochet placemat]
- Scalloped Crochet Doily — A lace doily emphasizing shells and picot edging. [INTERNAL LINK NEEDED: scalloped crochet doily]
- Spiral Crochet Pillow — A square cushion panel built around a circular spiral motif. [INTERNAL LINK NEEDED: spiral crochet pillow]
Conclusion
The interlocking pink center, long radial openings, and twenty broad scallops define this two color crochet spiral doily pattern. Make the spiral center first and confirm that it lies flat before investing time in the openwork rounds. Next, complete one blocked sample and record its diameter, yarn weight, and color consumption before producing the smaller matching pieces. Keep the same hook and yarn line throughout the set so the spiral proportions remain consistent. Share a finished placemat or coaster set on Pinterest and Instagram with #PinkSpiralDoily. For this specific design, would you make the inner spiral darker than the outer shells, or reverse the two pink values?









