Introduction
A phone bag needs enough depth to hold a smartphone without forcing the flap outward. This crochet crossbody phone bag pattern uses dense cotton stitches, a rectangular body, a rounded flap, and a reinforced shoulder strap. The proposed design measures approximately 18 cm tall and 12 cm wide, uses worsted cotton and a 4 mm hook, and suits confident beginners. Its compact construction provides a practical alternative to a full-size handbag.
The Design: What Makes This Crochet Phone Bag Different
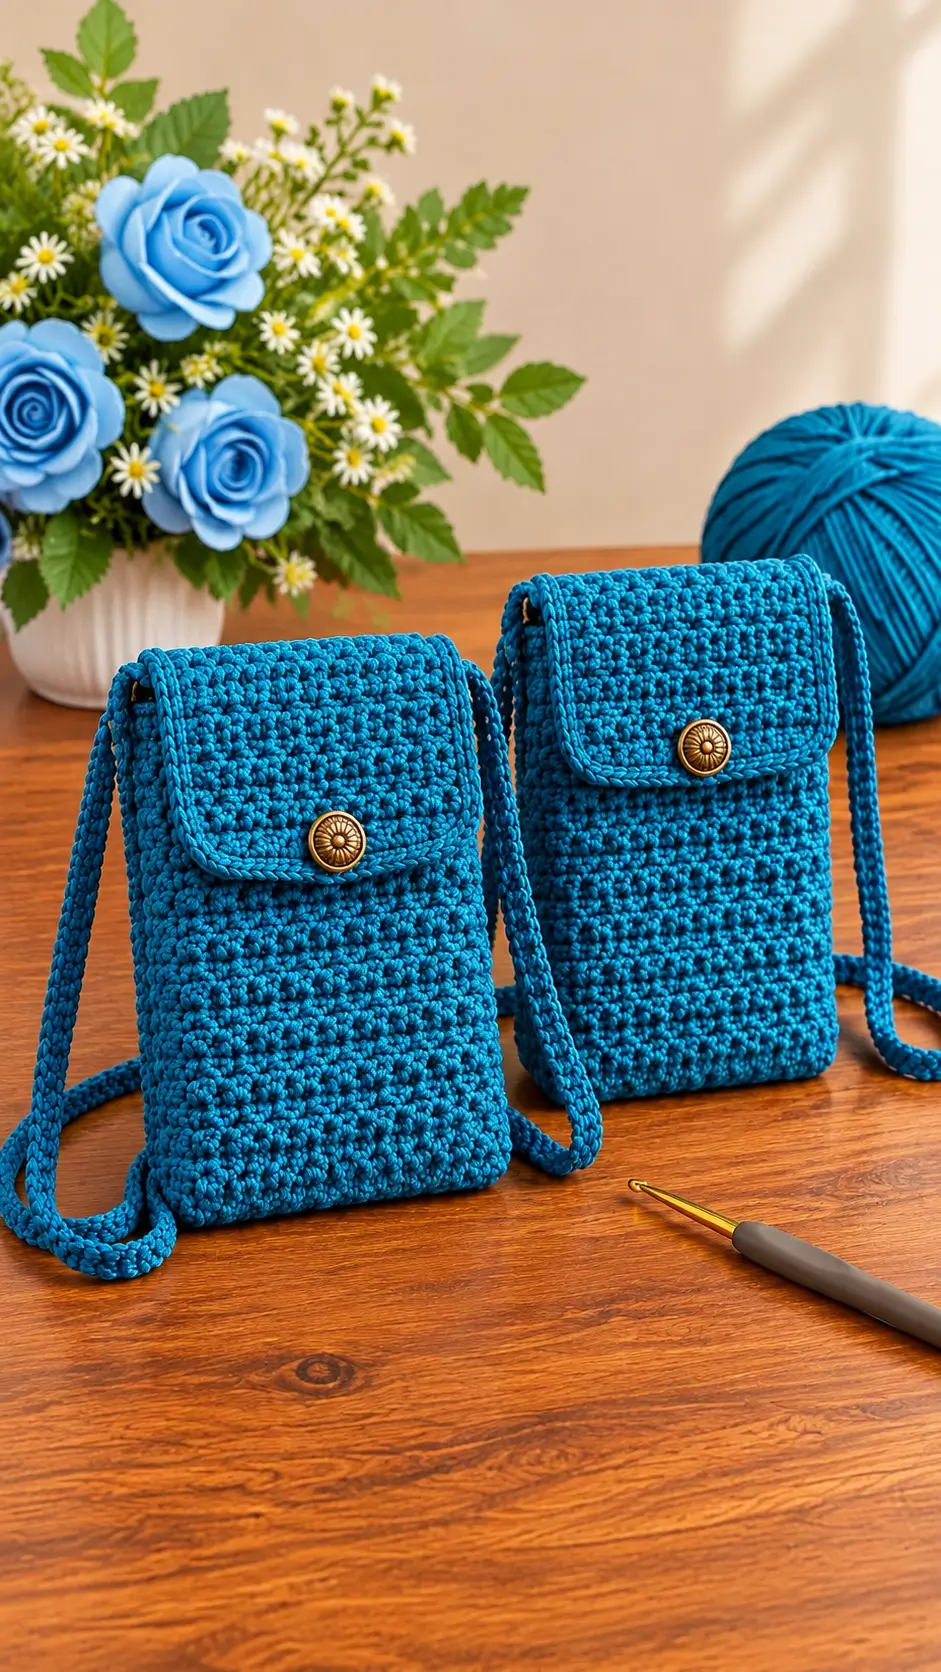
The turquoise bags in the reference image combine three structural elements: a firm rectangular body, a curved overlapping flap, and a narrow crocheted shoulder strap. Each element contributes to the finished bag’s function.
The rectangular panels create usable interior space without the rounded bottom found in many pouch patterns. A narrow gusset adds depth while keeping the front surface flat. This makes the crochet phone pouch suitable for carrying a smartphone and a small cardholder.
The rounded flap is worked separately so its width and closure position can be adjusted before assembly. Its button sits near the center, where the flap overlaps the front panel.
Finally, the crochet mini crossbody bag uses a tightly worked strap to reduce stretching. One frequent construction mistake is attaching the strap only through the uppermost stitch. Reinforcing several rows distributes the load more effectively.
Project Info at a Glance
| Detail | Specification |
|---|---|
| Skill Level | Confident beginner |
| Estimated Time | 5–7 hours |
| Target Finished Size | 18 × 12 × 2.5 cm |
| Hook | 4.0 mm |
| Yarn | Worsted #4 cotton |
| Construction | Flat panels and sewn gusset |
| Closure | Button and crocheted loop |
| Best For | Smartphone, cards, small essentials |
The dimensions and time are design targets, not measured results from a finished test sample.
Materials and Tools
Yarn
- Turquoise blue cotton yarn: Worsted weight #4, approximately 100–120 g. Suggested brand: Lily Sugar’n Cream or similar.
- Optional matching cotton yarn: Approximately 10–15 g extra for a longer strap or additional edging.
Cotton is recommended because the finished fabric should resist excessive stretching. Choose a smooth yarn with clearly defined strands. Very soft acrylic yarn may produce a less structured bag, particularly when the strap carries the weight of a phone.
The photographed bags have a visibly raised texture. The written version uses a compact single-crochet and half-double-crochet combination to approximate that appearance.
Tools
- Crochet hook: 4.0 mm
- Button: One decorative metal button, approximately 20 mm
- Tapestry needle: Blunt tip suitable for cotton yarn
- Stitch markers: Two locking markers
- Scissors: Sharp embroidery scissors
- Measuring tape: Metric or dual scale
- Sewing thread: Matching blue, for reinforcing the button
- Optional lining: Lightweight cotton fabric
Gauge and Sizing
For the proposed stitch counts, use a planning gauge of 18 stitches and 20 rows per 10 cm in the main textured pattern.
Make a swatch at least 12 cm square. Measure the center 10 cm without stretching it. The project should be recalculated if your stitch gauge differs significantly.
For example, a 22-stitch panel at 18 stitches per 10 cm measures approximately 12.2 cm wide before seaming. Seams can reduce the usable interior width.
Measure your phone with its case attached. Allow approximately 1–1.5 cm of additional width and 1–2 cm of additional height, depending on the thickness of the device.
If the phone exceeds the proposed interior measurements, increase the foundation width and adjust the panel rows before making the flap.
Crochet Abbreviations
| Abbreviation | Meaning |
|---|---|
| ch | Chain |
| sc | Single crochet |
| hdc | Half double crochet |
| sl st | Slip stitch |
| st / sts | Stitch / stitches |
| inc | Two stitches in one stitch |
| dec | Decrease |
| BLO | Back loop only |
| RS | Right side |
| WS | Wrong side |
| rep | Repeat |
| FO | Fasten off |
An invisible decrease is made by working through the front loops of two adjacent stitches, reducing visible bulk compared with a conventional decrease.
Pattern notes: US crochet terminology is used throughout. Turning chains do not count as stitches. Work the panels in rows, not continuous spirals.
Pattern — Step by Step
This is a new construction designed to resemble the photograph. Its stitch arithmetic is checked, but the gauge, fit, and assembly have not been physically tested.
Main Textured Stitch
The texture uses a repeating combination of single crochet and half double crochet.
Pattern Row A: Alternate sc and hdc across the row.
Pattern Row B: Work hdc into the previous row’s sc stitches and sc into its hdc stitches.
Continue alternating the stitch placement on each row. The slightly taller hdc stitches create an irregular raised surface.
For a more pronounced texture, maintain firm, even tension rather than increasing the hook size.
Front Panel (Make 1)
Yarn: Turquoise blue — original design calculations.
Foundation: Ch 23.
Row 1: Sc in second ch from hook and each remaining ch (22).
Row 2: Ch 1, turn, (sc 1, hdc 1) ×11 (22).
Row 3: Ch 1, turn, (sc 1, hdc 1) ×11 (22).
Rows 4–34: Repeat Row 3 (22 stitches per row).
The alternating stitch heights, combined with turning the work, place the taller stitches over the shorter stitches in successive rows.
At the target gauge, 34 rows produce approximately 17 cm of fabric before edging.
Work one additional row if the panel needs more height. Keep both panels identical.
Fasten off. Leave a 25 cm yarn tail for assembly.
Back Panel (Make 1)
Yarn: Turquoise blue — original design calculations.
Foundation: Ch 23.
Row 1: Sc in second ch from hook and across (22).
Row 2: Ch 1, turn, (sc 1, hdc 1) ×11 (22).
Rows 3–34: Repeat Row 2 (22 stitches per row).
Fasten off. Leave a 30 cm sewing tail.
Compare the panels on a flat surface. Both should have matching widths and heights, with no visible flare along the side edges.
The back panel carries the flap and shoulder strap attachments, so it needs particularly firm finishing.
Side and Bottom Gusset (Make 1)
Yarn: Turquoise blue — original design calculations.
Foundation: Ch 6.
Row 1: Sc in second ch from hook and across (5).
Rows 2–102: Ch 1, turn, sc across (5).
Fasten off, leaving a 35 cm sewing tail.
This strip creates the two side walls and bottom of the bag. Its length must match the combined height of both sides plus the bottom width.
At a planning gauge of 20 rows per 10 cm, 102 rows produce approximately 51 cm. The desired perimeter is approximately 17 + 12 + 17 = 46 cm, so the strip may need shortening after measurement.
Important: The 102-row count is a starting allowance, not a fixed final length. Measure the actual panel edges, then add or remove gusset rows before sewing. Do not gather the panels to accommodate an oversized strip.
Rounded Flap (Make 1)
Yarn: Turquoise blue — original design calculations.
Foundation: Ch 23.
Row 1: Sc in second ch from hook and across (22).
Rows 2–11: Ch 1, turn, sc across (22).
Row 12: Ch 1, turn, dec, sc 18, dec (20).
Row 13: Ch 1, turn, dec, sc 16, dec (18).
Row 14: Ch 1, turn, dec, sc 14, dec (16).
Row 15: Ch 1, turn, dec, sc 12, dec (14).
Row 16: Ch 1, turn, dec, sc 10, dec (12).
The five decrease rows narrow the lower edge, forming a softly tapered flap. The photograph shows rounder corners, which can be approximated by working an additional sc edging around the outer perimeter.
Fasten off, leaving a 30 cm sewing tail.
Pin the flap to the back panel before making the button loop. Check that it covers the bag opening and overlaps the front panel by at least 4 cm.
Button Loop (Make 1)
Yarn: Turquoise blue — original design calculations.
Foundation: Ch 9.
Row 1: Sl st into second ch from hook and each remaining ch (8).
Fasten off. Leave 15 cm tails at both ends.
Fold the short cord into a loop. Place it at the center of the flap’s lower edge, with the loop extending just far enough to pass over the button.
The exact loop size depends on button thickness. Test the fit before sewing it permanently.
Shoulder Strap (Make 1)
Yarn: Turquoise blue — original design calculations.
Foundation: Ch 5.
Row 1: Sc in second ch from hook and across (4).
Rows 2–220: Ch 1, turn, sc across (4).
Fasten off. Leave a 30 cm tail at each end.
At a planning row gauge of 20 rows per 10 cm, 220 rows produce approximately 110 cm of strap before stretching.
For a longer crossbody fit, add rows in groups of ten. For a shorter shoulder bag, reduce the row count after measuring the intended drop.
Avoid loosely worked chains as the entire strap structure. A flat single-crochet band distributes tension across four stitches and gives a broader attachment surface.
Optional Strap Reinforcement (Make 2)
Yarn: Turquoise blue — original design calculations.
Foundation: Ch 5.
Row 1: Sc in second ch from hook and across (4).
Rows 2–8: Ch 1, turn, sc across (4).
Fasten off. Leave a 20 cm tail.
Place each reinforcement patch on the inside of the back panel, directly behind the strap attachment. Sew through the patch, panel, and strap end.
This construction helps prevent the strap from pulling individual stitches out of alignment.
Optional Interior Card Pocket (Make 1)
Yarn: Turquoise blue — original design calculations.
Foundation: Ch 15.
Row 1: Sc in second ch from hook and across (14).
Rows 2–12: Ch 1, turn, sc across (14).
Fasten off. Leave a 25 cm tail.
Sew the pocket to the inside of the front panel along its two sides and bottom, leaving the upper edge open.
Check the pocket’s position before closing the bag. It should not obstruct the phone or interfere with the flap button.
Assembly
- Prepare the panels. Lay the front and back panels flat, with their top edges aligned. Check that the stitch counts and dimensions match.
- Attach the gusset to the front. Starting at the upper-left edge, pin the gusset along the left side, bottom, and right side. Adjust its length to fit without gathering.
- Join the back panel. Sew the second long edge of the gusset to the back panel using a whipstitch or mattress stitch. Keep the seam allowance consistent.
- Secure the upper opening. Work a row of single crochet around the exposed upper rim, taking care not to close the opening.
- Position the flap. Center the flap on the upper back panel. Pin its straight edge approximately 1 cm below the opening, then sew across securely.
- Attach the button loop. Sew the loop to the center of the flap’s rounded edge. Check that both ends are anchored through several stitches.
- Position the button. Fold the flap over the front and mark the button location. Sew the button through a reinforced section of fabric.
- Attach the shoulder strap. Sew each strap end to the upper side of the back panel. Add the optional reinforcement patches inside the bag.
- Add optional accessories. Install the interior pocket or cotton lining if desired. Keep the closure and strap attachment areas accessible.
- Finish the bag. Weave in all remaining ends, inspect the seams, and test the closure using the intended phone.
The finished pouch should stand with a defined rectangular shape and close without excessive tension across the flap.
7 Technical Tips for a Better Crochet Phone Bag
- Mark the panel edges. Place stitch markers at the first and last stitch of each row if you frequently lose track of turning chains. Accidentally adding one stitch per row creates a noticeably wider upper edge.
- Control fabric firmness. A loose gauge can make the bag stretch downward under the weight of a phone. Compare the finished swatch with the target 18 stitches per 10 cm before beginning the panels.
- Keep decrease rows symmetrical. The flap loses two stitches per shaping row, one at each end. Uneven decreases cause the rounded edge to lean toward one side.
- Check button placement with the phone inside. A filled pouch changes the angle and overlap of the flap. Positioning the button while the bag is empty may make the closure too tight during use.
- Avoid excessive strap stretch. Measure the strap after gently applying tension by hand. If the strap lengthens substantially, use a smaller hook or add a woven cotton reinforcement tape.
- Pin the gusset before sewing. The gusset must match the actual perimeter of the panels. A difference greater than approximately 1 cm can produce puckering or distort the lower corners.
- Weave in yarn tails over several stitches. Secure each tail in at least two directions through the interior fabric. Short, unsecured ends can loosen around high-stress areas such as the strap and button.
How to Customize the Size
The easiest modification is to change the number of stitches in the starting chain.
For a wider bag, add two foundation chains at a time. This preserves the even number of working stitches required for the alternating sc and hdc texture.
For a taller bag, add rows to both front and back panels. Increase the gusset length accordingly.
For a deeper bag, widen the gusset by adding foundation chains. A wider gusset gives the bag more storage capacity but may make it less stable when standing unsupported.
The flap should be wide enough to cover the opening without pulling the side seams inward. If the front panel width changes, adjust the flap foundation to match.
When changing the bag size, recalculate the gusset perimeter rather than relying on the original row count.
Cleaning and Maintenance
Cotton crochet bags can accumulate lint and surface dirt around the flap, strap, and lower corners.
Check the yarn manufacturer’s washing instructions before cleaning. If the button is metal, avoid prolonged soaking unless its finish is suitable for water exposure.
Hand washing in cool water is a cautious option for an unlined cotton bag. Reshape the pouch while damp and allow it to dry flat.
Do not hang the bag by its strap while wet. The added weight of absorbed water can stretch the crocheted band.
Inspect the button stitching and strap attachment points periodically. These areas experience more mechanical stress than the flat body panels.
Conclusion
This crochet crossbody phone bag pattern combines flat textured panels, a narrow gusset, a shaped flap, and a reinforced strap. The construction can be resized by changing the panel width, height, and gusset length while preserving the same assembly method. Before making a second bag, record the finished dimensions, actual yarn consumption, and strap length from the first sample. Those measurements will make future versions more consistent.
Save the pattern to Pinterest with a clear photograph of the finished bag. On Instagram, share the finished project using #TurquoiseCrochetPhoneBag.
For the next version, would a rounded flap with a single antique-brass button work better than a straight rectangular closure?








