Introduction
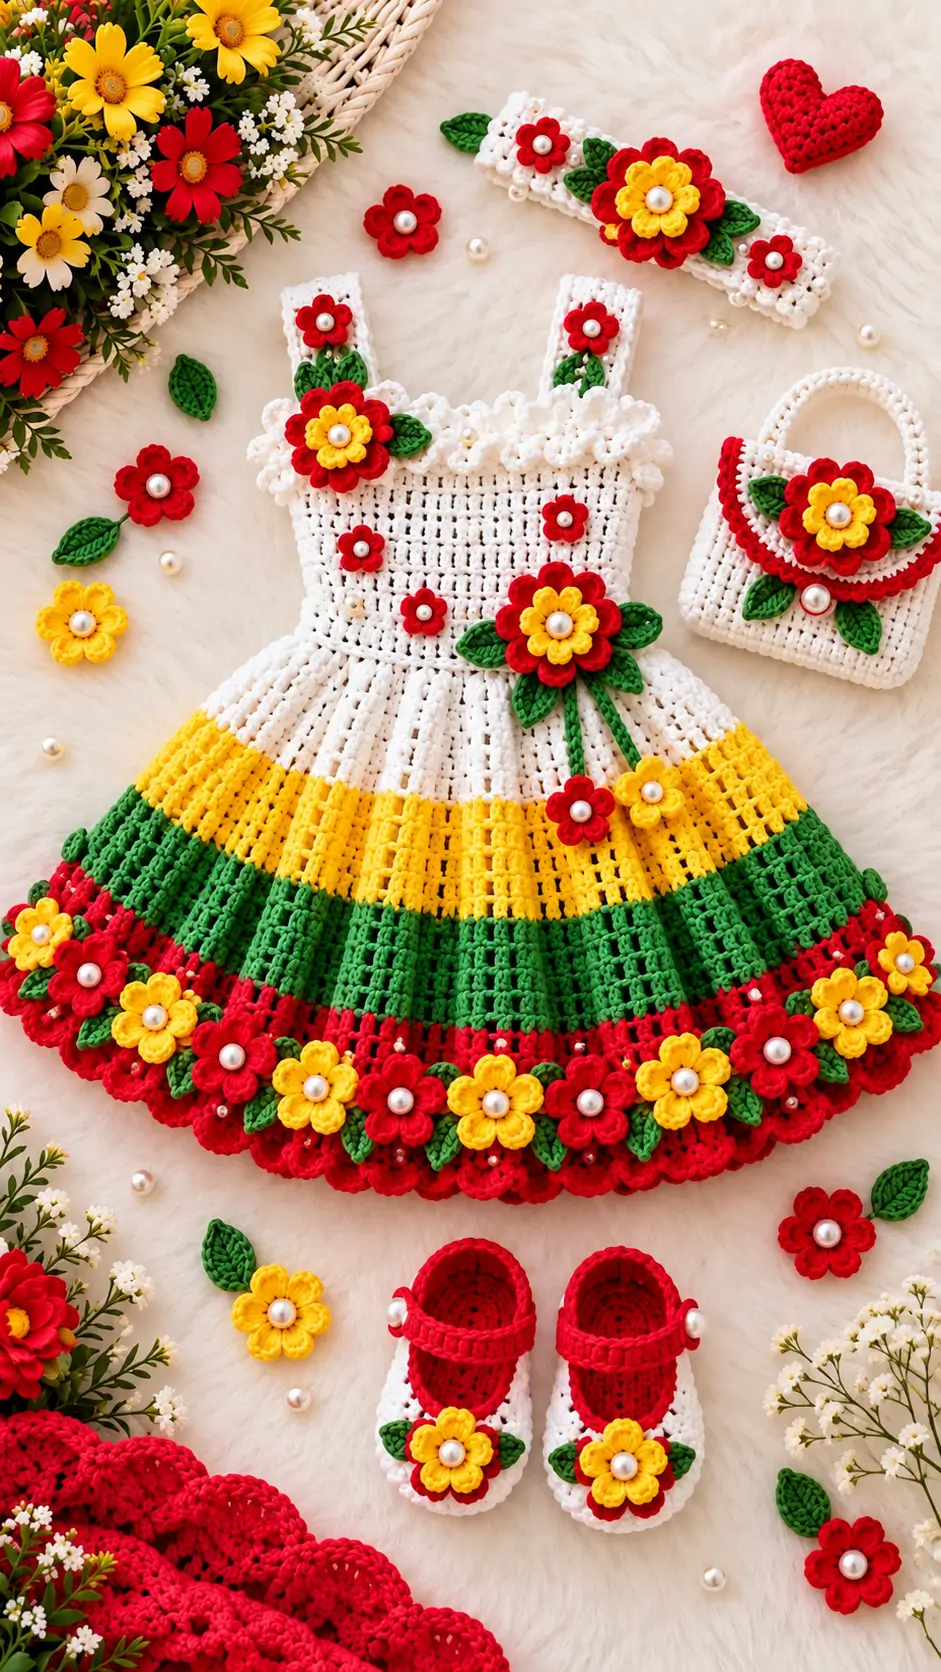
The red-and-yellow flower border on this baby dress must follow the skirt’s expanding circumference without pulling the hem inward. This crochet baby girl dress pattern uses DK cotton, a 4 mm hook, and a proposed 6–12 month size with an approximately 49 cm finished chest. Designed for intermediate crocheters, the project combines a sleeveless floral dress, matching headband, small handbag, and Mary Jane-style shoes. Separate appliqués make decorative repairs possible without reconstructing the garments.
The Design: What Makes This Floral Dress Different
The dress combines three construction systems: a firm white bodice, an expanding striped skirt, and separately attached dimensional flowers. The bodice uses a relatively compact stitch structure to support shoulder straps and decorative motifs. Its open back allows the garment to be dressed without stretching the neckline excessively.
Below the waist, increases distribute additional fabric around the circumference. The skirt changes from white to yellow, green, and red, with the widest section supporting a scalloped flower border.
The crochet flower appliqué motifs use layered petals and separate leaves. Attaching these after the garment is finished makes positioning more accurate.
A common mistake in a floral crochet baby dress is sewing large flowers directly across the waistline, restricting stretch and creating a rigid band. This design places the largest motifs away from the main expansion line.
Project Info at a Glance
| Detail | Specification |
|---|---|
| Skill Level | Intermediate |
| Estimated Time | 15–22 hours |
| Proposed Size | 6–12 months |
| Target Finished Chest | 49 cm |
| Target Dress Length | 32 cm |
| Main Hook | 4 mm |
| Smaller Hook | 3.5 mm |
| Yarn | DK cotton |
| Construction | Rows, joined rounds, separate appliqués |
| Best For | Supervised photographs and special-event clothing |
Note: Measurements are design targets based on comparable baby garments, not measurements taken from the photograph. This is an original photo-inspired draft and has not been sample-tested.
Materials and Tools
Yarn
Use smooth DK cotton or a baby-appropriate cotton blend. The following quantities are purchasing estimates for the complete set, not verified yarn consumption.
- White DK cotton — 200–250 g: Bodice, skirt, straps, headband, handbag, and shoe accents.
- Yellow DK cotton — 35–50 g: Skirt stripe and flower centers.
- Green DK cotton — 40–60 g: Lower skirt stripe, leaves, and stems.
- Red DK cotton — 50–70 g: Hem border, flowers, handbag edging, and shoes.
Paintbox Yarns Cotton DK is one possible yarn choice. Select matching yarn weights across all four colors to maintain consistent stitch dimensions.
Tools
- 4 mm crochet hook for the dress and main accessories.
- 3.5 mm crochet hook for small floral details.
- Locking stitch markers for round beginnings and increase positions.
- Tapestry needle for sewing and weaving ends.
- Measuring tape for garment and shoe measurements.
- Scissors and rust-resistant blocking pins.
- Age-appropriate garment closures selected for secure attachment.
Infant safety: The reference photograph includes pearl-like beads. Replace these with embroidered flower centers for an infant-wearable version. Avoid detachable beads, loose ornaments, and long decorative cords. Remove headbands and accessories during sleep or whenever the infant is unattended.
Gauge and Sizing
Work a swatch before beginning the bodice.
Proposed working gauge: 20 double crochet stitches × 10 rows = approximately 10 × 10 cm, measured after washing and drying.
This gauge is a construction target rather than a measurement verified from the photographed dress.
A bodice circumference of 96 double crochet stitches at 20 stitches per 10 cm produces approximately 48 cm before finishing. Blocking and edging may bring it close to the 49 cm target.
Measure the intended wearer and allow enough positive ease for comfortable movement and an underlayer.
If your swatch differs substantially, adjust the stitch count or hook size before continuing. A larger hook may change both the openness and weight of the fabric.
Crochet Abbreviations
| Abbreviation | Meaning |
|---|---|
| MR | Magic ring |
| ch | Chain |
| sc | Single crochet |
| hdc | Half double crochet |
| dc | Double crochet |
| tr | Treble crochet |
| inc | Two stitches in the same stitch |
| dec | Decrease |
| sl st | Slip stitch |
| BLO | Back loop only |
| st / sts | Stitch / stitches |
| rep | Repeat |
| RS | Right side |
| WS | Wrong side |
An invisible single crochet decrease is made through the front loops of two adjacent stitches before completing one single crochet.
Construction note: Dress and accessory rounds are joined unless otherwise stated. Turning chains do not count as stitches in this draft.
Pattern — Step by Step
Part 1: White Bodice
Yarn: White DK cotton.
The bodice is worked as a flat rectangle with a short opening at the back. Its lower edge becomes the foundation for the skirt.
Foundation: Ch 98.
Row 1: Dc in the fourth chain from the hook and each remaining chain (96 dc).
Rows 2–8: Ch 2, turn, dc in each stitch (96).
Rows 9–10: Ch 1, turn, sc in each stitch (96).
The bodice has ten completed rows.
Measure its height. At the proposed gauge, the section will be approximately 10 cm tall, although the single crochet finishing rows may reduce that measurement slightly.
Work one row of single crochet along each short side to tidy the back opening.
Join the two short edges at the lower portion only, leaving an opening above for dressing. Check the opening length against the intended wearer’s measurements.
Fasten off and weave in the lower yarn tail.
Part 2: Shoulder Straps (Make 2)
Yarn: White DK cotton.
The two straps support the neckline and repeat the narrow vertical texture visible in the photograph.
Row 1: Ch 9, sc in the second chain from the hook and across (8).
Rows 2–20: Ch 1, turn, sc across (8).
Fasten off, leaving a 20 cm sewing tail.
Make a second strap identically.
Pin the straps approximately 6–7 cm apart at the front neckline, then position the back ends symmetrically. Check the shoulder length against the wearer before sewing.
A finished strap should lie flat without twisting. If it is too short, add rows to both straps equally.
Part 3: White Upper Skirt
Yarn: White DK cotton.
Attach yarn at the bottom edge of the bodice. Work in joined rounds, distributing the stitches evenly.
R1: Work 96 dc around the lower edge (96).
R2: Repeat 3 dc, inc around (120).
R3: Dc in every stitch (120).
R4: Repeat 4 dc, inc around (144).
R5–R7: Dc in every stitch (144).
R8: Repeat 5 dc, inc around (168).
R9–R11: Dc in every stitch (168).
R12: Repeat 6 dc, inc around (192).
R13–R14: Dc in every stitch (192).
Fasten off the white yarn.
The skirt now has twice the stitch count of the original bodice foundation. These increases produce the flared silhouette needed for the lower color bands.
If the fabric ripples sharply rather than hanging in soft folds, check the actual gauge and distribution of increases.
Part 4: Yellow Skirt Band
Yarn: Yellow DK cotton.
Join yellow yarn at the beginning of the next round.
R15: Dc in each stitch (192).
R16–R19: Repeat R15 (192).
R20: Repeat 7 dc, inc around (216).
R21–R23: Dc in each stitch (216).
Fasten off.
The yellow stripe forms the first prominent color transition. Keep the join aligned with the back of the dress so the color changes are less visible from the front.
Part 5: Green Skirt Band
Yarn: Green DK cotton.
R24: Dc in each stitch (216).
R25–R28: Dc in each stitch (216).
R29: Repeat 8 dc, inc around (240).
R30–R32: Dc in each stitch (240).
Fasten off.
Measure the dress at this stage. The green section should sit above the decorative red hem, leaving enough remaining length for the border.
Part 6: Red Hem and Scalloped Border
Yarn: Red DK cotton.
R33: Dc in every stitch (240).
R34: Repeat 9 dc, inc around (264).
R35–R36: Dc in each stitch (264).
R37: Repeat [skip 2 stitches, 5 dc in next stitch, skip 2 stitches, sc in next stitch] around (44 scallops).
Join with a slip stitch.
Fasten off and weave in the tail.
The scallops create a rounded foundation for the flower arrangement. Their spacing should remain consistent around the entire hem.
Part 7: Large Layered Red-and-Yellow Flowers (Make 3)
Yarn: Red and yellow DK cotton.
These flowers are intended for the dress front, headband, and handbag.
Red Outer Flower
R1: Make 6 sc in MR (6).
R2: Inc in each stitch (12).
R3: Repeat sc, inc around (18).
R4: Repeat 2 sc, inc around (24).
R5: Repeat 3 sc, inc around (30).
Petal round: Repeat [sl st in next stitch, ch 2, 3 dc in next stitch, ch 2, sl st in next stitch] ten times around the 30-stitch foundation.
Fasten off with a 20 cm sewing tail.
Yellow Inner Flower
R1: 6 sc in MR (6).
R2: Inc in each stitch (12).
R3: Repeat [sl st in next stitch, ch 2, 3 hdc in next stitch, ch 2, sl st in next stitch] six times.
Fasten off.
Position the yellow flower centrally over the red flower and sew it securely through the center. Embroider a small white center using repeated yarn stitches.
The result is a two-layer flower with raised petals and contrasting colors.
Part 8: Small Red Flowers (Make 8–12)
Yarn: Red DK cotton.
R1: 6 sc in MR (6).
R2: Inc in every stitch (12).
R3: Repeat [sl st, ch 2, 2 dc in next stitch, ch 2, sl st] six times.
Fasten off with a 15 cm tail.
These flowers are suitable for the upper bodice, skirt accents, and accessory decoration.
Work embroidered centers in white yarn. Use the same hook for every small flower to maintain consistent motif dimensions.
Part 9: Yellow Hem Flowers (Make 8–10)
Yarn: Yellow DK cotton.
R1: 6 sc in MR (6).
R2: Inc in each stitch (12).
R3: Repeat [sl st, ch 2, 3 hdc in next stitch, ch 2, sl st] six times.
Fasten off, leaving a sewing tail.
Arrange the flowers around the red hem before attaching them. They should sit above the lowest edge of the scallops so the decorative border remains visible.
Do not force a fixed number of flowers onto a hem that differs in circumference from the sample. Space them evenly using stitch markers first.
Part 10: Green Leaves (Make 18–24)
Yarn: Green DK cotton.
Ch 9.
R1: Sc in second chain from hook, hdc in next stitch, dc in next four stitches, hdc in next stitch, 3 sc in final chain. Continue along the opposite side of the foundation chain: hdc in next stitch, dc in next four stitches, hdc in next stitch, sc in final stitch.
Join with a slip stitch.
Fasten off, leaving a 15 cm sewing tail.
Each leaf has a tapered oval shape. For a stronger central vein, embroider a short line through the middle using matching green yarn.
Position leaves in pairs around the flowers. Alternate their directions to create a balanced floral arrangement.
Part 11: Floral Headband
Yarn: White DK cotton.
The headband is a flat strip joined after measuring. Its finished circumference must be selected for the actual wearer rather than copied from an age label.
Row 1: Ch 9, sc in the second chain from the hook and across (8).
Rows 2 onward: Ch 1, turn, sc in each stitch (8).
Continue until the strip reaches the required length.
Join the short ends with slip stitches or sew them together using a tapestry needle.
Attach one large layered flower near the front center. Position two small flowers to either side and sew several green leaves underneath the petals.
Check that the finished headband does not constrict the head. Remove it during sleep and whenever the infant is unattended.
Part 12: Mini Crochet Handbag
Yarn: White, red, yellow, and green DK cotton.
This accessory is a decorative photo prop, not an item for an infant to carry unsupervised.
Front and Back Panels (Make 2)
Row 1: Ch 25, sc in second chain from hook and across (24).
Rows 2–18: Ch 1, turn, sc across (24).
Fasten off the first panel. Leave a sewing tail on the second.
Bag Assembly
Place the panels together with their right sides facing outward.
Single crochet along three sides, joining the panels. Leave the upper edge open.
Handle
Ch 45.
Row 1: Starting in the second chain, sc across (44).
Row 2: Ch 1, turn, sc across (44).
Sew each end securely to the upper corners of the handbag.
Decoration
Work one round of red single crochet along the upper opening, avoiding the handle attachment points.
Attach one large red-and-yellow flower to the front panel. Add two green leaves beneath the petals.
For a decorative flap, crochet a small white rectangle and sew it to the back upper edge. Avoid pearl closures and detachable beads.
Part 13: Mary Jane-Style Baby Shoes (Make 2)
Yarn: Red and white DK cotton.
The shoes are drafted around an oval sole. Check the sole against the wearer’s foot before continuing; age-based sizing alone is not reliable.
Oval Sole
R1: Ch 12. Work 2 sc in the second chain from the hook, sc in next 9 chains, 4 sc in final chain. Continue on the opposite side, sc in next 9 chains, 2 sc in the final chain (26).
R2: Inc in each of the first 2 stitches, sc in next 9, inc in each of the next 4 stitches, sc in next 9, inc in each of the final 2 stitches (34).
R3: Sc in every stitch (34).
R4: BLO sc in every stitch (34).
Shoe Upper
R5–R6: Sc in every stitch (34).
R7: Sc in first 10 stitches, dec seven times, sc in final 10 stitches (27).
R8: Sc in first 10 stitches, dec three times, sc in final 11 stitches (24).
Fasten off.
These rounds create a raised upper with a shaped toe.
White Trim
Attach white yarn to the shoe opening and work one round of single crochet, keeping the edge flat.
For a Mary Jane-style strap, crochet a short strip approximately 1.5 cm wide and test its length across the foot. Attach it securely without small buttons or loose fasteners.
Make the second shoe as a mirror image so both straps face outward.
Attach one small yellow flower and two green leaves to each toe, sewing through the motif center and leaf bases.
Assembly — 10 Steps
- Prepare the dress: Lay the bodice and skirt flat, align the back opening, and inspect the color transitions for loose yarn ends.
- Attach the straps: Pin both straps to the front and back bodice, checking equal spacing and length before sewing.
- Finish the back closure: Add a secure, age-appropriate closure and verify that the neckline opens sufficiently for dressing.
- Arrange the large flowers: Position one prominent layered flower near the upper bodice and another near the lower front skirt, leaving room for smaller motifs.
- Place the small flowers: Distribute red flowers across the bodice and lower skirt, keeping the arrangement balanced without restricting fabric movement.
- Attach the green leaves: Sew leaf bases underneath the flower petals and secure the pointed ends where necessary.
- Decorate the hem: Pin the yellow flowers around the red border at regular intervals before stitching them in place.
- Complete the headband: Join the band, attach its central flower and leaves, and check the circumference.
- Finish the handbag and shoes: Sew on the floral motifs, inspect the handle and straps, and weave in all loose yarn ends.
- Block and inspect: Gently wash according to the yarn label, dry flat, measure the finished dress and accessories, and check every decorative attachment for security.
The completed set consists of one dress, one headband, one handbag, and two shoes.
7 Technical Tips for Better Results
- Stitch marker placement: Place markers at the beginning of each skirt round and at four evenly spaced reference points. Missing a round marker can shift increases and create diagonal distortion through the color bands.
- Gauge variation: Measure a washed 10 cm swatch before starting the 96-stitch bodice. A difference of two stitches per 10 cm can noticeably alter the finished chest circumference.
- Increase distribution: Spread skirt increases evenly around the circumference rather than stacking them vertically. Repeatedly placing increases above one another can form visible corners in an otherwise rounded skirt.
- Flower attachment: Pin each large flower at three or four points before sewing. Stitching only through the center allows heavy petals to curl or rotate during wear.
- Color transitions: Change yarn at the back join and weave each tail through several centimeters of neighboring stitches. Poorly secured tails can emerge after laundering and weaken the striped sections.
- Shoe measurements: Measure each completed sole from heel to toe before working the upper. A sole that is too short cannot be corrected by adding height to the shoe opening.
- Infant safety: Replace the photographed pearl-like beads with embroidered centers and test all sewn decorations for movement. Loose beads, long cords, and insecure appliqués present avoidable hazards.
Conclusion
This crochet baby girl dress pattern uses a structured bodice, controlled skirt increases, four contrasting yarn colors, and individually attached floral motifs. The matching headband, handbag, and shoes repeat the same decorative elements at different scales.
Before making the complete set, crochet a gauge swatch and one sample flower, then confirm the intended wearer’s measurements. Record the final chest circumference, shoulder-to-hem length, and shoe sole length for future size adjustments.
Save the project to Pinterest or share a finished version on Instagram with #FloralBabyDressSet.
For this particular design, would you keep the red scalloped hem beneath the yellow flowers, or use a narrower red border to reduce bulk?
Pattern note: This photo-inspired pattern is an untested draft. Crochet a sample, verify fit and stitch counts, and inspect all closures and attachments before using it as infant clothing.








