Introduction
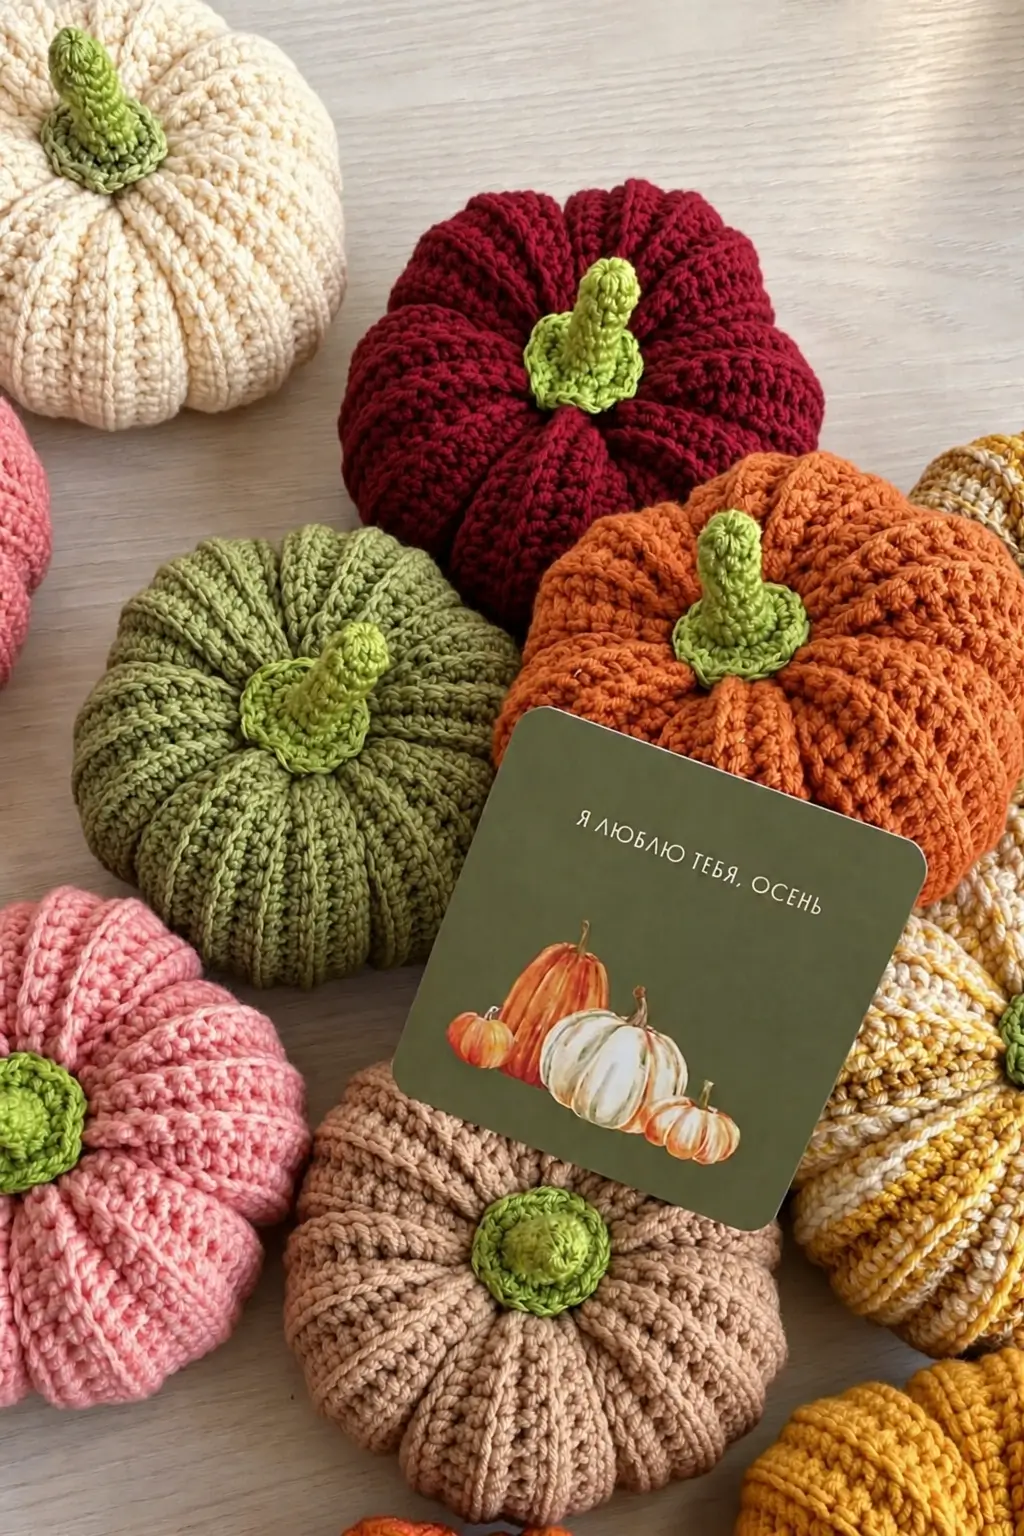
A pumpkin only reads correctly when its ribs pull inward at the center instead of forming a round stuffed ball. This ribbed crochet pumpkin pattern recreates the photographed collection with pronounced vertical sections, a squat profile and a green crochet stem. Work it in burgundy, burnt orange, sage, blush, cream or tan using worsted-weight yarn. The project uses basic flat crochet, stuffing and a separate shaping stage.
The Design: What Makes These Crochet Pumpkins Different
The photograph shows pumpkins with unusually deep sculpted grooves. Crochet ribbing creates the first layer of texture, but the finished shape also depends on external strands pulled from top to bottom after stuffing. That combination produces the eight rounded sections visible in the reference image.
A second structural decision is the low, broad body. Instead of making a tall amigurumi sphere, the pumpkin begins as a ribbed rectangle that is joined into a tube. Published crochet pumpkin patterns use the same general construction: a flat rectangle is seamed, gathered, stuffed and shaped. Some versions use back-loop-only half double crochet, while others use back-loop single crochet.
The green stem is deliberately thicker at its base. A narrow stem attached directly to the gathered opening tends to expose the closure and looks undersized against a heavily ribbed pumpkin.
Project Info at a Glance
| Skill Level | Construction | Finished Size | Hook | Best For |
|---|---|---|---|---|
| Advanced beginner | Flat ribbed rectangle, seamed and stuffed | Approx. 15–18 cm wide | 4.5–5 mm | Autumn table displays, shelves and centerpieces |
The photographed pumpkins vary in size, so 15–18 cm is a practical target rather than a claimed measurement of the original objects. Published worsted-weight pumpkin patterns use hooks around 4–5 mm, while designs made with heavier yarn may use substantially larger hooks.
Materials and Tools
Yarn
- Pumpkin color — worsted/Aran weight #4 — approximately 40–60 g per medium pumpkin
- Leaf green — worsted/Aran weight #4 — approximately 5–10 g for stem and base
Suitable body colors for reproducing the collection include burgundy, burnt orange, sage green, blush pink, cream, camel and mustard. Published worsted-weight pumpkin patterns can require as little as 15–56 g depending on finished size, so yarn consumption changes substantially with dimensions and stitch density.
Tools
- 4.5 or 5 mm crochet hook
- Worsted/Aran weight #4 yarn
- Polyester fiberfill
- Long tapestry needle
- Stitch markers
- Scissors
- Tape measure
Abbreviations
- MR — magic ring
- ch — chain
- sc — single crochet
- hdc — half double crochet
- sl st — slip stitch
- BLO — back loop only
- inc — 2 sc in the same stitch
- dec — single crochet decrease
- st/sts — stitch/stitches
An invisible decrease is worked through the front loops of the next two stitches before completing one single crochet; it reduces the visible gap produced by a conventional decrease.
Ribbed Crochet Pumpkin Pattern
This is an original photo-inspired construction. The body is crocheted flat because that method produces strong vertical ribs similar to those visible in the uploaded image. Published ribbed pumpkin patterns also commonly begin with a rectangle before the fabric is seamed and gathered.
Medium Pumpkin Body
Yarn: burgundy, orange, sage, blush, cream, tan or another pumpkin color.
Foundation: Ch 23.
Row 1: Hdc in second ch from hook and in every chain across. Ch 1, turn. (22 sts)
Row 2: Hdc BLO in each stitch across. Ch 1, turn. (22 sts)
Rows 3–36: Repeat Row 2. (22 sts)
Do not fasten off yet.
The rectangle should have 36 pronounced vertical ridges. If your fabric is substantially taller than it is wide when folded into a tube, check the gauge before continuing.
Joining the Pumpkin Body
Fold the rectangle so the first and last rows meet, with the ribbing running vertically.
Insert the hook through the corresponding stitches of both short edges and slip stitch the edges together from bottom to top.
Seam: Sl st through both layers across. (22 joining sts)
Fasten off, leaving a tail approximately 50–60 cm long.
Turn the tube so the seam sits on the inside.
Closing the Bottom
Thread the long yarn tail onto a tapestry needle.
Run the needle in and out around one open edge of the tube, catching the end of every ridge. Pull firmly until the opening closes.
Pass the needle across the gathered center several times and knot securely on the inside.
Do not trim the yarn until the closure is stable. A weak gathering thread is one of the most common failure points in stuffed crochet pumpkins.
Stuffing the Pumpkin
Add polyester fiberfill in small pieces rather than inserting one large bundle.
Fill the outside edge first. Continue adding stuffing around the circumference, then fill the center.
The pumpkin should feel firm but compressible. Excess stuffing works against the shaping strands and can make the grooves shallow.
Before closing the top, press the center downward with your fingers to establish the squat profile visible in the photograph.
Closing the Top
Cut a separate body-color strand approximately 60 cm long.
Thread it onto the tapestry needle and weave around the upper opening exactly as for the bottom.
Pull the opening closed gradually. Push any exposed stuffing beneath the stitches before tightening completely.
Secure the gathering strand but leave a small central indentation. The stem will cover the remaining closure.
Creating the Deep Pumpkin Ribs
The external shaping stage produces the strongest resemblance to the photographed pumpkins.
Cut a body-color strand approximately 150–180 cm long and thread it onto a long tapestry needle.
Insert the needle through the center of the pumpkin from bottom to top. Pull until the yarn tail disappears into the lower indentation.
Bring the yarn down the outside of the pumpkin, positioning it in one crochet groove. Insert the needle through the bottom center and bring it back through the top center.
Pull until the strand sinks visibly into the fabric.
Repeat this process around the pumpkin to create 8 evenly spaced sections.
Each shaping strand should sit inside a natural crochet groove. Pull firmly enough to produce definition, but stop before the yarn begins cutting into or distorting individual stitches.
After completing all eight sections, pass the needle through the center once more and secure the yarn inside the top indentation.
Green Crochet Stem
Yarn: leaf green.
The stem is worked separately in continuous rounds.
R1: 6 sc in MR. (6)
R2: Sc around. (6)
R3: Sc around. (6)
R4: Sc around. (6)
R5: Sc around. (6)
R6: Inc ×6. (12)
R7: (Sc, inc) ×6. (18)
R8: (2 sc, inc) ×6. (24)
Sl st in next stitch and fasten off, leaving approximately 30 cm for sewing.
The first five rounds create the upright stalk. Rounds 6–8 flare outward into a broad base that covers the pumpkin’s gathered center.
For a curved stem, bend the stalk slightly before sewing and secure it at a small angle rather than attaching it perfectly vertical.
Optional Textured Stem
The stems in the photograph have visible surface texture. A simple modification can increase that effect.
After completing the stem, join green yarn at its base. Work surface slip stitches vertically toward the tip, following one column of stitches.
Fasten off at the top.
Add two or three more surface lines around the stem, spacing them evenly. Keep these stitches loose enough that the stem does not contract.
Small Crochet Pumpkin
Use the same construction with fewer stitches and rows.
Foundation: Ch 17.
Row 1: Hdc in second ch from hook and across. Ch 1, turn. (16 sts)
Rows 2–28: Hdc BLO across. Ch 1, turn. (16 sts)
After Row 28, seam the short sides, gather the bottom, stuff and close the top.
Add 6 or 8 shaping strands depending on the desired appearance. Six sections create broader lobes; eight produce the strongly segmented shape seen in the photograph.
Large Crochet Pumpkin
For a larger centerpiece version, increase both dimensions of the starting rectangle.
Foundation: Ch 29.
Row 1: Hdc in second ch from hook and across. Ch 1, turn. (28 sts)
Rows 2–44: Hdc BLO across. Ch 1, turn. (28 sts)
Seam and stuff using the same method as the medium pumpkin.
Use approximately 200 cm of yarn for the shaping strand because the yarn must travel through the center and around the outside several times.
Pumpkin Size Guide
| Size | Starting Chain | Working Stitches | Rows | Suggested Ribs |
|---|---|---|---|---|
| Small | 17 | 16 | 28 | 6–8 |
| Medium | 23 | 22 | 36 | 8 |
| Large | 29 | 28 | 44 | 8 |
These dimensions are project specifications for this photo-inspired pattern rather than measurements taken from the objects in the photograph. Yarn thickness and personal tension will change the final diameter.
How to Make the Pumpkin Flatter
The photographed pumpkins have a broad, compressed profile rather than a spherical amigurumi shape.
After stuffing, place one hand on the bottom and one on the top. Compress the center before adding the external shaping strands.
When each shaping strand passes from bottom to top, pull it slightly tighter than the previous pass until the center begins to indent.
A second method is to pass a separate strong yarn strand directly through the center after all eight ribs are complete. Pull the top and bottom toward one another and secure the strand inside the stem area.
Do not continue tightening after the center reaches the intended depth. Excessive compression can create an hourglass-shaped body instead of a flattened pumpkin.
How to Change the Pumpkin Size
The starting chain controls the approximate height of the crochet rectangle and therefore influences the pumpkin’s height. The number of rows controls the tube circumference and has a major effect on finished width.
For a wider pumpkin, add rows.
For a taller pumpkin, add foundation chains.
For the low profile shown in the photograph, increase the number of rows more aggressively than the number of foundation stitches.
Published ribbed pumpkin patterns demonstrate the same flexibility. Documented designs use multiple yarn weights and hook sizes, including medium-weight yarn with a 5.5 mm hook, bulky yarn with a 6.5 mm hook and super-bulky yarn with a 9 mm hook.
Assembly
- Crochet the body rectangle in back-loop-only half double crochet.
- Fold the rectangle and slip stitch the two short edges together to form a tube.
- Gather one open edge tightly and secure it to create the bottom.
- Add fiberfill gradually, keeping the center slightly less dense than the outer circumference.
- Gather the second opening and secure the top.
- Pass a long body-color strand repeatedly from bottom to top to form six or eight deep sections.
- Compress the top and bottom toward one another until the body develops a squat pumpkin profile.
- Crochet the green stem and its flared base.
- Pin the stem over the gathered top and sew around the 24-stitch base.
- Hide all yarn tails inside the pumpkin and reshape the ribs by hand.
The completed pumpkin should have evenly spaced vertical grooves, a depressed center and a stem base large enough to conceal the upper gathering point.
7 Technical Tips for Better Crochet Pumpkins
- Count all 22 stitches on every medium body row. Losing one stitch at an edge gradually shortens the rectangle and creates a diagonal seam instead of a vertical one.
- Insert the hook through the back loop only for every ribbed row. Accidentally working through both loops creates a flat horizontal patch that remains visible after the pumpkin is stuffed.
- Leave at least 50–60 cm for gathering. A short sewing tail can run out before the opening is fully cinched, forcing an additional knot at the highest-tension part of the pumpkin.
- Keep the fiberfill slightly softer at the center. A densely packed core resists compression and prevents the shaping yarn from producing the deep top indentation visible in the reference design.
- Divide the circumference into eight equal sections before tightening. Marking the intended grooves first prevents the final section from becoming noticeably narrower than the other seven.
- Run each shaping strand inside a crochet groove. A strand placed across the top of a raised rib compresses the wrong part of the fabric and makes the segmentation look uneven.
- Sew through every few stitches of the 24-stitch stem base. Attaching only the narrow stalk creates a weak pivot point and allows the green stem to lean or expose the gathered opening.
Choosing Colors for a Crochet Pumpkin Collection
The uploaded image demonstrates why a pumpkin collection does not need to stay within conventional orange. Burgundy provides the darkest value, burnt orange supplies the traditional autumn reference, and cream creates the strongest contrast against the green stems. Sage, blush, camel and mustard fill the middle range.
Keep the stem color consistent across the collection if the pumpkins use many body colors. Repeating the same leaf green connects otherwise unrelated shades and makes the group read as one set.
For a smaller palette, use three body colors: cream, burgundy and burnt orange. For a muted display, combine cream, sage and camel. A brighter arrangement can use blush, mustard and orange.
Why Back-Loop Crochet Works for Pumpkin Ribs
Working half double crochet through the back loop leaves the unused front loop visible across each row. Once the rectangle is turned into a tube, those lines run vertically from the top gathering point to the bottom.
The technique provides texture before any sculpting yarn is added. Published pumpkin tutorials also use BLO half double crochet or BLO single crochet for this reason. One documented pattern works 26 half double crochet stitches for 32 rows before joining the resulting ribbed rectangle into a tube.
The external shaping yarn then exaggerates selected grooves. This two-stage construction produces substantially deeper segmentation than stuffing a plain crochet tube without ribbing.
Finishing the Crochet Pumpkin
Roll the finished pumpkin gently between both hands to distribute the stuffing after the shaping threads are secured. Pull individual sections outward where necessary so all eight lobes have similar volume.
Check the bottom next. If the pumpkin rocks on a hard surface, push the gathered center slightly upward so the surrounding sections become the contact points.
Finally, inspect the stem attachment. The flared green base should cover the gathering stitches without hiding the upper ends of the pumpkin ribs.
These pumpkins are designed as indoor decorative objects. If making them for environments where small children or pets can access them, secure every component carefully and avoid adding wire, beads or other detachable decorations.
Conclusion
The strongest feature of this ribbed crochet pumpkin pattern is created after the body has already been crocheted: eight external shaping passes turn a simple stuffed tube into deep pumpkin sections. Start with the medium 22-stitch version to establish your tension, then adjust the chain and row counts for a mixed-size display. Burgundy, orange, sage, blush, cream and tan reproduce the range visible in the photograph, while one consistent green keeps the stems visually connected. Save the pattern to Pinterest or share your finished pumpkin set on Instagram with #RibbedCrochetPumpkinPatch. Which body color would you pair with the bright green stem first?








