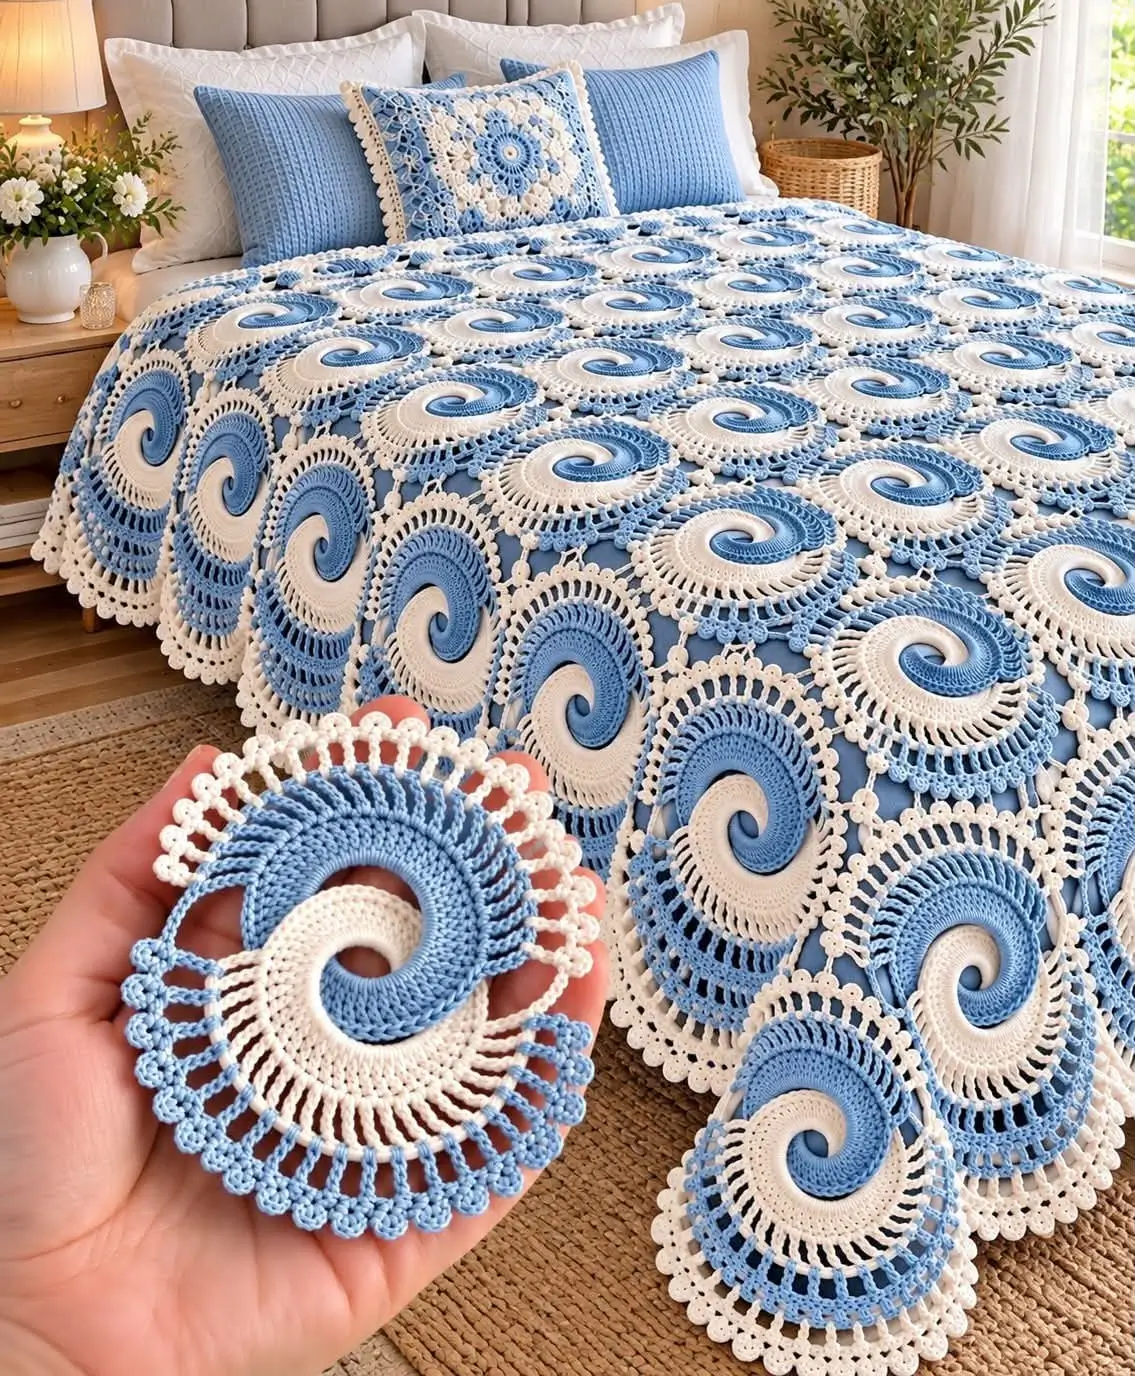
Two interlocking spiral arms must expand at the same rate or the blue-and-white swirl loses its circular shape. This blue and white crochet spiral blanket pattern uses alternating yarn colors, individual motifs, and openwork edging to create a decorative bed covering. The proposed version uses DK cotton-blend yarn and a 4 mm hook, with advanced-level joining and finishing techniques. Its modular construction allows the finished dimensions to be adjusted to suit different beds.
The Design: What Makes This Spiral Blanket Different
The defining feature is the contrast between the powder-blue spiral and the ivory section surrounding it. Each color must maintain a consistent width as the motif expands. Uneven increases distort the curve, so stitch placement matters more than simply adding decorative rounds.
A second structural decision concerns the lace border. Open chain spaces reduce the visual density of the circular center and provide attachment points for joining neighboring motifs. The crochet lace bedspread gains flexibility from these open sections, although excessive chain length can create gaps between motifs.
Finally, the repeated units must remain close in diameter. A spiral motif blanket assembled from different-sized circles develops ripples along the joining seams.
One frequent mistake is forcing a circular motif into a square arrangement without measuring the spaces between its outer loops. Plan the layout before fastening every joining thread.
Project Info at a Glance
| Detail | Specification |
|---|---|
| Skill level | Advanced |
| Estimated time | Dependent on swatch and motif count |
| Finished size | Customizable; verify after joining |
| Hook | 4 mm proposed |
| Yarn | DK cotton blend |
| Construction | Individual motifs and joining strips |
| Best for | Decorative bedspreads and throws |
This is an original photo-inspired working design, not a tested reproduction of the pictured blanket. The original motif’s exact shaping and gauge are unknown.
Materials and Tools
Yarn
Choose yarn with consistent thickness and a clearly defined stitch structure.
- Powder blue — DK cotton-blend yarn — quantity determined by sample motif — suggested range: 100–125 m per 50 g.
- Ivory white — matching DK cotton-blend yarn — quantity determined by sample motif — use the same brand and yarn line as the blue.
- Optional coordinating blue — DK yarn — for joining seams and a decorative outer border.
Suitable yarn lines to investigate include Paintbox Yarns Cotton DK and Stylecraft Special DK. These are suggestions, not verified matches for the photograph.
Tools
- 4 mm crochet hook for the sample motif.
- 3.5 mm crochet hook if the fabric is too loose.
- Locking stitch markers, at least four.
- Blunt tapestry needle for joining and weaving.
- Sharp scissors.
- Flexible measuring tape.
- Blocking mat and rust-resistant pins.
- Small digital scale for measuring yarn consumption.
Calculating Yarn Quantity
Do not purchase a full bedspread quantity from an untested estimate. Crochet one complete motif, including its lace border, and weigh it.
For example, if one completed motif weighs 18 g and the layout requires 80 motifs:
80 × 18 = 1,440 g
Add approximately 10–15% for joins, edging, and working allowance. At 15%, the illustrative total becomes 1,656 g.
Weigh blue and ivory separately if you want accurate purchasing quantities for each color. Record the measurements before producing the remaining motifs.
Crochet Abbreviations
All terminology uses US crochet terms.
| Abbreviation | Meaning |
|---|---|
| MR | Magic ring |
| sc | Single crochet |
| hdc | Half double crochet |
| dc | Double crochet |
| tr | Treble crochet |
| inc | Two stitches in one stitch |
| dec | Single-crochet decrease |
| sl st | Slip stitch |
| ch | Chain |
| BLO | Back loop only |
| st(s) | Stitch(es) |
| rep | Repeat |
| sp | Space |
| RS | Right side |
| WS | Wrong side |
For an invisible decrease, insert the hook through the front loops of the next two stitches, yarn over, pull through, then complete one single crochet.
Pattern – Step by Step
Before Working the Main Motif
The motif described here has three elements: a two-color center, an ivory transition round, and a decorative lace edge. It uses a continuous single-crochet spiral for the center, with color sections that shift around the circle.
The center is designed for 36 stitches after Round 6, using six increases per round. The same six-increase rule continues through Round 10 to reach 60 stitches.
This is not the only way to crochet a two-color spiral. Double-crochet spirals produce a taller and more pronounced ridge, while single crochet produces a flatter, denser center.
Part 1: Two-Color Spiral Center (Make One Per Motif)
Yarn: powder blue (A) and ivory white (B). Work continuously unless otherwise stated.
For the color changes, carry the unused yarn loosely along the wrong side. Place a marker at the beginning of the round and move it upward after each completed round.
R1: With A, work 3 sc into MR. With B, work 3 sc into the same MR. (6)
R2: Inc in each stitch, working A over the first three original stitches and B over the next three. (12)
R3: Rep [1 sc, inc] ×6 around. (18)
R4: Rep [2 sc, inc] ×6 around. (24)
R5: Rep [3 sc, inc] ×6 around. (30)
R6: Rep [4 sc, inc] ×6 around. (36)
R7: Rep [5 sc, inc] ×6 around. (42)
R8: Rep [6 sc, inc] ×6 around. (48)
R9: Rep [7 sc, inc] ×6 around. (54)
R10: Rep [8 sc, inc] ×6 around. (60)
For R3–R10, shift the two color-change positions by one stitch in the same direction on each new round. Each color should occupy approximately half of the growing circle, with a moving boundary rather than a fixed radial dividing line.
The stitch totals are mathematically checked, but the color-placement method is untested and may require adjustment. For a more established interlocking spiral construction, consult a dedicated two-color spiral tutorial before making the full blanket.
After Round 10, fasten off blue, leaving a 15 cm tail. Keep ivory attached for the transition.
Part 2: Ivory Transition Round (Make One Per Motif)
Yarn: ivory white.
R11: Sc in each stitch around. (60)
R12: Rep [9 sc, inc] ×6. (66)
R13: Sc in each stitch around. (66)
Fasten off, leaving a 15 cm tail.
This transition produces a neutral ring between the center and the decorative border. Check that the circle remains flat before proceeding. If the fabric begins to cup, the hook may be too small or the stitch tension too firm. If the edge waves, review the increase spacing.
Part 3: Blue Openwork Border (Make One Per Motif)
Yarn: powder blue.
Attach the yarn to any stitch from R13.
R14: Ch 1, sc in the same stitch. Rep [ch 3, skip 2 sts, sc in next st] around, adjusting the final spacing to finish evenly. Join with sl st.
R15: Sl st into the first ch-3 sp. Ch 1, then work [sc, ch 4, sc] into each ch-3 sp around. Join with sl st.
R16: Sl st into the first ch-4 sp. Work [sc, ch 5, sc] in each ch-4 sp around. Join with sl st.
Fasten off, leaving a 20 cm tail.
The decorative rounds are a proposed lace treatment rather than verified original instructions. Because R14 starts from 66 stitches, 22 evenly spaced chain arches are intended; the written repeat should be checked against the physical sample before making additional motifs.
Part 4: Ivory Scalloped Outer Edge
Yarn: ivory white.
Attach ivory to one of the outer chain spaces.
R17: In each ch-5 space, work [sc, 5 dc, sc]. Repeat around and join with sl st.
Fasten off, leaving a 20 cm tail.
This creates a simple fan-style scallop. The photograph shows more elaborate openwork with raised, separated picot clusters; the fan edging here is a simplified alternative.
For a closer visual interpretation, work a second experimental border with picots, then compare both samples against the photograph before selecting the final construction.
Part 5: Joining the Spiral Motifs
The motifs must be connected into rows or panels. Circular shapes leave spaces between them, so a joining method needs to accommodate those gaps without pulling the circles out of shape.
Lay out the blocked motifs on a flat surface. Arrange the spiral direction consistently, with every blue curve turning the same way. Alternating the orientation creates a different overall design.
Use the ivory yarn and a tapestry needle to connect corresponding outer scallops with a loose whipstitch. Begin by connecting motifs at four evenly spaced points. Add intermediate connections only after checking the spacing.
Do not pull the edges completely together. Small open areas between circular motifs preserve the lace appearance and allow the fabric to drape.
For a more structured blanket, make separate joining strips using rows of chain spaces and single crochet. Attach the strips to the outer scallops, then connect the completed panels.
Part 6: Optional Gap-Filling Lace
Yarn: ivory white.
Circular motifs can leave diamond-shaped spaces where four units meet. These may be filled with small crochet inserts.
R1: Work 6 sc in MR. (6)
R2: Inc ×6. (12)
R3: Rep [1 sc, inc] ×6. (18)
R4: Rep [2 sc, inc] ×6. (24)
Fasten off, leaving a 25 cm sewing tail.
Use these inserts only where their diameter suits the space between the four motifs. They are optional, and the photo’s original connecting lace is not confirmed.
Pin each insert before sewing. A filler that is too large will create a raised intersection; one that is too small will pull the surrounding scallops inward.
Part 7: Final Blanket Border
After joining all motifs, measure the blanket along every side.
Attach ivory yarn at a corner and work a foundation round of single crochet along the outer edge. Place extra stitches in corner spaces where needed to prevent curling. The exact number depends on the motif arrangement.
For the second border round, alternate chain spaces with single crochet anchors. Maintain consistent spacing across the long and short sides.
Finish with a scalloped round using groups of five double crochet stitches separated by single crochet anchors. Adjust the number of repeats so each corner lies flat.
Fasten off and weave in the remaining yarn tail through several stitches on the wrong side.
Assembly – 10 Steps
- Complete the sample spiral. Measure its diameter and weigh it before committing to the blanket quantity.
- Block the sample. Pin the circle into a consistent shape and allow it to dry fully.
- Calculate the layout. Divide the desired blanket width and length by the effective joined-motif dimensions.
- Make the remaining centers. Keep the same hook, yarn, and increase placement throughout.
- Add the transition rounds. Check the stitch count at the end of each center.
- Crochet the lace borders. Compare the diameter of every completed motif with the sample.
- Arrange the motifs. Lay them out in the planned orientation before sewing.
- Connect the motifs. Join corresponding scallops using consistent thread tension.
- Fill selected gaps. Attach small lace inserts only where necessary.
- Finish the perimeter. Add the outer border, weave in yarn tails, and block the completed blanket.
The blanket is complete when all joining points are secured, the perimeter lies flat, and the yarn ends have been woven into the fabric.
7 Technical Tips for a Consistent Spiral Blanket
- Mark every round boundary. A missing marker can shift the increase sequence by one stitch and create a visible distortion in the circle. Move the marker immediately after completing each round.
- Measure motif diameter after blocking. Even a 5 mm difference can accumulate across a long row of motifs. Compare at least five completed units before beginning the joining stage.
- Control the color-change tension. Carrying unused yarn too tightly across the wrong side causes the center to cup. Leave enough slack for the spiral to lie flat without exposing long loose strands.
- Check increase placement. Six increases per round must be distributed consistently in the single-crochet center. A concentrated group of increases creates a corner rather than a circular edge.
- Test the scalloped border. Five double crochets in each chain space may create a crowded edge when the yarn is thick. Make one complete sample before applying the edging to every motif.
- Pin joining points first. Sewing without pinning can pull the outer arches out of alignment. Secure four evenly spaced anchor points and inspect the seam before filling the remaining gaps.
- Weave tails in different directions. A yarn tail passed through only one or two stitches can loosen during handling. Work it through several neighboring stitches, reverse direction, and trim after the fabric settles.
Conclusion
The finished result depends on three measurable factors: consistent spiral shaping, uniform motif diameter, and controlled joining tension. Before producing a full bedspread, make two complete motifs and connect them to evaluate the lace spacing. Record the hook size, blocked diameter, yarn consumption, and number of connecting points in a project notebook.
This blue and white crochet spiral blanket pattern is a photo-inspired construction guide rather than an exact reproduction of the reference design. Share your completed sample or blanket on Pinterest and Instagram using #BlueWhiteSpiralBlanket, and include your hook size and yarn weight so other makers can compare results.
Which border produces a closer match to the photographed blue-and-white spiral: open chain arches or raised picot clusters?









