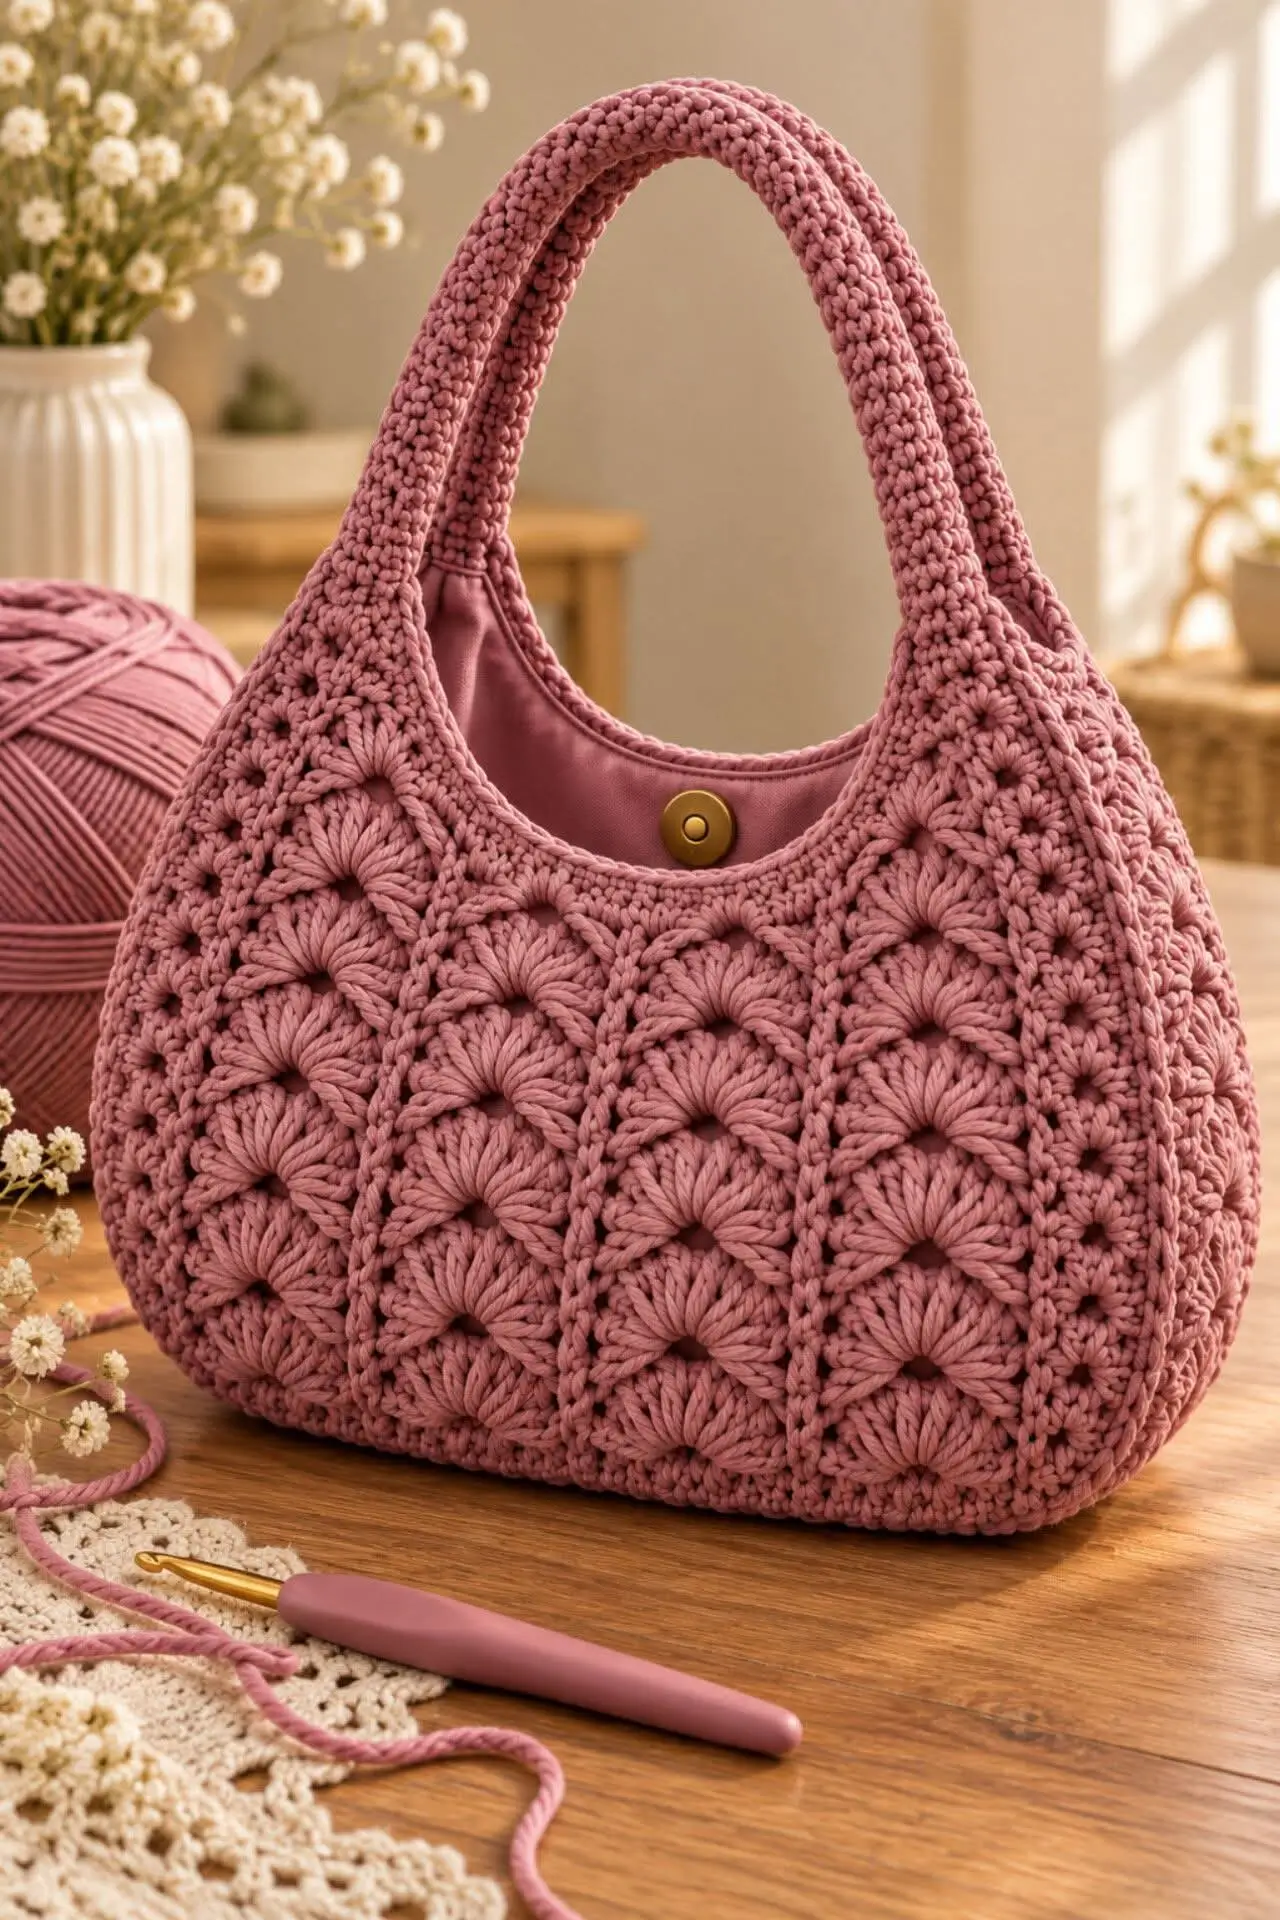
The raised flower panels on this dusty rose handbag must curve around a rounded base without distorting their petals. This crochet floral hobo bag pattern combines dimensional six-petal motifs, dense single crochet, reinforced shoulder handles, and a fabric lining. Designed for intermediate crocheters, the proposed bag measures approximately 32 cm wide and 26 cm tall, excluding handles. Its lined construction makes it suitable for carrying everyday essentials without stretching the floral fabric.
The Design: What Makes This Floral Hobo Bag Different
Three construction decisions define this textured crochet shoulder bag.
First, the raised flower motifs are made separately and joined into rectangular panels. This method gives the maker control over petal placement while allowing the floral surface to remain dimensional. Each panel uses repeated six-petal squares, with smaller single-crochet stitches forming the joining edges.
Second, a separate bottom and side gusset creates the rounded silhouette. You can adjust its depth without changing the flower arrangement. The gusset also distributes weight more evenly than joining two flat panels directly along their edges.
Third, the dusty rose crochet purse uses reinforced handles and a fabric lining to limit stretching. The crocheter must pay particular attention to the handle attachment points, where concentrated weight can distort open floral stitches.
A common mistake is attaching shoulder straps directly to decorative petals rather than the structural border.
Project Info at a Glance
| Feature | Details |
|---|---|
| Skill Level | Intermediate |
| Estimated Time | 12–16 hours |
| Finished Size | Approximately 32 × 26 × 9 cm |
| Hook Size | 4.5 mm |
| Yarn | 3 mm polyester cord |
| Construction | Floral panels, separate gusset, reinforced handles |
| Best For | Everyday shoulder bag and handmade accessories |
Note: Measurements and working time are design estimates. This original, photo-inspired pattern has not been sample-tested.
Materials and Tools
Yarn
- Dusty rose polyester cord: 3 mm thickness, approximately 500–650 g planned.
- Matching dusty rose cord: Reserve approximately 60–90 g from the main allowance for handles and reinforcement.
- Matching sewing thread: For attaching the lining and magnetic closure.
The yarn quantities are purchasing estimates rather than measured consumption. Actual requirements depend on cord density, stitch tension, motif gauge, and handle length.
Polyester cord provides abrasion resistance and helps the bag maintain its shape. Firm cotton cord is another option, although it may change the finished weight and flexibility.
Tools
- 4.5 mm crochet hook
- 18 mm sew-in magnetic snap
- Dusty rose cotton lining fabric: Approximately 45 × 75 cm
- Medium-weight woven interfacing
- Blunt tapestry needle
- Stitch markers
- Fabric scissors
- Sewing needle and matching thread
- Measuring tape
- Rust-resistant sewing clips
- Optional cotton webbing: 10–15 mm wide for handle reinforcement
Choose a hook that creates a firm fabric without forcing the stitches excessively. The finished flower motif should hold its shape when lifted by one corner.
Crochet Abbreviations
| Abbreviation | Meaning |
|---|---|
| MR | Magic ring |
| ch | Chain |
| sc | Single crochet |
| hdc | Half double crochet |
| dc | Double crochet |
| tr | Treble crochet |
| inc | Two single crochets in one stitch |
| dec | Single crochet decrease |
| sl st | Slip stitch |
| BLO | Back loop only |
| st(s) | Stitch(es) |
| sp | Space |
| R | Round |
| RS | Right side |
| WS | Wrong side |
An invisible decrease is worked through the front loops of two adjacent stitches to reduce visible bulk, although this bag construction does not require shaped amigurumi decreases.
Gauge and Construction Notes
The floral surface resembles a repeating raised-petal design. Its exact stitch sequence cannot be determined from the photograph alone.
This pattern is an original modular interpretation using six-petal flower squares. It creates a similar dimensional appearance rather than an identical stitch-for-stitch reproduction.
Make one complete sample motif before beginning the full bag. Aim for a blocked square approximately 8 cm wide.
If a square measures 9 cm, four squares will produce a panel approximately 36 cm wide before joining. A 7 cm motif may require additional border rounds to reach the intended proportions.
Construction plan: Make 24 flower squares, join 12 for the front and 12 for the back, add a separate gusset, crochet two handles, then install the lining and magnetic closure.
Free Crochet Floral Hobo Bag Pattern – Step by Step
1. Raised Flower Motif (Make 24)
Yarn: Dusty rose. Original motif based on standard crochet construction.
This flower uses a central ring, six chain spaces, and six raised petals. A separate foundation will convert each flower into a square for joining.
R1: Make a magic ring. Ch 2 (does not count as a stitch), work 12 dc into the ring. Join with sl st to the first dc. (12 dc)
R2: Ch 1, sc in the first stitch, then repeat [ch 3, skip 1 stitch, sc in next stitch] around, treating the final join as the closing anchor. (6 sc, 6 ch-3 spaces)
R3: Sl st into the first ch-3 space. Work (sc, hdc, 3 dc, hdc, sc) into each ch-3 space. Join to the first sc. (6 petals, 42 stitches)
R4: Working behind the petals, attach the yarn around the six R2 sc posts in sequence. Work sc around each post and ch 4 between posts. Join. (6 sc, 6 ch-4 spaces)
R5: In each ch-4 space work (sc, hdc, 5 dc, hdc, sc). Repeat around. Join. (6 raised outer petals, 54 stitches)
Fasten off, leaving a 15 cm tail for weaving.
Keep the foundation chains behind the first petal layer rather than working through the visible petal stitches. Check the six chain spaces before continuing.
2. Square Foundation Border (Make 24)
Yarn: Dusty rose.
Each flower requires a square foundation. Crochet the foundation separately, then stitch the flower onto its center.
R1: 6 sc in MR. (6)
R2: Inc × 6. (12)
R3: (sc, inc) × 6. (18)
R4: (2 sc, inc) × 6. (24)
R5: (3 sc, inc) × 6. (30)
R6: (4 sc, inc) × 6. (36)
R7: (5 sc, inc) × 6. (42)
R8: Work one sc in every stitch, except at stitches 1, 11, 22, and 32, where you work (sc, ch 2, sc). Join. (46 sc, four ch-2 corner spaces)
Fasten off with a 20 cm tail.
Block the foundations into squares, targeting approximately 8 × 8 cm. Stitch each flower onto its foundation using small stitches around the central and rear petal structure.
Do not flatten the visible petals during attachment.
3. Front Floral Panel (Make 1)
Arrange 12 completed flower squares into three rows of four.
Join the squares using slip stitches through the back loops of adjacent foundation borders. This produces a raised seam on one side and a flatter finish on the other.
Work the joining stitches loosely enough that the floral panels remain flat.
After joining, crochet one round of sc around the outside perimeter. Place three sc into each external corner space.
For the second border round, work sc in every stitch, maintaining three stitches at each corner.
Fasten off with a 25 cm tail.
The panel should measure approximately 32 cm across and 24–26 cm high, depending on gauge and joining method.
4. Back Floral Panel (Make 1)
Repeat the front-panel instructions using the remaining 12 squares.
Check both panels against each other before adding the gusset. Their external stitch counts must match or be adjusted along the border.
Do not compensate for a large difference by stretching one panel during assembly. Rework the border instead.
5. Rounded Bottom and Side Gusset (Make 1)
Yarn: Dusty rose.
The gusset forms the bottom and lower sidewalls. It also creates the rounded lower profile visible in the reference photograph.
Foundation: Ch 19.
Row 1: Sc in the second chain from the hook and in each remaining chain. Ch 1, turn. (18)
Rows 2–6: Sc in each stitch. Ch 1, turn. (18)
Rows 7–72: Repeat Row 2. (18 each row)
Measure the strip against the lower and side edges of the assembled floral panels. Add or remove rows until the strip follows the desired U-shaped attachment path.
For a narrower bag, reduce the starting chain count. For a deeper bag, increase it.
Work one final sc row without a turning chain. Fasten off, leaving a 35 cm tail.
The 72-row length is a starting specification, not a verified fit for every gauge. Fit the gusset physically before seaming.
6. Reinforced Shoulder Handles (Make 2)
Yarn: Dusty rose.
Foundation: Ch 9.
Row 1: Sc in the second chain from the hook and across. Ch 1, turn. (8)
Rows 2–64: Sc in BLO across. Ch 1, turn. (8)
Row 65: Sc across. (8)
Fasten off, leaving a 35 cm tail at both ends where possible.
Each strap should measure approximately 35–42 cm long, depending on gauge. Both handles must have the same finished length.
For additional strength, stitch cotton webbing along the underside of each handle. Fold the crocheted strap around the webbing and sew the edges together with matching thread.
This internal support reduces stretching when the bag carries a phone, wallet, keys, and other small objects.
7. Upper Opening Border
Yarn: Dusty rose.
With the front and back panels joined to the gusset, work a continuous border around the top opening.
R1: Sc evenly around the entire opening. Join with sl st. (Count depends on assembled edge)
R2: Ch 1, sc in every stitch. Join. (Same count as R1)
R3: Repeat R2. (Same count)
R4: Work reverse single crochet around the opening for a firm decorative edge, or use a final standard sc round for a flatter result.
Fasten off, leaving a 20 cm tail.
The upper opening should curve gently between the handle attachment points. Avoid pulling the border too tightly, which can collapse the bag’s sides.
8. Fabric Lining (Make 1)
Material: Dusty rose woven cotton.
Place the completed crochet shell on folded lining fabric. Trace its general outline, including the bottom gusset depth, and add approximately 1.5 cm seam allowance.
Cut two main lining panels and one gusset strip.
Sew the gusset between the two panels, keeping the right sides together. Leave the upper edge open.
Press the seam allowances toward the gusset. Turn the lining right side out and place it inside the crochet shell to check the fit.
The lining should sit approximately 5–8 mm below the top crochet edge.
If it is too large, adjust the side seams before installation. Excess lining fabric can bunch under the magnetic closure and distort the opening.
9. Magnetic Snap Closure
Material: 18 mm sew-in magnetic snap.
Find the center of the front and back lining panels.
Mark positions approximately 2.5 cm below the upper edge, checking that both snap halves align when the bag is closed.
Add small pieces of interfacing behind the attachment areas.
Sew the magnetic snap components securely to the lining. Keep all attachment stitches within the reinforced area.
For this bag, a sew-in snap is preferable to forcing metal prongs directly through raised crochet petals.
10. Optional Interior Pocket (Make 1)
Material: Matching lining fabric.
Cut a rectangle measuring approximately 18 × 14 cm.
Fold under 1 cm on the side and bottom edges. Fold the top edge twice by 1 cm and stitch it flat.
Position the pocket on the back lining panel, at least 5 cm below the top opening.
Sew along the sides and bottom, reinforcing the two upper corners with short backstitches.
The pocket can hold small flat items without placing additional strain on the floral shell.
How to Assemble the Crochet Floral Hobo Bag
- Prepare the flower panels. Lay both panels flat and compare their width, height, and outer border counts.
- Attach the gusset. Pin the gusset around the bottom and lower sides of the front panel. Sew or slip-stitch it into position.
- Join the back panel. Attach the opposite gusset edge to the back panel, matching the lower center points.
- Shape the bag body. Turn the bag right side out and inspect the lower corners. Adjust any puckered seams.
- Check the upper opening. Confirm that the opening curves evenly and that the front and back edges align.
- Attach the handles. Position each handle symmetrically, approximately 5–7 cm from the side edges. Stitch through the structural border and reinforce each attachment area.
- Secure the floral features. Inspect all raised petals and anchor any loose foundation threads without flattening the flowers.
- Install the lining. Insert the prepared fabric lining, align the upper edge, and sew it to the crochet shell with small, evenly spaced stitches.
- Check the magnetic closure. Close the snap and verify that the lining remains flat without pulling the bag opening out of shape.
- Finish the construction. Weave in remaining cord tails, trim excess thread, and test the bag with a light load.
The completed bag has two floral panels, a shaped gusset, reinforced handles, and a lined magnetic closure.
7 Technical Tips for a Better Crochet Flower Handbag
- Stitch-marker placement: Mark the first stitch of each foundation round and all four square corners. Losing a corner position by one stitch can produce uneven joins across a twelve-square panel.
- Petal tension: Keep the six chain spaces in each flower consistent. A chain-space variation of even 3–4 mm can visibly change the diameter of the raised petals.
- Joining accuracy: Compare the edges of every square before seaming. Joining a 7.5 cm square directly to an 8.5 cm square can cause rippling that becomes more noticeable after lining.
- Handle reinforcement: Secure each handle through at least 3 cm of the structural upper border. Attaching the strap only to flower petals can cause the decorative stitches to stretch or tear.
- Cord tension: Use the same hook and working tension throughout the bag. Switching from firm to loose stitches midway through the gusset can create a visible change in depth.
- Lining placement: Position the lining 5–8 mm below the upper crochet edge. A lining sewn above the edge may remain visible from the outside and interfere with the magnetic snap.
- Tail weaving: Weave each cord tail through several stitches in one direction and then reverse direction before trimming. Short, unsecured tails can work loose under repeated movement, particularly near the handles.
Common Problems and Corrections
Why Does the Flower Panel Curl?
The most likely causes are inconsistent motif sizes, tight joining stitches, or too many stitches added around the outer border.
Measure the individual squares before joining. If they differ significantly, rework the outliers rather than forcing the entire panel into alignment.
Why Does the Bottom Sag?
A crochet handbag can stretch when its contents are heavier than the fabric can support.
Use a firm gusset stitch, add a removable plastic canvas base covered with fabric, or select a denser cord. The lining should also support the bottom without pulling upward.
Why Are the Handles Stretching?
Crochet stitches naturally lengthen under repeated load.
Webbing sewn inside the handles provides a more stable structure. Keep the webbing slightly shorter than the crocheted strap so the reinforcement bears most of the weight.
Can This Bag Be Made with T-Shirt Yarn?
Yes, but the dimensions and yarn consumption will change.
T-shirt yarn is generally thicker and more elastic than tightly twisted polyester cord. Make a complete flower sample and measure it before committing to the full project.
Can the Floral Motifs Be Crocheted Directly into the Bag?
An integrated floral stitch pattern is possible, but it requires a different construction method.
This modular version uses separate motifs because they are easier to position consistently across front and back panels. Integrated motifs may produce fewer seams but demand more careful stitch-count planning.
Conclusion
This crochet floral hobo bag pattern combines dimensional flower motifs with a separate gusset, reinforced handles, and a fitted lining. The main construction priorities are consistent square measurements, stable joining seams, and strong handle attachment points. Before making the full handbag, crochet one flower square and record its finished dimensions, yarn consumption, and tension. Use those measurements to calculate the final panel size and purchase sufficient cord.
Save the project to Pinterest as a floral crochet handbag reference, or share the finished version on Instagram using #DustyRoseFloralHoboBag.
For this particular design, would you keep the matching dusty rose lining or replace it with a contrasting cream fabric?









