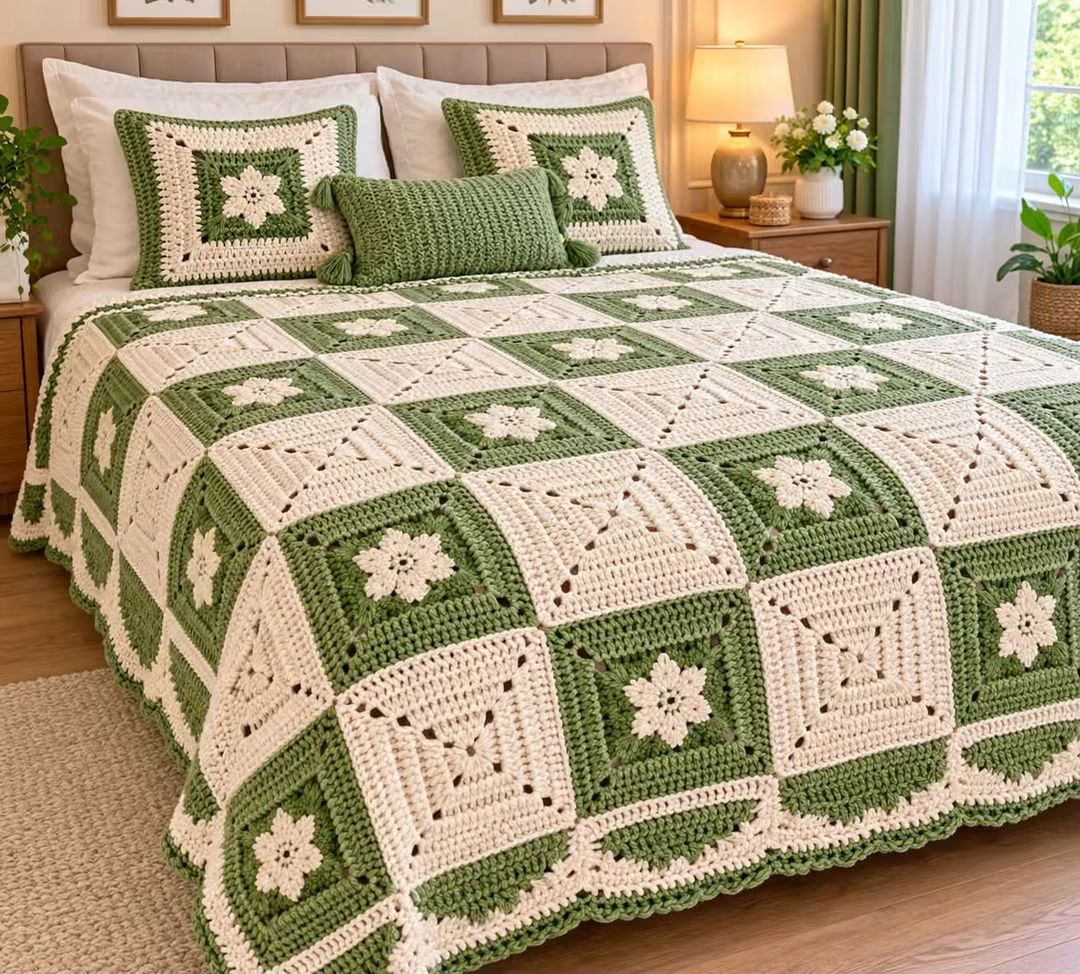
Every cream flower must remain centered inside its sage-green square while the neighboring ivory square forms four matching corners. This sage green granny square blanket pattern combines two alternating motifs, raised floral centers, geometric openwork, and coordinated cushion covers. Use DK yarn with a 4–4.5 mm hook for an intermediate-level bedspread. The modular construction allows the blanket to be adjusted to different mattress sizes.
The Design: What Makes This Blanket Different
The photograph combines two distinct granny square structures. One has a raised cream flower surrounded by sage-green framing rounds. The other is predominantly ivory, with a smaller center and diagonal openings that draw attention toward its four corners.
Both squares must finish at identical dimensions. That requirement controls the construction: each motif uses the same number of outer stitches and matching corner spaces, even though its center looks different.
The checkerboard arrangement is the second major design decision. Alternating a floral square with a geometric square prevents the raised flowers from forming an overly dense surface. This gives the green and cream crochet blanket its balanced appearance.
A common mistake in a flower granny square crochet pattern is making the flower round too tight. The square then cups around its center and becomes difficult to join.
Project Info at a Glance
| Skill Level | Construction | Hook | Yarn | Best For |
|---|---|---|---|---|
| Intermediate | Two alternating square motifs | 4–4.5 mm | DK / #3 | Bedspreads, throws, matching cushions |
Published flower granny square patterns support DK yarn with hooks in the 4–4.5 mm range. A decorative floral square can measure approximately 22 cm, although the squares in this photograph appear smaller. Make and block one sample of each design before calculating the bedspread dimensions.
Materials and Tools
Yarn
- Sage-green DK yarn — floral square backgrounds, joining accents, outer border, and textured cushion.
- Warm ivory DK yarn — flower centers, geometric squares, joining seams, and decorative edging.
Choose yarns with similar thickness and fiber content. Cotton blends and smooth acrylic DK yarns are practical options for defined stitches and consistent square measurements.
A published DK flower granny square throw uses approximately 800 g of background yarn plus additional flower colors. That quantity belongs to a different pattern and should not be treated as the exact requirement for this bedspread.
Tools
- 4–4.5 mm crochet hook
- Yarn needle
- Scissors
- Locking stitch markers
- Tape measure
- Blocking mats
- Rustproof pins
- Two square cushion inserts
- One rectangular cushion insert
Abbreviations
- MR — magic ring
- ch — chain
- sl st — slip stitch
- sc — single crochet
- hdc — half double crochet
- dc — double crochet
- tr — treble crochet
- sp — space
- st/sts — stitch/stitches
- BLO — back loop only
- RS — right side
- WS — wrong side
An invisible decrease is not required for the blanket squares because their shape is created through corner increases and evenly distributed stitches.
Special Stitches
Three-Double-Crochet Cluster
Yarn over and insert the hook into the indicated stitch or space.
Pull up a loop.
Yarn over and pull through two loops.
Repeat this incomplete double crochet twice more in the same position.
Yarn over and pull through all remaining loops.
Ch 1 to secure the cluster.
Raised Puff Stitch
Yarn over and insert the hook into the indicated stitch.
Pull up a long loop.
Repeat the yarn-over and loop-pull sequence twice more in the same position.
Yarn over and pull through all loops on the hook.
Ch 1 to secure the puff.
Keep the elongated loops at the same height to produce uniform petals.
Pattern A — Sage Green Flower Granny Square
Work this motif in joined rounds. Beginning chains do not count as stitches unless stated otherwise.
Round 1 — Cream Flower Center
Yarn: warm ivory.
Make an MR.
Ch 2.
Work 12 dc into the ring.
Join with sl st to the first dc.
Stitch count: 12 dc.
Pull the ring closed.
Round 2 — Raised Flower Petals
Ch 1.
Work one puff stitch into the first dc, followed by ch 1.
Repeat around:
1 puff stitch in next dc, ch 1.
Join with sl st to the top of the first puff.
Stitch count: 12 puff stitches and 12 ch-1 spaces.
Fasten off ivory.
The flower should remain flat around its center.
Round 3 — Green Flower Surround
Yarn: sage green.
Join yarn in any ch-1 space.
Work 2 dc and ch 1 in the same space.
Repeat around:
2 dc in next ch-1 space, ch 1.
Join with sl st to the first dc.
Stitch count: 24 dc and 12 ch-1 spaces.
The twelve spaces will be used to establish the four corners in the next round.
Round 4 — Turning the Flower into a Square
Continue with sage green.
Join or move to the first ch-1 space.
Work the first corner:
(2 dc, ch 2, 2 dc) in the same space.
In each of the next two ch-1 spaces, work 2 dc.
Repeat the corner treatment in the following ch-1 space.
Continue around, placing corners in the first, fourth, seventh, and tenth ch-1 spaces.
Join with sl st.
Stitch count: 32 dc and four ch-2 corner spaces.
The four corners contain 16 dc in total. The eight remaining spaces contain another 16 dc.
Round 5 — Green Square Frame
Join sage green in any corner space.
Work:
(2 dc, ch 2, 2 dc) in the corner.
Work one dc into each stitch along the next side.
Repeat the same corner treatment at the following corner.
Continue around all four sides.
Join with sl st.
Stitch count: 48 dc and four ch-2 corner spaces.
Round 6 — Second Green Frame
Continue with sage green.
Work one dc into each stitch along every side.
At each corner work:
(2 dc, ch 2, 2 dc).
Join with sl st.
Stitch count: 64 dc and four ch-2 corner spaces.
Round 7 — Final Floral Square Border
Continue with sage green.
Work one dc in each stitch around.
At every corner work:
(2 dc, ch 2, 2 dc).
Join with sl st.
Stitch count: 80 dc and four ch-2 corner spaces.
Fasten off, leaving a 15 cm tail if the square will be sewn to another motif.
The completed square has a cream raised flower and a sage-green frame.
Pattern B — Cream Geometric Granny Square
This square uses the same outer stitch counts as Pattern A. The center is flatter, making it suitable for alternating between raised floral motifs.
Round 1 — Cream Center
Yarn: warm ivory.
Make an MR.
Ch 2.
Work 12 dc into the ring.
Join with sl st.
Stitch count: 12 dc.
Round 2 — Open Center
Ch 2.
Work one dc in the first stitch, followed by ch 1.
Repeat around:
1 dc in next stitch, ch 1.
Join with sl st.
Stitch count: 12 dc and 12 ch-1 spaces.
The chain spaces create a lighter center than the raised flower motif.
Round 3 — Expanding the Center
Work 2 dc and ch 1 into each ch-1 space.
Continue around all twelve spaces.
Join with sl st.
Stitch count: 24 dc and 12 ch-1 spaces.
Round 4 — Cream Square Corners
Join or move to the first ch-1 space.
Work:
(2 dc, ch 2, 2 dc) into that space.
Work 2 dc in each of the next two ch-1 spaces.
Repeat the corner treatment in the following space.
Continue around, placing corners in the first, fourth, seventh, and tenth spaces.
Join with sl st.
Stitch count: 32 dc and four ch-2 corner spaces.
Round 5 — Cream Geometric Frame
Work one dc in every stitch along each side.
At each corner work:
(2 dc, ch 2, 2 dc).
Join with sl st.
Stitch count: 48 dc and four ch-2 corner spaces.
Round 6 — Second Cream Frame
Continue with ivory.
Work one dc in every stitch along each side.
At each corner work:
(2 dc, ch 2, 2 dc).
Join with sl st.
Stitch count: 64 dc and four ch-2 corner spaces.
Round 7 — Final Cream Border
Continue with ivory.
Work one dc in each stitch around.
At every corner work:
(2 dc, ch 2, 2 dc).
Join with sl st.
Stitch count: 80 dc and four ch-2 corner spaces.
Fasten off.
Both Pattern A and Pattern B now have the same outer stitch count and corner structure.
Optional Diagonal Eyelet Details
The cream squares in the photograph contain diagonal openwork that is more elaborate than the basic geometric square above.
To approximate this detail without changing the outer edge, add decorative surface chains after completing the square.
Join ivory near the center.
Work a loose chain line diagonally toward one corner.
Anchor the line with slip stitches at selected positions.
Repeat toward the other three corners.
Keep the chains loose enough that the square remains flat.
This is a surface decoration rather than the same open holes created by a fully charted lace square. A true eyelet version requires replacing selected interior stitches with chain spaces while preserving the outer stitch counts.
Making the Two Square Designs Match
Complete one flower square and one geometric square.
Block both motifs.
Measure the width and height of each.
The outer stitch counts are identical, but the raised flower can still affect tension.
If one square is larger, adjust hook tension or blocking rather than adding stitches randomly.
Check that the corners remain square.
Both designs should lie flat before they are joined.
Planning the Checkerboard Layout
The photograph alternates green floral squares with cream geometric squares.
Begin the first row with Pattern A.
Follow it with Pattern B.
Continue alternating across the row.
Begin the second row with Pattern B.
Follow it with Pattern A.
Repeat this arrangement throughout the blanket.
The result is a checkerboard grid in which each green floral square is bordered by cream squares along its horizontal and vertical edges.
Lay the completed motifs on a flat surface before joining to confirm the arrangement.
How Many Squares Are Needed?
The required number depends on the blocked square dimensions and the desired bedspread size.
Suppose each square measures 16 cm after blocking.
An arrangement of 10 squares across and 12 squares down contains 120 squares.
Before joining and border allowances, that panel measures approximately 160 × 192 cm.
A 12 × 14 arrangement contains 168 squares and measures approximately 192 × 224 cm.
A larger 14 × 16 arrangement contains 224 squares and measures approximately 224 × 256 cm.
These are planning examples, not measurements of the photographed bedspread.
For an even-numbered checkerboard layout, half the squares will be floral and half geometric.
Joining the Granny Squares
Block all squares before joining.
Arrange them in the chosen checkerboard order.
Use ivory yarn for a visible but restrained joining line.
Place two neighboring squares with right sides facing.
Insert the hook through corresponding edge loops.
Work loose slip stitches along the seam.
Join the squares into horizontal rows first.
Then join the rows into one large rectangular panel.
Check the blanket after each completed row.
A tight seam can shorten the joined edge and cause the bedspread to pucker.
Alternative Flat Joining Method
For a flatter seam, place the squares side by side with right sides facing upward.
Join through corresponding back loops using slip stitches.
Keep the working yarn beneath the squares.
Continue along the complete seam.
This method leaves the flower surfaces facing upward and reduces bulk between the motifs.
Test both joining methods on four squares before assembling the full bedspread.
Adding the Blanket Border
Once all squares are joined, work a continuous border around the outside edge.
Join sage-green yarn at any corner.
Work one sc into each suitable edge stitch.
At every outside corner, work three sc.
Join with sl st.
For the second round, switch to ivory.
Work one dc into each stitch around.
At the corners, work three dc into the corner stitch.
Join with sl st.
Add another green round if a stronger outer frame is desired.
Decorative Scalloped Edging
The photograph has a restrained decorative finish along the lower edge.
A small scalloped border can reproduce that appearance.
Work one sc into the first suitable stitch.
Skip two stitches.
Work five dc into the next stitch.
Skip two stitches.
Work one sc into the following stitch.
Repeat around the blanket.
Adjust the spacing near corners so the scallops lie flat.
Fasten off and weave in the final tail.
Matching Floral Cushion Covers
The photograph includes two square cushions made with the same sage-green and ivory palette.
Each cushion has a central cream flower surrounded by a green square and a broad ivory frame.
Begin with Pattern A.
Add additional framing rounds until the panel reaches the required cushion dimensions.
Continue alternating sage green and ivory as desired.
Keep every corner consistent with the existing square structure.
Block the front panel before making the back.
Measure the completed panel and select a matching cushion insert.
Making the Cushion Back
A solid crochet back provides support for the decorative floral front.
Ch enough stitches to match the width of the blocked cushion front.
Work rows of hdc until the panel reaches the required height.
Alternatively, make two shorter rectangles that overlap to form an envelope closure.
Place the front and back with wrong sides together.
Join around the edges using sc.
Leave the intended opening accessible if using a removable insert.
Fasten off and weave in the tails.
Rectangular Textured Green Cushion
The smaller cushion in the photograph uses a denser stitch texture than the floral squares.
A ribbed hdc pattern provides a practical approximation.
Ch to the desired cushion width.
Work one row of hdc.
Turn.
For the following rows, work hdc in the back loop only.
Continue until the panel reaches the required length.
Make a matching back panel.
Join the pieces around the edges.
Add tassels to the four corners if desired.
Making the Cushion Tassels
Cut several equal lengths of sage-green yarn.
Fold the strands in half.
Wrap another length of yarn around the bundle near the folded end.
Secure the wrap firmly.
Trim the loose ends to an even length.
Attach one tassel to each selected cushion corner.
For a balanced result, make all tassels the same length.
Assembly — 10 Steps
- Make one sage-green flower square and verify the stitch counts through Round 7.
- Make one cream geometric square and confirm that its outer stitch count matches the flower square.
- Block both samples and record their finished dimensions.
- Calculate the required blanket size and number of squares.
- Make the remaining floral and geometric squares in equal quantities for an even checkerboard layout.
- Arrange the squares into alternating rows before joining.
- Join the squares into rows, then connect the rows into the complete bedspread.
- Add the continuous border and optional scalloped edging.
- Make two floral cushion covers and one rectangular textured green cushion.
- Weave in all yarn tails, inspect the seams, and complete the final blocking.
The completed set consists of an alternating floral and geometric bedspread, two matching square cushions, and one textured rectangular cushion.
7 Technical Tips
- Count all 12 center stitches before beginning the flower petals. An extra stitch creates an additional puff and changes the spacing of the square corners.
- Keep the twelve puff stitches at a consistent height. Unequal elongated loops make the flower center rise unevenly and can cause cupping.
- Verify the 80-stitch outer round on both square designs. Different perimeter counts prevent the motifs from joining cleanly without skipped or doubled stitches.
- Compare blocked square dimensions within approximately 5 mm. Larger differences accumulate across long rows and produce uneven bedspread edges.
- Test the joining method on four squares before assembling the blanket. Tight seams shorten the edges and pull the checkerboard grid out of alignment.
- Measure cushion fronts before selecting inserts. Oversized inserts stretch the corners and can flatten the raised cream flowers.
- Weave yarn tails through at least 4–5 cm of matching-color stitches. Green strands carried behind ivory sections may show through the lighter fabric.
Choosing the Right Sage Green Yarn
The photograph uses a muted sage green rather than a bright emerald or dark forest shade.
That color works with the warm ivory background because the contrast remains clear without becoming harsh.
Choose a green yarn with a slightly gray or olive undertone.
Pair it with cream rather than stark white if you want a similar neutral appearance.
Make one complete floral square before purchasing the full yarn quantity.
View the sample in natural light and under indoor lighting.
The raised flower should remain clearly visible against the green frame.
Calculating Yarn Requirements
A full-size granny square bedspread can require considerably more yarn than a small throw.
Published flower granny square blankets provide useful benchmarks, but consumption depends on motif size and stitch density.
Weigh one completed floral square.
Weigh one completed geometric square.
Record the sage-green and ivory quantities separately.
Multiply each measurement by the number of squares required.
Add yarn for the joining seams, outer border, and cushions.
For example, if a floral square weighs 25 g and the project requires 80 floral squares, those motifs alone require approximately 2,000 g.
The 25 g figure is a calculation example, not a measured requirement for the photographed design.
Preventing Uneven Blanket Rows
Measure the width of each completed row before joining it to the next.
If one row is longer, inspect the square dimensions first.
Do not compensate for a large difference by pulling the joining yarn tighter.
That approach transfers the problem into the seam and creates puckering.
Correct or reblock the mismatched squares.
Keep the same hook size and yarn tension throughout the project.
Consistent gauge is especially important when alternating two different square designs.
Blocking the Finished Squares
Block the floral and geometric motifs to the same target dimensions.
Dampen each square according to the yarn manufacturer’s instructions.
Place the square on a blocking mat.
Pin the four corners first.
Check that the diagonals are equal.
Arrange the side edges without stretching the flower center.
Leave the motif pinned until completely dry.
Repeat with the remaining squares.
Use the first blocked sample as a template for the complete set.
Adjusting the Bedspread for Different Beds
Measure the mattress width and length.
Decide how much of the bedspread should hang over the sides and foot.
Add the desired side drops to the mattress width.
Add the foot drop to the mattress length.
Divide those dimensions by the blocked square size.
Round up to a whole number of squares.
For a balanced checkerboard layout, even row and column counts make it easy to use equal numbers of floral and geometric motifs.
Check the completed panel size before adding the outer border.
Care and Washing
Follow the yarn manufacturer’s care instructions.
Large crochet bedspreads become heavy when wet, particularly when made from cotton.
Support the fabric across its width when moving it.
Avoid hanging a wet bedspread from one narrow edge.
The weight can stretch the joining seams.
Dry flat whenever practical.
Reshape the corners and border while the fabric is damp.
Check the raised flowers after drying and adjust any petals that have folded beneath neighboring stitches.
Conclusion
The alternating square layout is the defining feature of this sage green granny square blanket pattern. Keep the floral and geometric motifs identical in outer dimensions, use consistent corner increases, and block every square before joining. Begin with one sample of each design, then test a four-square checkerboard panel to confirm the seam tension and finished repeat size. Record the yarn consumption before making the full bedspread and matching cushions. Share the completed green-and-cream bedroom set on Pinterest or Instagram with #SageGreenGrannyBlanket. For this specific design, would you keep the cream geometric squares or reverse their colors so the entire bedspread has a predominantly sage-green background?









