Introduction
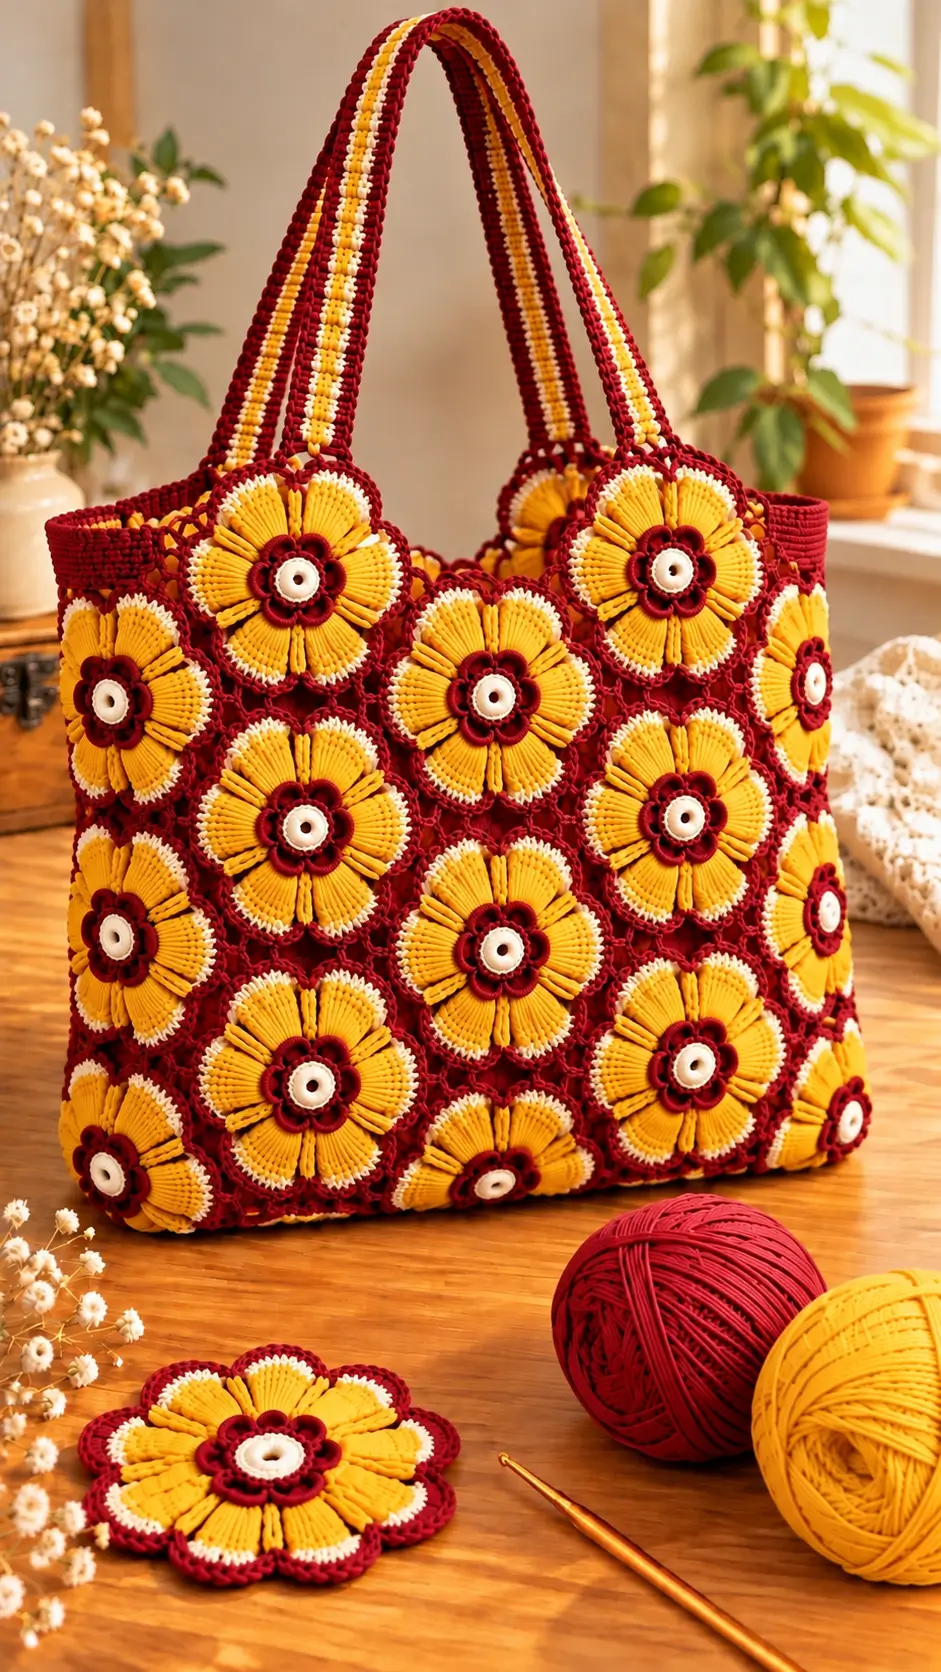
Sunflower petals must radiate evenly around a central disk, but this tote also needs those petals to retain their shape when the bag is loaded. This crochet sunflower tote bag pattern uses burgundy framing, golden raised petals, cream accents, and striped shoulder straps. Designed for intermediate crocheters, the project uses DK cotton yarn and a 4.5 mm hook. Its modular construction makes damaged flower motifs replaceable without rebuilding the entire bag.
The Design: What Makes This Sunflower Tote Different
Three structural decisions distinguish this sunflower crochet bag from a conventional granny-square tote.
First, the flowers are constructed as raised circular motifs rather than flat squares. Each motif contains a contrasting center, a six-petal arrangement, and a burgundy outer frame. This creates the dimensional surface visible in the reference photograph.
Second, the burgundy joining fabric connects individual motifs while allowing small openings between them. The connecting stitches must remain firm enough to prevent distortion when the bag carries weight.
Third, the striped shoulder straps use dense crochet rows rather than loosely joined chains. The resulting fabric resists stretching better than openwork handles.
A common mistake with a 3D flower crochet tote is attaching the flowers only at their centers. The surrounding petals then lift unevenly, and the connecting fabric carries excessive tension. Secure each motif at multiple points around its perimeter.
Project Info at a Glance
| Detail | Specification |
|---|---|
| Skill Level | Intermediate |
| Estimated Time | 20–30 hours |
| Target Width | 34 cm |
| Target Body Height | 33 cm |
| Crochet Hook | 4.5 mm |
| Yarn | DK cotton |
| Construction | Individual flower motifs, joined panels |
| Best For | Shoulder bag, market tote, everyday accessories |
Note: Measurements and working time are design targets. The finished dimensions depend on your gauge and motif layout.
Materials and Tools
Yarn
- Deep burgundy cotton yarn — DK — approximately 200 g — suggested brand: Paintbox Yarns Cotton DK.
- Golden yellow cotton yarn — DK — approximately 150 g — suggested brand: Paintbox Yarns Cotton DK.
- Cream white cotton yarn — DK — approximately 40 g — suggested brand: Paintbox Yarns Cotton DK.
These quantities are provisional estimates for this photo-inspired design. Actual yarn consumption depends on gauge, joining methods, and strap length.
Tools
- 4.5 mm crochet hook
- 3.5–4 mm crochet hook for firmer straps, optional
- Tapestry needle
- Stitch markers
- Sharp scissors
- Measuring tape
- Blocking pins and mat
- Cotton fabric lining, optional
- Sewing needle and matching thread
Choose smooth, tightly twisted cotton for defined petals. Stretch-prone acrylic may require additional lining and handle reinforcement.
Abbreviations
| Abbreviation | Meaning |
|---|---|
| MR | Magic ring |
| sc | Single crochet |
| inc | Two single crochets in one stitch |
| dec | Single crochet decrease |
| sl st | Slip stitch |
| ch | Chain |
| hdc | Half double crochet |
| dc | Double crochet |
| tr | Treble crochet |
| BLO | Back loop only |
| st | Stitch |
| rep | Repeat |
| FO | Fasten off |
An invisible decrease is made through the front loops of two adjacent stitches, reducing visible bulk on the right side of the fabric.
All instructions use US crochet terminology. Circular flower sections are joined rounds unless otherwise noted.
Pattern — Step by Step
Construction Plan
The reference bag features overlapping floral motifs across its front, sides, and lower edge. Their exact hidden joins cannot be determined from one photograph.
For a reproducible alternative, this pattern uses 18 six-petal flowers, assembled into two panels of nine motifs each. Each panel is arranged in three rows of three flowers. The bag is joined along three sides, then finished with a top band and two handles.
This is an original photo-inspired construction rather than an exact reconstruction of an unidentified commercial pattern.
Flower Center (Make 18)
Yarn: cream white.
R1: 6 sc in MR (6).
R2: inc ×6 (12).
R3: (1 sc, inc) ×6 (18).
R4: (2 sc, inc) ×6 (24).
R5: 1 sc in each st around (24).
Join with sl st. Fasten off, leaving a 15 cm tail.
The cream center should remain flat. If it cups upward, loosen the working tension slightly.
Burgundy Inner Flower Ring (Make 18)
Yarn: deep burgundy.
Attach burgundy yarn to any stitch of R5.
R6: (3 sc, inc) ×6 (30).
R7: (4 sc, inc) ×6 (36).
R8: 1 sc in each st around (36).
Join with sl st.
The 36-stitch circumference is divided into six sections of six stitches. These sections establish the position of the six raised yellow petals.
Mark the first stitch of each section. Fasten off, leaving a 20 cm tail.
Raised Golden Petals (Make 6 Per Flower)
Yarn: golden yellow.
Each petal is worked separately into a six-stitch section of the burgundy foundation.
Attach yellow yarn to the first marked stitch.
Row 1: Ch 1, sc in each of the next 6 sts (6).
Row 2: Ch 1, turn, inc, 4 sc, inc (8).
Row 3: Ch 1, turn, 8 sc (8).
Row 4: Ch 1, turn, inc, 6 sc, inc (10).
Row 5: Ch 1, turn, 10 sc (10).
Row 6: Ch 1, turn, dec, 6 sc, dec (8).
Row 7: Ch 1, turn, dec, 4 sc, dec (6).
Row 8: Ch 1, turn, dec, 2 sc, dec (4).
Row 9: Ch 1, turn, dec ×2 (2).
Row 10: Ch 1, turn, dec (1).
Fasten off, leaving a 15 cm tail. Repeat for all six sections.
The petals are wider at their midpoint and narrower toward their tips. This creates a dimensional flower without requiring stuffing.
For stronger relief, work a second, slightly smaller petal layer behind the first, or fold each petal gently toward the center before securing it to the foundation.
Cream Petal Edging
Yarn: cream white.
Attach yarn at the base of the first petal.
Work one sc into each accessible edge position, placing 2 sc into the uppermost tip where needed to avoid pulling.
Continue around the petal outline. Repeat for all six petals.
Because the petal edges consist of row ends rather than a uniform round of stitches, the exact edging count depends on how stitches are distributed along those edges. The edging should lie flat without rippling.
Fasten off and weave in the ends.
Burgundy Outer Flower Frame (Make 18)
Yarn: deep burgundy.
The raised petals need a supporting frame that can be joined to neighboring flowers.
Work the following separate circular backing piece for each flower.
R1: 6 sc in MR (6).
R2: inc ×6 (12).
R3: (1 sc, inc) ×6 (18).
R4: (2 sc, inc) ×6 (24).
R5: (3 sc, inc) ×6 (30).
R6: (4 sc, inc) ×6 (36).
R7: (5 sc, inc) ×6 (42).
R8: (6 sc, inc) ×6 (48).
R9: (7 sc, inc) ×6 (54).
R10: (8 sc, inc) ×6 (60).
R11: (9 sc, inc) ×6 (66).
R12: (10 sc, inc) ×6 (72).
R13: 1 sc in each st around (72).
Join with sl st. Fasten off, leaving a 30 cm sewing tail.
Position the flower on the backing circle and sew the burgundy inner ring securely to it. Attach the petals near their bases while leaving their upper surfaces raised.
The backing diameter will depend on stitch gauge. Make one complete sample before crocheting the remaining 17 motifs.
Connecting the Floral Motifs
Lay nine completed motifs into a three-by-three grid for the front panel. Repeat for the back panel.
Each motif has 72 stitches around its outer edge. Divide that circumference into six equal 12-stitch sections using markers.
For each pair of neighboring motifs, select the facing 12-stitch sections.
With burgundy yarn, join the facing sections using slip stitches through corresponding edge stitches.
Keep the joining tension even.
At the points where four motifs meet, use short chain bridges to connect the neighboring edges without forcing the circles into squares.
For a compact join, use ch 3 bridges. For more openwork, test ch 5 bridges on a sample first.
Check the completed panels on a flat surface. The motifs should retain their round outlines without large unsupported gaps.
If the panel puckers, remove and rework the joining stitches with less tension.
Side Seams and Bottom Edge
Place the front and back panels together with right sides facing outward.
Join the left and right edges using burgundy slip stitches through corresponding outer stitches.
Continue around the bottom edge.
Where adjacent motifs create a gap, bridge it with short chains, then anchor into the next available edge stitch.
A narrow fabric strip can be sewn inside the bottom seam for reinforcement.
Do not assume the finished bag will stand independently. The weight of cotton yarn and the flexibility of the joining fabric affect its shape.
Upper Bag Band
Yarn: deep burgundy.
Join yarn at the top edge.
Foundation round: Work sc evenly around the opening, placing stitches into secure motif-edge positions and chain bridges.
Count the stitches and adjust to an even total.
Rounds 1–6: Sc in every stitch around.
Join each round with a sl st if using joined rounds, or work continuously with a stitch marker.
The band should measure approximately 3–4 cm tall, depending on gauge.
Its purpose is to distribute the load from the straps across the upper edge instead of concentrating it at individual flower motifs.
Striped Shoulder Straps (Make 2)
Yarn: burgundy, golden yellow, and cream.
Target dimensions per strap: approximately 65–75 cm long and 3–4 cm wide before attachment.
With burgundy yarn:
Row 1: Ch 9, sc in second ch from hook and across (8).
Rows 2–4: Ch 1, turn, 8 sc (8).
Change to golden yellow.
Rows 5–6: Ch 1, turn, 8 sc (8).
Change to cream.
Row 7: Ch 1, turn, 8 sc (8).
Change to golden yellow.
Rows 8–9: Ch 1, turn, 8 sc (8).
Change to burgundy.
Rows 10–12: Ch 1, turn, 8 sc (8).
Repeat Rows 5–12 until the strap reaches the required length.
Fasten off, leaving a 30 cm tail at both ends for attachment.
This produces repeated horizontal color bands. To reproduce the photograph’s lengthwise stripes more closely, crochet three long narrow strips separately in burgundy, yellow, and cream, then join them edge-to-edge with slip stitches. Add a burgundy edging along both long sides.
The lengthwise-striped option is the closer visual match.
Reinforced Strap Edging
Yarn: burgundy.
Attach yarn at one end of the strap.
Work sc evenly along one long edge, across the short end, along the second long edge, and across the opposite short end.
At each corner, place additional stitches only when necessary to prevent curling.
For more rigidity, add a second edging round with a smaller hook.
A cotton twill tape insert may be sewn to the underside of each strap to limit stretching.
Assembly — 10 Steps
- Complete the flower motifs. Make all 18 floral units and check their finished diameters against the first sample.
- Arrange the front panel. Position nine flowers in three rows of three, keeping the petal directions consistent.
- Arrange the back panel. Repeat the layout and match its overall width and height to the front.
- Join the floral units. Connect neighboring burgundy backing edges using the marked sections and short chain bridges.
- Close the bag body. Join the side and bottom edges, leaving the upper opening unobstructed.
- Shape the top opening. Crochet the burgundy upper band, distributing stitches evenly around the joined motif edges.
- Position the handles. Mark two attachment points on each panel, placing them symmetrically about the centerline.
- Attach the straps. Sew each strap end through the upper band and supporting motif fabric using a rectangular seam with diagonal reinforcement.
- Add optional lining. Cut cotton fabric to the bag’s internal dimensions, sew the side and bottom seams, then hand-stitch the lining below the top band.
- Finish the project. Weave in loose yarn tails, inspect the joins, check both strap lengths, and block the bag lightly.
The completed bag consists of two joined floral panels, a reinforced opening, and two shoulder straps.
7 Technical Tips for a Better Crochet Flower Bag
- Stitch marker placement: Mark every sixth stitch on the 36-stitch inner ring before attaching petals. Incorrect spacing causes uneven flower symmetry and misaligned petal bases.
- Petal shaping: Avoid stuffing the petals, because added fiberfill can distort their flat fan-shaped profiles. Create dimension through shaping, layering, and controlled attachment instead.
- Invisible decreases: Work decreases through the front loops when tapering the petals. Conventional decreases can create visible ridges along the narrowing tip.
- Flower center alignment: Attach the cream center before securing the raised petals permanently. A center displaced by even 3–4 mm can make the six-petal arrangement appear unbalanced.
- Yarn tension: Maintain the same hook size and working tension across all 18 backing circles. A diameter difference greater than approximately 5 mm can produce puckered joins.
- Pinning before joining: Pin all nine motifs of each panel before sewing the edges. This reveals gaps and twisting before the joining stitches become difficult to remove.
- Strap reinforcement and tail weaving: Weave each strap attachment tail through several different stitch directions over at least 5 cm. A tail woven in only one direction may loosen when the bag carries repeated loads.
Care and Maintenance
Cotton crochet bags can become heavier and stretch when wet. Check the yarn manufacturer’s care instructions before washing.
For routine maintenance, remove loose debris with a soft brush. Spot-clean individual areas with a small amount of mild detergent and cool water.
When full washing is appropriate for the selected yarn, place the bag in a mesh laundry bag and use a gentle cycle, or wash it by hand.
Reshape while damp. Lay the bag flat on a towel and align the flower motifs and top band.
Avoid hanging the wet bag by its handles. The extra water weight can stretch the straps and distort the upper edge.
If a lining has been added, follow the care requirements of both the crochet yarn and the lining fabric.
Customization Options
Adjusting the Bag Size
The finished dimensions depend on the diameter of each completed flower motif.
For a wider bag, increase the number of motifs in each row or add narrow side panels.
For a taller bag, add another horizontal row of flowers. The strap positions should remain balanced around the top opening.
Changing the hook size alone may affect both the motif dimensions and fabric density. Test one sample before committing to a different gauge.
Changing the Color Palette
The reference photograph uses burgundy, yellow, and cream. This combination makes the yellow petals visually dominant while the darker background defines the flower outlines.
Other combinations include:
- Forest green framing with golden yellow petals
- Chocolate brown framing with mustard petals
- Navy blue framing with pale yellow petals
- Cream framing with terracotta petals
Keep enough contrast between the petals and the outer frame for the floral structure to remain visible.
Adding a Zipper or Magnetic Closure
A zipper should be attached to a fabric lining or a firm internal band rather than directly to unsupported openwork.
A magnetic closure can be added to the lining, with a small reinforcing fabric patch behind each magnetic component.
Test the closure placement before sewing it permanently. The opening must still accommodate the intended contents without pulling the top band inward.
Frequently Asked Questions
Can beginners make this sunflower crochet bag?
The pattern is better suited to intermediate crocheters. It requires accurate stitch counting, multiple color changes, repeated flower construction, motif joining, and reinforced strap attachment.
A beginner who already understands single crochet, increases, decreases, and basic seaming can practice by making one complete flower before attempting the bag.
Which yarn is best for the flower motifs?
Smooth DK cotton is a practical choice because it produces defined stitches and holds the shape of individual petals.
Worsted cotton is another option, but it will usually produce larger, heavier motifs when worked at a comparable gauge.
How many flowers are needed?
This photo-inspired version uses 18 flowers: nine for the front and nine for the back.
The original photographed bag may use a different number, including motifs around its sides or base.
Does the bag need a lining?
A lining is optional for light use but recommended when carrying small objects, books, or items that could protrude through the openwork.
Lining also helps reduce distortion around the lower seams.
How can the handles be made stronger?
Use dense stitches, attach the ends across several centimeters of the upper band, and reinforce the underside with cotton tape.
Check the attachment seams after the first few uses.
Can this bag be made with acrylic yarn?
Yes, but acrylic may stretch differently from cotton and can change the finished dimensions.
A fabric lining and reinforced straps become more important when the selected yarn has substantial elasticity.
Conclusion
This crochet sunflower tote bag pattern combines dimensional floral construction with a modular bag structure. The six-petal motifs, burgundy backing circles, cream accents, and reinforced striped straps reproduce the main visual elements of the reference design without relying on an unidentified original pattern.
Before making all 18 flowers, complete one sample motif and measure its diameter. Use that measurement to calculate the finished panel dimensions and adjust the layout where necessary.
Save the pattern to Pinterest and share the finished project on Instagram using #SunflowerToteBag.
For your version, would you keep the photograph’s deep burgundy background or replace it with forest green to contrast with the golden petals?









