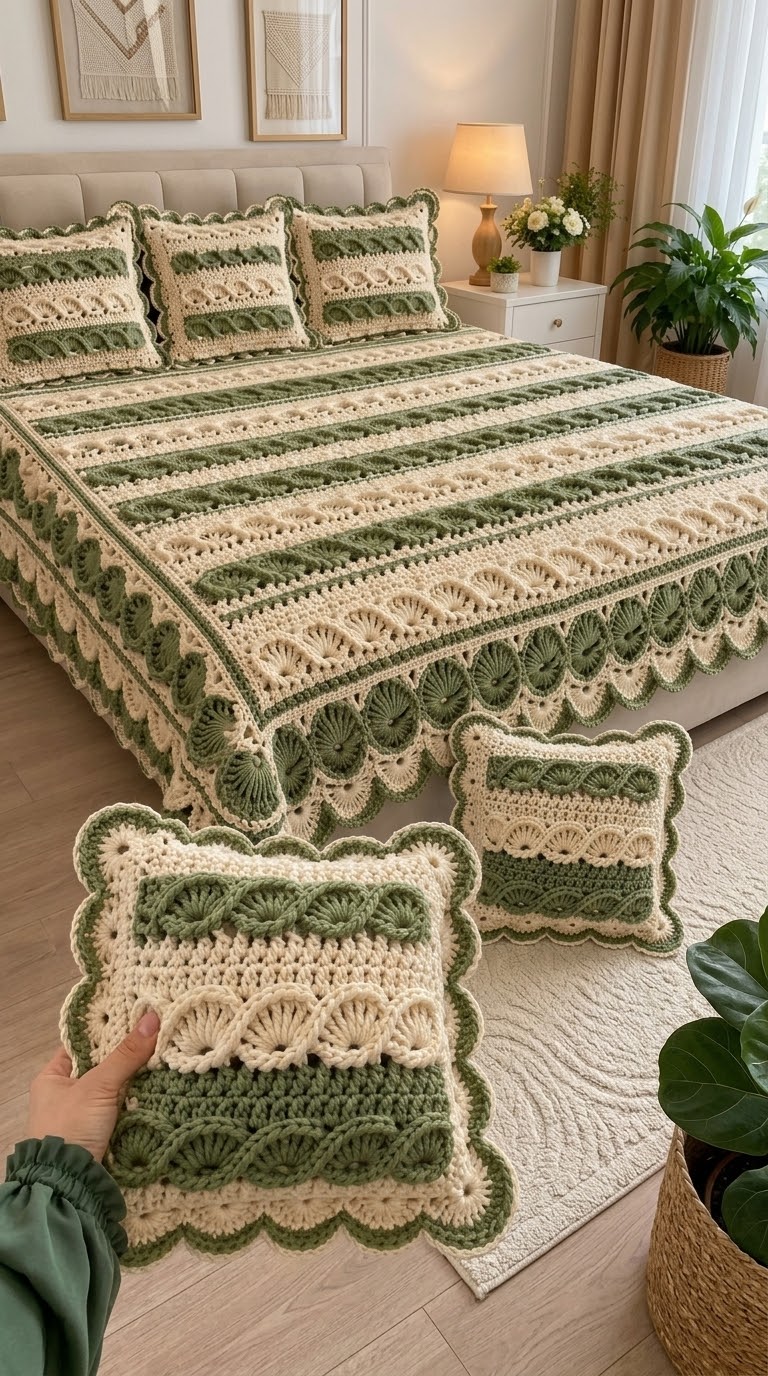
A deep row of overlapping crochet fans changes the entire structure of this sage-and-cream bedspread. This crochet bedspread pattern combines horizontal textured bands, openwork sections, raised shell motifs, and an oversized scalloped border to create a coordinated bedroom set. The reference design also includes matching rectangular cushions worked in the same two-color palette. Use the construction guide below as a practical interpretation of the photographed piece rather than an exact reproduction of an existing commercial pattern.
What Makes This Crochet Bedspread Different
The strongest feature of this design is not simply the sage green and cream color combination. It is the deliberate change in stitch depth from the center of the bedspread to the outer edge. Relatively flat horizontal bands cover the main sleeping surface, while increasingly dimensional fan and shell motifs appear toward the sides and foot of the bed.
That structure matters. Large raised motifs across the entire bed surface would consume considerably more yarn and produce a heavier fabric. Keeping the central section flatter reduces bulk, while the decorative border remains visible when the bedspread is in place.
The photographed cushions repeat the same visual vocabulary on a smaller scale: cream openwork, sage fan bands, raised texture, and a scalloped outline. This repetition is what makes the pieces read as one coordinated crochet bedding set rather than unrelated projects.
Project Information at a Glance
| Feature | Recommendation |
|---|---|
| Skill Level | Intermediate |
| Construction | Flat rows with decorative border |
| Yarn Weight | DK (#3) or Worsted (#4) |
| Suggested Hook | 5.0–6.5 mm depending on yarn and gauge |
| Main Colors | Cream and sage green |
| Main Techniques | Double crochet, shell stitch, fan stitch, openwork, scalloped edging |
| Best Use | Bedspread, decorative coverlet, throw, coordinated cushion set |
Published shell-blanket patterns demonstrate that hook choice varies considerably with yarn and the desired fabric. Examples range from a 5.0 mm hook for some worsted-weight shell projects to 6.5 mm and larger hooks for more open fabrics. Make a gauge swatch before calculating a bed-sized foundation.
Materials and Tools
Yarn
- Cream yarn — DK (#3) or Worsted (#4) — main background and contrasting shells.
- Sage green yarn — same yarn weight as the cream — textured bands, fan motifs, and edging.
A smooth acrylic, cotton-acrylic blend, or washable wool blend will show the fan definition clearly. The two colors should have the same fiber composition and approximately the same meterage per 100 grams so the fabric does not change density at each color transition.
Tools
- 5.0–6.5 mm crochet hook, selected after swatching
- Yarn needle for weaving ends
- Locking stitch markers
- Sharp scissors
- Flexible measuring tape
- Blocking mats and pins if available
Abbreviations
- ch — chain
- sc — single crochet
- hdc — half double crochet
- dc — double crochet
- tr — treble crochet
- sl st — slip stitch
- st/sts — stitch/stitches
- sp — space
- RS — right side
- WS — wrong side
A shell is formed by working several tall stitches into the same stitch or space. Five double crochets are a common shell construction, although larger decorative fans can contain seven, nine, or more tall stitches.
Understanding the Fan and Shell Construction
The photographed bedspread contains motifs that resemble elongated fans rather than a single basic shell stitch throughout. That distinction is useful when planning the project.
A conventional shell can be made by working five double crochets into one stitch, skipping stitches on either side, and anchoring the shell with a single crochet. Repeating those shells produces a compact scalloped texture. Published shell-stitch instructions commonly use this basic relationship between grouped double crochets and anchoring single crochets.
For the larger border seen in the reference image, increase the number or height of stitches inside each fan. A practical decorative fan can be built with a progression such as hdc, dc, tr, tr, tr, dc, hdc worked into a chain space. The taller center stitches create the rounded leaf-like profile.
Before You Crochet the Bedspread
Measure the mattress rather than selecting a foundation chain from a generic blanket chart. Record the mattress width, mattress length, drop from the top surface to the desired side position, and the amount of coverage required at the foot.
The photographed piece has a substantial drop. For that appearance, the finished width must equal the mattress width plus approximately twice the desired side drop.
For example, a 152 cm mattress with a 40 cm drop on both sides requires a finished bedspread width of roughly 232 cm:
152 + 40 + 40 = 232 cm
Do the same calculation for length. Add the required foot drop and any extra coverage wanted at the head of the bed.
Make a Gauge Swatch First
Work at least a 15 x 15 cm swatch using the intended yarn, hook, and main stitch sequence. Wash or block it exactly as the finished bedspread will be treated. Measure only after the swatch has dried.
This step is particularly important with shell stitches. Their width can change after blocking because the grouped stitches spread outward. A foundation calculated from an unblocked sample can produce a bedspread several centimeters wider than planned.
If the fabric feels rigid, increase the hook by 0.5 mm. If the fan sections collapse and the spaces become too loose, reduce the hook by 0.5 mm.
Crochet Bedspread Pattern — Main Panel
The following construction is an original interpretation designed to reproduce the overall visual structure of the photographed bedspread. Adjust the foundation to your measured bed size and swatched stitch repeat.
Foundation
With cream yarn, make a foundation chain wide enough for the required finished width while maintaining the stitch multiple needed for your chosen shell repeat.
For a basic five-double-crochet shell sequence, a multiple of 6 plus the required turning chains is practical.
Do not force the foundation chain to match the mattress measurement while it is stretched. Lay it flat without tension.
Section 1: Cream Foundation Band
Row 1: Work dc evenly across the foundation chain. Turn.
Row 2: Ch 1, sc across. Turn.
Row 3: Ch 3, dc across. Turn.
Row 4: Ch 1, sc across. Fasten off cream.
This compact band provides a stable base for the more open decorative rows above it.
Section 2: Sage Texture Band
Join sage green at the beginning of the row.
Row 1: Ch 3. Work dc across.
Row 2: Ch 1. Work sc across.
Row 3: Ch 3. Alternate groups of raised or clustered stitches with short chain spaces across the row.
Row 4: Work sc across, placing stitches into both the stitches and chain spaces as required to return to the original row width.
Fasten off sage.
Section 3: Cream Openwork Band
Join cream.
Row 1: Ch 3, dc across.
Row 2: Ch 3, dc in the next stitch, ch 1, skip 1 stitch, dc in the next stitch. Repeat the openwork sequence across.
Row 3: Work dc into each dc and each chain space across.
Row 4: Sc across.
The open spaces break up the heavier shell sections and closely match the alternating solid-and-lacy structure visible in the reference.
Section 4: Sage Fan Band
Join sage.
Row 1: Ch 1, sc across.
Row 2: Ch 1, sc in the first stitch. Skip 2 stitches, work 5 dc into the next stitch, skip 2 stitches, sc in the next stitch. Repeat across.
Row 3: Work a stabilizing row, placing sc stitches across the tops of the shells and into the spaces between them while preserving the original width.
Fasten off.
The exact repeat may need adjustment at the two edges depending on the foundation count. Both edges must contain matching partial repeats; otherwise one side of a bed-sized piece can gradually become longer than the other.
Building the Full Bedspread
Repeat the four-band sequence until the central panel reaches the required mattress length. Change the order periodically if you want the broader horizontal arrangement visible in the photograph.
A practical sequence is:
- Cream solid band
- Sage textured band
- Cream openwork band
- Sage shell band
- Cream openwork band
- Sage textured band
- Cream solid band
Repeat this sequence while measuring the work every 15–20 cm. Bedspread dimensions are less forgiving than throw dimensions. A small discrepancy repeated through dozens of rows becomes obvious once the cover is placed on a mattress.
Large Decorative Fan Border
The border is the dominant feature of the photographed design. Small five-dc shells alone will not create the same depth. Build the edge in stages instead.
Border Round 1: Foundation
With cream, work sc evenly around all four sides. Place 3 sc in each corner.
On row ends, distribute the stitches by measurement rather than blindly placing the same number into every row. The border must lie flat before the decorative fans are added.
Border Round 2: Sage Setup
Join sage and work a round of sc or hdc. Increase at each corner sufficiently to maintain a flat rectangle.
Border Round 3: Chain Spaces
Create evenly distributed chain loops around the perimeter. These spaces become the anchors for the large fans.
Count the spaces on opposite sides. Both long sides should match, and both short sides should match.
Border Round 4: Large Sage Fans
Into each designated chain space, work a broad fan using a sequence such as:
hdc, dc, 5 tr, dc, hdc
Anchor between fans with sc.
For a deeper fan, increase the center group to seven treble crochets after testing one repeat. Do not increase every fan until the sample lies flat.
Border Round 5: Cream Outline
Join cream and work around the outside of every sage fan. Place one stitch into each tall stitch and add extra stitches near the center of each fan only when required to prevent cupping.
This cream outline separates the sage motifs visually and strengthens the scalloped edge.
Border Round 6: Final Sage Edging
Join sage and work sc around the complete border. Add a small picot or short chain arch at the crest of each scallop if a more decorative finish is required.
Fasten off and weave the tail through at least 5 cm of neighboring stitches.
How to Crochet the Matching Cushion Cover
The matching cushion shown in the image is rectangular and uses the same horizontal band construction as the bedspread. Rather than shrinking the bedspread pattern mechanically, calculate the cushion front independently.
Measure the cushion insert. Crochet the front panel approximately 2–4 cm smaller than the insert in both dimensions if the yarn stretches substantially. This gives the filled cushion a firm shape rather than a loose cover.
Cushion Front
Work a cream foundation panel. Add a sage fan band across the lower section, followed by cream openwork, another sage textured band, and a cream upper section.
Finish the front with a narrow sage-and-cream scalloped border.
Cushion Back
For the cleanest construction, crochet two overlapping rectangular panels in cream or sage. Position them across the back to create an envelope opening.
Place the front and back pieces with wrong sides together. Work sc through both layers around the perimeter, incorporating the scalloped border during the final round.
This method allows the cushion insert to be removed without placing a zipper through thick crochet fabric.
Color Placement
The reference uses approximately equal visual importance for sage and cream, but the colors do different jobs. Cream creates negative space and highlights the openwork. Sage defines the raised motifs.
Keep the largest fans primarily sage if you want the photographed effect. Their darker value makes each scallop visible from across the room.
A useful ratio for planning yarn purchases is roughly 55–60% cream and 40–45% sage, but actual consumption depends heavily on the depth and number of fan bands. Tall shell stitches consume considerably more yarn than plain single-crochet rows.
Choosing Yarn for a Full Bedspread
Fiber choice becomes more important as project size increases. A king-size crochet cover made entirely from dense cotton can become extremely heavy. Acrylic is lighter and generally easier to wash, while cotton-acrylic blends provide more stitch definition without the full weight of pure cotton.
DK yarn produces a lighter cover and finer motifs. Worsted yarn produces a more substantial piece and reaches bed dimensions with fewer stitches.
Published shell blanket patterns demonstrate both approaches. Some designs use light #3 yarn with a 6.5 mm hook, while others use worsted or Aran yarn with hooks from approximately 5.0 mm upward. The correct combination is the one that produces open fans without loose, unstable stitches.
Seven Technical Tips for Cleaner Results
- Mark every pattern repeat. Missing one anchor stitch can shift every shell that follows it. Place a marker after every fifth or tenth repeat on bed-width rows so an error can be found before the next color band.
- Measure the foundation without stretching it. A tight chain can pull a 200 cm edge inward by several centimeters. Move up 0.5–1.0 mm for the foundation chain if your chains are consistently tighter than your double crochet.
- Check the fan center. A seven- or nine-stitch fan needs a clear central stitch. Mark that center stitch when working the cream outline so the edging remains symmetrical.
- Control border rippling immediately. Too many stitches around the perimeter create waves. If the first border round will not lie flat on the floor, correct that round before adding the fans.
- Pin large motifs before final blocking. Measure from the center of one fan to the center of the next. Equal spacing prevents the finished scallops from appearing compressed near a corner.
- Keep color-change tails at least 12–15 cm long. Short tails can work loose under the weight and repeated washing of a large bedspread. Weave each tail in multiple directions through stitches of the same color.
- Count both opposite sides before adding the decorative border. A difference of one chain space means the two edges will contain different numbers of fans. Correct the setup round instead of disguising the mismatch at the final corner.
Blocking a Large Crochet Bedspread
A full bedspread may be too large for conventional blocking mats. Work in sections instead.
First wash or dampen the piece according to the yarn manufacturer’s care instructions. Lay one section flat and shape it to the required measurement without overstretching the shells. Pin the scallops only if the fiber tolerates pinning.
Once the first area is dry, move to the next section while keeping the already blocked portion flat. Pay particular attention to the four corners and the transition between the main panel and border.
Shell stitch can change noticeably after blocking because the individual tall stitches spread. For that reason, final bed measurements should be taken only after the fabric is dry.
Common Problems and Corrections
The Bedspread Gets Wider as You Crochet
Count the anchors between shell groups. An accidental extra stitch at the beginning or end of repeated rows can slowly increase the width. Mark the first and last true stitch of every row.
The Sides Pull Inward
The foundation chain may be too tight, or the edge stitches may be worked with greater tension than the center stitches. A larger hook for the foundation can correct the first problem.
The Border Ruffles
There are too many stitches in the border foundation round. Remove stitches evenly rather than trying to correct severe rippling with tighter tension on the next round.
The Border Cups Upward
The border contains too few stitches or the fans need additional spacing. Add stitches to the setup round, particularly around corners.
The Sage Fans Lose Their Shape
The hook may be too large for the yarn, or the fan contains too many tall stitches for its available base. Reduce the hook by 0.5 mm or remove two center stitches from each fan.
Adapting the Design to Different Bed Sizes
Do not depend on fixed chain counts for twin, full, queen, or king beds. Mattress dimensions vary by country, manufacturer, and mattress depth. Calculate from the actual bed.
Use this formula:
Finished width = mattress width + left drop + right drop
Finished length = mattress length + foot drop + desired head allowance
Next, divide the required width by the measured width of one blocked stitch repeat. Round to the nearest complete repeat.
For example, if one blocked fan repeat measures 7 cm and the required width is 224 cm:
224 ÷ 7 = 32 repeats
Build the foundation around 32 complete repeats rather than adding arbitrary chains to reach 224 cm.
Finishing
- Inspect the main panel for missed stitches or loose joins.
- Weave in all cream yarn tails through cream stitches.
- Weave sage tails through sage sections so they remain concealed.
- Check that opposite edges contain the same number of border repeats.
- Shape all four corners before working the final edging.
- Complete the sage outer round.
- Secure every final tail through several neighboring stitches.
- Wash or damp-block according to the yarn label.
- Shape each large fan while the fabric is damp.
- Measure the bedspread after it has dried completely.
The finished piece should lie flat across the mattress while the large fan border hangs freely along the sides and foot.
Final Notes
The sage green and cream crochet bedspread works because its stitch density changes in controlled stages: stable rows across the main surface, openwork between color bands, smaller shells for texture, and oversized fans around the perimeter. Start by measuring the mattress and making a blocked swatch before buying the full yarn quantity. Once the gauge is fixed, calculate the foundation in complete motif repeats and use the same measurements for every subsequent band.
Save the finished bedspread to Pinterest or share the completed sage-and-cream version on Instagram with #SageFanBedspread. For the closest match to the reference image, keep the outer fans sage with a narrow cream outline. Which would you repeat on the matching cushions: the large sage fan band or the smaller cream shell section?









