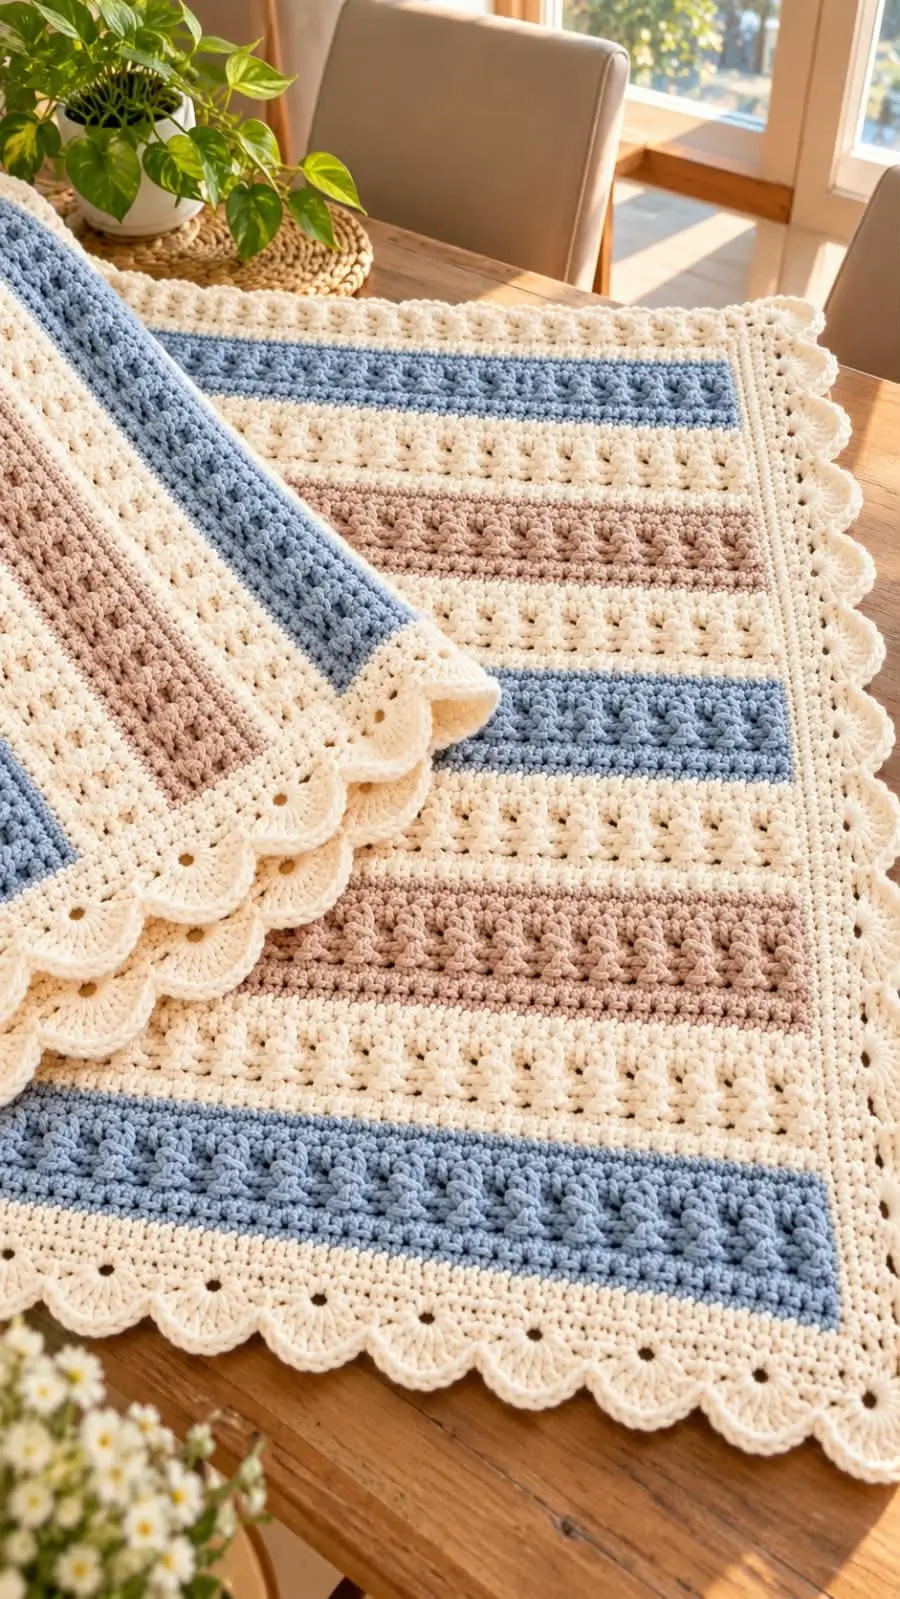
Large cream scallops change the geometry of this blanket before the first blue stripe is considered. This textured striped crochet blanket pattern reconstructs that structure with worsted yarn, a 5.5 mm hook and a roughly 50 × 60-inch throw format. It is an intermediate project built from solid, openwork and raised bands. The repeating sections also make length adjustments possible without redesigning the entire blanket.
The Design: What Makes This Textured Blanket Different
Three decisions define the construction. First, cream acts as a structural color rather than simply another stripe; it separates blue and taupe relief sections and then forms the entire outer frame. Second, dense textured bands alternate with more open cream rows. That difference prevents the striped crochet blanket pattern from becoming one continuous heavy fabric.
Third, the oversized scalloped crochet blanket border is added only after a stable rectangular frame has been established. The foundation rounds stabilize the rectangle before the decorative shells are worked.
The common mistake is width drift. Raised stitches consume yarn differently from open cluster stitches, and the blanket can gradually narrow if the maker tightens tension during the denser bands. Check the stitch total at every transition row.
Project Info at a Glance
| Skill Level | Time | Finished Size | Hook | Best For |
|---|---|---|---|---|
| Intermediate | 20–30 hours | Approx. 50 × 60 in / 129.5 × 152.5 cm | 5.5 mm / I-9 | Sofa throw |
Note: The finished dimensions are a target for this photo-inspired reconstruction. Yarn, individual tension and blocking can change the final measurements.
Materials and Tools
Yarn
- Warm cream/ivory — worsted #4 — approximately 750–850 g
- Dusty blue — worsted #4 — approximately 350–450 g
- Soft taupe/beige — worsted #4 — approximately 300–400 g
Use the same yarn line for all three colors where possible. Matching fiber content and yarn diameter reduces unwanted changes in stripe width.
The quantities are estimates for the reconstructed blanket rather than measurements that can be recovered from the photograph. Textured stitches, particularly bobbles and raised stitches, consume more yarn than flat double crochet.
Tools
- 5.5 mm / I-9 crochet hook
- Tapestry needle
- Scissors
- Locking stitch markers
- Flexible measuring tape
- Blocking mats and rust-resistant pins
Abbreviations
- ch — chain
- sc — single crochet
- hdc — half double crochet
- dc — double crochet
- tr — treble crochet
- sl st — slip stitch
- st/sts — stitch/stitches
- sk — skip
- sp — space
- BLO — back loop only
- RS — right side
- WS — wrong side
- YO — yarn over
Gauge and Sizing
Work a swatch before starting the full foundation chain. The photograph cannot provide an exact gauge, and the different textured stitches contract at different rates.
For this reconstruction, target approximately 14 stitches per 10 cm / 4 inches in the solid section after the swatch has rested.
The stitch pattern uses a multiple of 4 + 3 chains. A foundation of 179 chains provides 176 working stitches when the first three chains count as the first double crochet.
If your swatch produces a substantially different width, change the foundation-chain multiple instead of forcing tighter or looser tension through the entire blanket.
Textured Striped Crochet Blanket Pattern
Construction: Work the blanket flat in horizontal rows. Turn after every row. Add the border after completing the rectangular body.
Foundation and Cream Base
Yarn: warm cream.
Foundation: Ch 179.
Row 1: Dc in fourth ch from hook and in each ch across. Turn. (176 sts)
Row 2: Ch 1, sc in each st across. Turn. (176)
Row 3: Ch 3, dc in each st across. Turn. (176)
Row 4: Ch 1, sc in each st across. Turn. (176)
These rows create a stable lower section before the first raised color band begins.
Dusty Blue Raised Band
Change to dusty blue.
Row 5: Ch 3, dc across. Turn. (176)
Row 6: Ch 1, sc across. Turn. (176)
Row 7: Ch 3. Work raised front-post stitches at regular intervals across the row, maintaining 176 working positions. Turn. (176)
Row 8: Ch 1, sc across. Turn. (176)
Row 9: Ch 3, dc across. Turn. (176)
Row 10: Ch 1, sc across. Turn. (176)
Keep the post stitches relaxed enough to match the width of the cream base. Short post stitches can pull the blue band inward.
Cream Openwork Band
Change to warm cream.
Row 11: Ch 3, dc across. Turn. (176)
Row 12: Ch 3, dc in first st, *ch 1, sk 1, dc in next st; repeat across*, adjusting the final repeat to maintain a straight edge.
Row 13: Ch 1, sc in every dc and ch-1 sp across. Turn. (176)
Row 14: Ch 3, dc across. Turn. (176)
Row 15: Repeat Row 12.
Row 16: Repeat Row 13. (176)
Keep the chain spaces relaxed. Tight chain stitches can make this open section narrower than the surrounding solid bands.
Taupe Textured Band
Change to soft taupe/beige.
Row 17: Ch 3, dc across. Turn. (176)
Row 18: Ch 1, sc across. Turn. (176)
Row 19: Ch 1, sc in first 2 sts, *bobble in next st, sc in next 3 sts; repeat across*, adjusting the final repeat so the motifs remain visually balanced.
Make each bobble by working several partial double crochet stitches into the same stitch and closing the remaining loops together. Each finished bobble occupies one working stitch.
Row 20: Ch 1, sc across. Turn. (176)
Row 21: Ch 3, dc across. Turn. (176)
Row 22: Ch 1, sc across. Turn. (176)
The flat rows surrounding the bobbles limit excessive bulk and provide a clean transition into the next cream section.
Second Cream Openwork Band
Change to warm cream.
Rows 23–28: Repeat Rows 11–16.
Count the working stitches after the final row. The blanket should return to 176 working positions before the next textured section begins.
Second Dusty Blue Band
Change to dusty blue.
Rows 29–34: Repeat Rows 5–10.
Compare the width of this blue section with the first one. A visible difference indicates a tension change rather than an intended shaping adjustment.
Cream Separator
Change to warm cream.
Row 35: Ch 3, dc across. Turn. (176)
Row 36: Ch 1, sc across. Turn. (176)
Row 37: Ch 3, dc across. Turn. (176)
Row 38: Ch 1, sc across. Turn. (176)
Continue the Stripe Sequence
Continue repeating the established sequence:
Dusty blue relief band → cream openwork band → taupe textured band → cream openwork band → dusty blue relief band → cream separator.
Repeat complete sections until the blanket body measures approximately 55–56 inches / 140–142 cm, leaving room for the outer border.
Do not finish halfway through a textured section. Add or subtract an entire color unit when changing the length so the stripe distribution remains balanced.
Finish the body with four cream rows corresponding to the foundation section. This gives the upper and lower edges similar density before the border is added.
Scalloped Crochet Blanket Border
The scalloped border is one of the strongest visual features in the reference blanket. Instead of attaching shells directly to the striped body, work several cream foundation rounds first. The additional width separates the decorative fans from the colored stripes.
Border Round 1
Join warm cream yarn in any corner.
Ch 1 and sc evenly around the entire blanket. Work 3 sc in each corner.
The number of stitches along the vertical edges depends on the height of your rows. Space them evenly enough that the fabric remains flat.
Join with sl st.
Border Round 2
Ch 1. Sc in each stitch around.
At each corner, work 3 sc into the center corner stitch.
Join with sl st.
Border Round 3
Ch 2. Hdc evenly around the blanket.
Increase at each corner sufficiently to maintain a flat rectangular shape.
Join with sl st.
Border Round 4
Ch 1. Sc around the entire blanket, maintaining the corner increases.
Join with sl st.
At this point, the cream frame should lie flat without pulling the striped body inward or forming waves along the outside edge.
Border Round 5 — Large Scallops
Work the decorative shell sequence around the outside edge:
*Sc in anchor st, skip 2 sts, 7 dc in next st, skip 2 sts; repeat from * around.
Adjust the spacing as you approach each corner. Position one complete fan across each corner instead of forcing two partial shells into the turn.
Check several completed scallops before continuing around the entire blanket. If the shells overlap heavily, increase the distance between them. If the border pulls inward, reduce the skipped space or increase the shell width.
Fasten off after completing the final scallop and weave the yarn tail securely into the cream border.
Finishing the Blanket
- Lay the completed blanket flat without stretching the fabric.
- Measure the width at the top, center and bottom.
- Secure loose yarn tails before blocking.
- Thread each color-change tail through stitches of the same color.
- Reverse direction once while weaving each tail to reduce movement.
- Check all four corners for equal expansion.
- Shape each large scallop separately.
- Block the blanket to rectangular dimensions without pulling only on the decorative shells.
- Allow the blanket to dry completely while positioned flat.
- Remove the pins and take the final measurements.
The finished blanket should have parallel horizontal bands, an even cream frame and regularly distributed scallops around all four sides.
7 Technical Tips for Better Results
- Mark both edge stitches. Missing one stitch during a 176-stitch row produces progressive side taper. Put a locking marker in the first and last working stitch before crocheting the center of each row.
- Measure after every major color band. A difference greater than about 2 cm between the foundation width and a later stripe indicates a tension change. Correct it before several additional sections make the distortion harder to repair.
- Keep relief stitches at normal height. Short post stitches pull a blue or taupe band inward. Draw each relief stitch up to the height of the surrounding stitches before completing it.
- Count every transition row. An accidental increase or decrease is difficult to identify inside bobbles and open spaces. Verify all 176 working positions whenever a textured section returns to a solid row.
- Control bobble direction. Raised stitches can push toward the wrong face of the blanket. Position each bobble consistently before working the following flat row.
- Test several scallops before completing the border. Three consecutive shells that overlap significantly indicate excessive border fullness. Change the shell spacing before working around the remaining perimeter.
- Keep yarn tails inside matching colors. A dusty-blue tail woven through cream openwork can remain visible from the opposite side. Weave each tail through at least 5 cm of dense fabric in its corresponding color.
Adjusting the Blanket Size
The easiest way to alter the length is to add or remove complete stripe sections. This keeps the color distribution and texture sequence consistent.
Width adjustments require more planning because the openwork and raised-stitch repeats need compatible stitch counts. Maintain the multiple of 4 + 3 foundation-chain structure when changing the starting width.
For a smaller lap blanket, remove foundation-chain repeats until the swatch calculation reaches the required width. For a wider throw, add groups of four chains. Always make the adjustment from measured gauge rather than assuming a fixed number of stitches per inch.
Border width also changes the final dimensions. The four cream foundation rounds plus the large scallops add substantially more width and length than a simple single-crochet edging.
Color Placement
Cream should remain the dominant color if you want to retain the structure visible in the reference blanket. It separates the textured sections, surrounds the complete striped rectangle and forms every scallop.
Dusty blue works as the stronger accent. Positioning it at regular intervals gives the horizontal layout clear visual divisions.
Taupe functions as the secondary accent and benefits from raised texture. Keeping the taupe sections narrower than the cream areas prevents the center of the blanket from becoming visually dense.
When substituting colors, retain the same hierarchy: one dominant light neutral, one stronger accent and one quieter secondary shade. Changing the colors does not require changing the stitch sequence.
Blocking the Scalloped Edge
Block the rectangular body first, then shape the decorative edge. Pinning only the scallops can stretch the outer round while leaving the central blanket distorted.
Place the blanket flat and establish the four corners. Measure both diagonals. If the measurements differ substantially, reposition the corners before pinning the individual shells.
Spread each seven-dc fan into a rounded shape without pulling the center stitch excessively. The scallops should touch or nearly touch at their outer edges without stacking over one another.
Allow the blanket to dry completely before removing the pins. Recheck the top, middle and bottom widths afterward because blocking should correct minor variation, not conceal major stitch-count errors.
Conclusion
Measure the finished body before adding the scallops; that measurement determines whether the final frame remains rectangular. For this textured striped crochet blanket pattern, keep cream dominant, alternate dusty blue and taupe relief bands, and reserve enough cream yarn for every border round. The next practical step is to crochet a 15 cm swatch containing a solid row, openwork row and relief row, then compare their widths before starting the foundation chain. Save the finished blanket to Pinterest and share your color arrangement on Instagram with #TexturedStripeScallopBlanket. Which stripe would you repeat more often: the dusty-blue relief band or the taupe bobble band?









