Introduction
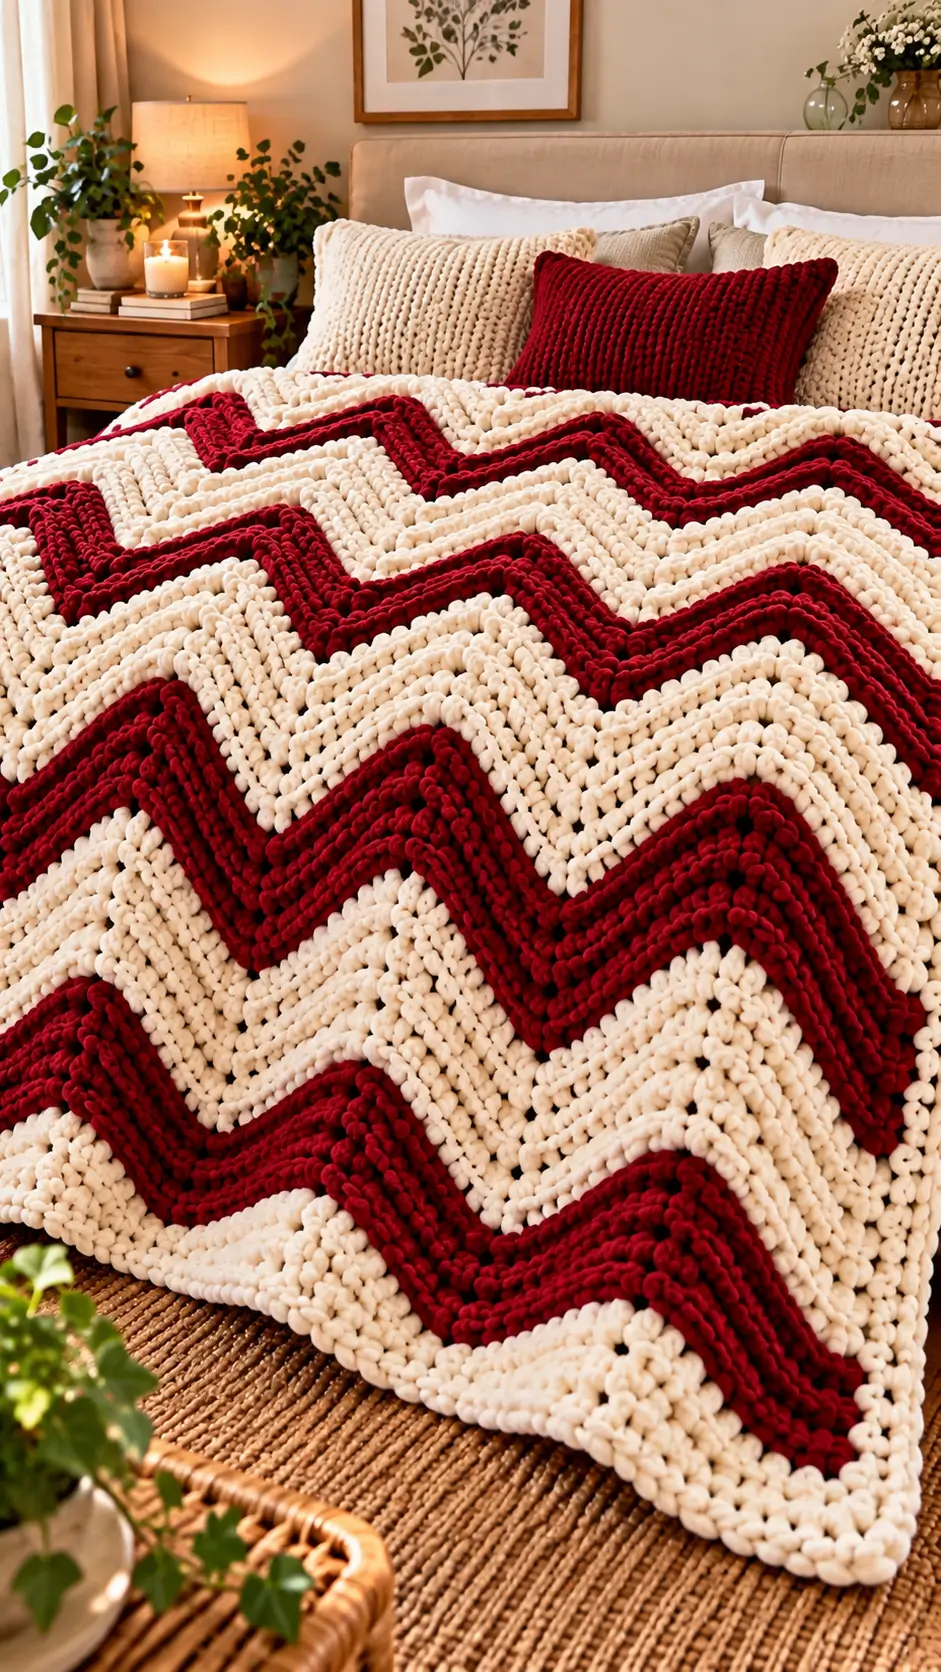
Deep cranberry chevrons crossing wide ivory bands are the defining engineering problem in this blanket: every red point has to meet the cream point beneath it. This chunky chevron crochet blanket pattern uses super-bulky yarn, a 10 mm hook, and repeated increase-and-decrease shaping for a throw around 142 × 168 cm. The project suits an advanced beginner who can count rows accurately, and the thick yarn makes a full sofa-size throw relatively fast.
The Design: What Makes This Chevron Blanket Different
The photograph uses sharp Vs rather than shallow ripples, so the shaping points need to remain directly above one another. That is the first structural decision. A misplaced peak by even one stitch gradually produces a diagonal kink.
Second, the broad cream sections carry most of the visual area while narrower cranberry bands act as dividers. This makes the red and cream crochet blanket read as a graphic zigzag instead of ordinary horizontal striping. Third, a plush super bulky crochet blanket needs comparatively open tension; compressing chenille-style yarn removes stitch definition and makes the valleys bunch.
A frequent mistake is treating the valley as an approximate location. It is not. The decrease or skipped-stitch point must remain aligned with the valley below it. The maker counts the repeat; the blanket then maintains its width.
Project Info at a Glance
| Skill Level | Time | Finished Size | Hook | Best For |
|---|---|---|---|---|
| Advanced beginner | Approx. 12–18 hours | About 142 × 168 cm | 10 mm | Sofa throw / bed accent |
The 142 × 168 cm measurement is a benchmark based on a comparable super-bulky chevron blanket. Actual dimensions depend on the yarn construction, hook size, stitch pattern, and individual tension.
Materials and Tools
Yarn
- Cream / ivory — Super Bulky #6 — approximately 1,350–1,700 g for the dominant color.
- Cranberry / deep red — Super Bulky #6 — approximately 1,000–1,350 g for the narrower contrast stripes.
Choose both colors from the same yarn family when possible. Matching yarn construction keeps the row height consistent and prevents one color from pulling the chevrons out of alignment.
A comparable 56 × 66-inch super-bulky blanket uses approximately 3,062 g of yarn in total. Treat that amount as a planning benchmark rather than an exact requirement because fiber type, gauge, stripe allocation, and final dimensions affect consumption.
Tools
- 10 mm N/P crochet hook
- 8–12 locking stitch markers
- Large-eye tapestry needle
- Sharp scissors
- Flexible measuring tape
- Row counter
- Blocking mats or a clean flat drying surface
Abbreviations
- ch — chain
- st / sts — stitch / stitches
- hdc — half double crochet
- hdc2tog — half double crochet two together
- inc — increase
- dec — decrease
- rep — repeat
- RS — right side
- WS — wrong side
- FO — fasten off
An invisible decrease is primarily an amigurumi technique. For this flat blanket, paired half-double-crochet decreases are more suitable because the shaping needs to remain symmetrical at every valley.
Pattern — Step by Step
Construction note: this blanket is worked back and forth in rows rather than in a continuous spiral. Chevron patterns use different stitch multiples depending on the exact shaping method, so the important rule is to maintain the same number of stitches added at peaks and removed at valleys.
Gauge Swatch
Yarn: cream — Super Bulky #6.
Before making the full foundation, crochet a swatch containing at least two complete peaks. Work with the 10 mm hook and measure the width after the fabric has rested flat.
A comparable super-bulky chevron pattern reports approximately 4 stitches and 4 rows per 4 inches. Because stitch construction and yarn composition affect gauge, use this only as a reference point.
If your fabric becomes rigid, test a hook one size larger. If the valleys gape and the stitches separate excessively under the blanket’s weight, test one size smaller.
Foundation and Chevron Setup
Yarn: cream.
For a large throw, begin with a foundation long enough to measure approximately 135–145 cm after the first complete setup row has formed the zigzags. Measuring the raw foundation chain alone is less reliable because chevron shaping pulls a straight chain inward.
Place a stitch marker at every planned peak and valley before continuing.
The structural sequence is:
decrease → straight slope → peak increase → straight slope → valley decrease → straight slope → peak increase
Every increase must balance the stitches removed by the corresponding decreases. This balance keeps the blanket from gradually becoming wider or narrower.
Cream Chevron Section
Yarn: cream.
Row 1: Establish the complete chevron sequence across the foundation. Work a decrease at the outer edge, hdc evenly along the first slope, make the peak increase, hdc down the opposite slope, and form the valley decrease. Repeat the measured sequence across the row. Finish with the mirrored outer-edge decrease.
Row 2: Ch 1 and turn. Work into the first stitch rather than counting the turning chain as a stitch. Repeat the established shaping. Place each peak increase into the center stitch of the previous peak and every valley decrease directly over the previous valley.
Rows 3–8: Repeat Row 2.
Measure the width after Row 4. If the blanket has gained or lost more than approximately 2 cm, recount every repeat before continuing.
Eight cream rows create the first broad light section and establish the stripe proportions for the rest of the blanket.
Cranberry Stripe
Yarn: cranberry / deep red.
Join the cranberry yarn at the beginning of a row rather than halfway along a chevron slope.
Rows 9–12: Repeat the established chevron shaping in cranberry.
Keep all peak and valley markers in position. Plush yarn can hide the center stitch around an increase or decrease, making the shaping point difficult to identify on the next row.
Check the color transition from the right side before weaving in or trimming any yarn ends.
Second Cream Section
Yarn: cream.
Rows 13–20: Repeat the established chevron row.
The cream section is deliberately wider than the cranberry stripe. This proportion produces the broad ivory areas separated by strong red zigzag bands seen in the reference design.
Before changing colors again, inspect three shaping locations: the first peak, one central valley, and the final peak. Each point should sit vertically above its corresponding shaping point in the rows below.
Repeating Red-and-Cream Stripe Sequence
Continue the blanket using the following stripe sequence:
4 rows cranberry → 8 rows cream
Repeat this 12-row sequence until the blanket approaches approximately 160 cm in length.
For a closer visual interpretation of the reference blanket, an occasional cranberry section can contain 6 rows instead of 4. Keep the peak and valley positions unchanged when adjusting stripe depth.
Never add or remove stitches simply because a color section becomes wider. Stripe depth changes vertically; the chevron repeat remains structurally identical across the full blanket.
Final Cranberry Band
Yarn: cranberry.
Work 4 rows in the established chevron pattern.
Measure the blanket vertically through a central valley rather than along a sloping outer edge. This gives a more consistent measurement.
If additional length is needed, add complete rows across the blanket rather than extending individual chevrons.
Fasten off and leave approximately a 20 cm tail.
Final Cream Section
Yarn: cream.
Work 8 final rows using the established chevron shaping.
Maintain the same working tension on the final row. Pulling the last row more tightly than previous rows can make the upper edge visibly narrower.
Fasten off and leave approximately a 20 cm tail.
Side Edges
The blanket in the reference image retains pronounced chevron points rather than filling the valleys to create a straight rectangular edge.
A heavy border is therefore unnecessary.
If the two long sides appear uneven, join cream yarn at a lower corner and crochet one loose row of single crochet along the long edge. Maintain a consistent stitch-placement rate.
Do not automatically place one stitch into every visible strand of plush yarn. Excessive edge stitches create a ruffled or flared border.
Optional Chevron Edge
Yarn: cream.
Follow the existing peaks and valleys rather than attempting to square the zigzag edge.
Work one single crochet in each stitch across the edge. At each outer peak, place 3 sc in the peak stitch. At each inner valley, use a centered decrease so the border follows the existing V shape.
Check the edge after several chevrons. If it begins to ripple, too many stitches are being added. If it curls inward, the border requires slightly more room at the peaks.
Fasten off and weave the tail through at least 8–10 cm of dense matching-color fabric.
Assembly and Finishing
- Lay the blanket flat with the right side facing upward and identify every color-change tail.
- Check the top and bottom widths at the widest peak-to-peak points before finishing the ends.
- Thread each cream tail into a cream section instead of carrying it through cranberry stitches.
- Weave cranberry tails through matching red stitches for at least 8–10 cm.
- Reverse weaving direction once so normal stretching cannot pull the yarn directly out.
- Trim the tails only after the blanket has been spread flat and gently adjusted widthwise.
- Align the first and final peaks and inspect both long sides for accidental flare.
- Pin severe curling sections to the intended dimensions without stretching individual peaks.
- Wash and dry according to the care instructions printed on the yarn label.
- Measure the finished blanket through the center and record the final dimensions, hook size, and yarn quantities for future resizing.
The completed blanket should retain the same number of peaks from the foundation edge through the final row.
7 Technical Tips for a Cleaner Chevron Blanket
- Stop peak drift: Put a locking marker in the center stitch of every peak for at least the first eight rows. A peak displaced by one stitch per row quickly develops into a diagonal zigzag.
- Prevent valley stitch loss: Count each repeat immediately after its valley decrease. An accidental additional decrease gradually narrows the blanket and pulls the long edge inward.
- Check fabric density: Super-bulky yarn can produce rigid fabric when the hook is too small. If a 10 cm swatch does not drape under its own weight, test a hook approximately 1 mm larger.
- Avoid a color-change jog: Change yarn only at a row edge. A color change halfway down a chevron slope creates a visible step across the red-and-cream stripe.
- Mark hidden stitches: Chenille and blanket yarn can conceal the top loops around decreases. Keep a stitch marker in every valley rather than trying to locate the decrease by touch on the next row.
- Measure the side edges: Compare both long sides after every 12-row stripe repeat. A difference greater than approximately 2 cm can indicate a missed edge stitch or inconsistent turning tension.
- Secure yarn tails: Leave approximately 20 cm at each color change and weave at least 8–10 cm through matching-color stitches. Very short tails can work loose from plush yarn after repeated washing.
Adjusting the Blanket Size
The safest way to resize a chevron blanket is to alter it by complete chevron repeats rather than adding arbitrary stitches to the foundation. Crochet one complete test repeat first and measure its finished horizontal width.
For example, if one complete repeat measures approximately 18 cm and you want about 144 cm of finished width, eight repeats provide a useful starting calculation. The exact foundation count still depends on the shaping formula used for your chosen chevron construction.
Length is easier to modify. Continue repeating complete rows until the required measurement is reached. Keep the planned 4-row cranberry and 8-row cream proportions if you want the same stripe balance.
Remember that adding width has a larger effect on yarn consumption than simply adding several rows of length. An additional chevron repeat continues through every subsequent row.
Keeping the Chevron Points Straight
Chevron blankets expose counting mistakes quickly. Each increase forms a peak, while each corresponding decrease forms a valley. Those shaping points should create vertical columns through the blanket even though the stitches between them travel diagonally.
Place markers before a problem appears. One marker at every peak and every valley provides a fixed reference when plush yarn makes individual stitches difficult to distinguish.
After each color section, spread the blanket flat without stretching it. Look along the line of peaks from the foundation toward the working edge. If one peak has moved sideways, inspect the rows immediately below that point for a misplaced increase or decrease.
Correcting the error early usually requires undoing only a few rows. Continuing despite the shift makes the distortion increasingly visible because every subsequent row follows the incorrect shaping position.
Planning the Red and Cream Stripes
The strong contrast between deep cranberry and warm cream gives this blanket much of its visual structure. The cream sections occupy more vertical space, while the narrower red stripes define the chevrons.
A practical starting sequence is eight cream rows followed by four cranberry rows. This creates a 2:1 row ratio.
Row count does not always equal visual stripe width. Dark yarn can appear heavier than a light color, and two yarn colors from different product lines may also produce different row heights.
For that reason, compare the actual stripe measurements after the first full color repeat. If four cranberry rows look disproportionately narrow, increase the red section to five or six rows while leaving the underlying chevron shaping unchanged.
Yarn Quantity and Substitution
A large chunky crochet blanket consumes substantial yarn. A published 56 × 66-inch super-bulky example uses about 2,007 yards, or 1,835 meters, making that figure a useful purchasing reference.
Do not substitute yarn by ball count alone. One brand may contain substantially more meters per ball than another even when both are labeled Super Bulky #6.
Compare three specifications instead: yarn weight category, meters or yards per ball, and ball weight in grams. Then calculate the approximate total meterage required.
When replacing a conventional spun super-bulky yarn with chenille or blanket yarn, make a gauge sample first. Plush constructions can be much thicker at the same nominal yarn category and may change both the finished dimensions and the amount of yarn required.
Conclusion
Measure one complete chevron before buying the full yarn quantity; width, row height, and consumption can change substantially between spun super-bulky yarn and plush blanket yarn. Once the swatch matches the intended proportions, record the peak spacing and keep those shaping points marked throughout the project. That single control catches most width errors early. For the next step, choose the cranberry-to-cream stripe ratio, crochet two complete repeats, and measure them flat before committing to the full throw. Save this chunky chevron crochet blanket pattern to Pinterest and share the finished color combination on Instagram with #RedCreamChevronBlanket. Would you keep the narrow cranberry bands shown here, or make every red chevron the same width as the cream sections?









