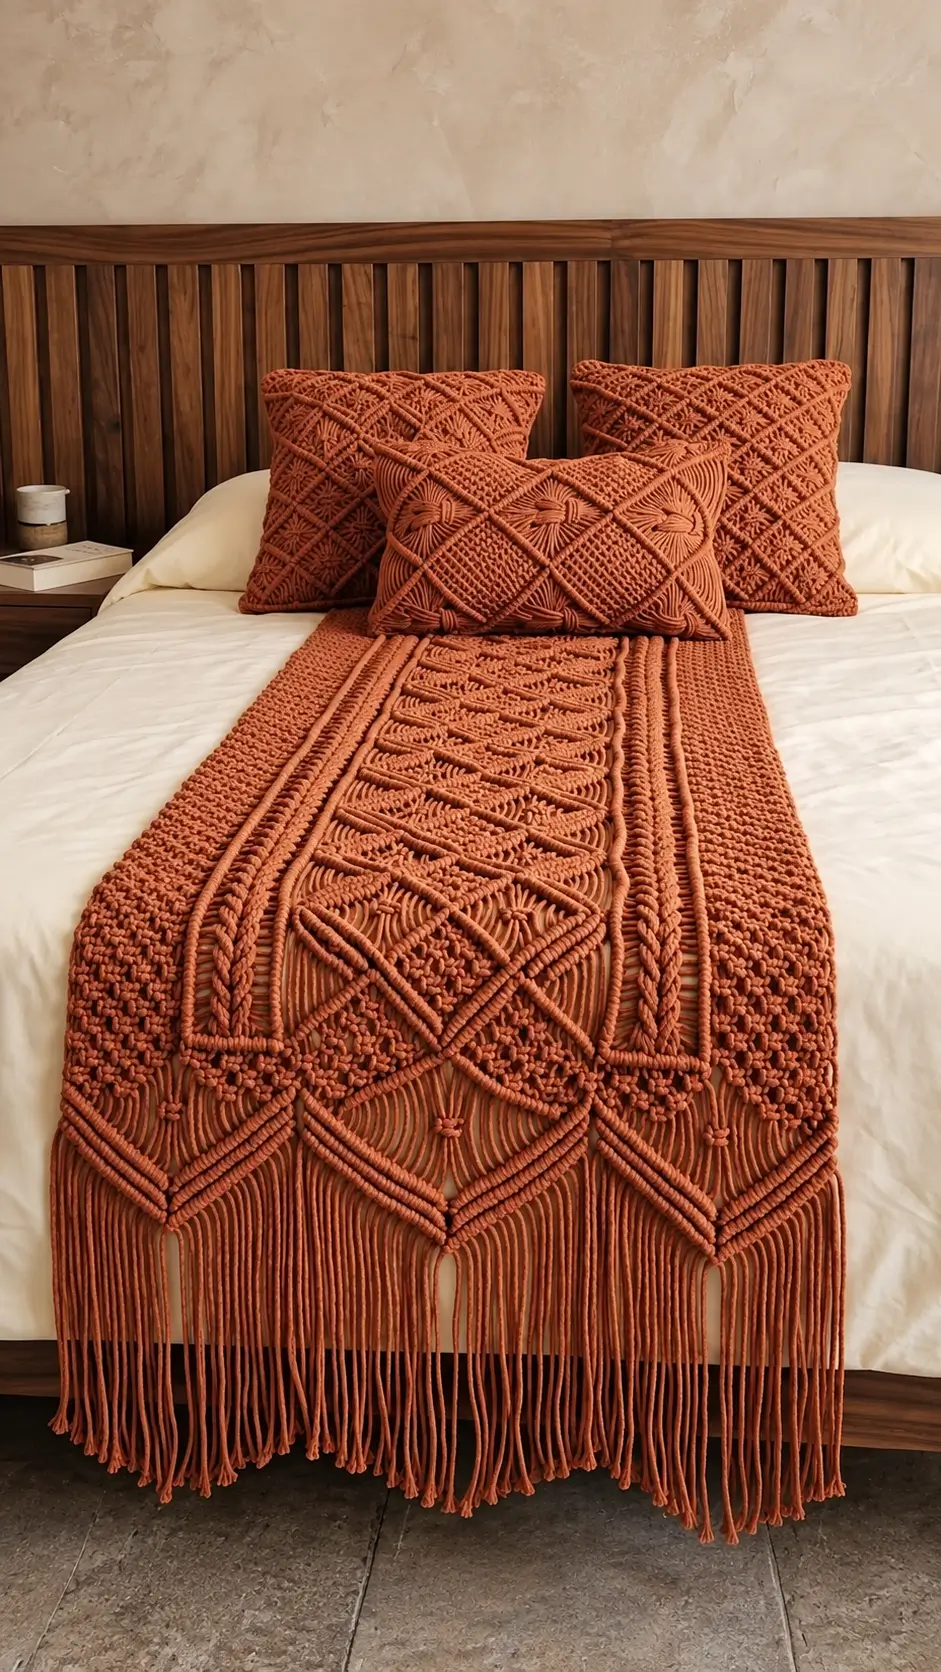
The long diamond panels are the defining engineering problem in this terracotta macramé bed runner: every diagonal cord must stay aligned while the runner remains flat across the bed. This macramé bed runner pattern uses cotton cord, alternating square knots, diagonal double half hitch knots, textured sections, and long fringe. The project is best suited to intermediate macramé makers and creates a substantial decorative textile for the foot of a bed.
The Design: What Makes This Macramé Bed Runner Different
This design combines three different structures rather than repeating one knot across the entire runner. Dense side panels provide visual weight and help the textile lie flat. The center uses elongated diamonds outlined with raised diagonal cords, producing the strongest geometric feature visible in the design. Open cord sections inside several diamonds reduce bulk and make the boundaries more distinct.
The long fringe is also part of the construction rather than a separate decoration. Its vertical lines continue the geometry created by the knotted panels above. A common mistake with a large macramé bed runner is tightening diagonal knots inconsistently. Even a small tension difference accumulates across a wide panel and can pull the lower edge out of square. Measuring the diamonds as they are formed is therefore more reliable than judging alignment only by eye.
Project Information at a Glance
| Skill Level | Intermediate |
|---|---|
| Project Type | Macramé bed runner / decorative bed throw |
| Main Material | Cotton macramé cord |
| Main Color | Terracotta / burnt orange |
| Construction | Flat knotted panels |
| Main Motif | Geometric diamonds |
| Finish | Long loose fringe |
Materials and Tools
Macramé Cord
- Terracotta cotton cord — use one consistent diameter throughout the main runner.
- 3–5 mm cord works well for a substantial bed-size textile.
- Single-twist cotton cord gives a softer fringe that can be combed.
- Braided cotton cord gives firmer geometric lines and resists untwisting.
The exact quantity depends on the finished width, bed size, cord diameter, knot density, and fringe length. Dense square-knot sections consume considerably more cord than open decorative sections, so cord requirements should be calculated from a test panel before cutting the complete set.
Tools
- Macramé board or sturdy horizontal support
- Sharp fabric scissors
- Flexible measuring tape
- T-pins or macramé pins
- Large comb for single-twist fringe
- Fabric clips for separating cord groups
- Long ruler or straightedge
Macramé Knots Used
The design visible in the reference image is based on combinations of standard macramé structures. The exact knot sequence cannot be determined from a finished photograph alone, but the appearance can be recreated with the following techniques.
- Lark’s Head Knot: attaches working cords to a support cord when required.
- Square Knot: creates dense textured sections and repeating grids.
- Alternating Square Knots: form wider continuous fabric without obvious vertical columns.
- Double Half Hitch Knot: forms the raised diagonal boundaries around the diamond motifs.
- Diagonal Double Half Hitch: creates the V-shaped and diamond-shaped outlines.
- Gathering Knot: can secure grouped cords where a controlled transition is required.
Planning the Bed Runner
Measure the usable width of the mattress before cutting any cord. The runner in the reference image covers most of the mattress width while leaving visible bedding at both sides. Its fringe extends beyond the main knotted section and should be included separately when calculating total length.
Draw the design as a rectangle divided into three primary zones: left textured panel, central geometric panel, and right textured panel. The central zone should be the widest because it carries the main sequence of diamonds. Keep both outer zones equal in width to maintain symmetry.
Before making the full runner, create a small sample with the actual cord. Measure a section before and after knotting. This gives a practical cord-consumption ratio and reveals how much the chosen cord contracts under dense knotting.
Step-by-Step Macramé Bed Runner Pattern
Step 1: Cut and Organize the Cords
Determine the finished width first. Cut enough cords to create a dense textile across that measurement. Because this design contains both compact knots and long open sections, individual working cords will not all consume material at the same rate.
Cut the cords longer than the basic finished-length calculation rather than joining short pieces in the center of a visible motif. Reserve additional length for the heavily knotted side sections and the large central diamonds.
Group the cords into left, center, and right sections with temporary clips. Mark the exact center of the runner. Every major diamond should be positioned relative to this center line.
Step 2: Establish the Top Edge
Create a stable horizontal starting edge. The first several rows should remain compact because they determine the width and alignment of everything below them.
Work an even row of square knots or alternating square knots across the cords. Check the width after the first row and again after several rows. Do not pull individual knots hard enough to narrow the fabric.
Step 3: Build the Outer Textured Panels
Separate equal groups of cords on the left and right. These areas form the dense side borders visible in the reference design.
Work alternating square knots in closely spaced rows. Offset each new row so its knots sit between the knots in the previous row. This produces a continuous textured field rather than rigid vertical columns.
Keep both sides synchronized. After completing a section on the left, work the corresponding section on the right before progressing farther down the runner. Comparing the two sides frequently prevents cumulative length differences.
Step 4: Create the First Central Diamond
Select the central cord group. Choose one cord as a diagonal holding cord and work double half hitch knots downward toward the center. Mirror the process from the opposite side.
The two diagonal lines should meet on the center axis. Continue with two outward diagonals to close the lower half of the diamond.
Pin all four corners before tightening the final knots. Measure from the top point to both side points. Equal measurements keep the motif symmetrical.
Step 5: Fill the Diamond
Use alternating square knots inside the outlined diamond while preserving a small amount of open space around the raised border. Another option is to leave selected cords vertical and place compact knot clusters at controlled intervals.
The photograph uses contrast between dense knotting and open cord areas. Filling every available space would remove that contrast and make the central panel visually similar to the outer borders.
Step 6: Add the Elongated Geometric Section
Below the first motif, form longer diagonal double half hitch lines. These should travel farther vertically before meeting at the center.
Create a sequence of nested V shapes using separate holding cords. Keep the angle consistent from one side to the other. A ruler placed horizontally across corresponding points is useful for detecting an uneven slope.
Fill selected spaces with square-knot clusters. Leave neighboring sections comparatively open. The alternation is what produces the layered geometric construction seen in the reference.
Step 7: Form the Lower Diamond Panels
Divide the lower portion into several adjacent diamond motifs. Start each diamond from measured points rather than simply following the natural position of the cords.
Work diagonal double half hitch knots toward each center point, then reverse direction to close the shapes. Maintain equal widths between neighboring diamonds.
Inside each motif, allow vertical cords to remain exposed. Small central knot groups can stabilize those cords without filling the entire interior.
Step 8: Connect the Center and Side Panels
The central geometric section and textured outer panels must finish at approximately the same horizontal level before the lower border begins.
If one section is shorter, do not compensate by making several extremely loose rows. Instead, adjust spacing gradually across multiple rows. Abrupt changes create a visible horizontal ridge.
Use diagonal lines to connect the center motif to the denser side sections. Pin the runner flat while completing these transitions so that the finished piece does not contract toward its center.
Step 9: Create the Lower Border
Work a stable row across the full width immediately above the fringe. This border carries the weight of the loose cords and visually separates the structured pattern from the hanging ends.
A row of square knots can provide sufficient stability. For a more pronounced boundary, use a horizontal double half hitch line.
Measure from the top edge to the lower border at the left side, center, and right side. Correct differences before cutting the fringe.
Step 10: Finish the Fringe
Allow all remaining cords to hang vertically. Place the runner on a flat surface and comb single-twist cord carefully if a separated fringe is wanted.
Measure from the lower border rather than from the ends of neighboring cords. Trim across the entire width using a ruler as a reference.
The reference design uses long fringe, so the loose portion should remain substantial relative to the knotted section. Longer strands also emphasize the vertical lines beneath the geometric motifs.
Matching Macramé Cushions
The photograph includes two square cushions and one rectangular lumbar cushion in the same terracotta color. They repeat the runner’s geometry rather than introducing a separate motif system.
Square Cushion Panels
Make a macramé panel slightly larger than the intended cushion face to account for contraction during knotting. Use diagonal double half hitch lines to establish a repeating diamond grid.
Fill selected intersections with compact square-knot motifs. Keep the spacing regular across the panel. Once the macramé face is complete, attach it securely to a fabric cushion cover or construct a separate backing panel.
Rectangular Lumbar Cushion
The lumbar cushion can use fewer, larger diamonds because its horizontal format provides more width than height. Establish three primary motifs across the front and connect them with diagonal knot lines.
Use denser knotting inside the central portions and cleaner raised outlines around each diamond. Match the cord diameter and terracotta shade to the bed runner so the pieces read as one coordinated set.
Assembly and Finishing
- Lay the completed runner on a large flat surface without stretching it.
- Measure the overall width at the top, middle, and lower border.
- Correct any movable knots that have pulled one section inward.
- Check the center line of every large diamond against the center of the runner.
- Inspect all diagonal double half hitch knots for loose sections.
- Tighten square-knot clusters that differ noticeably from neighboring clusters.
- Separate and straighten the fringe cords.
- Measure the required fringe length from the final knotted border.
- Trim the fringe on a flat surface using a straightedge.
- Position the runner across the bed and check that both sides fall evenly.
The completed piece should lie flat, maintain a centered geometric panel, and finish with an even fringe line.
7 Technical Tips for a Cleaner Macramé Bed Runner
- Mark the center from the first row. Losing the center line can shift every large diamond several centimeters to one side by the bottom of the runner. Keep a removable marker attached to the center cords throughout construction.
- Measure diagonal pairs. A diamond with one diagonal longer than its mirror will visibly lean. Measure from the upper point to each side point before closing the lower half.
- Control square-knot tension. Over-tightening the side panels can make them shorter than the more open central panel. Compare panel lengths after every major motif section.
- Pin large diamonds before completing them. Freehand diagonal knotting can gradually change the angle of the holding cord. Fix the corners temporarily so corresponding diagonals follow the same slope.
- Do not cut fringe while the runner is hanging. The weight of individual cords can distort the cutting line. Place the entire lower section flat before measuring and trimming.
- Keep cord batches consistent. Mixing noticeably different cord diameters changes both knot size and panel length. Use cord from the same product line and diameter throughout the visible face.
- Test cord consumption before cutting the full project. Dense square knots can consume several times the visible finished length of a cord section. Make a measured sample using the exact knots and cord planned for the runner.
Adjusting the Pattern for Different Bed Sizes
Do not resize this design simply by adding length to every cord. Width and length require different adjustments.
For a wider bed, increase the number of cords in the outer textured panels or add additional geometric units while preserving the center line. For a longer runner, extend the vertical repeat between the upper and lower diamond sections.
A narrower runner can omit some side-panel repeats without changing the main central motif. The central diamond section should remain symmetrical even when the overall width changes.
Place a measuring tape across the actual mattress before choosing the finished width. Decide how much white bedding or bedspread should remain visible on either side, then use that measurement as the target width of the knotted section.
Choosing Cord for This Design
Cord structure changes the final appearance considerably. Single-twist cotton produces soft edges and can be combed into a fine fringe, but repeated handling may separate the fibers. Three-ply twisted cord produces clearer rope-like definition. Braided cord holds firm geometric lines and is less likely to unravel during a large project.
For the design shown here, medium-thickness cotton cord provides enough definition for the raised diagonal borders without making the square-knot sections excessively bulky.
Buy the main terracotta cord in one batch when possible. Slight color differences between dye lots are especially visible across a large, single-color textile.
Keeping the Diamond Pattern Symmetrical
Symmetry depends on reference points. Mark the vertical center, outer edges of the central panel, and horizontal levels where major diamonds begin and end.
Do not rely exclusively on counting knots. Two sections can contain the same number of knots yet finish at different lengths when tension varies. Physical measurements provide a second control.
After each complete diamond, measure its width and height. Compare those dimensions with the corresponding motif on the opposite side. Corrections are much easier while only a few rows have been completed.
Conclusion
A terracotta macramé bed runner depends on controlled geometry more than complicated individual knots. Establish the center line first, keep the side panels equal, and measure each diamond before progressing to the next section. The practical next step is to make a small sample containing square knots and diagonal double half hitch knots with the exact cord intended for the finished runner. Use that sample to calculate cord consumption and final knot density. Save the finished design to Pinterest or share the completed bed set on Instagram with #TerracottaMacrameBedRunner. For this specific design, would you keep the long fringe shown in the reference image or shorten it to the edge of the mattress?









