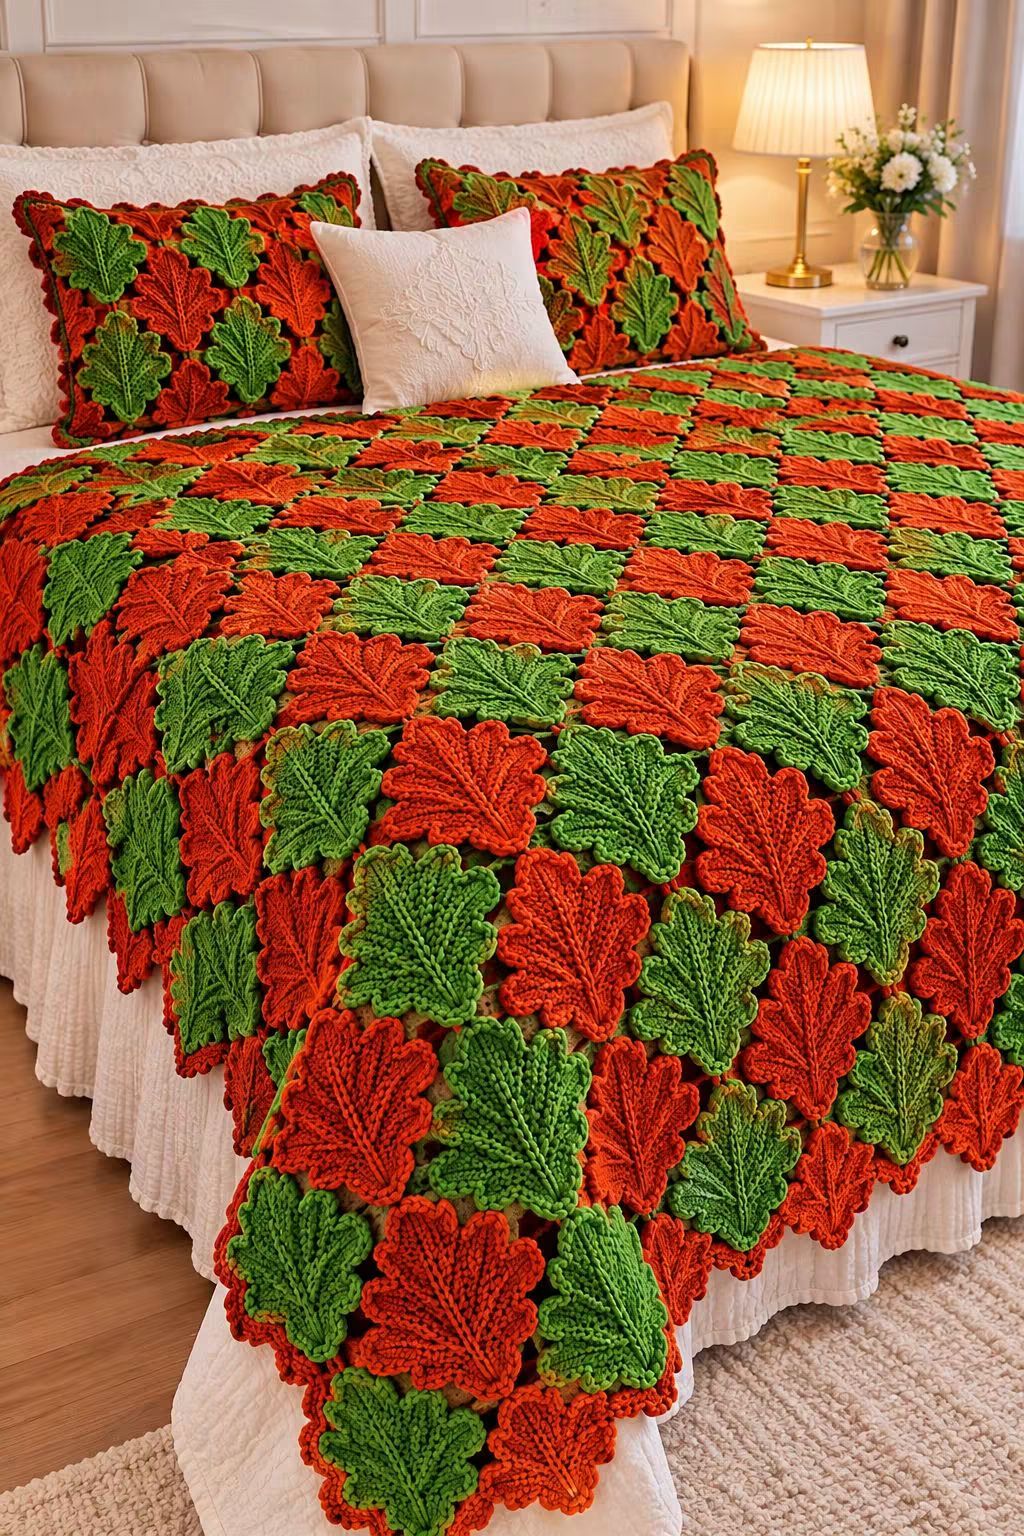
A leaf with a flat center vein would lose the feature that dominates every block in this bedspread. This 3D crochet leaf blanket pattern instead builds individual burnt-orange and green motifs with raised ribs, shaped edges, concealed joins, and matching leaf-covered pillow shams. Use firm DK or worsted yarn and a hook suited to that yarn. The modular construction is intermediate to advanced and scales from a throw to a full bedspread.
The Design: What Makes This Leaf Blanket Different
The blanket is assembled from recognizable leaves rather than conventional granny squares. Each motif has a broad lower section, tapered upper point, scalloped botanical edge, and a strongly raised center rib. Secondary ridges branch away from that center line, adding the dimensional structure visible across the bed.
Alternating burnt orange and green prevents neighboring leaves from merging visually. The joins are also deliberately inconspicuous. Motif edges overlap or meet beneath their outer ridges, so the finished surface reads as a continuous field of leaves rather than a grid.
The main failure point in a crochet autumn leaf blanket is inconsistent motif size. A difference of only several millimeters becomes significant across ten or more motifs. Block one master leaf first, then compare every subsequent motif with that template before assembly.
Project Info at a Glance
| Skill Level | Construction | Reference Throw | Hook Range | Best For |
|---|---|---|---|---|
| Intermediate–Advanced | Joined individual leaf motifs | 40 × 50 in published leaf-throw reference | 3.5–4.5 mm starting range | Throws, bedspreads, pillow shams |
The photograph does not provide measurable scale, so its exact bedspread dimensions should not be inferred. Calculate the finished size from one blocked leaf and the number of motif positions required across the mattress.
Materials and Tools
Yarn
- Burnt orange or autumn red DK/worsted yarn — approximately half of the leaf motifs.
- Leaf green DK/worsted yarn — approximately half of the leaf motifs.
- Olive green yarn — optional edge variation and joining details.
- Matching joining yarn — use whichever neighboring color makes each seam least visible.
Select yarns from the same weight category and preferably the same product line. Differences in thickness become obvious where red and green motifs meet.
Tools
- 3.5–4.5 mm crochet hook, selected after swatching
- Yarn needle
- Locking stitch markers
- Scissors
- Tape measure
- Digital kitchen scale for yarn calculations
- Blocking mats
- Rustproof pins
Abbreviations
- ch — chain
- sl st — slip stitch
- sc — single crochet
- hdc — half double crochet
- dc — double crochet
- tr — treble crochet
- BLO — back loop only
- FLO — front loop only
- sp — space
- st/sts — stitch/stitches
- RS — right side
- WS — wrong side
An invisible decrease is not required here; the leaf is shaped by graduated stitch heights, edge reductions, and a defined central ridge.
3D Crochet Leaf Blanket Pattern
Make one complete leaf before starting blanket production. Block it lightly, measure its maximum width and length, and weigh it. Those three figures determine the blanket layout and provide a more dependable yarn estimate than calculations taken from the photograph.
Leaf Foundation
Yarn: burnt orange or green.
Row 1: Ch 20.
Beginning in the second chain from the hook, work 4 sc, 4 hdc, 5 dc and 5 tr along the foundation.
Work multiple tall stitches into the final chain to turn around the upper point without twisting the foundation.
Continue down the opposite side of the foundation chain with the stitch heights reversed: tr, dc, hdc and sc.
Join near the lower end with sl st.
The result should resemble an elongated oval with one pointed end. The central foundation chain remains visible because it will become the base of the raised midrib.
Widening the Leaf
Round 2: Ch 1. Work sc through the lower section, hdc through the transition, and dc through the broad middle section.
Increase gradually as the work approaches the upper third.
At the tip, place several stitches into the turning point so the leaf remains flat.
Mirror the stitch sequence down the second side.
Do not increase uniformly around the entire motif. Most additional width belongs in the middle and lower-middle sections rather than at the narrow tip.
Forming the Broad Lower Leaf
Round 3: Work sc along the first lower edge.
Transition to hdc and dc as the motif widens.
Add controlled increases across the widest section.
Return through dc, hdc and sc as the opposite side approaches the base.
Lay the motif flat after completing the round. If the edges wave, remove an increase from each side. If the center cups, additional width may be required in the outer round.
Shaping the Upper Point
The upper section needs to remain narrower than the body.
Work sc and hdc along the approach to the tip, followed by dc and tr only where extra height is required.
At the highest point work:
(dc, tr, ch 2, sl st in second ch from hook, tr, dc).
Continue down the opposite side in mirror order.
The tip should remain centered over the foundation chain.
Raised Center Vein
The prominent ridge is the defining feature of the motif.
With the right side facing, join matching yarn at the lower end of the original foundation chain.
Work surface sc upward through the visible center loops.
Insert the hook consistently beneath the same structural loop on every stitch. Do not crochet deeply through the complete motif because that can pull the two sides together.
Continue to approximately 1 cm below the upper point.
Fasten off.
The finished ridge should stand slightly above the surrounding fabric without shortening the motif.
Left Secondary Veins
Join yarn approximately one-third of the way up the central ridge.
Surface sl st diagonally toward the left edge.
Fasten off before reaching the perimeter.
Make a second branch slightly higher on the center ridge and angle it toward the upper-left edge.
Add a shorter lower branch where required.
Keep all surface stitches loose enough that the motif still lies flat.
Right Secondary Veins
Repeat the left-side vein placement in mirror orientation.
Compare each branch with its opposite partner before fastening off.
The branches do not need to be mathematically identical, but their endpoints should occupy corresponding areas of the leaf.
Textured Leaf Edge
Join yarn at the lower side of the motif.
Work sc along the edge.
For each small rounded projection, work:
(sc, hdc, 2 dc, hdc, sc) into the designated edge section.
Use sl st between projections to pull the valleys inward.
Continue around the complete perimeter.
At the upper tip, preserve the existing point rather than covering it with a large shell.
Fasten off at the lower edge.
Optional Picot Edge
For a more serrated leaf, replace selected rounded projections with small picots.
Work:
sc, ch 2, sl st in second ch from hook, sc.
Space the picots regularly around both sides but omit them from the lowest joining area.
The photographed motifs appear more rounded than sharply toothed, so use this variation sparingly.
Burnt Orange Leaf
Work the complete motif in burnt orange or autumn red.
Use the same yarn for the raised veins unless a contrasting vein effect is wanted.
Fasten off with a 20–25 cm tail on motifs that will be sewn to neighboring leaves.
Green Leaf
Repeat the complete construction in leaf green.
Do not change the hook simply because the color changes. Different tension between the two colors will produce unequal motifs.
Block the first green leaf against the first orange leaf before producing the remaining batch.
Planning the Blanket Layout
The reference alternates red and green motifs rather than grouping large areas of one color. This distributes both colors across the complete bedspread.
Place the blocked leaves on a large flat surface with their points alternating direction where needed. Slight changes in orientation help the outer edges overlap without exposing large gaps.
A simple starting sequence is:
Row A: Orange, green, orange, green.
Row B: Green, orange, green, orange.
Continue alternating the sequence.
Offsetting alternate rows can create a denser surface. Test both a straight grid and an offset arrangement before sewing anything permanently.
Joining the Leaf Motifs
The joins should remain subordinate to the raised leaf texture.
Lay two blocked motifs in their final positions with their edges overlapping by approximately 5–10 mm.
Thread a yarn needle with the color of the upper motif.
Sew through back loops or dense edge stitches only. Avoid stitching through the raised center veins.
Secure the leaves at the upper sides, middle sides, and lower edges.
Do not sew every millimeter of the perimeter. Small free sections preserve the layered dimensional appearance.
After joining four motifs, place the section flat and inspect the intersection. No large hole should remain where their edges meet.
Building the Blanket in Rows
Join individual leaves into horizontal strips first.
Keep every strip aligned to the same blocked measurement.
Once several strips are complete, arrange them on the bed or a large floor surface.
Join the strips through concealed leaf edges.
Check the blanket width after each strip is attached. Overlapping each seam by an additional centimeter across many motifs can reduce the final dimensions substantially.
Continue until the required bed length is reached.
Finishing the Outer Edge
The reference does not depend on a conventional rectangular crochet border. The leaf points themselves create the decorative perimeter.
Where an outside motif feels unstable, join matching yarn behind its edge and work concealed sc between neighboring leaves.
Use chains only where a small gap must be bridged.
Keep these stitches behind the motifs so the blanket still appears to end in individual leaves.
A straight upper edge can be added if the blanket will sit beneath pillows. Work one concealed row of sc across the backs of the uppermost leaves, followed by a second stabilizing row.
Matching Crochet Leaf Pillow Sham
The photograph includes rectangular pillows covered with the same dimensional motifs.
Make enough red and green leaves to cover the front of the intended pillow insert.
Create a plain rectangular crochet or fabric backing panel to the required cushion dimensions.
Arrange the leaves across the front with the same alternating color sequence used on the blanket.
Overlap neighboring edges slightly and attach them at several concealed points.
Keep raised veins and most outer ridges free.
Attach the decorated front to the pillow backing. An envelope-style back allows the insert to be removed without disturbing the leaf motifs.
Assembly
- Make one complete orange leaf and block it to establish the master dimensions.
- Make one green leaf and compare its width, length, and edge shape with the orange sample.
- Crochet the required number of alternating red and green motifs.
- Add the raised center vein and matching secondary veins to every leaf.
- Block all motifs to the master dimensions without flattening the raised ridges.
- Arrange the leaves in alternating rows and test the amount of edge overlap.
- Join motifs into horizontal strips using concealed back-edge stitches.
- Join the completed strips while checking the blanket width after every new row.
- Stabilize the outer motifs and make matching leaf-covered pillow fronts if required.
- Weave in all remaining tails and complete a final light blocking without compressing the dimensional veins.
The finished bedspread should have consistent leaf dimensions, distributed red and green motifs, concealed joins, aligned center ridges, and a naturally shaped outer edge.
7 Technical Tips
- Measure every tenth motif against the master leaf. A width difference of only 5 mm multiplied across ten motifs changes the blanket width by approximately 5 cm.
- Keep surface-crochet veins loose. A center ridge worked too tightly shortens the motif and causes both sides to curl upward.
- Mark the center foundation before adding texture. Moving the raised ridge even two stitches sideways makes the leaf look twisted once neighboring motifs are attached.
- Block the motif before calculating the overlap. A wet-blocked leaf can change several millimeters in both directions, which affects every joining position.
- Limit motif overlap to roughly 5–10 mm at the main seams. Excessive overlap creates thick ridges that become uncomfortable in a bedspread.
- Pin four motifs together before sewing the intersection. Joining them individually without checking the center can leave a visible hole or create a bulky four-layer stack.
- Weave each joining tail through at least 5 cm of dense edge stitches. Avoid running tails through raised veins because that can flatten the relief and make the yarn visible.
Calculating Blanket Size
Do not determine the number of motifs from the photograph. Measure the bed and decide how far the blanket should extend over the sides and foot.
Next, block one complete leaf. Record its width and length.
Because the motifs overlap, subtract the planned overlap from the effective measurement. A 15 cm-wide leaf with a 1 cm overlap contributes approximately 14 cm to the finished row.
If the target width is 210 cm, dividing 210 by an effective 14 cm motif width gives approximately 15 motif positions across. The exact layout changes when rows are offset, so assemble a short test strip before committing to the complete count.
Repeat the same calculation vertically using the effective motif length.
Estimating Yarn for a Bedspread
A large motif blanket should be calculated by weight rather than by guessing skein counts from an image.
Make one fully finished orange leaf, including its raised veins, and weigh it on a digital kitchen scale. Repeat with one green leaf.
For example, if one finished motif weighs 18 g and the planned blanket contains 120 motifs, the leaves alone require approximately 2,160 g of yarn.
Then add yarn for joining, samples, pillow shams, and finishing. Buying the main colors in one dye lot reduces visible variation across the large surface.
Record the actual consumption of the first ten motifs. That figure provides a stronger estimate than the weight of a single sample because minor tension differences are averaged out.
Keeping the Raised Veins Dimensional
The center ridge should sit above the leaf body without turning into a stiff cord.
Surface crochet only through the intended center loops. Pulling the hook through several layers of the motif compresses the fabric and creates a hard line.
After washing, shape the leaf while damp. Press the main fabric flat with the fingers, then lift the ridge slightly rather than pinning directly through it.
Do not iron the raised surface. Heat and pressure can flatten synthetic yarn permanently and remove the relief that defines this textured crochet blanket.
Managing Color Placement
The alternating palette works because neighboring leaves remain easy to distinguish. Orange against green exposes every curved edge and prevents the motifs from reading as one continuous textured fabric.
Start each row with the opposite color from the row above. This produces a checkerboard-like distribution without requiring square blocks.
Olive variations can be inserted among brighter green leaves, but keep them limited if the goal is to preserve the strong two-color rhythm shown in the reference.
Lay out an entire strip before joining. Moving one color is much easier before the overlapping seams have been sewn.
Blocking Individual Leaf Motifs
Blocking takes place before assembly because the finished bedspread is too large for precise correction of individual motifs.
Pin the lower center first, followed by the upper point. This establishes the long axis.
Next pin the widest left and right edges to the master measurement.
Add pins around the scalloped perimeter only after the overall dimensions match the template.
Keep the raised center vein unpinned. The objective is to flatten the leaf body while preserving the relief.
Allow every motif to dry completely before stacking it with the finished batch.
Conclusion
The master leaf controls every measurement in this 3D crochet leaf blanket pattern. Make one orange motif and one green motif first, block both to identical dimensions, weigh them, and test a four-leaf joining section before producing the full bedspread. Keep the center ribs loose enough to remain raised without curling the leaf bodies, and conceal joining stitches beneath overlapping edges. Once the blanket and matching pillow shams are assembled, photograph the alternating layout for Pinterest or Instagram with #AutumnLeafBlanket. For this specific bedspread, would you keep the strict red-and-green alternation or introduce occasional mustard leaves between the two main colors?









