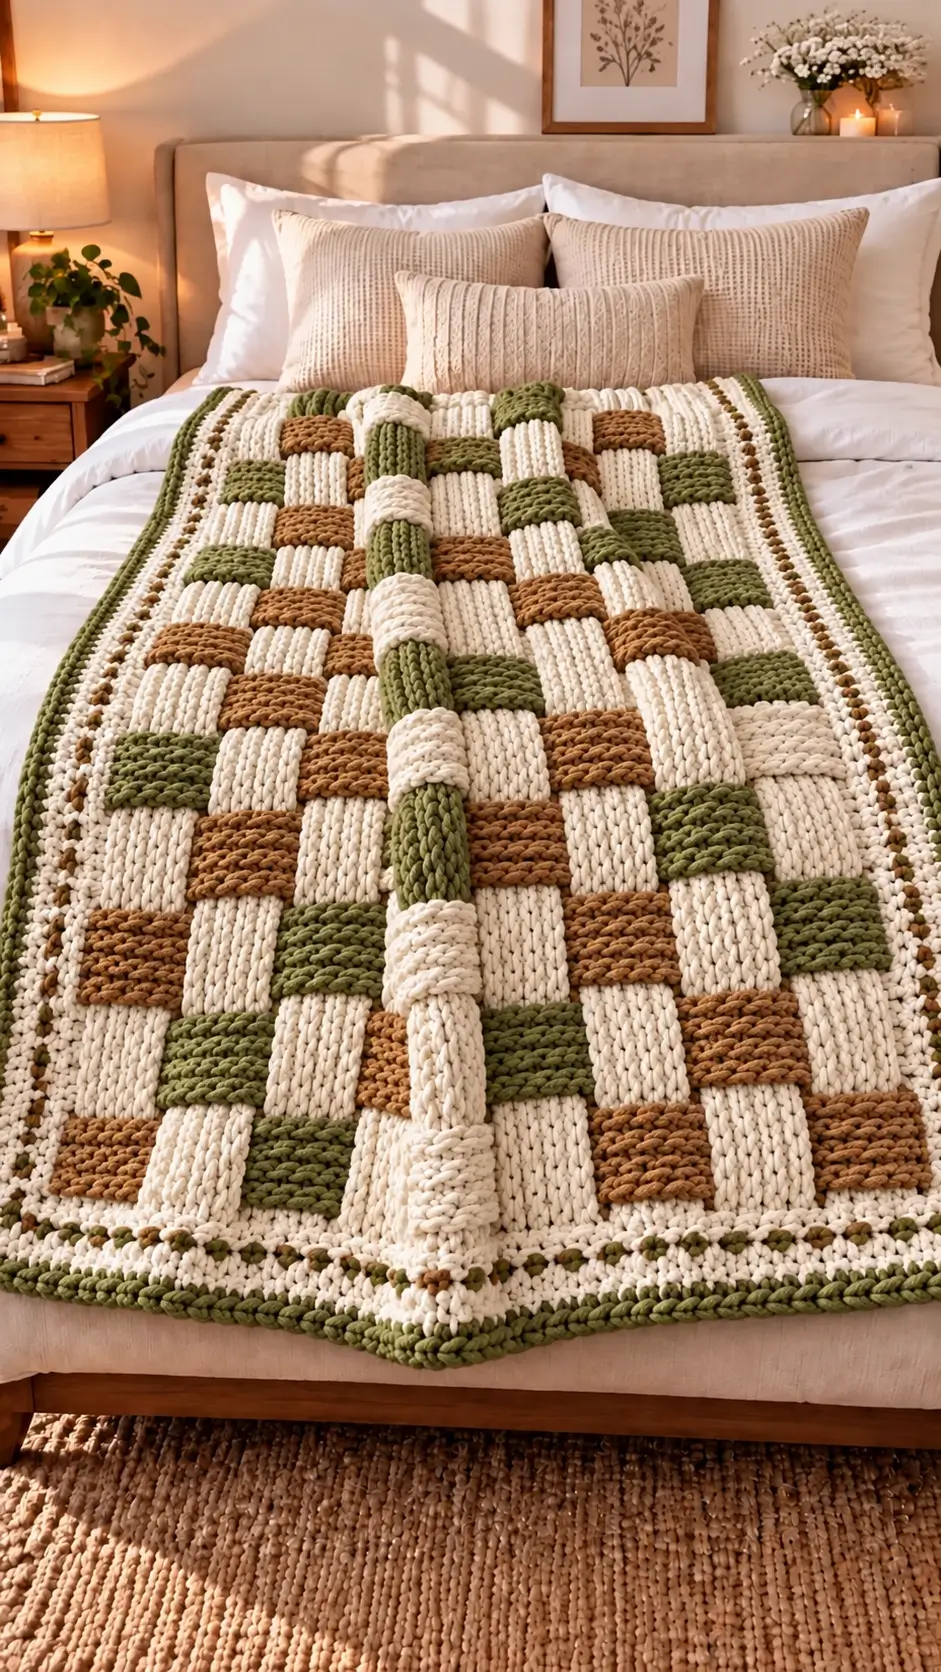
This blanket depends on olive, caramel, and ivory rectangles appearing to pass over and under one another across the bed. This basket weave crochet blanket pattern recreates that structure with super-bulky yarn, a 9 mm hook, and oversized post-stitch blocks. The target is a large 127 × 144.5 cm throw at intermediate level. Its dense construction makes it particularly useful as a substantial bed layer rather than a thin decorative cover.
The Design: What Makes This Basket Weave Blanket Different
Three structural decisions define this version. First, six-stitch post groups create larger rectangles than the four-stitch basketweave commonly shown in stitch tutorials. That scale better matches the broad blocks visible in the reference. Second, ivory remains dominant while olive green and caramel interrupt the field; the resulting three color crochet blanket reads as a grid rather than ordinary horizontal striping. Third, a stable perimeter separates the heavy post-stitch center from the outer edge.
The chunky basket weave crochet blanket also needs a controlled gauge. Post stitches consume more yarn and create a thicker fabric because the hook passes around the stitch post rather than through its top. A common mistake is missing one post at a block boundary. The error shifts every following block sideways and breaks the woven alignment.
Project Info at a Glance
| Skill Level | Time | Finished Size | Hook | Best For |
|---|---|---|---|---|
| Intermediate | Approx. 18–24 hours | 127 × 144.5 cm | 9 mm | Bed layer, large throw |
The finished-size and hook benchmarks are based on a published super-bulky basketweave blanket. Working time is an estimate and will vary according to crochet speed, yarn choice, and tension.
Materials and Tools
Yarn
A practical target for a blanket of this size is approximately 2,400 g of super-bulky yarn. For the color distribution shown in the reference blanket, divide the yarn approximately as follows:
- Warm ivory/cream — super bulky #6 — approximately 1,200 g
- Olive green — super bulky #6 — approximately 650 g
- Caramel/camel brown — super bulky #6 — approximately 550 g
These individual color quantities are planning estimates rather than exact measurements from the photographed blanket. When substituting yarn, compare meterage as well as weight because two super-bulky yarns of the same weight can contain different lengths.
Tools
- 9 mm crochet hook
- Large tapestry needle
- Locking stitch markers
- Scissors
- Measuring tape
- Blocking mats or another large flat surface
A 10 mm hook can be used for the foundation chain if your starting edge normally contracts. Return to the 9 mm hook for the setup row and main pattern.
Abbreviations
- ch — chain
- sc — single crochet
- dc — double crochet
- FPdc — front post double crochet
- BPdc — back post double crochet
- sl st — slip stitch
- st/sts — stitch/stitches
- RS — right side
- WS — wrong side
- rep — repeat
An invisible decrease is not required because this rectangular blanket keeps a constant body stitch count rather than using shaped amigurumi construction.
Gauge
Target approximately 8 stitches × 5 rows = 10 × 10 cm in the established basketweave pattern.
Measure a basketweave swatch rather than ordinary double crochet. Front-post and back-post stitches change both yarn consumption and the dimensions of the finished fabric.
This reconstruction uses 84 working stitches because 84 divides exactly into fourteen six-stitch blocks:
84 ÷ 6 = 14 blocks
That clean division prevents partial blocks from appearing at either side of the blanket.
Basket Weave Crochet Blanket Pattern — Step by Step
This blanket is worked flat in rows rather than in a continuous spiral.
Foundation and Setup
Yarn: warm ivory.
Foundation: Ch 86 loosely.
Setup Row: Dc in 3rd ch from hook and in every chain across. Turn. (84 sts)
Place a stitch marker in the first and last stitch.
The markers are important when working with thick yarn. Super-bulky post stitches can hide an edge stitch, and repeatedly dropping that stitch gradually reduces the blanket width.
Basketweave Section A
Use ivory, olive, or caramel according to your planned color sequence.
Row 1 — RS: Ch 2, turn. *FPdc around next 6 sts, BPdc around next 6 sts.* Repeat across. (84 sts)
Row 2 — WS: Ch 2, turn. *BPdc around next 6 sts, FPdc around next 6 sts.* Repeat across. (84 sts)
Row 3: Repeat Row 1. (84 sts)
Row 4: Repeat Row 2. (84 sts)
The first four rows establish fourteen raised and recessed rectangular sections.
Basketweave Section B
The direction now reverses. This reversal changes the fabric from simple vertical ribs into the characteristic woven-looking checkerboard.
Row 5 — RS: Ch 2, turn. *BPdc around next 6 sts, FPdc around next 6 sts.* Repeat across. (84 sts)
Row 6 — WS: Ch 2, turn. *FPdc around next 6 sts, BPdc around next 6 sts.* Repeat across. (84 sts)
Row 7: Repeat Row 5. (84 sts)
Row 8: Repeat Row 6. (84 sts)
Rows 1–8 form one complete basketweave cycle.
Three-Color Blanket Layout
The reference blanket does not use ordinary narrow horizontal stripes. Ivory, olive green, and caramel brown are distributed so the colors emphasize the rectangular basketweave structure.
For a reproducible version, work complete eight-row sections in the following sequence:
- Section 1: Ivory — Rows 1–8
- Section 2: Olive — Rows 9–16
- Section 3: Ivory — Rows 17–24
- Section 4: Caramel — Rows 25–32
- Section 5: Ivory — Rows 33–40
- Section 6: Olive — Rows 41–48
- Section 7: Caramel — Rows 49–56
- Section 8: Ivory — Rows 57–64
- Section 9: Olive — Rows 65–72
Repeat the sequence as required until the main body approaches the planned finished length.
Maintain 84 stitches in every row. Count at least once after each four-row block. A missing stitch changes the placement of every following six-stitch section.
How to Change Colors
Work the final double crochet or post stitch of the old color until two loops remain on the hook. Yarn over with the new color and pull the new color through those two loops.
Leave approximately 15 cm of yarn tail at each color change.
Avoid carrying an unused super-bulky color through an entire eight-row section. Long carried strands increase thickness and may become visible between the post stitches.
Border
Round 1 — Ivory Stabilization Round
Yarn: warm ivory.
Join ivory at any corner.
Round 1: Ch 1. Sc evenly around the entire blanket, placing 3 sc in each corner. Join with sl st.
The exact number of stitches along the vertical sides depends on the total number of body rows. Distribute them evenly rather than forcing a fixed count.
Place the blanket on a flat surface after this round. A waving border normally indicates too many stitches, while an edge that pulls inward indicates too few.
Round 2 — Caramel Accent
Yarn: caramel brown.
Join caramel in any corner.
Round 2: Ch 1, sc in each stitch around. Work 3 sc into the center corner stitch at every corner. Join with sl st.
Keep the increases confined to the corners. Additional increases along a straight side can cause the border to ripple.
Round 3 — Ivory Border
Yarn: warm ivory.
Round 3: Ch 2. Dc in each stitch around. Work 3 dc into each marked corner stitch. Join with sl st.
Lay the blanket flat and check all four sides before continuing to the final rounds.
Rounds 4–5 — Olive Green Outer Border
Yarn: olive green.
Round 4: Ch 1. Sc in each stitch around, placing 3 sc in each corner. Join with sl st.
Round 5: Ch 1. Work reverse sc in each stitch around. Alternatively, use an ordinary sc round for a flatter edge. Join with sl st.
Fasten off and leave a 15–20 cm tail for weaving.
The green outer border gives the three-color field a defined frame and closely follows the visual proportions of the reference blanket.
Finishing and Assembly
- Complete the 84-stitch textured body to the required length.
- Count the final row and correct it if it does not contain exactly 84 stitches.
- Fasten off each field color with a tail approximately 15 cm long.
- Weave color-change tails into matching-color sections instead of pulling dark yarn through ivory stitches.
- Lay the blanket flat and measure both diagonals to check that the body is square.
- Add the ivory stabilization round, distributing side stitches evenly.
- Work the caramel accent round without increasing along the straight edges.
- Add the ivory border and place every corner increase consistently.
- Finish with the olive outer border and weave the remaining tails through several stitch directions.
- Shape the blanket to approximately 127 × 144.5 cm if your yarn and gauge match the target specifications.
The completed blanket should remain rectangular, with fourteen six-stitch basketweave blocks spanning every 84-stitch textured row.
7 Technical Tips for a Cleaner Basketweave Blanket
- Mark both edge stitches. Missing one concealed edge stitch changes an 84-stitch row to 83 stitches. That single error shifts the following basketweave sections out of alignment.
- Check every six-stitch boundary. One FPdc accidentally worked as BPdc creates a recessed line through a block that should project forward. Count six posts before switching stitch direction.
- Control density through gauge. Overly tight super-bulky post stitches can produce a stiff blanket. Target approximately 8 stitches per 10 cm in the established basketweave fabric.
- Measure the foundation before building the full field. A foundation substantially shorter than the established textured rows creates a bowed lower edge. Use a hook one size larger for the foundation chain if necessary.
- Mark every sixth stitch during the first repeat. A misplaced block boundary is much easier to correct on Row 1 than after four rows of post stitches have reinforced the mistake.
- Use yarns with comparable thickness. Combining a thin #5 yarn with a heavy #6 yarn changes the physical dimensions of individual blocks. All three colors should have similar weight and construction.
- Weave tails at least 8–10 cm through dense stitches. Reverse direction once before trimming. Short tails can pull free because heavy blanket yarn places significant stress on color joins.
Why Basketweave Crochet Uses More Yarn
A basketweave blanket should not be budgeted like a basic double-crochet throw. Front-post and back-post double crochet travel around the vertical post of the stitch beneath rather than only passing through the top loops.
That longer yarn path creates the raised and recessed surface responsible for the woven appearance. It also increases yarn consumption.
For a large blanket around 127 × 144.5 cm, approximately 2,400 g of super-bulky yarn is a practical benchmark. Actual consumption changes with yarn meterage, tension, border width, and final dimensions.
Reserve the olive yarn required for the outer border before using the remaining green yarn in the central field. Running short at the final border is particularly noticeable because that color frames all four sides.
How to Make the Blanket Wider or Narrower
Keep the main stitch count compatible with the six-stitch block structure.
This pattern alternates six FPdc with six BPdc, creating a complete repeat of 12 stitches. Add or subtract stitches in multiples of 12 when changing the width if you want complete paired blocks.
For example:
- 72 stitches = 6 complete 12-stitch repeats
- 84 stitches = 7 complete 12-stitch repeats
- 96 stitches = 8 complete 12-stitch repeats
- 108 stitches = 9 complete 12-stitch repeats
Do not estimate finished width from the foundation chain alone. Crochet a proper basketweave swatch with the selected yarn and hook first.
At a gauge of approximately eight stitches per 10 cm, twelve textured stitches occupy roughly 15 cm. Personal tension can change that measurement, particularly with plush super-bulky yarn.
How to Make the Blanket Longer
Length adjustment does not require changing the stitch count. Continue working complete eight-row basketweave cycles until the blanket approaches the desired measurement.
Stop before reaching the exact final target because the border adds additional width and length.
For the cleanest geometry, finish after a complete eight-row cycle rather than stopping halfway through a raised/recessed block. This keeps the final row visually aligned with the rest of the basketweave grid.
Fixing Common Basketweave Problems
The Blanket Is Getting Narrower
Count the row. If it contains fewer than 84 stitches, an edge stitch or post has probably been skipped. Locking stitch markers at both edges make this failure easier to detect.
The Blocks Are Moving Sideways
Check each six-stitch group. The most likely cause is five or seven post stitches being worked before changing from FPdc to BPdc.
The Border Is Waving
Too many stitches have probably been placed along the side edges. Remove several evenly distributed stitches and work the stabilization round again.
The Border Pulls Inward
The side edge needs additional stitches. Add them gradually rather than placing several extra stitches in one location.
The Fabric Feels Too Stiff
Measure the gauge. If substantially more than eight stitches fit inside 10 cm, move to a larger hook and make another swatch before continuing.
The Color Changes Look Bulky
Do not knot multiple super-bulky strands together. Complete the last stitch with the incoming color, leave adequate tails, and weave those tails separately after the blanket is finished.
Final Measurements and Finishing
Lay the completed blanket on a large flat surface without stretching it. Measure the width at the top, center, and bottom. Then measure the length along the left edge, center, and right edge.
For this version, the target finished measurement is approximately 127 × 144.5 cm. Small variations are normal because super-bulky yarn responds strongly to changes in tension.
Check both diagonals as well. Similar diagonal measurements indicate that the blanket is reasonably square.
Before cutting the final olive strand, inspect every color join and border corner. Photograph the finished blanket flat so the ivory, olive, and caramel blocks remain clearly visible, then share the finished project on Pinterest or Instagram with #ThreeColorBasketWeaveBlanket. Record the actual yarn used for each shade before discarding the labels; those figures make future resizing more accurate. The most useful next step for this basket weave crochet blanket pattern is a 24-stitch gauge swatch using the intended 9 mm hook. Would you keep the olive-green outer border shown here or finish yours in caramel brown?










This is beautiful
I want it’s full method of weaving