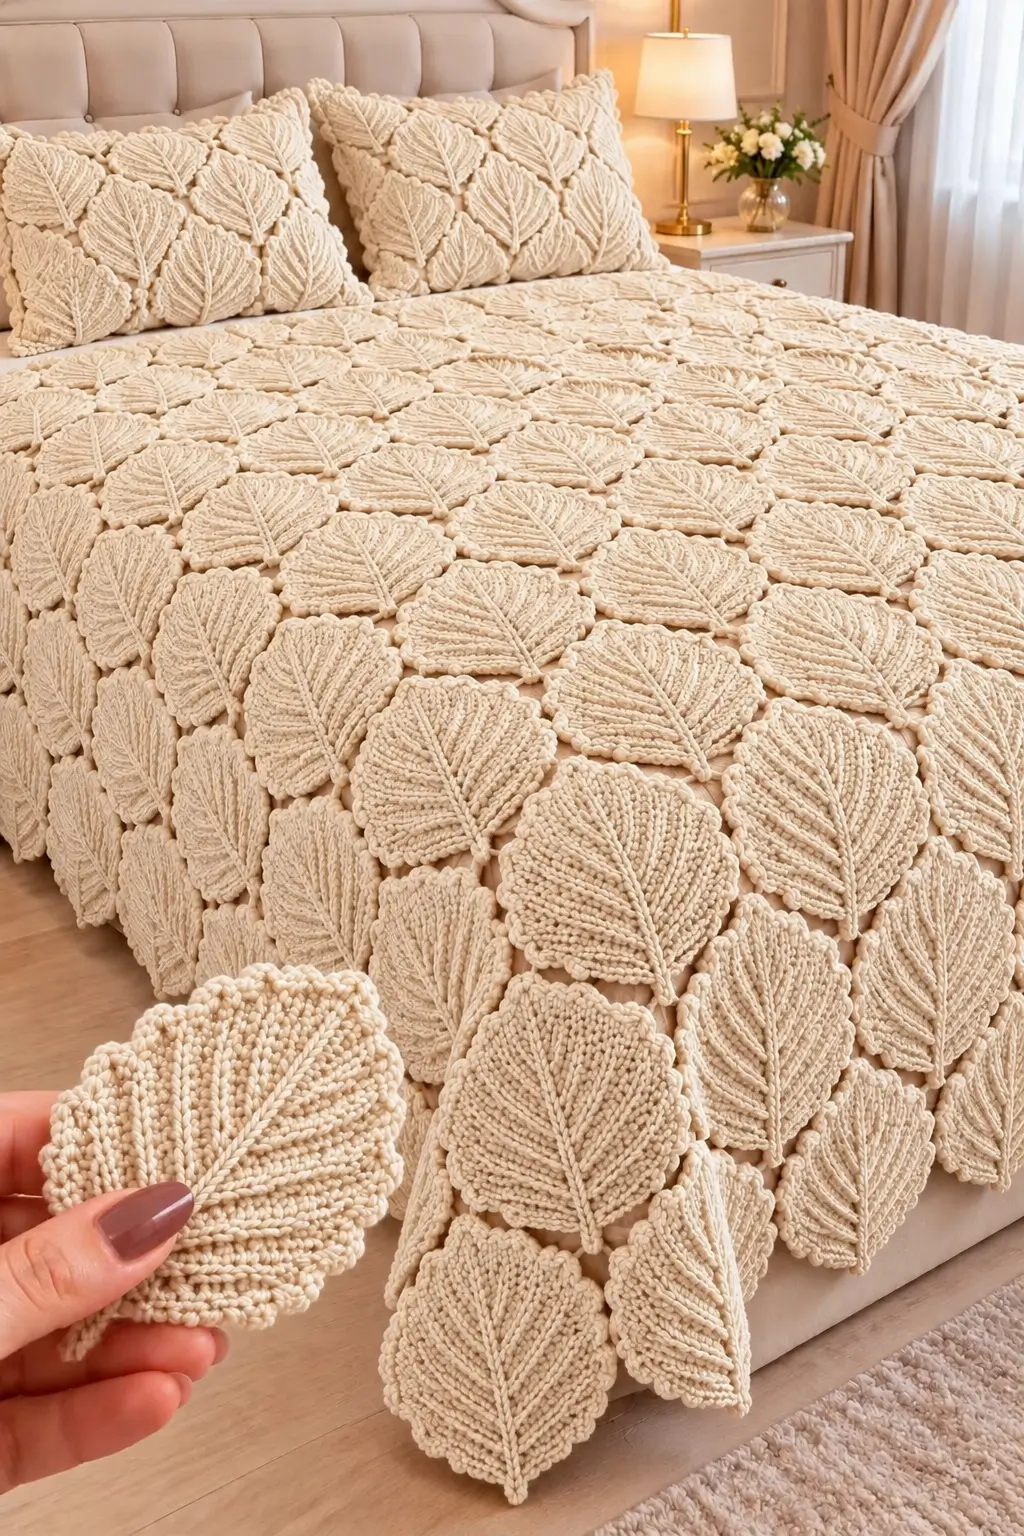
A leaf this large needs a center vein strong enough to control both halves of the motif. This 3D crochet leaf blanket pattern recreates the photographed look with oversized cream leaves, raised vein details and closely joined motifs. Medium-weight yarn and a 4.5–5.0 mm hook produce defined texture without making the bedspread excessively stiff. The modular construction is best suited to intermediate crochet skills.
The Design: What Makes This Leaf Blanket Different
The blanket is constructed from individual leaves rather than conventional granny squares. Each motif has a pointed tip, rounded lower body and pronounced center ridge. Raised diagonal ribs extend from that center line toward the outer edge, creating the distinctive botanical texture.
The second important feature is overlap. The leaves sit close together, and the joins are largely concealed beneath their textured edges. This gives the crochet leaf bedspread a continuous surface even though it is assembled from separate pieces.
Finally, the entire design uses one cream tone. With no color changes to define the pattern, stitch direction and relief must do that work instead. A common mistake is attaching every leaf completely flat. The reference design retains slightly raised edges, so attachment stitches should concentrate along the center and selected perimeter points.
Project Info at a Glance
| Skill Level | Time | Finished Size | Hook | Best For |
|---|---|---|---|---|
| Intermediate | 50–80 hours | Approx. 140 × 180 cm | 4.5–5.0 mm | Bedspread or textured throw |
The finished blanket measurement is a photo-inspired target rather than a measurement taken from the photographed object. Published crochet leaf patterns commonly use medium or worsted-weight yarn with hooks around 4–5.5 mm. Individual leaf size varies considerably with yarn, hook and construction.
Materials and Tools
Yarn
- Cream — #4 medium/worsted yarn — approximately 2,000–2,600 g for a large bedspread.
- Optional matching cream — reserve approximately 150–200 g for joining and repairs.
The yarn quantity is a working estimate for the photo-inspired construction rather than a published quantity for the pictured blanket. Make and weigh one finished leaf before buying yarn for a custom bed size. Multiply that weight by the required number of motifs and add approximately 10–15 percent for joining, swatching and variations in tension.
Tools
- 4.5 mm crochet hook for firm leaf motifs
- 5.0 mm crochet hook if additional drape is required
- Tapestry needle
- Locking stitch markers
- Scissors
- Blocking mats
- Rust-resistant pins
- Measuring tape
Abbreviations
- ch — chain
- sc — single crochet
- hdc — half double crochet
- dc — double crochet
- tr — treble crochet
- sl st — slip stitch
- inc — increase
- dec — decrease
- BLO — back loop only
- FLO — front loop only
- FPsc — front-post single crochet
- st/sts — stitch/stitches
- FO — fasten off
When an invisible decrease is required, work through the front loops of the next two stitches before completing one single crochet. This reduces the ridge normally produced by a conventional decrease.
Blanket Layout
The photographed blanket contains many overlapping leaf motifs rather than large square blocks. For a bedspread approximately 140 × 180 cm, begin with about 80–100 large leaves. The final number depends on the blocked dimensions of each motif and the amount of overlap used during assembly.
- Large cream leaves: approximately 80–100
- Optional smaller filler leaves: approximately 10–20
- Joining yarn: matching cream
- Optional edge motifs: use full leaves extending beyond the underlying foundation line
Do not make every motif before testing the layout. Complete six leaves first, block them, arrange them with the intended overlap and calculate the actual coverage.
3D Crochet Leaf Blanket Pattern — Step by Step
Large Textured Leaf — Make 80–100
Yarn: cream. Hook: 4.5–5.0 mm.
This is an original photo-inspired leaf construction. The leaf is worked around a central foundation before surface crochet creates the pronounced vein structure.
Ch 24.
First Side of the Leaf
Starting in the second chain from the hook:
Row 1: sl st, sc, sc, hdc, hdc, dc, dc, tr, tr, tr, dc, dc, hdc, hdc, sc, sc, sl st.
Continue toward the end of the foundation chain with sc stitches, leaving enough unused chain to form a short lower stem.
Work 5 dc into the chain at the broad turning point to begin forming the rounded upper section.
Second Side of the Leaf
Rotate the work and crochet along the opposite side of the foundation chain.
Mirror the stitch-height sequence:
sl st, sc, sc, hdc, hdc, dc, dc, tr, tr, tr, dc, dc, hdc, hdc, sc, sc, sl st.
Join near the lower center with sl st.
At this stage the motif should resemble an elongated oval leaf with a defined point and a visible foundation line through the middle.
Leaf Expansion Round
Work around the outside of the motif.
R1: Ch 1. Sc into the first stitches near the lower edge, then gradually change to hdc and dc as you approach the widest section.
Work increases at approximately four evenly spaced points along each rounded side.
Near the leaf tip, work:
2 dc, ch 2, 2 dc into the tip space.
Mirror the shaping down the opposite side.
Join with sl st near the stem.
The exact distribution of increases may need minor adjustment according to tension. The motif must lie flat before the raised ribs are added.
Second Leaf Expansion Round
R2: Ch 1 and sc around the lower section.
Change gradually to hdc across the middle third of the leaf.
Work dc stitches through the widest section.
At the pointed tip work:
dc, 2 tr, ch 2, 2 tr, dc.
Mirror the stitch heights down the opposite side.
Join with sl st.
Fasten off only if the raised center vein will be worked with a separate length of yarn.
Raised Center Vein
The pronounced center line is essential to the appearance of this textured crochet leaf.
Join cream yarn at the bottom of the leaf.
Surface crochet a line of slip stitches directly over the original foundation chain, working from the stem toward the pointed tip.
Keep the slip stitches even and slightly relaxed. Tight surface crochet will fold the motif along its center.
At the tip, fasten off and weave the tail through the back of the leaf.
Diagonal Raised Veins
The photograph shows numerous diagonal ridges branching from the central vein.
Join yarn approximately 1 cm from the bottom of the center vein.
Surface crochet diagonally toward the outer edge using slip stitches.
Fasten off at the perimeter.
Repeat on the opposite side at approximately the same height.
Continue toward the tip, spacing the vein lines approximately 6–10 mm apart.
Angle each line upward rather than working directly sideways. The veins should form a repeated V-shaped structure around the center ridge.
Depending on leaf size, use approximately 10–14 vein pairs.
Alternative Raised Vein Method
If repeatedly cutting yarn creates too many tails, work the diagonal texture while constructing the leaf body.
Use front-loop and back-loop stitches strategically to leave raised lines. Front-post single crochet can also create relief without adding separate embroidered strands.
Test both methods on one sample leaf. Surface slip stitches produce the strongest resemblance to the pronounced raised veins visible in the photograph.
Scalloped Leaf Edge
The outer perimeter should not appear mechanically smooth.
Join cream yarn at the lower edge.
Repeat the following around most of the leaf:
sl st in next stitch, 3 sc in next stitch, sl st in next stitch.
For a subtler edge, use:
sc, ch 2, sc at regular intervals.
Keep the pointed tip clear. Work one small picot at the tip rather than a rounded shell.
Fasten off with a 25–30 cm tail if the tail will be used for assembly.
Optional Small Filler Leaf
Yarn: cream. Hook: 4.5 mm.
Use smaller motifs where a full-size leaf would create excessive overlap near the outer edge.
Ch 17.
Starting in second chain from hook:
sl st, sc, hdc, dc, dc, tr, tr, dc, dc, hdc, sc, sl st.
Work 4–5 stitches into the turning chain and mirror the stitch sequence down the opposite side.
Work one expansion round around the perimeter.
Add a raised central vein and approximately 6–8 pairs of diagonal veins.
Finish with the same small scalloped edging used on the large motifs.
Blocking the Leaf Motifs
Blocking is required before the blanket layout is calculated. Unblocked leaves can differ substantially in width even when the stitch counts match.
Pin the stem and pointed tip first. Next, pin the widest points on both sides so the center vein remains straight.
Do not stretch the leaf until the raised veins flatten. The purpose is to standardize the outer dimensions while preserving the relief texture.
Measure each motif after it is completely dry.
A practical large-leaf target for this photo-inspired blanket is approximately 16–20 cm long and 12–15 cm wide. Change hook size rather than aggressively stretching motifs that finish outside the target range.
Planning the Leaf Arrangement
Place the blocked motifs on a bed or large clean surface before sewing anything permanently.
Orient most leaves vertically, with their tips pointing toward the head or foot of the blanket. Rotate selected leaves by approximately 10–20 degrees to prevent the layout from resembling a rigid grid.
Overlap adjacent leaf edges by approximately 1–2 cm. The overlap conceals joining stitches and eliminates large open spaces.
Offset alternate rows. A leaf in the second row should sit approximately between two motifs in the first row rather than directly underneath one.
Photograph the completed arrangement before dismantling it for assembly. This provides a placement reference while individual motifs are being sewn.
Joining the Crochet Leaves
The joining method determines whether the finished bedspread behaves like a blanket or a collection of separate appliqués.
Lay two neighboring leaves in their planned overlapping position.
Thread a tapestry needle with matching cream yarn.
Working from the wrong side, sew through the back loops of the overlapping perimeter stitches.
Keep the seam approximately 1–1.5 cm inside the visible edge. This allows the scalloped perimeter to remain free.
Add a second small attachment point near the center vein if the motif lifts excessively.
Do not sew around the complete circumference of every leaf. Partial joining maintains the dimensional edges seen in the reference design.
Joining Leaves into Rows
Assemble the blanket in manageable strips rather than attempting to join all motifs on the bed at once.
Make the first horizontal strip using approximately 7–9 leaves, depending on motif width.
Create the second strip with the leaves offset by half a motif.
Join the two strips along their overlapping edges.
Continue adding strips until the required blanket length is reached.
After every third strip, place the work flat and measure both side edges. Correct any developing curve before additional rows make the distortion harder to remove.
Finishing the Side Edges
The photographed bedspread intentionally has an irregular botanical perimeter. Individual leaves extend beyond neighboring motifs instead of terminating at a straight crocheted border.
For the closest visual match, leave selected leaf tips and lower edges exposed.
If a more practical straight edge is required, work a concealed foundation along the wrong side.
Attach cream yarn to the back of the outer motifs and work a loose line of chain stitches between attachment points.
Return across that foundation with single crochet.
Keep this stabilizing strip behind the leaves so it does not replace the natural outline.
Optional Straight Top Edge
A straight upper edge can make the blanket easier to position beneath pillows.
Arrange the final row of leaves so their upper edges overlap heavily.
Join cream yarn at one corner.
Work sc across the back of the motifs, inserting the hook only through concealed edge loops.
Use chains to bridge small gaps between motifs.
Work a second row of sc across the foundation.
Fasten off and weave the tail toward the center of a leaf.
Matching Crochet Leaf Pillow Covers
The reference image also includes pillows covered with the same large leaf motifs. A matching pillow can be constructed without changing the basic leaf pattern.
For a rectangular cushion, crochet approximately 8–12 leaves, depending on the finished motif size and cushion dimensions.
Arrange the leaves on a plain cream crochet or fabric cushion front.
Overlap their edges by approximately 1 cm and attach them through the back perimeter stitches.
Keep the outermost leaf edges inside the pillow seam allowance. This prevents raised tips from becoming trapped or distorted when the front and back panels are joined.
Assembly
- Make six test leaves first. Complete the body, center ridge, diagonal veins and edging before calculating the full motif quantity.
- Block every finished motif. Keep large leaves within approximately 5 mm of the selected target dimensions whenever possible.
- Arrange the first complete row. Overlap neighboring edges by 1–2 cm and vary the leaf angle slightly.
- Offset the next row. Position each new leaf between two motifs from the previous row to cover potential gaps.
- Join through the back loops. Keep most sewing stitches hidden at least 1 cm inside the visible scalloped perimeter.
- Connect the rows. Assemble manageable strips and join those strips after their individual alignment has been checked.
- Inspect the reverse. Reinforce any junction where three or four motifs meet, because these points carry more tension than a simple two-leaf overlap.
- Complete the outer layout. Add smaller filler leaves only where a full-size motif would produce excessive bulk.
- Stabilize the top if required. Add a concealed line of single crochet behind the final leaf row rather than covering the natural leaf tips.
- Weave all tails in two directions. Keep the woven sections on the wrong side and avoid pulling hard enough to distort the raised vein texture.
The completed bedspread should remain flexible between motifs while each cream leaf retains a distinct raised center vein and ribbed surface.
7 Technical Tips for a Better Crochet Leaf Blanket
- Prevent center-vein curling. Surface slip stitches must be worked more loosely than ordinary crochet. If the leaf folds sharply along its center after the vein is added, the surface stitches are too tight.
- Control motif size. Measure every fifth leaf after blocking. A repeated 5 mm increase in width becomes several centimeters of unwanted expansion across a row of eight or nine motifs.
- Avoid asymmetrical leaves. Count the major stitch-height groups on both sides of the foundation chain. One missing dc or tr can make one side visibly narrower after blocking.
- Protect the raised ribs. Do not press the motifs with a hot iron. Flattening the surface crochet removes the dimensional feature responsible for most of the pattern definition.
- Limit overlap to 1–2 cm. Excessive overlap makes the finished blanket unusually heavy and creates hard ridges where several leaves stack on top of one another.
- Reinforce multi-leaf junctions. Add two or three concealed stitches where three motifs intersect. Leaving these points unsupported can produce holes after the blanket is repeatedly lifted or folded.
- Use long joining tails. Leave approximately 25–30 cm where a motif will be sewn directly to its neighbor. Weave the remaining yarn in two directions so the seam cannot loosen from repeated movement.
How to Keep the Raised Leaf Texture Visible
The monochrome color scheme makes texture more important than color contrast. The center vein should therefore remain visibly higher than the surrounding crochet fabric.
Use a hook approximately 0.5 mm smaller for the surface details if the main fabric is very loose. The smaller hook produces compact raised stitches, but the working yarn must still be kept relaxed enough to prevent puckering.
Diagonal veins should begin close to the center ridge and finish near the perimeter. Maintain a consistent upward angle. Horizontal ribs make the motif resemble a feather more than a broad botanical leaf.
After washing, reshape the motifs while damp. Lift the scalloped edges and run a finger beneath the center vein rather than pressing the blanket completely flat.
Choosing Yarn for a Monochrome Leaf Bedspread
Medium-weight yarn provides enough stitch definition for the raised veins while keeping individual motifs manageable. Crochet leaf references commonly specify worsted-weight yarn, and published examples use hooks ranging from approximately 4 mm to 5.5 mm depending on the required firmness.
Cotton gives the ribs and scalloped edges strong definition, but a bed-size project made entirely from cotton can become heavy. Acrylic is lighter and generally easier to wash. A cotton-acrylic blend offers a middle option when both definition and manageable blanket weight are priorities.
Avoid switching between yarn brands halfway through the project unless their thickness and stretch are nearly identical. Even when two labels both state worsted weight, their blocked dimensions can differ enough to affect a modular blanket.
How to Calculate Yarn Before Making the Full Blanket
Complete one fully textured leaf, including all surface veins and edging. Weigh it on a digital kitchen scale before cutting any extra yarn away.
If one leaf weighs 24 g and the planned blanket requires 90 leaves, the motifs alone require approximately 2,160 g. Add at least 10 percent for joining, filler motifs, swatches and tension differences.
This method is more reliable than estimating from blanket dimensions because the numerous raised vein lines substantially increase yarn consumption.
Purchase the main yarn in one dye lot when possible. A monochrome cream design can reveal even small shade differences across adjacent motifs.
How to Adjust the Blanket Size
Calculate the dimensions from blocked motifs rather than relying on a fixed number of leaves.
For a lap blanket, approximately 35–45 large leaves may be sufficient depending on their final dimensions.
A medium throw can require approximately 55–70 leaves.
A large bedspread similar to the reference image can require approximately 80–100 or more leaves.
The actual total changes with motif size and overlap. Arrange two complete sample rows before committing to a final count.
Conclusion
The success of this blanket depends on repetition with tight dimensional control. Make several complete leaves first and use them to establish the blocked size, vein spacing and 1–2 cm overlap before producing the remaining motifs. Keep the center ridges raised, join primarily through concealed back loops and leave selected scalloped edges free so the surface retains its layered botanical structure. Weigh one finished motif before purchasing the full yarn quantity; that single measurement provides a more useful estimate than blanket dimensions alone. Save this 3D crochet leaf blanket pattern to Pinterest and share the finished bedspread on Instagram with #CreamLeafCrochetBlanket. Would you keep every leaf the same size or add smaller leaves around the outer edge?









