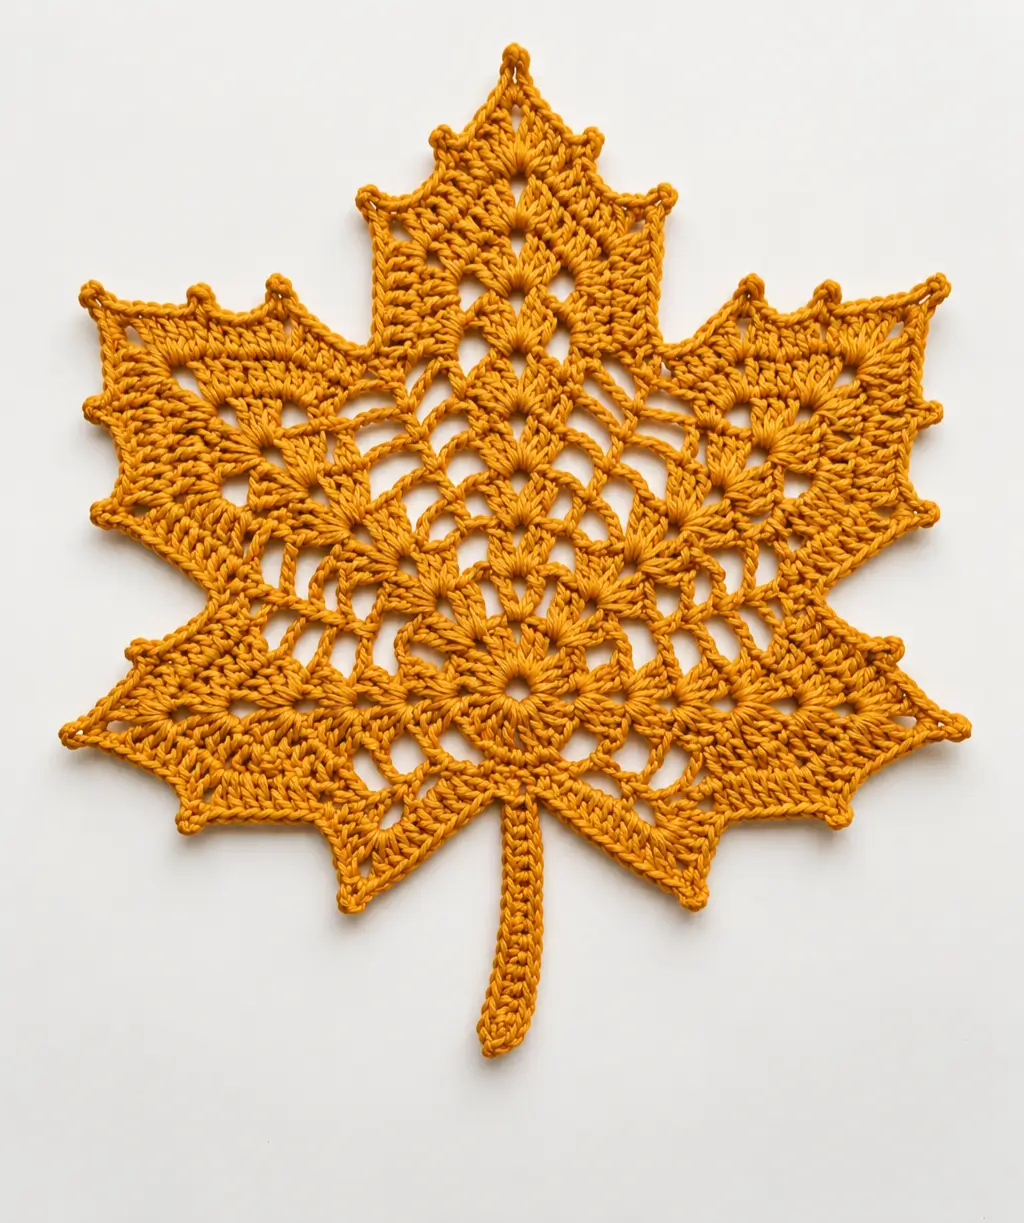
A maple leaf this open cannot depend on solid crochet alone: its veins have to hold five pointed lobes in position without collapsing the spaces between them. This crochet maple leaf doily pattern uses mustard cotton, radiating chain spaces, graduated stitches, pointed tips, and a narrow stem. The photo-inspired construction suits intermediate crochet and can be scaled for an autumn centerpiece, decorative mat, or oversized leaf appliqué.
The Design: What Makes This Maple Leaf Different
The openwork vein system is the defining feature. Instead of crocheting a nearly solid disk and shaping five points around its edge, the motif separates its lobes with large chain spaces extending from the center. Those openings reduce bulk and create the branching structure visible throughout the leaf.
Proportion provides the second structural rule. The central lobe is the longest. Two upper side lobes establish the width, while two lower lobes angle downward toward the stem. Smaller points between those dominant sections create the serrated outline.
A common mistake with an openwork crochet maple leaf is making every point equal. That produces a star rather than a maple silhouette. The center lobe needs greater height, and the valleys between neighboring lobes must remain clearly recessed.
Project Info at a Glance
| Skill Level | Construction | Reference Size | Hook | Best For |
|---|---|---|---|---|
| Intermediate | Center-out openwork motif | Up to approx. 30 × 30 cm | Depends on yarn | Doilies, centerpieces, table décor |
A published thread-crochet maple leaf doily measures approximately 30 × 30 cm. A DK maple-leaf reference measures about 10 × 10 cm, demonstrating how strongly yarn weight and hook size affect the final dimensions. For a larger table piece, make and block a sample before fixing the finished measurement.
Materials and Tools
Yarn
- Mustard gold cotton yarn — main leaf and stem.
For a fine traditional doily, use crochet cotton and the hook recommended for that thread. For a heavier decorative leaf similar to the substantial stitch definition visible in the photograph, DK cotton provides a practical alternative.
Use a firm, smooth yarn rather than an extremely fuzzy fiber. The open vein spaces and pointed perimeter depend on clearly defined stitches.
Tools
- 3–3.5 mm crochet hook for DK cotton
- Yarn needle
- Stitch markers
- Scissors
- Tape measure
- Blocking mat
- Rustproof blocking pins
Abbreviations
- MR — magic ring
- ch — chain
- sc — single crochet
- hdc — half double crochet
- dc — double crochet
- tr — treble crochet
- dtr — double treble crochet
- sl st — slip stitch
- sp — space
- st/sts — stitch/stitches
- RS — right side
A picot is formed by chaining several stitches and slip stitching back into the first chain or supporting stitch, creating the compact point used around the maple-leaf perimeter.
Openwork Crochet Maple Leaf Doily Pattern
This is an original photo-inspired reconstruction rather than a transcription of an unidentified designer’s pattern. The primary objective is to reproduce the five-lobed silhouette, radiating openwork, central vein structure, and pointed perimeter visible in the reference.
Central Foundation
Yarn: mustard gold.
Round 1: Make an MR. Ch 1 and work 6 sc into the ring. Join with sl st. (6)
Round 2: Ch 1, work 2 sc in each stitch around. Join with sl st. (12)
Round 3: Ch 2, work 2 hdc in each stitch around. Join. (24)
Do not pull the magic ring so tightly that the center buckles. The foundation must remain flat because every open vein radiates from this section.
Establishing the Five Main Veins
Place five stitch markers around the outer foundation to identify the directions of the central lobe, two upper side lobes, and two lower lobes.
Round 4: Work groups of dc separated by chain spaces, distributing five primary ch-2 spaces around the motif.
These chain spaces establish the first openings in the vein network.
The upper-center marker should align directly opposite the future stem. Check this alignment before beginning the lobes.
Central Openwork Vein
Join yarn at the upper-center marked space.
Row 1: Ch 3, 2 dc in the same space, ch 2, 3 dc in the same space.
Row 2: Turn. Sl st to the first ch-2 space. Ch 3, 2 dc, ch 3, 3 dc in the same space.
Row 3: Work dc along the first side, maintaining a central ch-2 opening.
Row 4: Increase once along each outside edge while preserving the center opening.
Row 5: Repeat the established structure with one central eyelet.
The resulting openings should form a visible line from the leaf center toward the upper tip.
Central Lobe
Continue from the central vein.
Row 6: Work dc toward the center, place (dc, ch 2, dc) around the central vein space, then work dc across the opposite side.
Row 7: Increase at both outer edges. Maintain the ch-2 vein opening.
Row 8: Work evenly.
Row 9: Begin tapering by reducing the width at both outside edges.
Row 10: Continue tapering while maintaining the center eyelet.
Row 11: Work hdc, dc, tr toward the center.
At the tip work tr, ch 3, sl st into the first chain, tr, then reverse the stitch heights down the second side.
The central point should extend farther from the foundation than any neighboring lobe.
Upper Left Lobe
Join yarn in the marked space immediately left of the center section.
Row 1: Ch 3, work dc across the allocated section, ch 2 at the internal vein, then continue with dc.
Row 2: Increase at both outer edges.
Row 3: Maintain one open vein space through the center of the lobe.
Row 4: Work evenly.
Row 5: Begin tapering toward the point.
Row 6: Work sc, hdc, dc and tr toward the tip.
Make a ch-3 picot at the highest point, then reverse the stitch sequence.
Fasten off.
Upper Right Lobe
Repeat the upper-left-lobe construction on the opposite side.
Count the rows and compare the number of stitches before fastening off. Both upper lobes should reach approximately the same width and height.
The pair must remain shorter than the central lobe.
Lower Left Lobe
Join yarn in the next marked lower space.
Row 1: Ch 2 and work hdc across the allocated section.
Row 2: Work dc while preserving a ch-2 eyelet along the lobe axis.
Row 3: Increase at the outside edge.
Row 4: Work evenly.
Row 5: Begin tapering.
Row 6: Shape the point with hdc, dc, tr, ch-3 picot, tr, dc and hdc.
Fasten off.
Lower Right Lobe
Repeat the lower-left-lobe construction in mirror orientation.
Both lower lobes should point diagonally downward rather than horizontally. Their tips should finish above the end of the stem.
Connecting the Openwork Veins
The photograph contains more open space than a conventional solid maple-leaf appliqué. Add connecting chain arches between the principal lobe veins to reproduce that lace structure.
Join yarn near the center.
Openwork Row 1: Ch 5 and sl st into the nearest lobe-side stitch.
Openwork Row 2: Ch 6 and attach to the next corresponding stitch along the neighboring lobe.
Openwork Row 3: Continue outward with chain arches while maintaining approximately equal openings on the left and right sides.
Repeat between every pair of major lobes.
Do not make the chains tight. The arches need enough length to lie flat when the points are blocked outward.
Secondary Vein Branches
Work additional chain branches from the main veins toward the sides of each lobe.
Join yarn to a principal vein.
Ch 4–6 depending on the distance to the outer lobe section.
Attach with sl st.
Work the next branch slightly farther toward the tip.
Repeat symmetrically on the opposite side of the vein.
The objective is a branching structure rather than a uniform mesh. Openings should become smaller as they approach the pointed perimeter.
Small Perimeter Points
Join yarn at the base of one lower lobe.
Work sc along the outside edge.
For each small serration work:
(sc, ch 2, sl st in second ch from hook, sc).
Continue in sc toward the next serration.
For a medium point work:
(hdc, dc, ch 3, sl st in first ch, dc, hdc).
At each major lobe tip preserve the larger existing picot rather than covering it with dense stitches.
Use slip stitches in the deepest valleys to pull the perimeter inward.
Outer Edging
Continue around the complete leaf with sc and slip stitches.
The edging should follow the existing geometry rather than add a thick frame.
At a major tip work:
sc, ch 3, sl st into first ch, sc.
At a minor tip work:
sc, ch 2, sl st into second ch from hook, sc.
At a valley work one or more sl sts.
Continue until reaching the lower center beside the stem position.
Stem
Join yarn at the lower-center point.
Row 1: Ch 14.
Row 2: Starting in the second chain from the hook, work sc in each chain back toward the leaf. (13)
Turn the work so the opposite side of the foundation chain is accessible.
Row 3: Work sc along the second side. Place 3 sc into the end chain to round the stem tip.
Continue back toward the leaf.
Join with sl st at the stem base.
Fasten off and weave the yarn tail through the dense stem stitches.
Assembly and Finishing
- Complete the circular foundation and mark all five principal lobe directions.
- Work the tall central lobe and keep its vein aligned with the lower-center stem position.
- Complete the matching upper side lobes.
- Work the two smaller lower lobes in mirror orientation.
- Add chain arches between neighboring lobes to build the openwork network.
- Add secondary vein branches while maintaining left-right symmetry.
- Work the pointed perimeter around all five major lobes.
- Crochet the narrow stem from the lower-center position.
- Weave every yarn tail through dense stitches rather than through open chain arches.
- Wet-block the motif and individually pin the central point, paired side points, lower lobes, small serrations, and stem.
The completed leaf should lie flat with one dominant central point, paired side lobes, symmetrical open veins, deep valleys, and a stem aligned with the center axis.
7 Technical Tips for an Openwork Maple Leaf
- Mark the center axis before working any lobe. A center point displaced by even 1–2 cm from the stem becomes obvious once the leaf is blocked.
- Keep the central lobe 10–20% longer than the upper side lobes. Equal-length lobes make the finished motif resemble a star rather than a maple leaf.
- Measure matching chain arches before continuing outward. A six-chain opening worked much tighter on one side can pull an entire lobe toward the center.
- Use slip stitches in the deepest valleys. Filling a valley with dc or tr removes the separation between neighboring lobes and rounds the silhouette.
- Do not tighten surface connections around the eyelets. A vein pulled several millimeters too short causes the surrounding solid crochet to cup.
- Pin every major and minor point separately. Stretching only the five large lobes leaves the smaller perimeter points rounded after drying.
- Weave tails through at least 4–5 cm of solid crochet. Chain arches provide too little friction and make hidden yarn ends visible through the lace openings.
How to Size the Maple Leaf Doily
Yarn choice changes this design substantially. Published crochet maple leaves made from DK yarn can measure approximately 10 cm, while a dedicated thread-crochet maple leaf doily can reach approximately 30 × 30 cm.
Decide first whether the finished piece will function as an appliqué, coaster, placemat, or centerpiece. Then make one central section and at least one lobe with the intended yarn.
For a substantial table decoration, aim for roughly 25–30 cm across the widest pair of side lobes. Measure the leaf itself rather than including the stem.
Do not enlarge the finished motif simply by adding several solid perimeter rounds. Doing so fills the deep valleys and weakens the maple silhouette. Scaling the yarn and hook or lengthening the lobe rows preserves the proportions more effectively.
Choosing Yarn for the Openwork Structure
Cotton is particularly useful for a crochet maple leaf doily pattern because the fiber provides enough definition for the vein openings and pointed edge to remain visible after blocking.
Fine crochet cotton produces a traditional lace doily. DK cotton creates a heavier motif with larger openings and stronger visual texture.
Whatever yarn is selected, make the chain arches without excessive tension. Openwork that looks correctly proportioned on the hook can contract after the surrounding solid sections are completed.
Use one yarn throughout the motif unless deliberate color changes are part of the design. Different yarn thicknesses alter the tension between solid lobes and open chain sections.
Keeping the Leaf Symmetrical
The central vein and stem form the primary axis. Check their alignment before adding secondary branches.
Work paired sections consecutively: left upper lobe followed by right upper lobe, then left lower lobe followed by right lower lobe. Record the row count for the first section and duplicate it on its partner.
Compare the distance from the center to each matching point. Small tension differences can be corrected during blocking, but missing rows or unequal chain arches need to be corrected in the crochet.
Lay the unfinished motif flat after every major lobe. If one section rotates away from the center, inspect the neighboring chain spaces before proceeding.
Blocking the Openwork Maple Leaf
Blocking determines the final geometry of this motif. The open chain network will not display its intended branching structure until the spaces are spread evenly.
Dampen the finished leaf according to the yarn’s care instructions. Remove excess water without twisting.
Pin the stem and central point first. These two locations establish the vertical axis.
Next pin the two upper side lobes at equal distances from the center. Repeat with the lower pair.
Pin every smaller perimeter point only after the five dominant lobes are balanced. Open the chain arches with additional pins where required, but avoid stretching individual spaces larger than their matching partners.
Allow the leaf to dry completely before removing any pins.
Using the Finished Maple Leaf
A large version works as a fall table centerpiece or decorative mat. Medium versions can be arranged across a table runner, while smaller DK or sport-weight leaves can be used for garlands and appliqués.
For a coordinated autumn table, repeat the same construction in mustard, rust, burgundy, olive, and natural cotton. Maintaining the same yarn line and hook size keeps the motifs comparable even when the colors change.
If the leaf will sit beneath dishes or glassware, keep the center relatively flat and reserve the most pronounced picots for the outside perimeter.
For hanging decoration, add a separate loop behind the stem rather than stretching one of the pointed lobes into a hanger.
Conclusion
The open vein network is the measurement to watch in this crochet maple leaf doily pattern. Build the five lobes around a fixed center axis, keep the central point longest, and compare every left-side chain arch with its partner on the right before continuing outward. After completing one sample, block it to the intended dimensions and record the lobe lengths before making additional leaves. Share the finished mustard leaf on Pinterest or Instagram with #OpenworkMapleLeaf. For this specific design, would you keep the large vein openings visible or reduce the chain lengths for a denser maple leaf?









