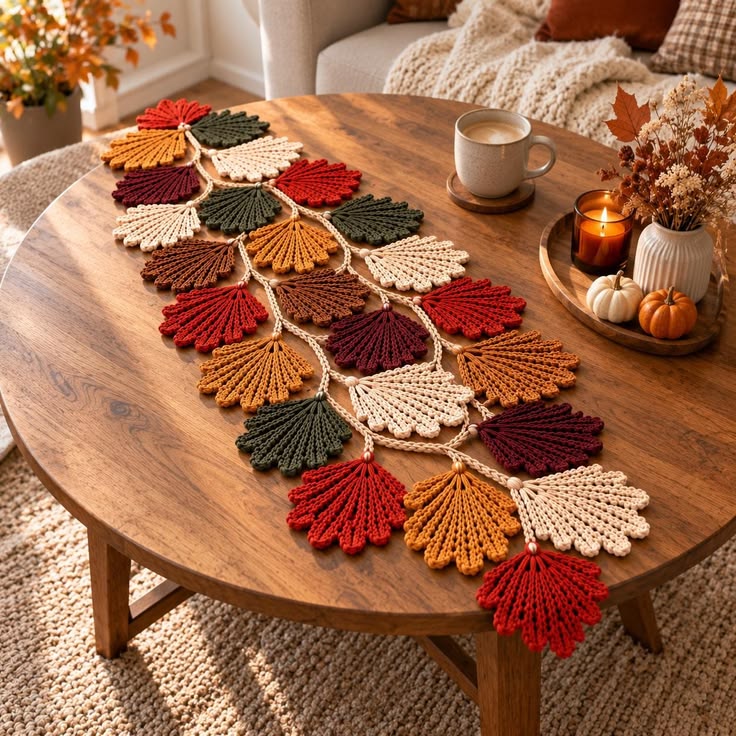
A ginkgo leaf widens from one narrow stem into a pleated fan, so the shaping has to radiate from the base rather than imitate an ordinary pointed leaf. This crochet ginkgo leaf table runner pattern combines ribbed fan-shaped motifs in mustard, rust, burgundy, olive, and cream with a cream connecting vine. Make individual leaves first, arrange the colors, then join them into a flexible runner sized for your table.
The Design: What Makes This Ginkgo Leaf Runner Different
The main structural feature is the fan shape. Each motif begins at a narrow base and expands outward through short-row shaping. Raised lines radiate from that base toward the scalloped outer edge, reproducing the pleated appearance visible in the reference image.
A second decision concerns assembly. These leaves are not sewn edge to edge like granny squares. Cream crochet chains form branching stems between individual motifs, leaving open areas of tabletop visible.
Finally, five autumn colors are distributed irregularly rather than in strict repeating stripes. This makes the crochet fall table runner look botanical while retaining an organized overall width. A common mistake with a ginkgo leaf crochet pattern is adding width uniformly across every row. That produces a semicircle instead of the characteristic flared fan.
Project Info at a Glance
| Skill Level | Leaf Size | Hook | Yarn | Construction |
|---|---|---|---|---|
| Intermediate | Approx. 9–11 cm wide | 4 mm | DK / light worsted cotton | Individual leaves joined with crochet stems |
The photographed runner cannot be measured directly. Published ginkgo patterns range considerably according to yarn and hook choice, so make one complete motif before calculating the runner dimensions.
Materials and Tools
Yarn
Use cotton or a cotton-rich yarn with enough structure to hold the fan shape. DK or light worsted yarn works well for table decor because the finished leaves remain relatively flat.
- Rust red — DK/light worsted cotton — approximately 20–25% of leaf yarn
- Mustard gold — DK/light worsted cotton — approximately 20%
- Deep burgundy — DK/light worsted cotton — approximately 20%
- Dark olive green — DK/light worsted cotton — approximately 20%
- Warm cream — DK/light worsted cotton — approximately 15–20% plus joining stems
Published ginkgo examples demonstrate how economical individual motifs can be. One worsted-cotton example uses about 10 yards per leaf, while another sport-weight version lists approximately 15–20 meters. Use the weight of your first completed motif for the final yarn calculation.
Tools
- 4 mm crochet hook
- Tapestry needle
- Scissors
- Locking stitch markers
- Tape measure
- Blocking mat
- Rust-resistant blocking pins
Abbreviations
- ch — chain
- sc — single crochet
- hdc — half double crochet
- sl st — slip stitch
- st/sts — stitch/stitches
- BLO — back loop only
- RS — right side
- WS — wrong side
- FO — fasten off
Finished Size and Runner Planning
Target approximately 9–11 cm across the widest part of each blocked leaf. The stem adds roughly 3–5 cm depending on placement within the runner.
For a small coffee-table runner, make approximately 18–22 leaves. A longer dining-table version may require 28–40 motifs depending on the spacing and finished leaf dimensions.
Do not calculate the length by multiplying leaf width alone. The motifs overlap vertically and are connected at different angles, so the completed runner is considerably narrower than a straight row of leaves.
Arrange all blocked motifs on the actual table before permanently connecting them.
Crochet Ginkgo Leaf Pattern
This is a photo-inspired reconstruction based on the visible fan shape, radial ribs, scalloped edge, autumn palette, and branching assembly. It is not presented as the original pattern used to produce the photographed item.
Foundation and Stem
Yarn: Choose one autumn leaf color.
Ch 16.
Beginning in the second ch from the hook, sl st in the first 5 chains.
These five slip stitches form the narrow stem section. The remaining foundation chains become the working base for the fan.
First Rib
Row 1: Sc in next 2 foundation chains. Turn. (2 sc)
Row 2: Ch 1, sc BLO across. (2)
Row 3: Ch 1, turn, sc BLO in 2 sts, sc in next unused foundation ch. (3)
Row 4: Ch 1, turn, sc BLO across. (3)
The unused front loops create the first visible rib.
Expanding the First Half
Row 5: Ch 1, turn, sc BLO across existing sts, then sc in next unused foundation ch. (4)
Row 6: Ch 1, turn, sc BLO across. (4)
Row 7: Ch 1, turn, sc BLO across, sc in next unused foundation ch. (5)
Row 8: Ch 1, turn, sc BLO across. (5)
Row 9: Ch 1, turn, sc BLO across, sc in next unused foundation ch. (6)
Row 10: Ch 1, turn, sc BLO across. (6)
Continue this increase structure until the fan has approximately 8 working stitches across its widest short row.
Center Fan Section
Row 15: Ch 1, sc BLO across. (8)
Row 16: Ch 1, sc BLO across. (8)
These central rows establish the widest part of the fan.
If your yarn produces a narrow motif, repeat one additional 8-stitch row. Do not add several plateau rows because the leaf will become rectangular rather than fan shaped.
Second Half of the Fan
Begin shortening the rows to mirror the first half.
Row 17: Ch 1, sc BLO in next 7 sts. Leave final st unworked. Turn. (7)
Row 18: Ch 1, sc BLO across. (7)
Row 19: Ch 1, sc BLO in next 6 sts. Turn. (6)
Row 20: Ch 1, sc BLO across. (6)
Row 21: Ch 1, sc BLO in next 5 sts. Turn. (5)
Row 22: Ch 1, sc BLO across. (5)
Row 23: Ch 1, sc BLO in next 4 sts. Turn. (4)
Row 24: Ch 1, sc BLO across. (4)
Row 25: Ch 1, sc BLO in next 3 sts. Turn. (3)
Row 26: Ch 1, sc BLO across. (3)
Row 27: Ch 1, sc BLO in next 2 sts. (2)
Fasten off, leaving a 12 cm tail.
Forming the Fan Shape
The leaf may look compressed immediately after crocheting. Spread the ribbed rows outward from the stem so the upper edge forms a broad fan.
The foundation area should remain narrow while the outer ends of the short rows spread apart.
Do not pull the center stitches into a full circle. A ginkgo leaf is broad across the upper edge but narrows abruptly where the blade meets the stem.
Scalloped Outer Edge
The photograph shows small rounded sections along the outside of each fan.
Join matching yarn at one side of the outer edge.
Work the following sequence across the tips of the ribs:
Sl st in first rib end, 3 hdc in next rib end, sl st in next rib end.
Repeat across the fan, adjusting the final repeat if necessary.
For smaller scallops, substitute 3 sc for 3 hdc.
Fasten off.
The edging should emphasize the individual ribs without turning the top of the leaf into large shell stitches.
Blocking the Ginkgo Leaves
- Weave in the outer-edge tail but leave the stem tail available if it will be used for assembly.
- Place the leaf on a blocking mat with the ribs facing upward.
- Pin the base of the fan first.
- Pull the stem into a straight line and pin its end.
- Spread the center ribs outward.
- Pin both outer edges of the fan.
- Adjust individual scallops until the upper edge is balanced.
- Measure the total width and compare it with the reference motif.
- Dampen or steam according to the yarn manufacturer’s care instructions.
- Allow the leaf to dry completely before removing the pins.
Blocking is particularly important for this motif because short-row shaping can remain compressed until the fan is manually opened.
Make the Autumn Leaf Collection
Make approximately 24 leaves for a medium decorative runner.
A balanced 24-leaf color distribution can use:
- 5 rust-red leaves
- 5 mustard leaves
- 5 burgundy leaves
- 5 olive-green leaves
- 4 cream leaves
Do not arrange the colors in a simple five-color repeating sequence. The photographed design distributes them irregularly while avoiding large groups of the same shade.
Planning the Table Runner Layout
Lay all blocked motifs across the table before making the cream vine.
Create a loose central line running from one end of the table runner to the other.
Place leaves alternately to the left and right of this line.
Some stems can connect directly to the central vine. Others should branch from short secondary chains.
Rotate the fans so they point in different directions. Avoid placing every motif at the same angle because the runner will resemble a rigid geometric strip rather than a branching botanical arrangement.
Leave visible table space between the motifs. The open areas are part of the design.
Crochet Connecting Vine
Yarn: Warm cream
Ch approximately 30–40 for the first section of the central vine.
Work sl st back through each chain if you want a narrow cord.
For a thicker connector, work sc back along the chain.
At the position of the first leaf, attach the cream vine securely to the base of the colored stem with a sl st.
Continue chaining toward the next motif.
Use approximately 8–15 chains between nearby leaves, adjusting according to the arrangement.
The connector should curve naturally when placed on the table. A vine pulled completely straight will make the runner rigid.
Adding Branches
At selected positions along the main cream vine, create side branches.
Join cream yarn to the main cord.
Ch 8–14 depending on the distance to the selected leaf.
Attach the branch to the base of the leaf stem with a sl st.
For additional thickness, sl st back along the chain toward the main vine.
Fasten off and weave the tail into the cream connector.
Repeat until every leaf is connected.
Decorative Connection Knots
The reference image shows small rounded details where some leaves meet the cream stems.
To reproduce that effect, work a small crochet bobble at selected connection points.
Join cream yarn at the junction.
Ch 2.
Work 4 unfinished hdc into the same point.
Yarn over and pull through all loops.
Ch 1 to close the cluster.
Fasten off.
Keep these connectors small. Their purpose is to cover the junction, not become separate floral motifs.
Alternative Continuous Vine Method
A continuous vine reduces the number of yarn tails.
Begin at one end of the runner and chain to the first leaf.
Attach the leaf with a sl st.
Continue chaining to the next motif without fastening off.
At a branch position, work the branch first, return to the junction with slip stitches, then continue along the main vine.
This method requires the full layout to remain in position while you crochet. Photograph and number the arrangement before beginning.
Adjusting the Runner Length
The modular construction allows the runner to fit different tables.
For a short coffee-table runner, use approximately 18 leaves.
For a medium dining-table runner, begin with approximately 24–30 leaves.
For a long table, add leaves in groups of four or five rather than simply lengthening the cream chain. Additional motifs maintain the visual density of the design.
Keep the outermost leaves several centimeters inside the table edge if the runner is intended to sit entirely on the tabletop.
Yarn Quantity Calculation
Published crochet ginkgo patterns demonstrate that leaf yardage changes significantly with yarn and hook size. The safest calculation comes from your own finished motif.
Make one leaf, including its edging, and weigh it.
If one leaf weighs 7 g and the runner contains 24 motifs:
7 g × 24 = 168 g of colored yarn.
Add approximately 10% for sampling and tails.
Weigh a 50 cm sample of the cream connecting cord and use that figure to estimate the joining yarn separately.
These numbers are examples only. Use the actual weight of your test leaf before purchasing the full quantity.
7 Technical Tips for a Better Ginkgo Leaf Runner
- Keep the base narrow. If the first 2 cm of the leaf spreads too quickly, the motif becomes semicircular rather than ginkgo shaped. Compare every fifth motif with the original blocked sample.
- Work BLO stitches consistently. Accidentally crocheting through both loops interrupts the raised rib and creates a visible flat section. Check the unused front loop before completing each short row.
- Measure leaf width after blocking. A 5 mm difference becomes visible when several fans sit next to one another. Keep finished motifs within approximately 5 mm of the target width.
- Do not tighten the cream connecting chains. A rigid chain pulls neighboring leaves inward and prevents the runner from following the table naturally. The connecting cord should curve without lifting the motifs.
- Pin every fan before assembly. Unblocked short rows remain compressed and make color placement difficult to judge. Spread each leaf to its full width first.
- Keep branch lengths between approximately 8 and 15 chains. Branches that are too short crowd the motifs together, while excessively long branches leave unsupported loops across the tabletop.
- Test the runner directly on the table before fastening every connection. Move at least three or four leaves if one color dominates a section. Finalize the junctions only after the overall color distribution looks balanced.
Color Placement Guide
Use rust red, mustard gold, burgundy, dark olive, and warm cream as the primary palette.
Start the runner with two contrasting colors rather than two neighboring leaves in the same shade. Follow a dark leaf with a lighter mustard or cream motif, then introduce rust or burgundy.
Dark olive provides the strongest visual break between the warm red and orange shades. Position olive leaves throughout the runner rather than concentrating them at one end.
Cream leaves should remain less numerous than the colored motifs because the connecting vine is already cream. This keeps the individual pale fans visible against the structural cords.
Finishing the Table Runner
- Place the completed runner flat on the intended table.
- Check every leaf-to-vine junction.
- Reinforce any connection that stretches when the runner is moved.
- Weave all colored tails into matching leaves.
- Weave cream tails into the connecting cords.
- Spread every fan to its blocked width.
- Check that no cream branch pulls a leaf out of shape.
- Trim remaining yarn tails only after they are securely woven.
- Wash or damp-block according to the yarn label.
- Arrange the runner in its final branching shape and allow it to dry flat.
The finished runner should form an open network of ribbed fan-shaped leaves connected by narrow cream stems, with visible tabletop between the motifs.
Conclusion
Make three test motifs before producing the full set for this crochet ginkgo leaf table runner pattern. Block each sample, compare its fan width, and choose the version with the clearest radial ribs and most stable outer edge. Work the remaining leaves in color batches, but arrange all five shades together before adding the cream vine. The final assembly should remain flexible enough to curve along an oval or rectangular tabletop without pulling the fans inward. Save the finished runner to Pinterest and share the complete autumn arrangement on Instagram with #GinkgoLeafTableRunner. For this runner, would you use more dark olive leaves or make mustard gold the dominant autumn color?









