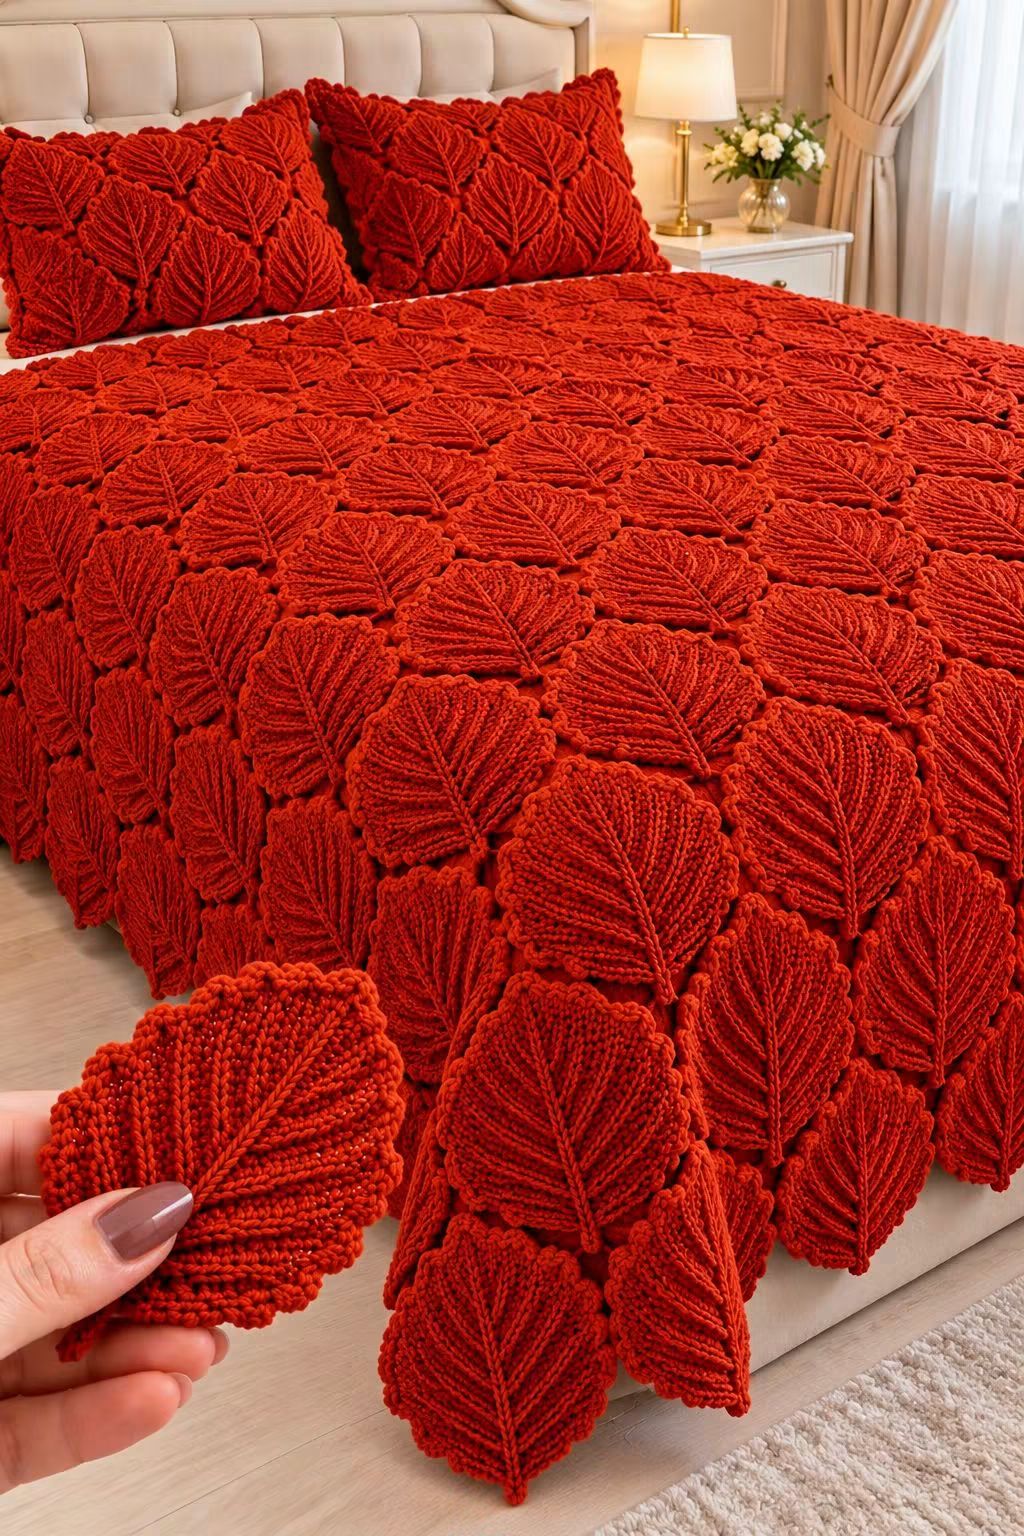
Every section of this blanket has to read as a leaf before hundreds of motifs can read as a bedspread. This 3D crochet leaf blanket pattern uses deep red yarn, raised center veins, ribbed leaf surfaces, and pointed edges to reproduce the layered botanical structure in the reference image. Work the motifs individually, block them to matching dimensions, then join them into rows for an adjustable throw or bed-size blanket.
The Design: What Makes This Crochet Leaf Blanket Different
The blanket is constructed around repeated pointed leaf motifs rather than conventional granny squares. Each leaf has a pronounced center vein, diagonal surface ridges, a narrow lower point, and a gently scalloped perimeter. Those features create the dimensional texture visible across the bed.
Construction accuracy matters because the motifs are repeated in a dense grid. If one leaf is wider or shorter than the next, the difference compounds across an entire row.
The monochromatic red palette places all visual emphasis on stitch direction and relief. No color changes are required. For this crochet leaf motif blanket, the most common structural mistake is making the center vein too tight. That pulls the motif inward and prevents adjacent leaves from lying at the same height.
Project Info at a Glance
| Skill Level | Motif Size | Hook | Yarn | Construction |
|---|---|---|---|---|
| Intermediate | Approx. 12–14 cm | 4.5 mm | Worsted #4 | Individual joined leaves |
The photographed blanket cannot be measured directly. Make and block one complete leaf before calculating the final blanket dimensions.
Materials and Tools
Yarn
- Deep red — worsted-weight #4 yarn — main leaf motifs
- Deep red — same yarn and dye lot — joining and finishing
Use the same yarn throughout the blanket. A single-color design exposes differences in yarn thickness and dye lot more readily because there are no contrasting sections to disguise them.
For a large blanket, make one complete leaf first and weigh it. Multiply that weight by the planned number of motifs, then add approximately 10–15% for joining, sampling, and finishing.
Tools
- 4.5 mm crochet hook
- Tapestry needle
- Scissors
- Locking stitch markers
- Tape measure
- Digital kitchen scale
- Blocking mats
- Rust-resistant blocking pins
Abbreviations
- ch — chain
- sc — single crochet
- hdc — half double crochet
- dc — double crochet
- tr — treble crochet
- sl st — slip stitch
- st/sts — stitch/stitches
- BLO — back loop only
- FLO — front loop only
- RS — right side
- WS — wrong side
- FO — fasten off
Gauge and Leaf Size
The target size for this reconstruction is approximately 12–14 cm long and 9–11 cm wide per finished leaf. Exact dimensions depend on yarn thickness, hook size, and tension.
Gauge matters more for the complete blanket than for an individual motif. Every finished leaf needs to be close to the same dimensions.
Make three test motifs before beginning production. Block all three and compare their length and width. If they differ by more than approximately 5 mm, adjust tension before making the remaining leaves.
3D Crochet Leaf Motif Pattern
This is a photo-inspired reconstruction based on the visible pointed shape, ribbed texture, center vein, monochromatic yarn, and repeated motif arrangement. A photograph of a finished blanket cannot establish the original designer’s exact stitch sequence.
Leaf Foundation
Yarn: Deep red
Ch 17.
The foundation chain forms the center axis of the leaf. The motif is worked around both sides of this chain so the stitches radiate outward from a central line.
Round 1 — First Side of Leaf
Beginning in the second ch from the hook:
Sl st in first ch.
Sc in next ch.
Hdc in next ch.
Dc in next 2 ch.
Tr in next 7 ch.
Dc in next 2 ch.
Hdc in next ch.
Sc in final ch.
At the end of the foundation, ch 2 to form the upper point.
Round 1 — Second Side of Leaf
Rotate the work and continue down the unused loops on the opposite side of the foundation chain.
Sc in first available loop.
Hdc in next loop.
Dc in next 2 loops.
Tr in next 7 loops.
Dc in next 2 loops.
Hdc in next loop.
Sc in next loop.
Sl st at the base of the leaf.
The motif should now form a symmetrical pointed oval with the original foundation chain visible through the center.
Round 2 — Building the Leaf Width
Ch 1.
Work sc in the first stitch.
Work hdc in the next 2 sts.
Work dc in the next 3 sts.
Work 2 dc in each of the next 3 sts.
Work dc in the remaining stitches toward the upper point.
At the point, work dc, ch 2, dc into the ch-2 space.
Mirror the same sequence down the opposite side:
Dc across the first section.
Work 2 dc in each of 3 corresponding center stitches.
Dc in next 3 sts.
Hdc in next 2 sts.
Sc near the base.
Sl st into the base stitch.
Do not fasten off.
Round 3 — Ribbed Surface
The visible blanket depends on directional ridges rather than a completely flat leaf surface.
Ch 1.
Work sc BLO along the first lower section.
Change to hdc BLO as the leaf becomes wider.
Work dc BLO through the broad center section.
Return to hdc BLO as you approach the point.
At the tip, work sc, ch 2, sc.
Mirror the stitch-height sequence along the opposite side.
Finish with sc BLO near the base and sl st into the starting stitch.
Working into the back loops leaves the unused front loops visible as raised lines across the motif.
Round 4 — Defined Leaf Edge
Ch 1.
Sc in the first 2 sts.
Work the following sequence around the leaf:
Sc in next st, ch 1, sc in next st.
Repeat toward the upper point.
At the leaf tip work:
Sc, ch 2, sc.
Continue the edging sequence down the opposite side.
Sl st at the base.
This round should produce a lightly textured perimeter rather than a large decorative shell.
Raised Center Vein
The center vein is the most important visual feature of the motif.
Keep the right side of the leaf facing upward.
Insert the hook at the bottom center and pull up a loop of the same red yarn.
Surface slip stitch along the original foundation chain toward the upper point.
Place approximately one surface slip stitch over each foundation position.
Stop immediately before the ch-2 tip.
Fasten off on the wrong side.
The vein should sit above the surrounding fabric without shortening the leaf. If the motif curls along its center, remove the surface stitches and work them with less tension.
Diagonal Leaf Veins
The reference image shows multiple diagonal ridges moving from the central vein toward the outer edge.
These can be emphasized using surface crochet.
Join yarn beside the lower section of the center vein.
Surface slip stitch diagonally toward the outside edge.
Fasten off on the wrong side.
Move approximately 1–1.5 cm upward along the center vein and repeat.
Continue until four to six diagonal veins have been added to the first half of the leaf.
Repeat on the opposite side, matching the starting positions.
Do not pull the diagonal veins tight. Their purpose is to add relief, not reshape the motif.
Alternative Ribbed Leaf Construction
If you prefer to avoid adding individual surface-crochet veins, work alternating rows or rounds through the back loop only. The exposed front loops create parallel ridges across the fabric.
Keep the central surface-slip-stitch vein even when using this method. The center line separates the left and right halves and makes the motif recognizable from a distance.
Blocking Each Leaf
- Weave in all tails except any tail reserved for joining.
- Place the motif right side up on a blocking mat.
- Pin the upper point first.
- Pin the bottom point on the same vertical axis.
- Measure the widest section of the leaf.
- Pin the left and right edges to matching widths.
- Check that the center vein remains straight.
- Reshape any perimeter sections that curve inward.
- Dampen or steam according to the yarn manufacturer’s instructions.
- Allow the motif to dry completely before removing the pins.
Use one blocked leaf as the measurement template for every subsequent motif.
Planning the Leaf Blanket
Determine the blanket dimensions only after measuring a blocked motif.
If one leaf measures approximately 13 cm long by 10 cm wide, a tightly arranged blanket requires many motifs. The exact quantity changes with overlap and joining method.
For a throw, begin by laying out approximately 8–10 motifs across and 10–12 motifs down. Increase the grid for a bed-size blanket.
The photographed blanket appears much larger and contains numerous motifs. Do not calculate its motif count directly from perspective in the image; mattress dimensions and hidden portions cannot be measured reliably from a photograph.
Arranging the Crochet Leaves
Place all blocked leaves on a flat surface before joining.
Position each center vein vertically.
Arrange the motifs into straight rows, allowing neighboring edges to touch or overlap slightly depending on the desired density.
Offset alternate rows by approximately half a motif width if you want a more organic layered appearance. Use straight columns if you prefer a stronger geometric grid.
Take a photograph of the completed arrangement before joining. This gives you a placement reference if the motifs become mixed during assembly.
Joining the Leaf Motifs
Invisible Sewn Join
Thread a tapestry needle with approximately 50–60 cm of matching red yarn.
Place two motifs side by side with their right sides facing upward.
Pass the needle through corresponding edge loops on the first leaf and then the second.
Continue for approximately 3–5 cm along the touching edges.
Do not sew around the entire perimeter of every motif. Small joining zones preserve the individual leaf outlines.
Secure the yarn on the wrong side and weave the tail through several stitches.
Repeat across the row.
Crochet Join
For a more structured connection, place two leaves with wrong sides together.
Insert the hook through matching edge stitches.
Join the red yarn.
Work sl sts through both layers for approximately 3–5 cm.
Fasten off.
Keep the joining stitches loose enough that the leaf edges remain flat.
Building the Blanket Row by Row
Join the leaves into individual horizontal strips first.
Place each completed strip on a flat surface and check its length before beginning the next one.
After all strips are complete, arrange them in blanket order.
Join neighboring rows at multiple contact points rather than making one continuous seam across the blanket. This allows the individual leaf edges to remain visible.
At least three secure joining points per motif are recommended for a functional bed covering: one near the upper section and two along the lower side edges.
Check the blanket after every two joined rows. If the assembly begins to curve, one row may contain tighter joins than the others.
Optional Stabilizing Backing
A blanket constructed entirely from overlapping leaves can contain openings between motifs. If you want a more stable bedspread, add a simple crochet backing panel.
Work a rectangular panel in matching red yarn using hdc or dc.
Make the panel approximately 2–4 cm smaller than the completed leaf layer on every side.
Place the motif blanket over the backing.
Secure the two layers around the perimeter and at regular interior points.
Do not sew every leaf completely to the backing. Leaving the outer portions free maintains the dimensional appearance.
Optional Crochet Border
The photographed design relies primarily on projecting leaf edges rather than a conventional rectangular border. A border is therefore optional.
If additional stability is required, work only along the underlying outside edge.
Round 1: Join red yarn and work sc evenly around the perimeter.
Place additional stitches only where required to turn a blanket corner.
Round 2: Ch 1 and work reverse sc or regular sc around.
Fasten off.
Keep the border narrow. A wide border competes with the repeated pointed leaf silhouette.
Matching Crochet Leaf Pillow Cover
The reference image also shows matching pillows covered with the same raised leaf motifs.
For a removable cushion cover, crochet or sew a plain red rectangular base sized to the pillow insert.
Arrange blocked leaf motifs across the front panel before assembling the pillow.
Attach each motif at several points while leaving portions of the perimeter slightly raised.
Once the decorative front is complete, attach it to a plain back panel. Add an envelope opening or zipper according to the preferred cushion construction.
Using the same leaf size for both blanket and pillows produces the strongest visual match.
Estimating Yarn for the Blanket
Do not estimate yarn solely from the photograph.
Instead, complete one finished leaf, including its surface veins, and weigh it on a digital kitchen scale.
For example, if one motif weighs 18 g and the planned blanket requires 100 motifs:
18 g × 100 = 1,800 g.
Add approximately 10–15% for joining, test motifs, tails, and finishing.
Using the same example, the total purchase quantity would be approximately 2,000–2,100 g.
This is an example calculation only. Use the actual weight of your completed motif before purchasing yarn.
7 Technical Tips for a Better Crochet Leaf Blanket
- Keep the center vein straight. A vein displaced by even 5 mm makes an otherwise symmetrical leaf appear twisted. Mark the top and bottom center before adding surface crochet.
- Measure every tenth motif. A 5 mm difference per leaf can create several centimeters of variation across a blanket row. Compare each batch against the original blocked sample.
- Do not tighten surface slip stitches. Tight veins shorten the center axis and make the motif curl upward. Place the leaf on a flat surface after every few centimeters of surface crochet.
- Block before joining. Joining unblocked leaves transfers individual shape errors into the full blanket. Each motif should match the target length and width before assembly.
- Keep joining zones short. Sewing the entire leaf perimeter flat removes the overlapping texture visible in the reference design. Join only the sections needed to keep neighboring motifs securely connected.
- Use one dye lot for a monochromatic blanket. A small red dye-lot difference can become obvious when two motifs meet directly. Purchase the primary yarn quantity together whenever possible.
- Test the blanket weight early. After joining approximately 12 motifs, weigh that section and extrapolate the expected finished weight. A densely constructed bedspread can become substantially heavier than a conventional open-stitch blanket.
Finishing the Blanket
- Lay the completed blanket on a large flat surface.
- Inspect every motif for loose center-vein tails.
- Check each joining point by gently separating neighboring leaves.
- Reinforce any join that stretches excessively.
- Measure the blanket at the top, center, and bottom.
- Compare both side lengths.
- Correct any visibly twisted outer motifs before washing.
- Wash according to the yarn manufacturer’s instructions.
- Reshape the outside leaves while the blanket is damp.
- Allow the blanket to dry completely before placing it on the bed.
The completed blanket should display repeated pointed leaves with straight central veins, diagonal raised texture, and individually visible edges across the surface.
Conclusion
Start this 3D crochet leaf blanket pattern with three test leaves rather than producing an entire batch immediately. Block those samples, compare their dimensions, and weigh one finished motif before calculating the blanket quantity. Once the leaf dimensions are consistent, work in batches and keep one blocked sample beside you as a reference. Join the motifs only after the full arrangement has been tested on a flat surface. For a bed-size version, check the assembled weight before completing every row. Save the finished blanket to Pinterest and share a close-up of the raised veins on Instagram with #RedCrochetLeafBlanket. Would you keep this design entirely deep red, or alternate the leaves between rust, burgundy, and dark crimson?









