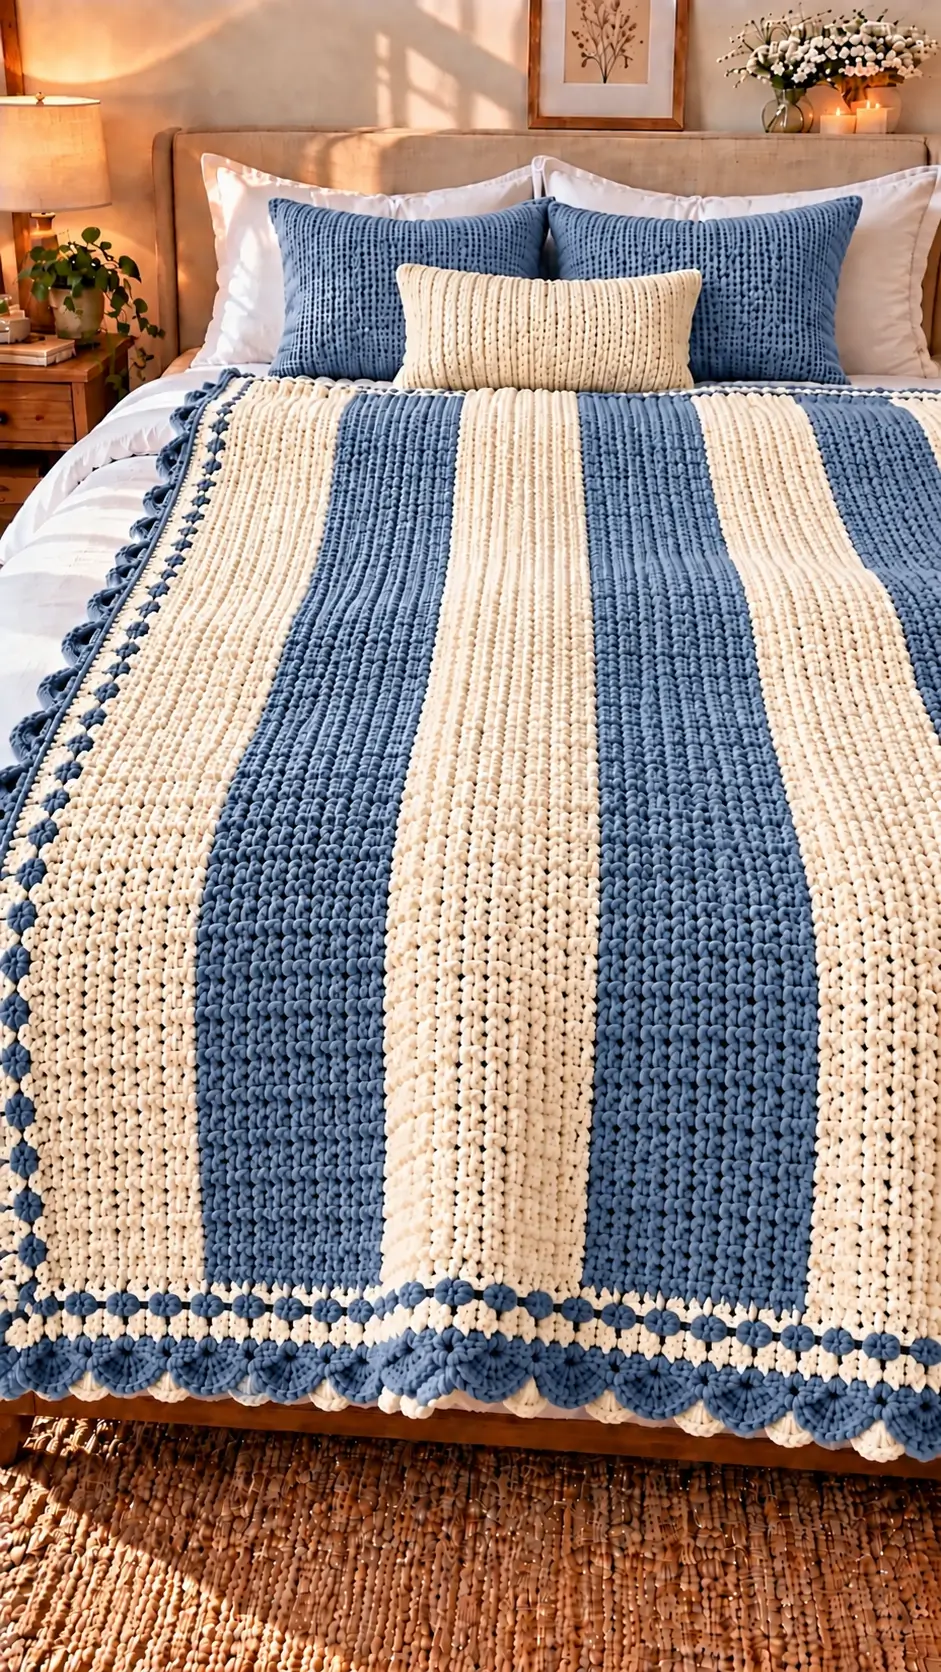
Wide denim-blue columns interrupt the cream field before a double-color scalloped edge closes this blanket. This blue and cream striped crochet blanket reconstruction uses bulky yarn, an 8 mm hook, and a target size of about 120 × 160 cm. The project suits an intermediate crocheter because consistent edges, large-scale color changes, and border spacing matter. Its two-color construction also makes yarn substitution relatively easy.
The Design: What Makes This Striped Blanket Different
The photographed blanket depends on proportion more than complicated colorwork. Broad cream and denim-blue sections run through the main field, so the color blocks remain visible even when the blanket is spread across a bed. A dense textured stitch keeps those panels visually substantial.
The second structural decision is the border. Narrow contrasting rows separate the rectangular field from a much deeper blue scalloped edge. That transition matters: starting large shells directly against the striped fabric can make the perimeter flare.
For this chunky crochet blanket pattern, consistent row width is more important than reproducing every visible bump. The common mistake in a textured crochet blanket of this scale is losing stitches at row ends. One missed stitch repeated across several rows creates a diagonal side that becomes obvious when the border is added.
Project Info at a Glance
| Skill Level | Time | Finished Size | Hook | Best For |
|---|---|---|---|---|
| Intermediate | Approx. 18–25 hours | Approx. 120 × 160 cm | 8 mm | Bed accent / large throw |
The finished dimensions are a target for this photo-inspired reconstruction. Make and measure a gauge swatch before starting the full blanket.
Materials and Tools
Yarn
Use a washable bulky #5 yarn with enough stitch definition to keep the surface texture visible. An 8 mm hook provides a practical starting point, but the swatch determines the final hook choice.
- Denim blue — bulky #5 yarn — quantity determined from swatch
- Warm cream — bulky #5 yarn — quantity determined from swatch
For the most consistent result, use both colors from the same yarn line. Matching fiber content and yarn construction reduces differences in gauge between the cream and blue sections.
Do not calculate the full yarn requirement from the photograph alone. Blanket consumption changes with finished dimensions, stitch density, yarn construction, hook size, border depth, and individual tension.
Tools
- 8 mm crochet hook
- Scissors
- Large-eye yarn needle
- Locking stitch markers
- Tape measure
- Digital kitchen scale for yarn calculations
- Blocking mats or a large flat drying surface
Abbreviations
- ch — chain
- sc — single crochet
- hdc — half double crochet
- dc — double crochet
- sl st — slip stitch
- st/sts — stitch/stitches
- RS — right side
- WS — wrong side
- rep — repeat
Gauge and Sizing
Make a minimum 15 × 15 cm swatch before starting the foundation chain. Bulky yarn varies considerably between manufacturers, even when two yarns carry the same weight classification.
For this reconstruction, aim for approximately 10 stitches per 10 cm across the established fabric. At that gauge, 120 stitches produce roughly 120 cm of width before the border is added.
If 120 stitches measure only 110 cm, the finished blanket will be narrower. If the same stitch count measures 130 cm, it will be wider. Correct the foundation count before working the full body.
Also measure row gauge. Continue the main pattern until the blanket reaches approximately 150 cm in length before adding the decorative border.
Blue and Cream Striped Crochet Blanket Pattern
This is a photo-inspired reconstruction based on the visible colors, proportions, texture, and edging. A finished photograph cannot reveal the original designer’s exact stitch sequence.
Main Blanket
Yarn: Warm cream and denim blue
With cream, ch 122.
Row 1: Hdc in third ch from hook and in every ch across. Turn. (120)
Row 2: Ch 2, hdc in each st across. Turn. (120)
Row 3: Ch 1, sc in first st, hdc in next st; repeat sc, hdc across. Turn. (120)
Row 4: Ch 2, hdc in each st across. Turn. (120)
Repeat Rows 3–4 until the first cream section reaches approximately 20 cm.
Change to denim blue on the final yarn-over of the last cream stitch.
Continue the same two-row stitch sequence in denim blue until the blue section measures approximately 20 cm.
Change back to cream and work another section measuring approximately 20 cm.
Continue alternating cream and denim-blue sections while maintaining 120 stitches on every row.
Stop when the main blanket body reaches approximately 150 cm in length, or adjust the length to your preferred bed or throw dimensions.
Textured Accent Row
Yarn: Current panel color
For additional surface definition, substitute the following row approximately every sixth row:
Accent Row: Ch 1, sc in first st, hdc in next st; repeat sc, hdc across while maintaining 120 stitches. Turn.
The alternating stitch heights increase the visible texture without changing the established blanket width.
Crochet Border
Border Round 1
Yarn: Warm cream
Join cream at one corner.
Round 1: Ch 1. Work sc evenly around all four sides. Work 3 sc in each corner. Join with a sl st.
The exact total depends on the number of body rows. Concentrate on placing the same number of stitches along opposite sides rather than forcing an arbitrary total.
Border Round 2
Yarn: Denim blue
Join denim blue in a corner stitch.
Round 2: Ch 1, sc in each st around. Work 3 sc in the center corner stitch at each corner. Join with a sl st.
Lay the blanket flat after completing the round. A rippled border usually indicates too many stitches along the edges.
Border Round 3
Yarn: Warm cream
Round 3: Ch 1, sc evenly around the blanket. Work 3 sc at each corner. Join with a sl st.
The narrow cream section creates a visual break between the striped blanket body and the heavier blue outer edging.
Border Round 4
Yarn: Denim blue
Round 4: Ch 1, sc evenly around. Add the required corner increases and join with a sl st.
Place the blanket on a flat surface before beginning the decorative edging. Correct any rippling or cupping at this stage.
Scalloped Crochet Edge
Yarn: Denim blue
Final Round: Skip 2 sts, work 5 dc in the next st, skip 2 sts, then sl st in the next st.
Repeat this sequence around the blanket.
Modify the spacing immediately before each corner so that a complete shell sits at or close to the corner. Do not force the regular repeat if doing so makes the corner twist.
Fasten off and leave approximately a 15 cm tail. Weave the tail through several stitches in opposing directions.
Optional Cream Shell Accents
The reference image contains small cream details around portions of the darker scalloped edge. These can be reproduced after completing the primary blue border.
Join cream behind a selected blue shell.
Work 3 dc into the selected border space, then sl st into the next suitable border stitch.
Repeat at consistent intervals around the blanket. Keep these cream sections smaller than the primary denim-blue shells so the outer border retains its dominant blue appearance.
Assembly and Finishing
- Lay the completed rectangle on a flat surface and measure both diagonals. A noticeable difference between them indicates that the body has skewed.
- Check the first and final stitch of each exposed row before covering the edges with the border.
- Weave cream yarn ends through cream stitches and blue yarn ends through blue stitches.
- Secure every color-change tail in more than one direction before trimming the excess yarn.
- Work the first border round while comparing the stitch totals on opposite sides.
- Add the blue and cream structural border rounds before starting the decorative shell edging.
- Lay the border flat and inspect all four corners for cupping, twisting, or excess fabric.
- Complete the blue scalloped round, modifying the spacing only where required at the corners.
- Add the optional cream accents after confirming that the main scalloped border lies flat.
- Wash or block according to the yarn manufacturer’s care instructions and reshape the blanket to the planned dimensions.
The completed project is a rectangular two-color striped crochet blanket with a layered blue and cream border and a pronounced scalloped outer edge.
7 Technical Tips for a Cleaner Blanket
- Mark both edge stitches. Missing the final stitch on only five rows removes five stitches from one side and produces a diagonal edge. Put a locking marker in the first and last stitch when the turning point becomes difficult to identify.
- Measure the width every 10 cm. A small increase in width can accumulate across a large blanket. Measure the top, middle, and lower sections rather than checking only one edge.
- Control every color change. Loose joins produce enlarged loops that remain visible underneath the border. Complete the final yarn-over of the previous stitch with the new color and adjust both yarn tails before continuing.
- Do not overcrowd the side border. Too many single crochets along the row ends produce a ruffled perimeter. Correct the first border round before adding additional rounds.
- Test the shell repeat over 30 cm. Five double crochets placed into one stitch require considerably more horizontal space than a single crochet. A short test section exposes flaring before the entire perimeter is worked.
- Treat the 8 mm hook as a starting size. If the swatch is excessively rigid, test a larger hook. If the stitches become loose enough to distort the edges, test a smaller hook.
- Weigh the finished gauge swatch. Calculate yarn consumption from the actual fabric instead of relying entirely on a general blanket chart. Include additional yarn for the multi-round border and scalloped edging.
Conclusion
Before beginning this blue and cream striped crochet blanket, make the gauge swatch and record its width, row height, and weight. Those measurements provide a practical basis for calculating finished dimensions and yarn requirements. Establish the 120-stitch body next, confirm that the first 10 cm remains rectangular, and then continue the alternating color sequence. Once the body is complete, add the structural border before working the larger scallops. Save the finished project to Pinterest and share the border detail on Instagram with #BlueCreamStripeBlanket. For your next version, would you make the denim-blue panels wider or increase the depth of the scalloped edge?









