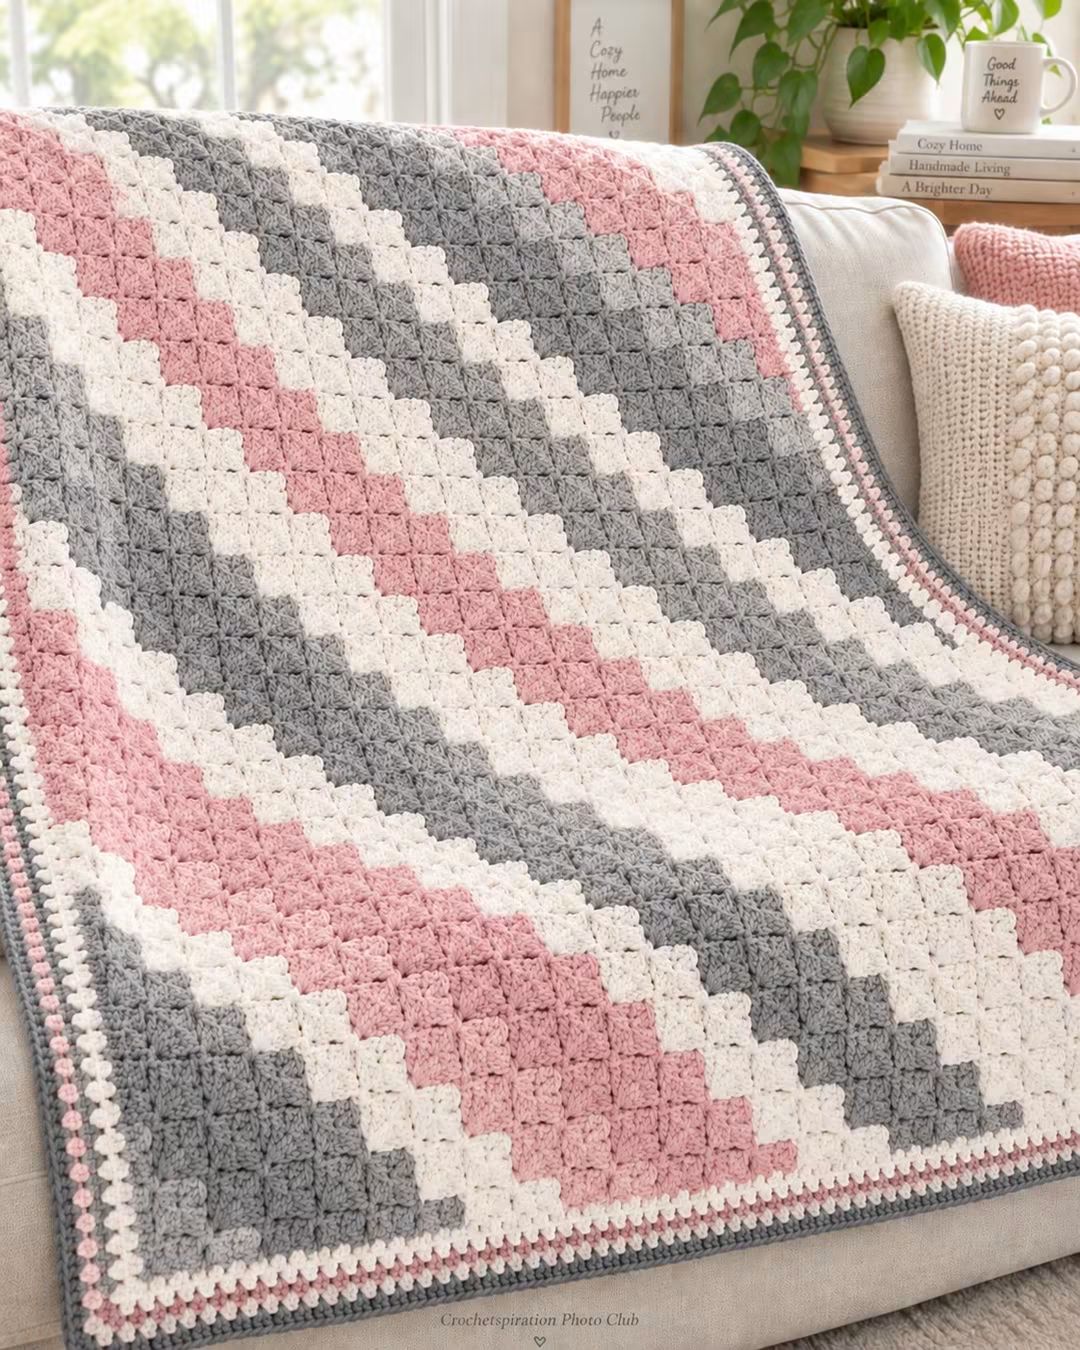
The diagonal bands in this blanket are not made by crocheting ordinary horizontal stripes. Each stripe advances one square at a time across a field of corner-to-corner tiles. This C2C crochet blanket pattern combines dusty pink, soft gray, and cream yarn in broad diagonal bands with a narrow three-color border. The construction uses repeated double-crochet tiles and suits confident beginners who can chain, double crochet, slip stitch, and change colors.
The Design: What Makes This C2C Blanket Different
The blanket is built diagonally rather than from the bottom edge upward. Small crochet tiles line up in diagonal rows, producing the stepped boundaries visible between the pink, cream, and gray sections.
Three design decisions control the finished appearance. First, the color bands are deliberately broad, so each shade occupies several diagonal tile rows before the next change. Second, narrow cream bands separate larger pink and gray areas, preventing the two darker colors from merging visually. Third, the border repeats all three colors in thin rounds instead of adding another wide stripe.
A common mistake in a corner-to-corner crochet blanket is counting stitches instead of tiles. During the increase section, Row 1 has one tile, Row 2 has two, Row 3 has three, and the sequence continues until the target width is reached.
Project Info at a Glance
| Skill Level | Construction | Yarn | Hook | Best For |
|---|---|---|---|---|
| Confident beginner | Corner-to-corner tiles | Worsted / Aran | 5–5.5 mm starting range | Throws, sofa blankets, bed blankets |
The photograph does not provide a reliable scale, so its exact finished dimensions cannot be verified from the image alone. C2C construction makes the dimensions adjustable: continue the increase section until the required width is reached, then use the rectangular shaping instructions to establish the length.
Materials and Tools
Yarn
- Soft gray worsted or Aran yarn — main diagonal sections and final edging.
- Dusty pink worsted or Aran yarn — contrasting diagonal sections and border accent.
- Cream or warm white worsted or Aran yarn — light diagonal bands and border.
Choose all three colors from the same yarn line when possible. Matching fiber content and meterage keeps the C2C tiles approximately equal in size after every color change.
Tools
- 5–5.5 mm crochet hook
- Yarn needle
- Locking stitch markers
- Scissors
- Tape measure
- Blocking mats and pins
Abbreviations
- ch — chain
- dc — double crochet
- sc — single crochet
- sl st — slip stitch
- sp — space
- st/sts — stitch/stitches
- C2C — corner to corner
- RS — right side
- WS — wrong side
For this pattern, one C2C tile consists of a chain space combined with three double crochet stitches. Count completed tiles rather than individual double crochet stitches when checking the dimensions.
C2C Crochet Blanket Pattern
The blanket begins at one corner. Each increase row contains one more tile than the previous row. Once the required width is reached, rectangular shaping maintains the width while adding length. The final section decreases toward the opposite corner.
First C2C Tile
Begin with the color selected for the first corner.
Row 1: Ch 6.
Dc in the 4th ch from the hook. Dc in each of the next 2 chains.
You now have 1 C2C tile.
Turn.
Second C2C Row
Row 2: Ch 6.
Dc in the 4th ch from the hook and in each of the next 2 chains. This forms the first tile of the new row.
Turn the new tile toward the tile from Row 1.
Sl st into the ch-3 space of the previous tile.
Ch 3, then work 3 dc into the same ch-3 space.
You now have 2 tiles.
Third C2C Row
Row 3: Ch 6.
Dc in the 4th ch from the hook and in each of the next 2 chains.
Sl st into the ch-3 space of the first tile from the previous row.
Ch 3, 3 dc in the same space.
Sl st into the ch-3 space of the next tile.
Ch 3, 3 dc in the same space.
You now have 3 tiles.
C2C Increase Rows
Continue using the same construction.
Row 4: 4 tiles.
Row 5: 5 tiles.
Row 6: 6 tiles.
Row 7: 7 tiles.
Row 8: 8 tiles.
Continue adding exactly one tile per row.
For every increase row, ch 6 and work 3 dc beginning in the 4th chain from the hook. Turn that new tile toward the previous row, sl st into the next ch-3 space, then work ch 3 and 3 dc into the same space. Repeat across the row.
Do not select the turning row from an unblocked measurement. Work until the two growing edges produce the required blanket width.
Planning the Pink, Cream and Gray Stripes
The reference blanket uses broad diagonal bands rather than changing color after every row. This reduces visual fragmentation and makes the stepped C2C geometry obvious.
A practical photo-inspired color sequence is:
- Gray — broad band
- Cream — narrow band
- Pink — broad band
- Cream — narrow band
- Gray — broad band
- Cream — narrow band
- Pink — broad band
Continue repeating the sequence across the blanket.
The exact number of rows in each photographed stripe cannot be established reliably from perspective alone. Choose the width after making a sample. For example, a broad band can occupy 8–12 diagonal rows while the cream separator occupies 4–6 rows.
Record every color change. Consistent stripe width matters more than copying an estimated row count from the photograph.
How to Change Colors in C2C Crochet
Work the current tile until the final yarn-over of its last double crochet.
Before completing that stitch, drop the old color and pull the new color through the remaining loops.
Continue the next tile with the new yarn.
When an entire diagonal row changes color, cut the previous yarn with enough tail for secure weaving. When the same color will be required again after only a short interval, carrying can reduce ends, but long floats should not cross the back of the blanket.
The color transition should occur at a tile boundary. Changing yarn in the middle of a three-double-crochet group creates an unintended split-color tile.
Making a Rectangular C2C Blanket
A square C2C project increases toward the widest diagonal and then decreases symmetrically. A rectangular blanket needs an additional stage.
When the first growing edge reaches the target width, stop increasing on that side while continuing to increase on the side responsible for the blanket length.
This produces rows with a constant number of tiles.
For example, if the blanket reaches the required width at 50 tiles, the rectangular middle section continues with 50 tiles per row rather than increasing to 51, 52, and 53.
Continue this constant-count stage until the second dimension reaches the target length.
Then begin decreasing on both sides.
How to Decrease C2C Crochet
At the beginning of a decrease row, do not create a new ch-6 tile.
Turn the work.
Sl st across the three double crochet stitches of the first tile and into its ch-3 space.
Ch 3 and work 3 dc into that space.
Continue making normal tiles across the row.
At the opposite edge, finish by slip stitching into the final ch-3 space rather than creating another tile.
Each full decrease row removes one tile from the diagonal count.
If the first decrease row contains 50 tiles, the following rows reduce to 49, 48, 47, and so on until one tile remains.
Finishing the Last Corner
Continue decreasing until only one C2C tile remains.
Work the final tile and sl st into the last available joining space.
Fasten off, leaving a yarn tail long enough to weave securely through several dense stitches.
Before beginning the border, place the blanket flat and inspect all four edges. Correct loose yarn ends and unusually stretched corner tiles now.
Preparing the C2C Edges for a Border
C2C naturally produces small spaces between the outside tiles. A preparation round creates an even foundation for the striped edging.
Join gray yarn near a corner.
Border Round 1: Ch 1. Work sc into the edge spaces, distributing the stitches evenly rather than forcing one sc into every visible strand.
At each corner, work 3 sc into the corner space.
Continue around all four sides and join with sl st.
Lay the blanket flat before proceeding. If the edge ripples, too many stitches were added. If the blanket cups inward, the preparation round contains too few stitches.
Three-Color Border
The reference blanket uses narrow gray, cream, and pink rounds. Keeping these rounds narrow prevents the border from competing with the diagonal body pattern.
Gray Foundation Round
Round 1: With gray, work sc evenly around. Place 3 sc in each corner. Join with sl st.
Cream Border Round
Round 2: Join cream. Ch 3 and work dc in each stitch around.
At each corner, work (2 dc, ch 2, 2 dc) into the corner stitch or space.
Join and fasten off.
Pink Accent Round
Round 3: Join pink. Ch 1 and sc in each stitch around.
Work 3 sc in each corner.
Join and fasten off.
Second Cream Round
Round 4: Join cream and work one round of dc.
Maintain the corner increases established in the previous rounds.
Final Gray Edge
Round 5: Join gray. Work one sc in every stitch around with 3 sc at each corner.
Join with sl st.
Fasten off and weave the tail through the gray edging.
Assembly and Finishing
- Make a C2C swatch with the intended yarn and hook before calculating the blanket dimensions.
- Begin at one corner and increase by exactly one tile per row.
- Change among gray, cream, and pink according to the recorded diagonal stripe sequence.
- Stop increasing on the width side when the required width has been reached.
- Maintain a constant tile count while extending the rectangular middle section.
- Begin decreasing on both sides when the required length has been reached.
- Continue decreasing until only the final corner tile remains.
- Weave in all stripe-change ends before adding the border.
- Work the gray, cream, pink, cream, and gray border sequence around the complete blanket.
- Block the blanket to rectangular dimensions and allow it to dry flat.
The completed blanket should have straight edges, square corners, uninterrupted diagonal color bands, and a border that lies flat without pulling or ruffling.
7 Technical Tips for C2C Crochet
- Count tiles at the end of every diagonal row. One missed tile changes the entire edge angle and can move later color changes out of alignment.
- Place a stitch marker at the first tile when beginning rectangular shaping. Starting the constant-count section one row late increases the blanket width by an entire C2C tile.
- Change colors on the final yarn-over. Changing after completing the stitch leaves a visible piece of the previous color at the beginning of the new stripe.
- Measure after at least 10–12 rows. Measuring the first few diagonal rows gives an unreliable width because the project has not yet developed enough fabric for useful gauge.
- Keep slip stitches loose. Tight joining stitches compress the corners of individual tiles and can make diagonal rows curve.
- Check the border after every round. A border that begins rippling by even 1–2 cm should be corrected immediately instead of relying on blocking to remove excess fabric.
- Weave each yarn tail through at least 4–5 cm of dense fabric. Color changes create many ends, and short tails can work loose under repeated blanket use.
How to Calculate the Finished Blanket Size
C2C blankets are easier to size by completed tiles than by individual stitches. Make a sample with the exact yarn, hook, and tension intended for the blanket.
Measure a group of several tiles rather than one tile. Divide that measurement by the number of tiles to obtain an average tile dimension.
For example, if 10 tiles span approximately 16 cm along an edge, the average tile contributes about 1.6 cm. A 50-tile side would therefore measure approximately 80 cm before the border.
This is only an example calculation. Use the dimensions from your own blocked swatch because yarn thickness, hook size, and tension alter C2C tile size.
For a rectangular throw, establish the width first. Continue the constant-count section until the length measurement is reached, then begin the final decrease phase.
Choosing Yarn for the Diagonal Stripes
Worsted or Aran yarn produces substantial tiles and reduces the number required for a throw-size blanket. A published C2C tutorial demonstrates the technique with worsted yarn and a 5.5 mm hook, while another uses Aran yarn with a 5 mm hook.
Those hook sizes provide a useful starting range rather than a fixed requirement. Dense yarn may need a larger hook; loosely spun yarn can require a smaller one to keep the tile structure defined.
The three colors should also have similar thickness. A noticeably thinner cream yarn would make every light stripe narrower even when the same number of tile rows is worked.
Keeping Diagonal Stripes Straight
The stepped edge between colors depends on accurate tile counts. Every tile must connect to the correct chain space from the previous row.
Do not correct a missing tile by squeezing an additional cluster into a later row. That approach changes the local density and usually produces a visible bulge.
If the count is wrong, locate the row where the discrepancy first appears and correct that section.
Keep a written stripe record beside the project. Mark each completed diagonal row and its color. Broad bands can look deceptively similar while the blanket is folded or turned during crochet.
Managing Yarn Ends
A three-color striped blanket creates more ends than a solid C2C project. Deal with them systematically rather than leaving every tail until the blanket is complete.
Weave ends after several completed bands, but leave the most recent color changes accessible until their stitch counts have been checked.
Run each tail through dense double crochet sections and reverse direction at least once. Avoid weaving long tails only through the open chain spaces because they remain more visible and have less friction holding them in place.
Trim ends only after the woven section has been lightly stretched. This prevents a short cut end from emerging when the finished blanket flexes.
Blocking the Finished C2C Blanket
Blocking should refine the rectangle rather than compensate for incorrect shaping. Measure the finished piece before wetting it and compare opposite sides.
Pin the four corners first. Next, pin the midpoint of each side, followed by additional points along the edges.
Keep the diagonal tile structure visible instead of stretching the blanket until the small spaces disappear. The goal is an even rectangle with straight borders and consistent tile dimensions.
Allow the blanket to dry completely before removing the pins. Check the final dimensions and record them with the yarn and hook information for future C2C projects.
Conclusion
The critical number in this C2C crochet blanket pattern is the tile count at each shaping stage. Establish the width during the increase section, maintain that count while extending a rectangle, and then remove one tile per decrease row toward the opposite corner. Make a 10–12-row swatch before committing yarn to the full blanket, and record every pink, cream, and gray color change as you work. After the final gray border is blocked, photograph the diagonal layout for Pinterest or Instagram with #PinkGrayC2CBlanket. For this specific color arrangement, would you keep the cream separator bands narrow or make them equal in width to the pink and gray sections?









