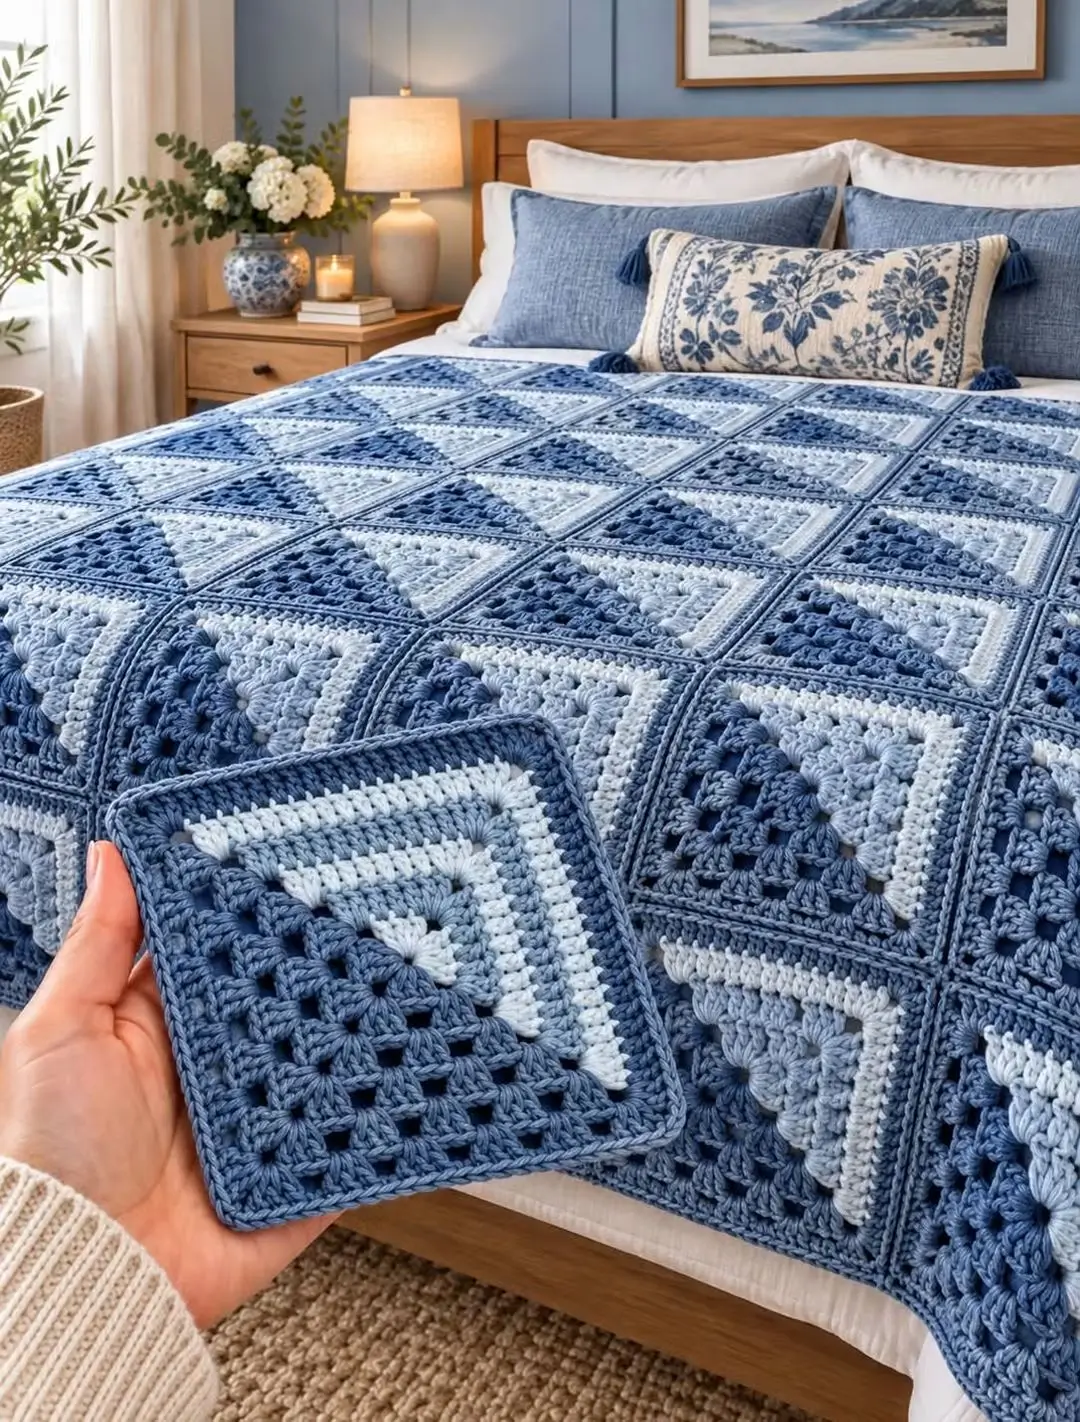
A diagonal granny square fails immediately when its color bands stop meeting at a clean 45-degree line. This blue granny square crochet bedspread pattern uses denim blue, pale blue and white motifs arranged into a repeating geometric grid. Each square combines an open granny-style corner with denser diagonal bands, then a blue raised join turns the individual blocks into the structured bed covering shown in the photo.
The Design: What Makes This Blue Bedspread Different
The photographed blanket is based on square modules, but the color placement gives each block a strong diagonal direction. Dark denim occupies one corner, white and pale blue form the center bands, and the remaining area returns to blue. Rotating neighboring motifs changes how those diagonals travel across the bed.
A visible blue seam is the second structural feature. Rather than hiding the joins, this design uses them to create a grid around every square. Crochet joining methods such as slip stitch or single crochet can produce a deliberate raised line between motifs.
The third decision is consistent blocking. Every square needs the same dimensions before assembly because joining cannot correct a substantial size difference between motifs.
A common mistake with a blue granny square blanket is joining blocks as soon as they are finished. Small gauge differences accumulate across a bed-sized grid and pull long seams out of alignment.
Project Info at a Glance
| Skill Level | Time | Finished Size | Hook | Construction |
|---|---|---|---|---|
| Intermediate | 35–50 hours | Approx. 180 × 210 cm | 4.5 mm | Mitered granny-style squares with visible joins |
The finished dimensions are a photo-inspired target rather than measurements taken directly from the pictured blanket. The final size should be calculated from one blocked sample square before the complete set of motifs is made.
Materials and Tools
Yarn
- Denim blue — worsted/category 4 — approximately 1,300–1,600 g
- Pale blue — worsted/category 4 — approximately 700–900 g
- White — worsted/category 4 — approximately 650–850 g
Allow approximately 2,650–3,350 g total for a bed-sized version. Yarn consumption depends on square dimensions, fiber, joining method and the number of border rounds.
A smooth worsted acrylic, cotton-acrylic blend or washable wool blend gives the diagonal bands clear stitch definition. Keep all three colors within the same yarn line when possible so the squares do not change size when the color changes.
Tools
- 4.5 mm crochet hook
- 4 mm hook for joining if the seams become loose
- Yarn needle
- Stitch markers
- Sharp scissors
- Blocking mats
- Rust-resistant pins
- Flexible tape measure
Abbreviations
- ch — chain
- sl st — slip stitch
- sc — single crochet
- hdc — half double crochet
- dc — double crochet
- sp — space
- st/sts — stitch/stitches
- RS — right side
- WS — wrong side
For this modular blanket, accurate corners matter more than decreases. Keep every corner chain space relaxed enough to accept the following round without cupping.
Planning the Bedspread
The photographed blanket appears to use a large grid of similarly sized square motifs. For a photo-inspired bedspread, target approximately 15 cm per blocked square.
A grid of 12 squares across × 14 squares long requires 168 motifs and produces a central panel around 180 × 210 cm before any additional outer border.
For a faster version with larger motifs, increase each square to approximately 20 cm and use a 9 × 10 grid. That requires 90 motifs for a central panel around 180 × 200 cm.
Make one complete square first. Wash or block it using the same method planned for the finished blanket, then measure it before calculating the grid.
Pattern — Step by Step
The following motif is a photo-inspired reconstruction. It combines granny-style clusters with diagonal color placement to reproduce the blue, pale-blue and white geometry visible in the reference image.
Blue Corner — Round 1
Yarn: denim blue.
Ch 4. Join with sl st to form a ring.
R1: Ch 3, 2 dc into ring, ch 2, 3 dc into ring, ch 2, 3 dc into ring, ch 2, 3 dc into ring, ch 2. Join to top of beginning ch 3.
You now have four 3-dc clusters separated by four corner spaces.
Blue Granny Section — Round 2
Sl st into the first corner space.
R2: Ch 3, 2 dc, ch 2, 3 dc in same corner space. Ch 1.
In each remaining corner space work:
(3 dc, ch 2, 3 dc), ch 1.
Join with sl st.
Fasten off denim blue.
Pale Blue Band — Round 3
Yarn: pale blue.
Join pale blue in any corner space.
R3: Ch 3, 2 dc, ch 2, 3 dc in the same corner.
Ch 1, 3 dc in the next side space, ch 1.
In the next corner work:
(3 dc, ch 2, 3 dc).
Continue around in the established granny-square sequence.
Join with sl st.
White Band — Round 4
Yarn: white.
Join white at a corner.
R4: Work (3 dc, ch 2, 3 dc) in each corner.
Along each side, work 3 dc into every ch-1 space with ch 1 between clusters.
Join with sl st.
Fasten off.
Creating the Diagonal Color Split
The photographed squares do not read as ordinary concentric granny squares. Their colors form diagonal sections. Create that effect by working partial rows over selected sides of the motif.
Place the square with one corner pointing upward.
Join denim blue at the left corner.
Diagonal Row 1: Ch 3. Work dc groups across two adjoining sides toward the opposite corner, maintaining the existing cluster spaces.
Turn.
Diagonal Row 2: Ch 3. Work back across the previous row, stopping one cluster before the end.
Turn.
Diagonal Row 3: Repeat, again shortening the row by one cluster.
Continue until the denim section forms a triangular corner.
Fasten off.
Pale Blue Diagonal Section
Join pale blue beside the denim triangle.
Work shortened dc-cluster rows in the same manner.
Each row should terminate one cluster earlier than the previous row.
The pale-blue section should form a diagonal stripe approximately 2–3 cluster rows wide.
Fasten off.
White Diagonal Section
Join white beside the pale-blue band.
Work another sequence of shortened granny-cluster rows.
Keep the diagonal edge parallel to the preceding pale-blue section.
Fasten off.
Second Blue Section
Fill the remaining corner with denim blue.
Continue the shortened-row sequence until the motif returns to a complete square.
Check all four edges. They must contain matching numbers of edge stitches and spaces before the border is added.
Square Leveling Round
Yarn: denim blue.
Join denim blue in any corner.
Leveling Round: Ch 1. Sc evenly around the complete motif.
At each corner work:
(sc, ch 2, sc).
Where the diagonal sections create slight height differences, distribute the sc stitches evenly rather than forcing one stitch into every visible bar.
Join with sl st.
Final Blue Frame
Frame Round: Ch 2. Hdc in every stitch around.
At each corner space work:
(2 hdc, ch 2, 2 hdc).
Join with sl st.
Fasten off with a 20 cm tail.
Block the square to the target dimension before making the full set.
Alternative Simplified Square
If you want the same blue-and-white bedspread palette with less color shaping, work a conventional granny square and rotate the color sequence between motifs.
Use this sequence:
Rounds 1–2: denim blue.
Round 3: pale blue.
Round 4: white.
Round 5: pale blue.
Rounds 6–7: denim blue.
Rotate alternating squares 90 degrees during assembly. The result will be more regular than the photographed design but keeps the same three-color structure.
Blocking the Squares
Block every motif before joining. Current granny-square joining guidance consistently recommends matching square dimensions first because seams lock size differences into the assembled fabric. 0
Place each damp square on a blocking mat.
Pin the four corners first.
Measure horizontally and vertically. Adjust until both dimensions match the target.
Add pins along the sides only if the edges bow inward or outward.
Allow the motifs to dry fully before removing them.
Sort the blocked squares by measurement. Any motif differing by more than approximately 5 mm should be corrected before assembly.
Planning the Color Layout
Lay every square on a bed or clean floor before joining.
Rotate neighboring motifs so their diagonal bands change direction.
For the repeating geometry shown in the photograph, use a four-square rotation:
Square A: dark diagonal points upper right.
Square B: rotate 90 degrees clockwise.
Square C: rotate another 90 degrees.
Square D: rotate another 90 degrees.
Repeat this rotation across the grid.
Photograph the complete arrangement before stacking the squares. Label each row so the orientation does not change during joining.
Raised Blue Join
Yarn: denim blue.
The photographed blanket has clearly visible lines around the motifs. A crocheted join is appropriate for this effect because slip-stitch and single-crochet joins can create visible structural ridges. 1
Place two squares with their wrong sides together.
Align the corner spaces.
Insert the hook through the corresponding edge loops of both motifs.
Join denim yarn.
Joining Row: Sl st through both layers across the complete edge.
Keep every slip stitch relaxed. Tight joins can make the blanket pucker even when the individual squares are correctly blocked. 2
Fasten off at the opposite corner.
Joining Squares into Rows
Join the motifs into horizontal rows first.
Check the diagonal orientation before adding each new square.
After one complete row is assembled, lay it flat.
The joined edge should remain approximately the same length as the unjoined edge.
If the seam contracts noticeably, increase joining-hook size or relax the slip-stitch tension.
Repeat until every horizontal row is complete.
Joining the Rows
Place the first two completed rows together.
Match every square intersection before starting the seam.
Add stitch markers at each intersection.
Slip stitch through corresponding loops across the full blanket width.
At each four-square junction, work through the corner spaces without adding unnecessary stitches.
Continue until the complete grid is assembled.
Joining squares into rows and then joining those rows is a standard assembly approach for large granny-square blankets. 3
Outer Denim Border
Yarn: denim blue.
Join denim at one corner of the assembled blanket.
Round 1: Ch 1. Sc evenly around the complete perimeter.
At each corner work:
(sc, ch 2, sc).
Join with sl st.
Round 2: Ch 2. Hdc in each stitch around.
At each corner work:
(2 hdc, ch 2, 2 hdc).
Join with sl st.
Pale Blue Border Round
Change to pale blue.
Round 3: Ch 1. Sc in every stitch around.
At each corner work:
(sc, ch 2, sc).
Join with sl st.
White Accent Round
Change to white.
Round 4: Ch 2. Hdc around.
Work (2 hdc, ch 2, 2 hdc) in each corner.
Join with sl st.
Final Denim Edge
Change to denim blue.
Round 5: Ch 1. Sc around.
At each corner work 3 sc.
Round 6: Work reverse sc around the complete perimeter.
Fasten off with a 30 cm tail.
Assembly
- Make one complete three-color square and block it to establish the finished motif measurement.
- Crochet enough matching motifs for the selected bedspread grid and weave in all color-change tails.
- Block every square to the same dimensions and correct any motif differing by more than approximately 5 mm.
- Lay the complete grid on a flat surface and rotate neighboring squares to establish the diagonal pattern.
- Photograph and label the layout before moving any motifs.
- Join individual squares into horizontal rows with relaxed denim slip stitches.
- Match all square intersections and join the completed rows across the full blanket width.
- Lay the assembled panel flat and correct any seam that contracts or causes puckering.
- Work the denim, pale-blue and white perimeter rounds around the complete bedspread.
- Finish with the denim edge, weave all remaining tails into matching stitches and block the complete perimeter.
The finished bedspread should show a regular blue grid with diagonal white and pale-blue bands moving through the individual motifs.
7 Technical Tips
- Keep blocked squares within 5 mm of the target size. A 5 mm discrepancy repeated across 12 motifs can produce a 6 cm difference across a full row.
- Mark square orientation before joining. One motif rotated incorrectly interrupts the diagonal sequence and becomes difficult to replace after four surrounding seams are complete.
- Keep the slip-stitch seam relaxed. A joining seam shorter than the square edge causes puckering; current joining guides identify excessive seam tension as a common cause of this problem. 4
- Match corners before working long seams. Place a marker at every square intersection so a one-stitch alignment error does not travel across the entire bed width.
- Use the same yarn line for all three colors. Different worsted yarns can have different diameters, causing the white or pale-blue sections to change the square’s dimensions.
- Check the panel after every joined row. Lay it flat and measure both outer edges; a difference greater than approximately 1 cm indicates seam tension or motif-size variation.
- Weave color-change tails before assembly. Leave at least 8–10 cm for secure weaving because accessing the back of a square becomes slower after the complete grid is joined.
Why the Visible Join Matters
A nearly invisible seam would change the character of this blanket. The reference image uses dark blue lines around individual motifs, making the grid part of the overall geometry.
Slip-stitch joining is particularly suitable when a low but visible ridge is wanted. Single crochet produces a stronger raised seam, while mattress stitch produces a much less visible result. Current joining references distinguish these methods by both seam height and visibility. 5
For the photographed effect, use denim blue for every join. That creates continuous lines even where neighboring squares contain pale blue or white along their edges.
Test the joining method on two sample squares first. The seam should add definition without becoming stiff enough to prevent the blanket from folding naturally.
Changing the Bedspread Size
Calculate the final size from the blocked square measurement rather than relying on a generic blanket chart.
If one square measures 15 cm, eight motifs across produce approximately 120 cm before the outer border. Ten produce approximately 150 cm, while twelve produce approximately 180 cm.
For length, twelve 15 cm squares produce approximately 180 cm. Fourteen produce approximately 210 cm.
Add the expected border width after calculating the motif grid.
For example, a five-round border adding approximately 5 cm on each side increases both finished dimensions by roughly 10 cm.
Color Placement
The three-color palette depends on value contrast as much as hue. Denim blue supplies the darkest sections and defines the joining grid. White creates the strongest diagonal highlight. Pale blue bridges those extremes.
Keep denim as the dominant color if you want the bedspread to retain the appearance shown in the photo.
For a softer version, replace denim with medium blue and use ivory instead of bright white. A coastal palette can combine navy, faded blue and cream.
For higher contrast, use navy for both the darkest motif sections and joining seams.
Do not distribute the three colors randomly within each motif if the diagonal effect is the goal. Repeat the same color sequence and change visual direction by rotating the completed squares.
Managing Yarn Tails
A three-color modular blanket creates many yarn ends. Deal with them during production rather than leaving every tail until assembly.
After completing four or five squares, weave the tails into the matching-color sections.
Run each tail in one direction through several stitches, reverse direction through another group and trim only after the fabric has relaxed.
Avoid carrying dark denim tails behind white sections. The darker yarn can remain visible through granny-style openings.
Keep joining-yarn tails near the blue seam lines, where they can be buried without crossing pale sections.
Blocking the Finished Bedspread
The complete blanket may be too large for conventional blocking mats. In that case, concentrate on the perimeter and any sections where the joining lines do not lie flat.
Follow the yarn manufacturer’s care instructions.
After washing, support the wet blanket from underneath. A bed-sized crochet piece becomes considerably heavier when saturated.
Lay it flat or arrange it according to the fiber’s care requirements.
Square the four corners first, then align the long outer edges.
Do not stretch individual diagonal sections independently. The joined grid should be treated as one fabric at this stage.
Care and Maintenance
A modular blanket can be easier to repair than a one-piece design because damage is often confined to a single motif or seam.
Inspect the raised joins periodically, particularly at four-square intersections. Those points receive stress when the blanket is folded or pulled across a bed.
If one seam loosens, repair it before neighboring squares begin separating.
Wash according to the yarn label and avoid hanging a wet bedspread from one edge. The weight can stretch the outer motifs and joining seams.
Fold the blanket along several different lines during storage rather than repeatedly creasing the same row of squares.
Conclusion
Make one complete motif before calculating the blanket grid, because its blocked dimensions control the finished bedspread more accurately than an assumed stitch gauge. Keep every square within approximately 5 mm of that sample, photograph the diagonal layout before joining, and use relaxed denim seams to preserve the visible blue grid. Add the outer border only after the assembled panel lies flat. This blue granny square crochet bedspread pattern can then be resized by adding or removing complete rows of motifs. Save the finished layout to Pinterest or share it on Instagram with #BlueMiteredGrannyBedspread. Would you arrange the white diagonals into repeating diamonds or alternate their direction across every row?









