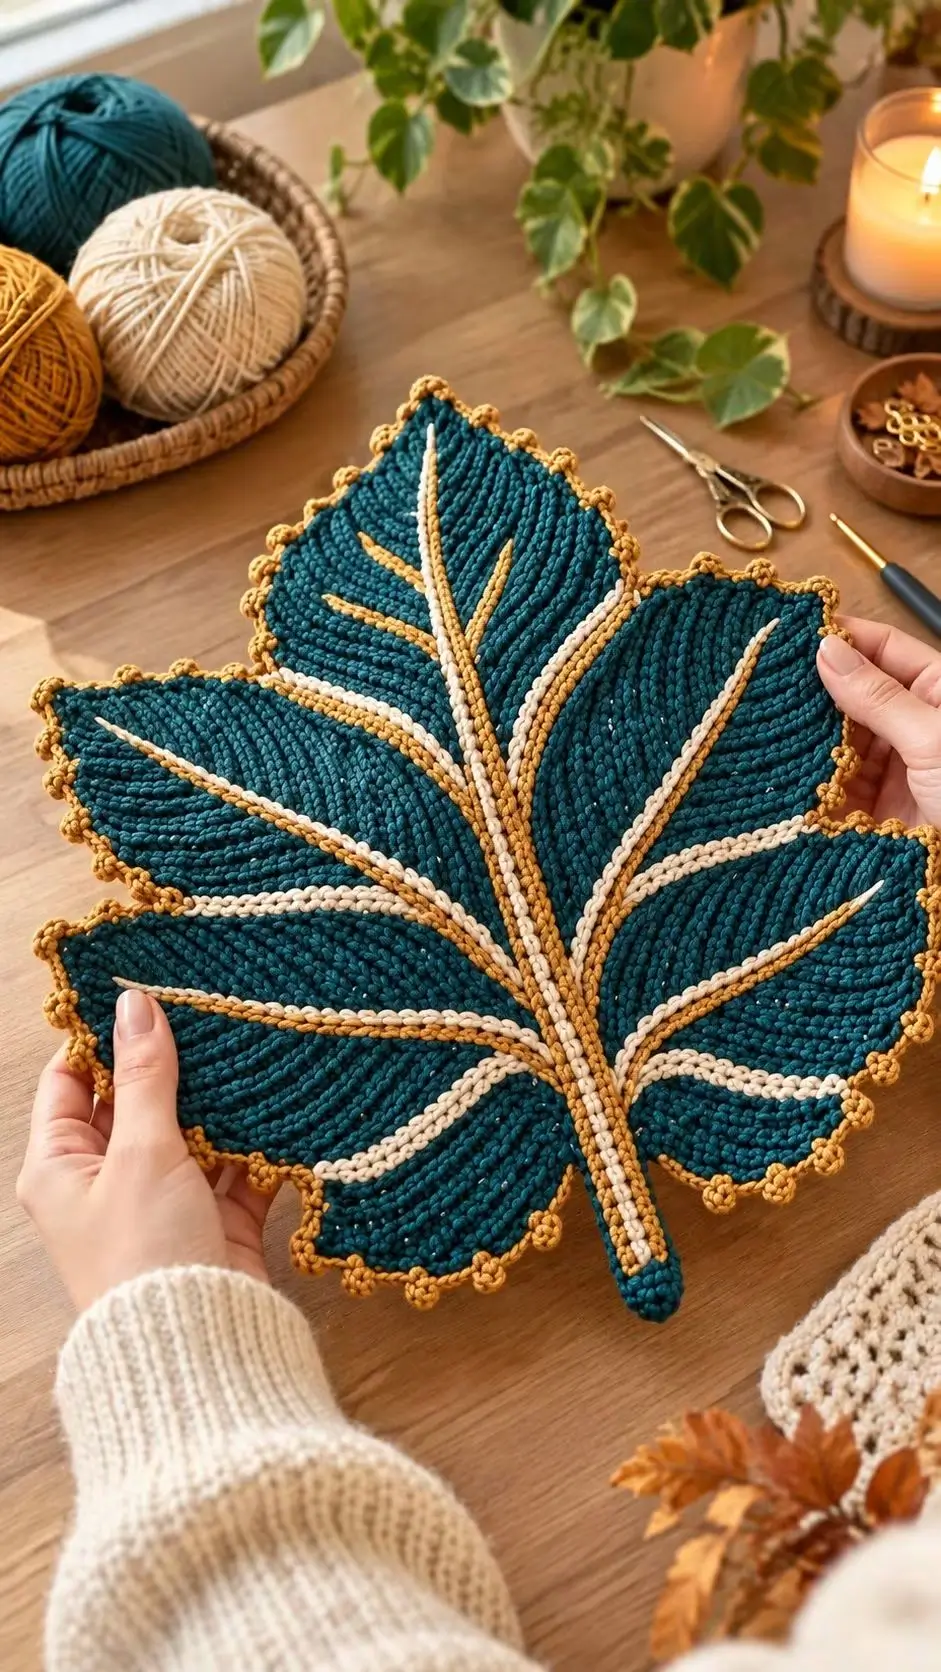
A maple leaf this broad depends on deep valleys between five lobes; soften those valleys and the silhouette becomes a generic fan. This crochet maple leaf placemat pattern uses dense teal crochet, raised cream-and-mustard veins, a long integrated stem and a picot-style gold border. The photo-inspired finished piece measures approximately 32–36 cm across and works as autumn table décor or a decorative centerpiece.
The Design: What Makes This Maple Leaf Different
The photographed leaf combines a dense background with pronounced surface lines. Five lobes radiate from the stem junction, but they are deliberately unequal: the central lobe is tallest, the upper side lobes provide width, and the lower pair spread almost horizontally.
The second structural feature is the vein network. Cream and mustard surface crochet follows the center spine before branching toward each lobe, creating stronger relief than ordinary color changes.
A mustard picot-style edging supplies the third defining element. Its repeated bumps emphasize the perimeter without filling the valleys between lobes.
The main construction error with a crochet maple leaf placemat is making all five points the same length. The center must dominate vertically while the lower lobes control width. That proportion produces the maple outline visible in the reference.
Project Info at a Glance
| Skill Level | Time | Finished Size | Hook | Construction |
|---|---|---|---|---|
| Intermediate | 5–7 hours | Approx. 32–36 cm wide | 4 mm | Five-lobe leaf with surface-crochet veins |
The dimensions above are a photo-derived target rather than a direct measurement of the pictured item. Make and block the central lobe first if an exact placemat width is required.
Materials and Tools
Yarn
- Deep teal — worsted/category 4 cotton or cotton blend — approximately 130–160 g
- Warm cream — worsted/category 4 — approximately 20–25 g
- Mustard gold — worsted/category 4 — approximately 30–40 g
A smooth cotton yarn gives the raised veins and perimeter points clearer definition. Use yarns of similar thickness for all three colors so the surface crochet does not overpower the teal background.
Tools
- 4 mm crochet hook
- 3.5 mm hook for surface details if needed
- Locking stitch markers
- Yarn needle
- Sharp scissors
- Blocking mat
- Rust-resistant pins
- Flexible tape measure
Abbreviations
- ch — chain
- sl st — slip stitch
- sc — single crochet
- hdc — half double crochet
- dc — double crochet
- tr — treble crochet
- inc — increase
- dec — decrease
- st/sts — stitch/stitches
- sp — space
- RS — right side
- WS — wrong side
Keep decreases tight at the inner valleys. Loose decreases add unwanted width precisely where the maple silhouette needs its strongest indentation.
Gauge and Sizing
This design is controlled primarily by measurements rather than a fixed gauge. Work a small teal swatch before making the leaf.
Foundation: Ch 17.
Row 1: Sc in second ch from hook and across. (16)
Rows 2–12: Ch 1, turn. Sc across. (16)
The fabric should remain flat and dense without becoming rigid. Large openings between stitches will weaken the sharp lobe edges, while excessively tight crochet makes blocking difficult.
Target approximately 32–36 cm across the two widest side points after blocking. The height from stem end to center-lobe tip should be approximately 38–43 cm.
Pattern — Step by Step
The photographed piece has a highly sculpted botanical appearance. This photo-inspired reconstruction builds five dense teal lobes around one lower junction, adds the stem, then uses surface crochet to create the raised vein network.
Central Lobe
Yarn: deep teal.
Ch 19.
Row 1: Sc in second ch from hook and across. (18)
Row 2: Ch 1, turn. Sc across. (18)
Row 3: Ch 1, turn. 2 sc in first st, sc across to final st, 2 sc in final st. (20)
Row 4: Ch 1, turn. Sc across. (20)
Row 5: Ch 1, turn. 2 sc in first st, sc across to final st, 2 sc in final st. (22)
Row 6: Ch 1, turn. Sc across. (22)
Row 7: Ch 1, turn. 2 sc in first st, sc across to final st, 2 sc in final st. (24)
Rows 8–13: Ch 1, turn. Sc across. (24)
Row 14: Ch 1, turn. Dec, sc across to final 2 sts, dec. (22)
Row 15: Ch 1, turn. Sc across. (22)
Row 16: Ch 1, turn. Dec, sc across to final 2 sts, dec. (20)
Row 17: Ch 1, turn. Sc across. (20)
Row 18: Ch 1, turn. Dec, sc across to final 2 sts, dec. (18)
Row 19: Ch 1, turn. Dec, sc across to final 2 sts, dec. (16)
Row 20: Ch 1, turn. Dec, sc across to final 2 sts, dec. (14)
Row 21: Ch 1, turn. Dec, sc across to final 2 sts, dec. (12)
Row 22: Ch 1, turn. Dec, sc across to final 2 sts, dec. (10)
Row 23: Ch 1, turn. Dec, sc across to final 2 sts, dec. (8)
Row 24: Ch 1, turn. Dec, sc 4, dec. (6)
Row 25: Ch 1, turn. Dec, sc 2, dec. (4)
Row 26: Ch 1, turn. Dec twice. (2)
Row 27: Ch 1, turn. Dec. (1)
Fasten off with a 30 cm tail.
This point establishes the vertical axis of the finished leaf.
Upper Left Lobe
Yarn: deep teal.
Ch 16.
Row 1: Sc in second ch from hook and across. (15)
Row 2: Ch 1, turn. Sc across. (15)
Row 3: Ch 1, turn. 2 sc in first st, sc across to final st, 2 sc in final st. (17)
Row 4: Ch 1, turn. Sc across. (17)
Row 5: Ch 1, turn. 2 sc in first st, sc across to final st, 2 sc in final st. (19)
Rows 6–10: Ch 1, turn. Sc across. (19)
Row 11: Ch 1, turn. Dec, sc across to final 2 sts, dec. (17)
Row 12: Ch 1, turn. Sc across. (17)
Row 13: Ch 1, turn. Dec, sc across to final 2 sts, dec. (15)
Row 14: Ch 1, turn. Dec, sc across to final 2 sts, dec. (13)
Row 15: Ch 1, turn. Dec, sc across to final 2 sts, dec. (11)
Row 16: Ch 1, turn. Dec, sc across to final 2 sts, dec. (9)
Row 17: Ch 1, turn. Dec, sc across to final 2 sts, dec. (7)
Row 18: Ch 1, turn. Dec, sc 3, dec. (5)
Row 19: Ch 1, turn. Dec, sc 1, dec. (3)
Row 20: Sc3tog. (1)
Fasten off with a 30 cm tail.
Upper Right Lobe
Repeat the upper-left lobe instructions.
Place the two pieces side by side before assembly. Their widest rows should differ by no more than approximately 5 mm.
Lower Left Lobe
Yarn: deep teal.
Ch 14.
Row 1: Sc in second ch from hook and across. (13)
Row 2: Ch 1, turn. 2 sc in first st, sc across to final st, 2 sc in final st. (15)
Row 3: Ch 1, turn. Sc across. (15)
Row 4: Ch 1, turn. 2 sc in first st, sc across to final st, 2 sc in final st. (17)
Rows 5–9: Ch 1, turn. Sc across. (17)
Row 10: Ch 1, turn. Dec, sc across to final 2 sts, dec. (15)
Row 11: Ch 1, turn. Sc across. (15)
Row 12: Ch 1, turn. Dec, sc across to final 2 sts, dec. (13)
Row 13: Ch 1, turn. Dec, sc across to final 2 sts, dec. (11)
Row 14: Ch 1, turn. Dec, sc across to final 2 sts, dec. (9)
Row 15: Ch 1, turn. Dec, sc across to final 2 sts, dec. (7)
Row 16: Ch 1, turn. Dec, sc 3, dec. (5)
Row 17: Ch 1, turn. Dec, sc 1, dec. (3)
Row 18: Sc3tog. (1)
Fasten off with a 30 cm tail.
Lower Right Lobe
Repeat the lower-left lobe instructions.
Both lower lobes should remain shorter than the upper pair but spread farther toward the sides after assembly.
Joining the Five Lobes
Lay the central lobe vertically with its broad foundation end at the bottom.
Position the upper-left and upper-right lobes at approximately 35–45 degrees from the center.
Place the lower pair at approximately 65–80 degrees.
Overlap the lower inner corners by approximately 1–2 cm.
Using teal yarn, whipstitch the overlapping areas from the wrong side.
Keep the center as flat as possible. The raised vein work will later cover much of this junction.
Shaping the Serrated Perimeter
Join teal yarn near the lower center.
Work sc around the outer edge.
At selected positions along each lobe, create a small secondary point with:
sc, hdc, dc, ch 2, sl st in second ch from hook, dc, hdc, sc.
Space these points approximately 2.5–3.5 cm apart.
At each major lobe tip work:
(sc, ch 2, sc).
At every deep valley between main lobes work:
sl st, sc, sl st.
Join at the starting point.
Fasten off.
Teal Stem
Yarn: deep teal.
Join at the lower central junction.
Ch 27.
Beginning in second ch from hook:
Sl st in next 3 ch, sc in next 5 ch, hdc in next 15 ch, sc in final 3 ch.
Work 5 sc into the end attachment area and continue along the opposite side of the foundation chain.
Sc in next 3 sts, hdc in next 15 sts, sc in next 5 sts, sl st in final 3 sts.
Work 3 sc around the free stem tip.
Join with sl st.
Fasten off and weave the tail into the wrong side.
Cream Central Vein
Yarn: warm cream.
Lay the leaf right side up.
Join cream yarn near the lower end of the stem.
Surface sl st up the center of the stem and continue through the central junction.
Follow the center of the tall upper lobe.
Stop approximately 1 cm before its point.
Fasten off on the wrong side.
The surface stitches should sit visibly above the teal background without pulling it inward.
Mustard Central Accent
Yarn: mustard gold.
Join mustard beside the cream central vein.
Surface sl st parallel to the cream line from the stem toward the central lobe.
Keep approximately one stitch of teal visible between the two raised lines where possible.
Stop slightly below the end of the cream vein.
Fasten off.
Cream Side Veins — Make 4
Join cream yarn against the main central vein.
Surface sl st toward one side lobe.
Follow the approximate center of that lobe and stop 1–1.5 cm before its point.
Fasten off.
Repeat for the other three side lobes.
The lower veins should spread more horizontally than the upper pair.
Mustard Side Veins
Join mustard yarn beside selected cream branches.
Surface sl st parallel to the cream vein for approximately 60–80% of its length.
Do not add mustard beside every branch. Alternating cream-only and cream-and-mustard lines reproduces the layered vein effect visible in the reference.
Secondary Vein Branches
Add two or three shorter cream or mustard branches to each major vein.
Begin against the primary vein.
Surface sl st diagonally toward the outer edge.
Stop approximately 1.5–2 cm before the perimeter.
Make the branches progressively shorter as they approach the tip of each lobe.
Mustard Picot Border
Yarn: mustard gold.
Join mustard at the stem base.
Work sc around the leaf perimeter.
Approximately every 3 stitches, make a picot:
Ch 3, sl st into first ch.
Continue sc to the next picot position.
At each major point work:
Sc, ch 3, sl st in first ch, sc.
At the deepest valleys, omit the picot and work one compact sl st instead.
Continue around the complete leaf.
Fasten off with a 20 cm tail.
The mustard edging should create small rounded projections without turning the perimeter into a ruffle.
Assembly
- Crochet the central teal lobe and use it as the size reference for the remaining four sections.
- Make two matching upper side lobes and two shorter lower lobes.
- Arrange the five pieces around one central junction and check the complete silhouette before sewing.
- Whipstitch the overlapping inner edges from the wrong side and keep the center flat.
- Add the teal serrated perimeter and crochet the long lower stem.
- Work the cream central vein continuously from the stem toward the upper point.
- Add the four cream side veins, followed by selected mustard parallel veins and secondary branches.
- Work the mustard picot edging around the complete leaf while leaving the deepest valleys compact.
- Weave all tails into matching-colored stitches on the wrong side.
- Wet-block the leaf with the central lobe and stem aligned on one vertical axis and allow it to dry completely.
The completed piece should have five dominant teal lobes, a long centered stem, raised cream-and-mustard veins and a small mustard picot border around the outer silhouette.
7 Technical Tips
- Keep matching side lobes within 5 mm of each other. Larger differences become obvious once the central vein establishes a strong visual axis through the leaf.
- Pin the valleys as well as the points. Blocking only the five outer tips produces a broad star shape because the inner indentations remain too shallow.
- Stop surface veins 1–2 cm before the perimeter. Veins that run directly into the mustard border make the outer edge visually crowded and can pull on the picots.
- Keep surface slip stitches slightly loose. A tight central vein can shorten the leaf by more than 1 cm and make the middle lobe curl upward.
- Space border picots about three stitches apart. Picots placed at every stitch produce excessive edging volume and obscure the teal serrations.
- Keep the lower lobes at approximately 65–80 degrees from the center axis. Positioning them vertically makes the leaf too narrow and removes the broad maple profile.
- Block the finished width to approximately 32–36 cm. Stretching substantially beyond the natural dimensions can open the dense teal stitches and reduce the raised appearance of the veins.
Creating the Raised Vein Effect
The vein network is one of the strongest features in the reference image. Instead of changing colors while making the teal background, the contrasting lines are applied afterward with surface crochet.
This method has two advantages. The background remains structurally continuous, and the vein placement can be adjusted after the five lobes have been assembled.
Begin with the longest line. The cream central vein establishes the stem-to-tip axis. Side branches are then positioned relative to that line.
Mustard should act as an accent rather than completely duplicating the cream network. Parallel lines near the center provide depth, while isolated mustard branches introduce controlled variation.
If the leaf starts curling during this stage, stop and loosen the most recent surface stitches before continuing.
Shaping the Five Maple Lobes
The center lobe controls height. Its point should extend beyond both upper side lobes by approximately 3–5 cm.
The upper side lobes control the widest part of the upper half. Angle them outward rather than placing them parallel to the center.
The two lower lobes create the broad base. Their tips should extend sideways and slightly upward.
Keep the valleys between all five sections visibly deep. The contrast between outward points and inward valleys is more important than adding numerous tiny serrations.
After joining, place the piece on a flat surface and inspect it from several feet away. Correct the five-lobe proportions before adding the surface veins.
Adjusting the Finished Size
For a smaller decorative leaf, use DK cotton with a 3–3.5 mm hook. Keep the same proportions but reduce the number of plateau rows in each lobe.
For the placemat-sized version shown here, worsted cotton and a 4 mm hook should produce a substantial motif when the target measurements are followed.
For an oversized centerpiece, use bulky yarn with an appropriate hook rather than adding large numbers of random stitches to individual lobes.
Changing yarn weight preserves the relative proportions more reliably than independently enlarging each section.
Choosing the Three-Color Palette
Deep teal forms a strong background for the raised botanical lines. Warm cream provides the highest contrast, making the central vein readable across the complete leaf.
Mustard gold connects the vein details to the decorative outer edge. Because the mustard is warmer than the teal, even small amounts remain visible.
Other combinations can follow the same three-level structure. Burgundy with cream and antique gold creates a traditional autumn version. Olive with ivory and rust produces a more natural leaf palette. Navy with silver-gray and ochre creates a cooler table setting.
Whatever palette is chosen, the background should remain substantially darker or lighter than at least one vein color.
Blocking the Finished Maple Leaf
Wet-blocking gives the five lobes their final geometry.
Dampen the finished piece according to the yarn manufacturer’s care instructions. Remove excess water without twisting the crochet.
Place the leaf right side up on a blocking mat.
Pin the stem first. Position the central lobe directly above it.
Next, pin both upper side lobes at matching angles. Spread the lower lobes outward and pin them last.
Add separate pins to every major valley and selected mustard picots.
Check that the cream central vein remains visually straight from the stem into the upper lobe.
Allow the piece to dry fully before removing the pins.
Using the Finished Leaf
The photo-inspired size works as a decorative placemat, autumn centerpiece or layered table accent. A set can be made in several background colors while retaining the cream-and-mustard vein treatment.
For a matching dining set, make the first leaf completely and record its blocked width and height. Match subsequent pieces to those measurements rather than relying only on row counts.
If the leaf will sit beneath plates, keep the surface veins moderately flat. Very thick decorative lines can make dishes less stable.
For purely decorative use, an additional surface-crochet line can be placed beside selected veins to increase relief.
Care and Storage
Follow the yarn label when washing the finished leaf. Cotton motifs can usually be reshaped while damp, which is useful for restoring sharp points after laundering.
Store the piece flat when possible. Folding directly across the central surface vein can leave a temporary crease through the raised crochet.
If several leaves are stacked, align them loosely rather than pressing the picot borders beneath heavy objects.
After washing, pin the five main points and the deepest valleys again while the fabric dries. This restores the maple silhouette without requiring aggressive stretching.
Conclusion
Build the five-lobe silhouette before adding any decorative surface work, because the central point, side-lobe angles and deep valleys determine whether the motif reads as a maple leaf. Once the teal foundation lies flat, work the cream spine from stem to tip, add selected mustard accents and finish with evenly spaced picots. Block the final piece with the stem and central lobe on one axis. This crochet maple leaf placemat pattern can then be repeated as a coordinated autumn table set. Save the finished leaf to Pinterest or share it on Instagram with #TealMapleLeafCrochet. Would you keep the teal background shown here or make the next leaf in deep burgundy?









