Introduction
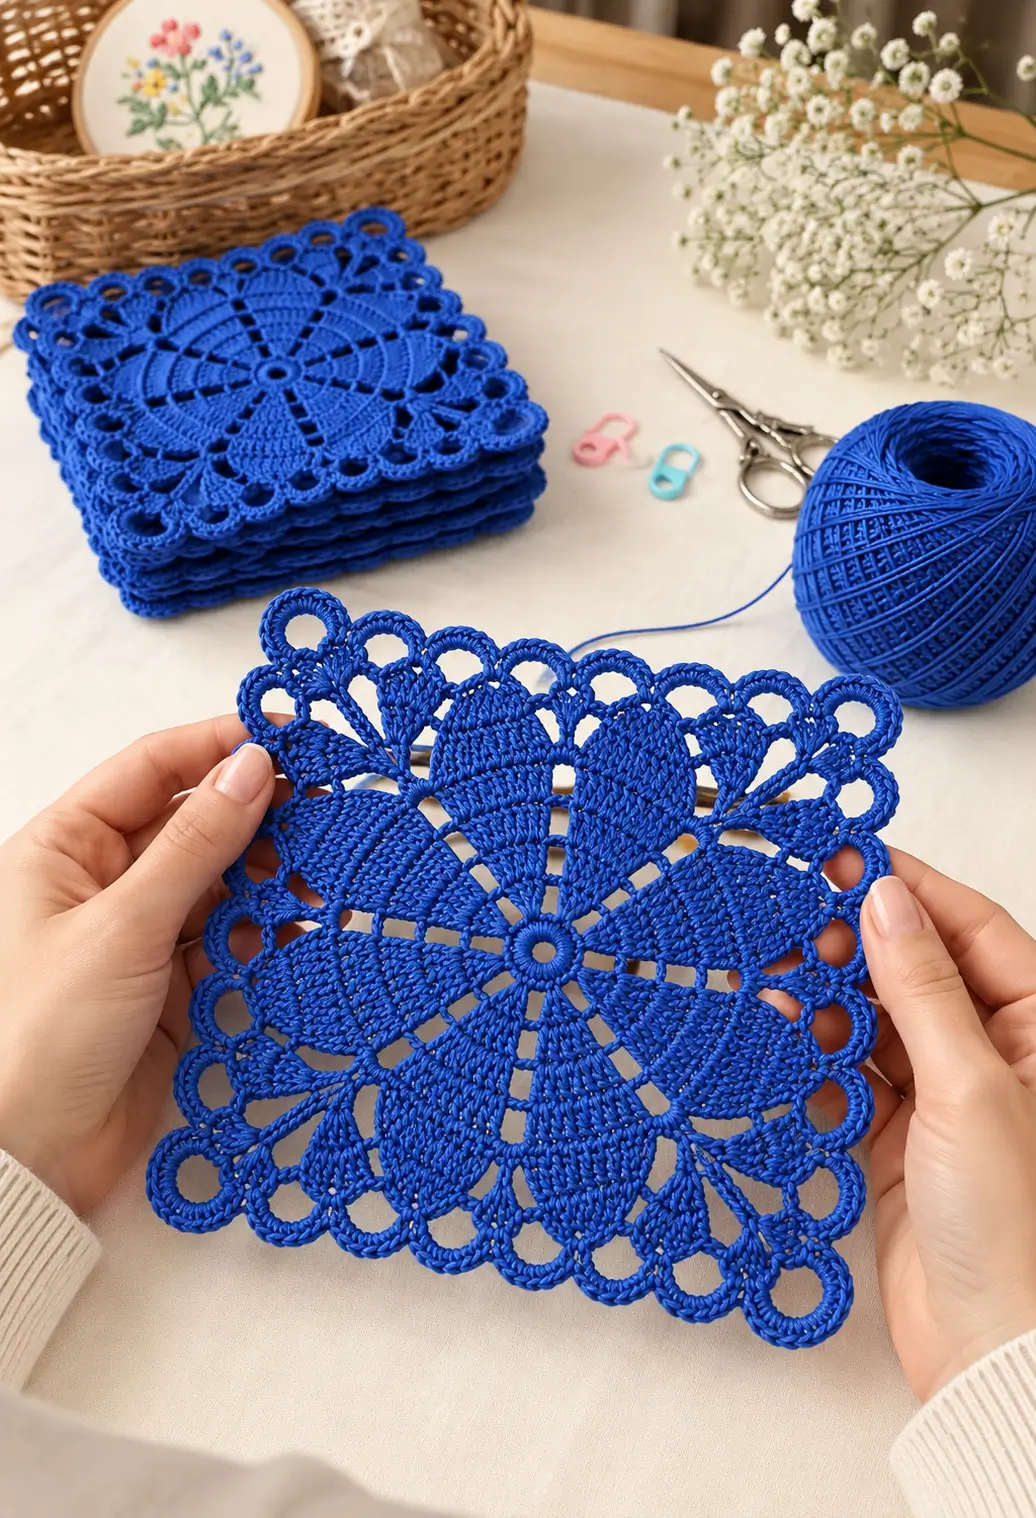
Eight pointed leaves radiate from the center before the border forces the circle into a square. This square crochet doily pattern uses mercerized cotton thread, a small steel hook, chain spaces, tall stitches, and looped edging to create a photo-inspired floral motif measuring approximately 22 cm after blocking. The project suits intermediate crochet skills. Its flat construction makes the finished square practical as a table mat or decorative insert.
The Design: What Makes This Floral Square Different
The central problem is geometric: a radial flower naturally wants to remain circular, while the finished piece needs four defined corners. Eight leaf-shaped sectors therefore establish the floral center before progressively longer corner spaces pull the outer rounds toward a square.
Open chain channels separate those leaves. They reduce bulk and make the crochet lace square visually closer to the photographed motif instead of producing a dense granny-square structure. A looped outer treatment then repeats around all four sides while larger corner loops preserve the outline.
A frequent mistake with this type of floral crochet motif is adding identical spacing at corners and sides. That leaves too little fabric at each diagonal and the finished motif cups upward. Corner arches need additional length, followed by blocking to establish the final geometry.
Project Info at a Glance
| Skill Level | Time | Finished Size | Hook | Best For |
|---|---|---|---|---|
| Intermediate | 3–5 hours | Approx. 22 cm square after blocking | 1.5 mm | Table mat, decorative insert, lace panel |
The 22 cm measurement is the target size for this photo-inspired version. Actual dimensions can vary with thread thickness, hook size, tension, and blocking.
Materials and Tools
Yarn
- Royal blue: size-10 mercerized cotton crochet thread — approximately 35–45 g.
- Accent yarn: none. The photographed motif is monochrome.
A tightly twisted mercerized cotton works well because it keeps the chain spaces and tall stitches clearly defined.
Tools
- 1.5 mm steel crochet hook
- 2 locking stitch markers
- Tapestry needle
- Small scissors
- Rust-resistant blocking pins
- Blocking mat
- Measuring tape
No stuffing or safety eyes are required because this is a flat lace crochet project.
Abbreviations
- MR — magic ring
- ch — chain
- sc — single crochet
- hdc — half double crochet
- dc — double crochet
- tr — treble crochet
- sl st — slip stitch
- sp — space
- ch-sp — chain space
- st/sts — stitch/stitches
- rep — repeat
- rnd — round
An invisible decrease is an amigurumi shaping method and is not required in this lace construction.
Square Crochet Doily Pattern — Step by Step
The photographed object is built as one flat motif rather than separate components. Work joined rounds unless a section states otherwise.
Center Ring
Yarn: royal blue size-10 cotton.
R1: Make MR, ch 3, work 15 dc into ring, join with sl st to top of beginning ch-3. (16 dc)
Pull the center firmly without distorting the stitches.
R2: Ch 1, sc in same st, ch 4, skip next dc, sc in next dc; repeat around, ending ch 4, join to first sc. (8 ch-4 spaces)
The eight spaces establish the radial divisions of the floral design.
Inner Floral Framework
R3: Sl st into first ch-4 sp. Ch 3, work 4 dc in same sp, ch 3, then 5 dc in same sp. Ch 2. In each remaining ch-4 sp work (5 dc, ch 3, 5 dc), ch 2. Join.
You now have eight paired fans.
R4: Sl st across to first ch-3 sp. Ch 1, work (sc, ch 5, sc) into that ch-3 sp, ch 4, sc into next ch-2 sp, ch 4; repeat around. Join.
Do not pull the ch-5 arches tightly. These become the tips of the radial leaves.
Large Leaf Sections
Each leaf is formed over one ch-5 arch.
R5: Sl st into first ch-5 sp. Work sc, hdc, 3 dc, 3 tr, 3 dc, hdc, sc into the arch. Ch 3, sc in the next intervening ch-4 sp, ch 3. Repeat around. Join.
There are eight raised leaf or petal units.
R6: Ch 1. Sc around the first leaf edge to its tip, work (sc, ch 3, sc) at the tip, then sc down the opposite edge. Ch 5, sc in the intervening anchor, ch 5. Repeat for all eight leaves.
Keep corresponding leaves equal in stitch density. Symmetry is more important here than forcing extra stitches onto one leaf.
Square-Shaping Round
Place a stitch marker at four alternating leaf tips. Those four points become the corners.
R7: Starting at a marked corner, work (sc, ch 9, sc) in the marked tip. Ch 5, sc in next leaf tip, ch 5, then work (sc, ch 9, sc) in the next marked tip. Continue around using ch-9 at the four corners and ch-5 between side elements.
There should be four visibly larger corner arches.
R8: In each ch-9 corner arch work (4 sc, ch 5, 4 sc). Work 5 sc in each ch-5 side arch. Continue around and join with sl st.
Lay the motif on a flat surface before continuing. If the center rises into a bowl, the side tension is too tight.
Outer Floral Fans
R9: Ch 1. At each corner ch-5 sp work (sc, ch 7, sc, ch 7, sc). Across each side, ch 4, skip approximately two base stitches, sc in next stitch; repeat evenly to the following corner.
Match the number of side arches on all four sides.
R10: Sl st into the first corner arch. Work (sc, hdc, 5 dc, hdc, sc) into each ch-7 corner arch. In every ch-4 side arch work (sc, 4 dc, sc).
This creates broader corner fans and smaller side fans.
Decorative Loop Border
The rounded loops are one of the most visible characteristics of the blue lace square.
R11: Ch 1, sc in first available edge stitch. Ch 6, skip the width of one small fan, sc between fans. Repeat across each side. At each corner work ch 8 instead of ch 6.
Adjust the placement of the anchors rather than the chain length if your individual stitch density differs.
R12: Into each ch-6 side loop work 8 sc. Into each ch-8 corner loop work 10 sc. Join with sl st.
R13: Sl st to the center of the first rounded loop. Ch 5, sl st into the center of the next loop. Repeat around. At each corner use ch 7.
R14: Work 6 sc around every ch-5 side loop and 8 sc around every ch-7 corner loop. Join.
Fasten off. Leave a 12 cm tail and weave it through the backs of at least six dense stitches before trimming.
Blocking and Final Dimensions
Blocking is part of the construction of a lace square. The piece may look rounded or slightly uneven directly from the hook even when the stitch distribution is correct.
Wash or thoroughly dampen the motif according to the care instructions for the selected cotton. Remove excess water without twisting the fabric. Place the square on a blocking mat and locate the four corner arches first.
Pin opposite corners until both diagonals match. Next, pin the midpoint of every side. Add pins progressively between those eight reference points rather than stretching one entire edge before working on the next.
Target approximately 22 × 22 cm for this version, but stop earlier if reaching that measurement visibly distorts the stitches. Thread diameter, hook size, and individual tension can alter the finished dimensions.
Allow the crochet square to dry completely while pinned.
How Thread Choice Changes the Result
Mercerized cotton suits this style because the construction depends on clearly defined chain spaces, tall stitches, and a border that holds its shape after blocking.
Fine crochet thread creates a compact lace structure. Moving to a thicker cotton increases the finished dimensions even when the same stitch sequence is followed. The spaces also become larger, which can change the visual balance between the solid leaves and open sections.
A smaller hook produces firmer stitches but can make long chains pull inward. A larger hook increases drape but may reduce the definition of the leaf shapes.
When substituting thread, make a small sample or complete the center through R5 before deciding whether the hook size is suitable. The leaves should lie flat without becoming stiff.
Changing the thread means treating the finished measurement as variable rather than forcing the crochet to exactly 22 cm.
Finishing the Crochet Lace Square
- Close the center ring firmly after completing the first round.
- Check that all eight radial spaces are evenly distributed.
- Count the eight floral sections before beginning the leaves.
- Mark four alternating leaf tips as corners.
- Complete the square-shaping rounds without removing the corner markers.
- Compare opposite sides after every outer round.
- Work the loop border with identical chain lengths on corresponding sides.
- Fasten off with a 12 cm tail and weave it through dense stitches on the reverse.
- Block the four corners first, then the side midpoints, followed by the remaining border.
- Allow the cotton to dry fully before removing the pins.
The completed piece is a single blocked floral lace square with eight radial sections and four defined corners.
7 Technical Tips for a Better Crochet Doily
- Corner curling: If the four corners pull inward after R8, the corner chain spaces are too tight for your gauge. Remake the ch-9 spaces with one or two additional chains rather than trying to correct severe curling during blocking.
- Center hole distortion: A loose magic ring can expand after washing. Weave the starting tail through several R1 stitch bases in two directions before trimming it.
- Unequal leaves: A one-stitch difference becomes conspicuous when eight leaves radiate from the same center. Compare each R5 leaf with the first completed leaf before moving to the next section.
- Wavy sides: Excessive border stitches create rippling rather than additional useful width. Keep equivalent arches on all four sides and place anchors at matching structural points.
- Rounded square: Failing to distinguish corner arches from side arches weakens the circle-to-square transition. Mark exactly four alternating leaf tips before R7 and retain those markers through the shaping rounds.
- Blocked size mismatch: Do not force a 19 cm piece to 22 cm simply because 22 cm is the target. Stop stretching when the leaves are open, the sides are straight, and the stitch structure remains balanced.
- Loose yarn tails: Thread tails woven through only two or three open lace stitches can work free. Leave approximately 12 cm and weave through at least six dense stitch backs, reversing direction once.
Conclusion
Block the finished motif by establishing its four corners first, then measure both diagonals before adding pins along the sides. That sequence matters more than forcing the work to an arbitrary dimension because cotton thickness and crochet tension alter the final scale. For the next sample, record both the unblocked and blocked measurements so the result can be repeated with the same thread. Save this square crochet doily pattern to Pinterest or share the finished blue version on Instagram with #BlueFloralLaceSquare. When adjusting the design, decide whether all eight radial leaves should remain equal or whether the four diagonal leaves should be longer to emphasize the square corners.









