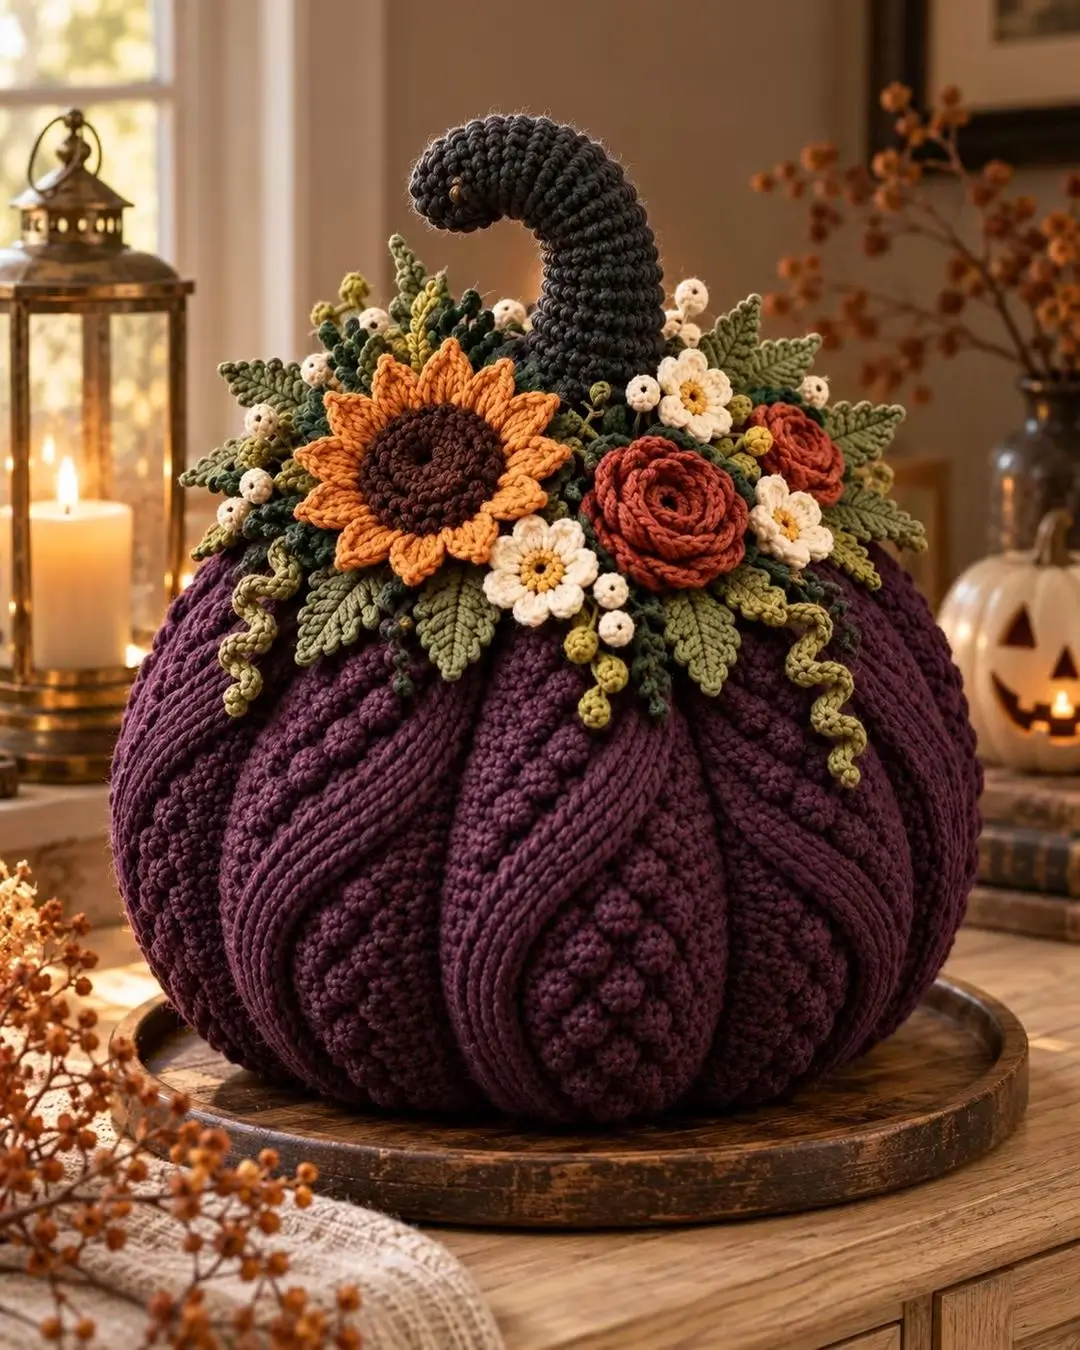
A pumpkin this large needs ribs that remain visible after stuffing; otherwise the body becomes a purple sphere under a floral crown. This large crochet pumpkin pattern uses deep plum yarn, raised cable-style ribs, a curved charcoal stem, sunflower, roses, small daisies, olive leaves and curling vines. The photo-inspired centerpiece is designed as an advanced decorative project for autumn and Halloween displays.
The Design: What Makes This Crochet Pumpkin Different
The body relies on pronounced vertical ribs rather than color changes. Wide textured panels alternate with raised cable-like columns, creating the deep grooves associated with a mature pumpkin. Firm stuffing supports those ribs, while controlled shaping keeps the base broad and stable.
The floral crown changes the proportions. A large sunflower anchors one side, rust roses balance the opposite side, and small cream flowers fill the remaining gaps. Layered olive foliage spreads horizontally so the arrangement connects naturally to the pumpkin instead of looking like a separate bouquet.
The final structural feature is the oversized curved stem. A common mistake with a crochet pumpkin centerpiece is making the stem too thin. A large body needs a substantial stem or the proportions look disconnected.
Project Info at a Glance
| Skill Level | Working Time | Target Size | Hook | Best For |
|---|---|---|---|---|
| Advanced | 10–16 hours | Approx. 30–35 cm wide | 5–6 mm body / 3–3.5 mm flowers | Fall centerpiece, mantel décor, Halloween display |
The photograph contains no yarn label or physical scale, so the finished dimensions are reconstruction targets rather than measurements of the original object. Make a body swatch first if an exact diameter is required.
Materials and Tools
Yarn
- Deep plum yarn — Aran or bulky weight — approximately 450–650 g
- Charcoal yarn — Aran weight — approximately 40–60 g
- Olive green yarn — DK or worsted — approximately 60–90 g
- Dark green yarn — DK or worsted — approximately 20–30 g
- Golden orange yarn — DK or worsted — approximately 30–40 g
- Dark brown yarn — DK or worsted — approximately 15–20 g
- Rust yarn — DK or worsted — approximately 35–50 g
- Cream yarn — DK — approximately 20–30 g
- Mustard yarn — small quantity for flower centers
Tools
- 5–6 mm crochet hook for pumpkin body
- 4–5 mm crochet hook for stem
- 3–3.5 mm crochet hook for flowers and leaves
- Polyester fiberfill
- Yarn needle
- Scissors
- Stitch markers
- Long upholstery needle
- Strong matching yarn for shaping
- Optional flexible craft wire for stem support
Abbreviations
- MR — magic ring
- ch — chain
- sl st — slip stitch
- sc — single crochet
- hdc — half double crochet
- dc — double crochet
- tr — treble crochet
- inc — increase
- dec — decrease
- FPdc — front post double crochet
- BPdc — back post double crochet
- BLO — back loop only
- st/sts — stitch/stitches
Use the invisible decrease on the body by inserting the hook through the front loops of the next two stitches before completing the single crochet.
Pattern Construction Notes
This is a photo-inspired reconstruction. The image provides the visible shape, texture and decorative arrangement but does not contain the unidentified original designer’s stitch counts.
The pumpkin body is built as a large textured tube, closed at both ends and shaped with strong vertical strands. This approach is practical for pronounced ribs because the texture can be established before stuffing.
The flowers, leaves, vines and stem are made separately. Complete the body first. Add the decorative crown only after the pumpkin has reached its final stuffed shape.
Large Crochet Pumpkin Body
Yarn: deep plum
Ch 57.
Row 1: Hdc in second ch from hook and across. Turn. (56)
Row 2: Ch 1, BLO hdc across. Turn. (56)
Row 3: Ch 1, hdc across. Turn. (56)
Row 4: Ch 1, BLO hdc across. Turn. (56)
These alternating rows begin the vertical rib structure.
Textured Pumpkin Panel
Repeat the following 8-row sequence across the body length.
Row 5: Ch 1, hdc across. (56)
Row 6: Ch 1, BLO hdc across. (56)
Row 7: Ch 1, hdc across. (56)
Row 8: Ch 1, BLO hdc across. (56)
Row 9: Ch 1, sc across. (56)
Row 10: Ch 1, BLO hdc across. (56)
Row 11: Ch 1, sc across. (56)
Row 12: Ch 1, BLO hdc across. (56)
Repeat Rows 5–12 until the rectangle measures approximately 85–95 cm along the long edge.
Do not fasten off.
Creating Stronger Raised Ribs
The reference pumpkin has deeper ribs than ordinary BLO crochet produces. Add raised surface columns before joining the body.
Lay the rectangle flat.
Identify approximately 10–12 evenly spaced vertical lines.
Using the same plum yarn, surface slip stitch along each marked line from the bottom edge to the top.
For a heavier cable appearance, work a second surface line directly beside the first.
Keep these stitches relaxed. Tight surface crochet shortens the body panel and causes unwanted puckering.
Joining the Pumpkin Body
Bring the two short edges together with right sides facing.
Slip stitch through corresponding stitches to form a large tube.
Fasten off, leaving a long tail.
Turn the tube right side out.
The raised ribs should now run vertically from one open end to the other.
Closing the Pumpkin Bottom
Thread approximately 80–100 cm of strong plum yarn through a long needle.
Work a running stitch around one open edge approximately 1 cm from the edge.
Pull firmly to gather the opening.
Pass through the gathered center several times.
Knot securely.
Do not trim the tail until the closure has been tested under tension.
Stuffing the Large Pumpkin
Add fiberfill in several smaller sections instead of pushing one large mass into the body.
Fill the outer circumference first.
Add stuffing beneath each raised rib.
Continue filling the center.
The body should be firm enough to support flowers but still compress when the external shaping strands are tightened.
Avoid packing the center so tightly that the top opening cannot be gathered.
Closing the Pumpkin Top
Work another strong running stitch around the remaining opening.
Pull the edge inward gradually.
Add the final fiberfill before the opening becomes too small.
Pull closed.
Pass the yarn through the center several times and secure.
Leave a small reinforced area in the center for attaching the stem.
Creating Deep Pumpkin Sections
The photograph shows approximately 10–12 pronounced ribs.
Cut a long strand of strong plum yarn at least four times the pumpkin circumference.
Insert the upholstery needle through the bottom center and bring it out through the top center.
Wrap the yarn down the outside of the pumpkin along one textured valley.
Insert the needle through the bottom center and return through the top.
Pull until the groove deepens.
Repeat around the pumpkin at evenly spaced intervals.
Do not tighten one groove completely before starting the others. Increase the tension gradually around the complete body to maintain symmetry.
Curved Charcoal Pumpkin Stem
The oversized stem is one of the defining features of the reference.
Yarn: charcoal
Make an MR.
Round 1: 6 sc in MR. (6)
Round 2: Inc around. (12)
Round 3: Repeat (sc, inc) around. (18)
Rounds 4–8: Sc around. (18)
Round 9: Repeat (4 sc, dec) around. (15)
Rounds 10–16: Sc around. (15)
Round 17: Repeat (3 sc, dec) around. (12)
Rounds 18–30: Sc around. (12)
Begin creating the curve.
Round 31: Sc in next 3 sts, hdc in next 3 sts, sc in remaining 6 sts. (12)
Round 32: Repeat Round 31.
Round 33: Sc around. (12)
Rounds 34–38: Repeat the asymmetric hdc shaping as required until the stem curves naturally.
Round 39: Repeat (sc, dec) around. (8)
Rounds 40–42: Sc around. (8)
Fasten off and close the tip.
Supporting the Curved Stem
For a purely soft decoration, stuff the stem firmly with fiberfill.
If a more pronounced curve is required, insert an appropriate flexible craft support inside before closing the stem.
Any internal support must remain completely enclosed and should not protrude through the crochet fabric.
Curve the stem gradually rather than folding it at one sharp point.
Attaching the Stem
Position the wide stem base over the pumpkin’s top closure.
Sew around the complete base using charcoal yarn.
Pass several additional stitches through the reinforced pumpkin center.
Check the stem from all sides.
The lower section should stand vertically before the upper section curves outward.
Crochet Sunflower
Brown Center
Yarn: dark brown
Make an MR.
Round 1: 6 sc in MR. (6)
Round 2: Inc around. (12)
Round 3: Repeat (sc, inc) around. (18)
Round 4: Repeat (2 sc, inc) around. (24)
Round 5: Repeat (3 sc, inc) around. (30)
Fasten off.
Sunflower Petals
Join golden orange yarn.
For each petal work:
Ch 6, sc in second ch, hdc, dc, tr, dc, sl st into the next available center stitch.
Repeat evenly around the center to create approximately 14–16 petals.
Fasten off with a long sewing tail.
Rust Crochet Rose – Make 2 or 3
Yarn: rust
Ch 42.
Row 1: Dc in fourth ch from hook, 2 dc in same ch. Work 3 dc in each remaining ch across.
The strip will curl naturally.
Fasten off with approximately 30 cm of yarn.
Beginning at one end, roll the strip tightly for the flower center.
Continue rolling more loosely toward the outside.
Use the long tail to sew through all layers at the base.
Shape the outer loops into overlapping rose petals.
Small Cream Daisy – Make 4 to 6
Yarn: mustard center and cream petals
Using mustard, make an MR.
Round 1: 6 sc in MR. Join. (6)
Change to cream.
In each stitch work:
Ch 3, 2 dc in same st, ch 3, sl st in same st.
Repeat around for 6 petals.
Fasten off with a long tail.
Tiny Cream Berry Flower – Make 6 to 10
Using cream, make an MR.
Round 1: 6 sc in MR. (6)
Round 2: Sc around. (6)
Fasten off.
Pull the opening nearly closed but leave a small central depression.
These miniature motifs fill narrow gaps between leaves and larger flowers.
Large Olive Leaf – Make 8 to 12
Yarn: olive green
Ch 15.
Starting in second ch from hook work:
sl st, sc, hdc, dc, dc, tr, tr, tr, dc, dc, hdc, sc, sl st.
Ch 3 at the tip.
Rotate and work the same stitch sequence along the opposite side of the foundation chain.
Join at the base.
Fasten off with a 20 cm sewing tail.
Leaf Vein
Using the same olive yarn, surface slip stitch from the base toward the tip.
For more definition, add two or three short diagonal surface-stitch branches on each side.
Keep them loose enough that the leaf remains flat.
Small Filler Leaves
Ch 10.
Beginning in second ch work:
sl st, sc, hdc, dc, tr, dc, hdc, sc, sl st.
Ch 2 at the tip.
Repeat along the opposite side.
Fasten off.
Make several in olive and dark green to create depth beneath the flowers.
Crochet Curly Vines
Yarn: olive green
Ch 30.
Work 3 sc in second ch from hook and 3 sc in every remaining chain.
The strip will spiral automatically.
Fasten off with a long attachment tail.
Make 3–5 vines in different lengths. A few shorter spirals prevent the arrangement from becoming too symmetrical.
Small Green Buds
Make an MR.
Round 1: 6 sc in MR. (6)
Round 2: Sc around. (6)
Round 3: Repeat (sc, dec) around. (4)
Fasten off.
Attach individual buds to short chains or thin crocheted stems and place them between larger leaves.
Planning the Floral Crown
Do not sew the flowers on immediately after making them.
Place the pumpkin on its final display surface.
Position the sunflower slightly left of center.
Place the largest rust rose to the right.
Add a second rose farther back and slightly higher.
Distribute cream daisies between the two dominant flower colors.
Slide olive leaves underneath the flowers until most gaps around the stem disappear.
Place vines last so they can fall naturally over the pumpkin ribs.
Photograph the arrangement before sewing.
Assembly
- Finish stuffing and shaping the plum pumpkin body before adding any decorative components.
- Sew the charcoal stem securely into the reinforced top center and confirm that its curve remains stable.
- Attach the sunflower slightly left of the stem, stitching through its brown center rather than only through the petals.
- Sew the largest rust rose to the right side and position the remaining rose or roses behind it.
- Add the cream daisies between the large flowers, leaving their outer petals free from the pumpkin surface.
- Slide large olive leaves underneath the flowers and sew only the lower 1–2 cm of each leaf.
- Add smaller dark-green leaves, cream berry flowers and green buds to fill visible gaps around the stem.
- Attach the curly vines beneath the floral crown and allow their spirals to extend over selected pumpkin ribs.
- Inspect the arrangement from every side and reinforce any flower that moves more than approximately 5 mm at its attachment point.
- Weave all remaining tails into matching colors and check that the finished pumpkin stands flat without the floral crown pulling it toward one side.
The finished centerpiece should have a broad ribbed body, a substantial curved stem and a low floral arrangement that spreads horizontally around the stem base.
How to Keep the Pumpkin Round
Stuff evenly around the circumference before filling the center.
Rotate the pumpkin repeatedly while adding fiberfill.
If one section becomes flatter, place additional stuffing directly behind that rib.
Apply external shaping strands gradually. Tightening one strand fully before the others creates a narrow groove on one side and a shallow groove on the opposite side.
Making the Pumpkin Flatter
The photographed body is broad rather than tall.
After stuffing, press the top and bottom gently toward one another before tightening the shaping strands.
If making another pumpkin from the beginning, shorten the starting chain while retaining approximately the same body circumference.
A shorter vertical panel creates a flatter pumpkin after gathering.
Making a Smaller Version
Use worsted yarn with a 4–4.5 mm hook.
Start with approximately 41–45 chains instead of 57.
Work the body until the long edge reaches approximately 60–70 cm.
Reduce the sunflower, rose and leaf quantities by approximately one third.
Make the stem shorter so it remains proportional to the reduced body.
Making an Oversized Floor Pumpkin
Use bulky yarn with a 6–7 mm hook.
Increase the body chain until the vertical panel reaches the required height.
Continue rows until the long edge wraps around the planned stuffed circumference with slight compression.
Use additional shaping strands rather than trying to create extremely wide ribs.
An oversized floral crown also requires more leaves to hide the larger stem junction.
Alternative Autumn Color Palettes
- Deep plum + rust + mustard + olive — closest to the reference
- Burnt orange + cream + sage + brown — traditional fall palette
- Forest green + copper + ivory + mustard — woodland version
- Charcoal + burgundy + dusty rose + olive — darker botanical palette
- Cream + terracotta + sage + camel — neutral farmhouse version
- Navy + rust + gold + eucalyptus — high-contrast version
Keep the stem darker than the body or floral crown if you want its curved silhouette to remain visible behind the flowers.
7 Technical Tips for a Better Crochet Pumpkin Centerpiece
- Mark all 10–12 shaping lines before tightening any of them. Uneven spacing produces one oversized pumpkin section that remains visible even after the floral crown is attached.
- Keep surface-crochet ribs loose enough that the panel remains its original length. A rib that shortens the panel by more than approximately 5 mm can cause localized puckering after stuffing.
- Stuff the outer circumference before filling the center. Filling the middle first creates a hard core while the visible rib sections remain soft and partially collapsed.
- Attach large flowers through their dense centers. Sewing only through sunflower or rose petals allows the flower to rotate when the pumpkin is moved.
- Leave 20–30 cm tails on large leaves and flowers. Short tails do not provide enough yarn for repeated reinforcing passes through the thick stuffed body.
- Keep the stem attachment at least 2–3 cm wide on a pumpkin of this scale. A narrow attachment point allows the tall curved stem to wobble under its own weight.
- Check the pumpkin’s balance before permanently attaching vines. A heavy floral cluster shifted several centimeters to one side can make a lightweight stuffed pumpkin lean on a smooth display tray.
Preventing Gaps Between the Flowers
Begin with leaves, not extra flowers.
Large olive leaves cover more surface without making the crown excessively heavy.
Use smaller dark-green leaves between the larger foliage.
Add cream berry flowers only after the green foundation has been established.
When viewed from the front, very little of the pumpkin’s top closure should remain visible beneath the arrangement.
Keeping the Flower Crown Secure
A decorative pumpkin is frequently moved by its body, which places repeated vibration on the top arrangement.
Pass attachment yarn through several body stitches rather than a single loop.
For the sunflower and largest roses, make at least three independent attachment points.
Leaves need less reinforcement because they carry little weight.
Do not use the curved stem as a carrying handle.
Finishing the Large Crochet Pumpkin
Place the pumpkin on a flat surface and inspect every rib from the front. Adjust any shaping strand that creates a noticeably deeper groove than its neighbors.
Next, inspect the flower crown from above. The sunflower and rust roses should remain the largest elements, while cream daisies and buds fill the intermediate spaces. Olive leaves should extend beyond the flowers at several points to maintain the botanical outline.
Check the curved stem last. Its base must remain stable even when the upper curve is touched lightly.
Trim no yarn tail until every decorative element has passed this inspection.
Care and Storage
Follow the care instructions supplied with the selected yarn. Because this centerpiece combines stuffing, multiple yarn weights and a structured stem, spot cleaning is generally more practical than frequent full washing.
Support the pumpkin from underneath when moving it.
Store it without placing heavy objects on the floral crown or curved stem.
If the leaves flatten during storage, reshape them by hand or re-block them according to the fiber’s care requirements.
Using the Pumpkin as Fall and Halloween Décor
The deep plum body works with both autumn and Halloween arrangements without relying on a conventional orange pumpkin. Place the centerpiece on a broad tray so the vines can extend beyond the body without being crushed.
Lanterns, flameless candles, pinecones and neutral ceramics can surround the piece while leaving the floral crown visible.
Keep yarn, fiberfill and decorative foliage away from open flames, candle wicks and other direct heat sources.
Conclusion
Build the pumpkin body before making the floral crown so every later component can be scaled to the actual stuffed diameter. Form the ribs gradually, anchor the curved charcoal stem through the reinforced top, then arrange the sunflower, rust roses and cream daisies over a foundation of olive foliage. Curly vines should be attached last because their placement depends on the finished flower balance. The next practical step is to crochet and measure the plum body panel before purchasing the full amount of decorative yarn. Save this large crochet pumpkin pattern to Pinterest and share the finished centerpiece on Instagram with #PlumFloralCrochetPumpkin. Would you keep the sunflower as the dominant flower or replace it with a second large rust rose?









