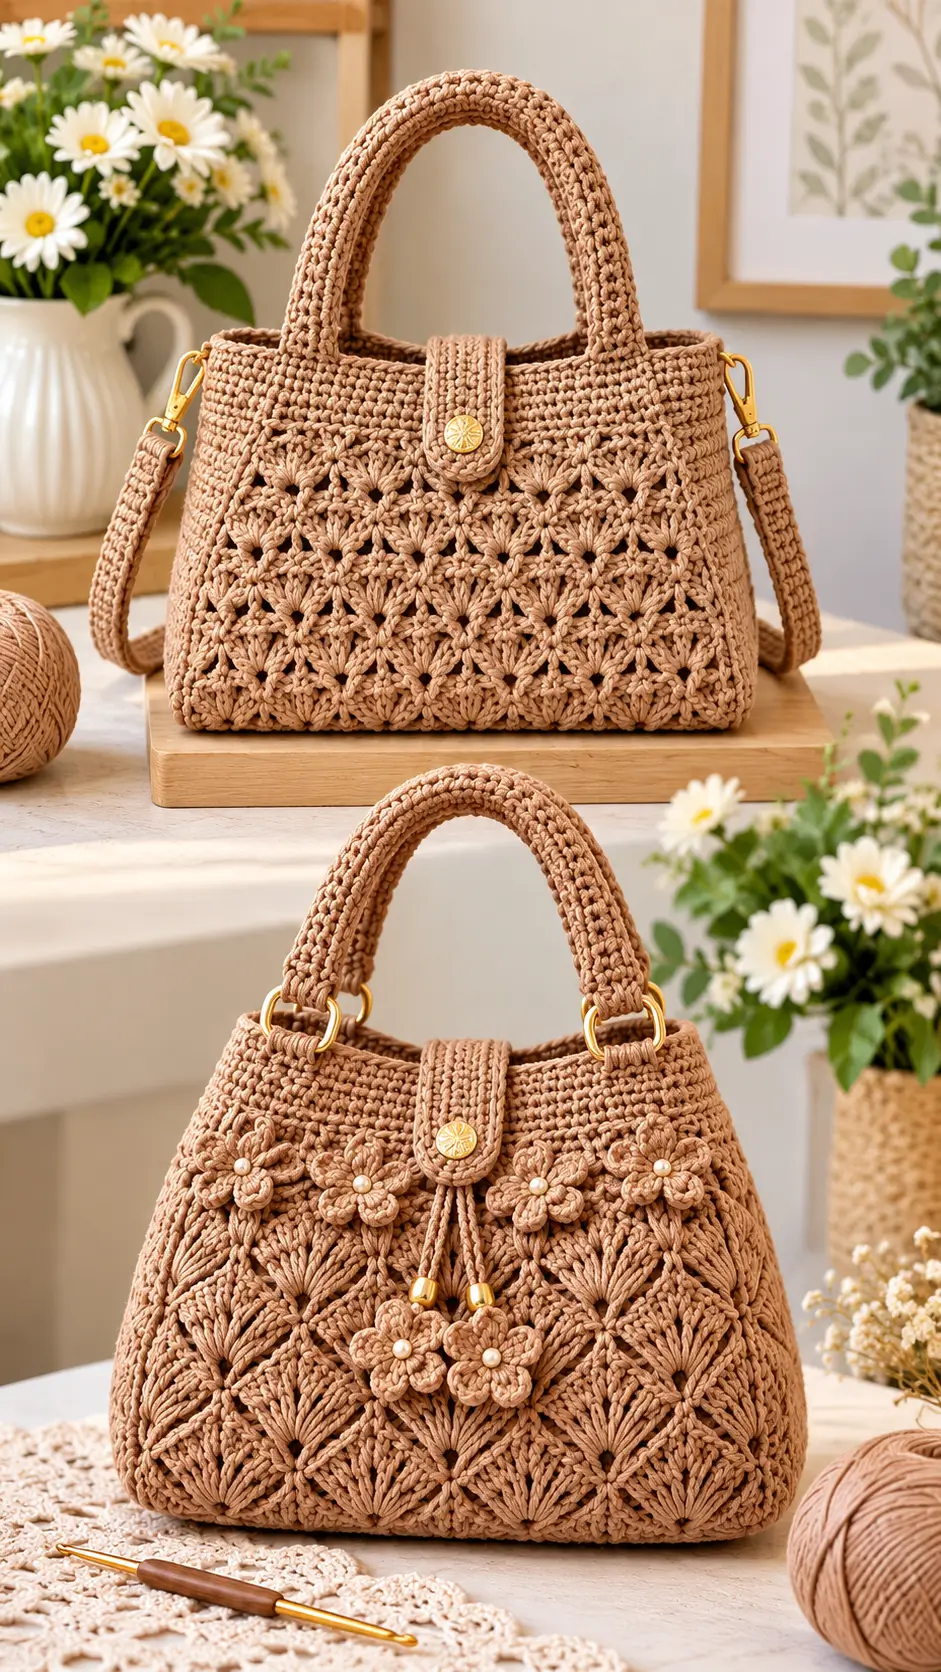
A raffia handbag fails visually when its openwork front stretches farther than its solid top band. This raffia crochet handbag pattern controls that problem with a firm rectangular base, an 88-stitch body, a dense upper section and reinforced handles. Use roughly 300–360 g of raffia with a 3.5 mm hook for a bag near 30 × 23 × 9 cm. The project suits intermediate crochet skills and produces a practical everyday handbag.
The Design: What Makes This Raffia Handbag Different
Three structural decisions define this version. First, the bottom remains dense rather than repeating the decorative stitch underneath the bag; that gives keys, a phone and other contents a flatter support surface. Second, the openwork fan section terminates below a band of single crochet. That band resists sideways distortion and provides a stable attachment zone for the handles.
The third decision is proportion. A crochet raffia bag with tall handles needs sufficient upper-body stiffness or the rim pulls upward at four attachment points. Here the handles are eight stitches wide and attached across reinforced sections.
A frequent mistake in a textured crochet bag is changing hook tension only during the decorative rounds. The resulting panel narrows or flares even when its stitch count remains correct. Maintain the same working tension through both dense and open sections.
Project Info at a Glance
| Skill Level | Time | Finished Size | Hook | Best For |
|---|---|---|---|---|
| Intermediate | 10–14 hours estimated | Approx. 30 × 23 × 9 cm | 3.5 mm | Structured everyday handbag |
The target dimensions are design measurements for the photo-inspired project. A comparable raffia shopper measures approximately 30 × 47 × 20 cm and uses a 3.5 mm crochet hook.
Materials and Tools
Yarn
- Camel/tan raffia yarn — worsted-style raffia — 300–360 g working allowance.
- Camel/tan raffia for flowers — same yarn — 15–25 g optional allowance.
- Cream crochet thread or pearl-style beads — optional, for the flower centers.
Choose a smooth paper, rayon or cellulose raffia intended for crochet bags. Yarn consumption changes with stitch tension, raffia thickness and the final handle length.
Tools
- 3.5 mm crochet hook
- Tapestry needle
- Locking stitch markers
- Scissors
- Measuring tape
- Removable pins or clips
- Magnetic snap or decorative button
- Optional gold-tone D-rings
- Optional swivel clips
- Optional pearl-style beads
Abbreviations
- MR — magic ring
- sc — single crochet
- inc — increase
- dec — decrease
- sl st — slip stitch
- ch — chain
- dc — double crochet
- tr — treble crochet
- BLO — back loop only
- sp — space
- st/sts — stitch/stitches
- RS — right side
An invisible decrease is primarily an amigurumi technique. For this handbag, shaping is controlled through the rectangular base, stitch placement and decorative repeats rather than stuffed-form decreases.
Raffia Crochet Handbag Pattern — Step by Step
This handbag is worked from a flat rectangular base upward. The decorative fan section is followed by a dense upper band that supports the handles, closure and optional shoulder-strap hardware.
Rectangular Base
Yarn: camel/tan raffia.
Ch 35.
Row 1: sc in second ch from hook and each ch across (34).
Rows 2–14: ch 1, turn, sc across (34).
The base should measure approximately 22–24 cm long and 8–9 cm deep. If your measurements differ substantially, adjust the gauge before building the side walls.
Do not fasten off.
Body Setup
Work around the complete perimeter of the rectangular base.
Round 1: 34 sc across first long edge, 10 sc across short edge, 34 sc across opposite long edge, 10 sc across remaining short edge (88).
Place a locking stitch marker before the first stitch.
Rounds 2–4: sc around (88).
These rounds form a dense lower frame beneath the decorative fan panel.
Textured Fan Body
Yarn: camel/tan raffia.
The decorative section uses four-stitch repeats across the 88-stitch body.
Round 5: *sc in next st, ch 3, skip 3 sts* ×22.
Round 6: sl st to first ch-3 sp, ch 1, *5 dc in ch-3 sp, sc in next sc* ×22.
Round 7: ch 4, *sc in center dc of next fan, ch 3, continue to next fan center* around; join with sl st.
Round 8: *5 dc in each ch-3 sp, sc in corresponding anchor point* around.
Rounds 9–16: repeat Rounds 5–8 twice.
Check the handbag width after Round 12. Raffia can hold an expanded fan more aggressively than soft yarn. The decorative panel should remain close to the width of the base rather than producing a pronounced flare.
Solid Upper Band
Round 17: work 88 sc evenly around, placing stitches into the fan tops and spaces as required (88).
Rounds 18–25: sc around (88).
Round 26: BLO sc around (88).
Rounds 27–29: sc around (88).
Fasten off and weave the yarn tail through at least 5 cm of dense crochet.
This solid section creates the structural area required for the handles, center closure and optional D-rings.
Main Handles — Make 2
Yarn: camel/tan raffia.
Ch 9.
Row 1: sc in second ch from hook and across (8).
Rows 2–70: ch 1, turn, sc across (8).
Measure each handle before fastening off. Aim for approximately 38–42 cm in total strip length, depending on the desired handle drop.
Fasten off, leaving a 35 cm sewing tail.
For the rounded appearance visible in the reference handbag, fold the long edges slightly toward the underside during assembly. Another option is to crochet two matching strips for each handle and seam the layers together. A double-layer handle stretches less when the bag carries weight.
Closure Tab
Yarn: camel/tan raffia.
Ch 9.
Row 1: sc in second ch from hook and across (8).
Rows 2–15: ch 1, turn, sc across (8).
Row 16: sc2tog, 4 sc, sc2tog (6).
Row 17: sc2tog, 2 sc, sc2tog (4).
Row 18: 4 sc.
Fasten off, leaving a 25 cm tail.
Fit the magnetic closure or button before permanently attaching the tab. The finished tab should cross the opening without pulling the back edge toward the front.
Side D-Ring Tabs — Make 2
Ch 7.
Row 1: sc in second ch from hook and across (6).
Rows 2–10: ch 1, turn, sc across (6).
Fasten off with a 25 cm tail.
Pass each tab through a D-ring, fold it in half and sew both ends firmly to the side of the solid upper band.
Optional Shoulder Strap
Yarn: camel/tan raffia.
Ch 7.
Row 1: sc in second ch from hook and across (6).
Rows 2–160: ch 1, turn, sc across (6).
Measure the strap before fastening off. Approximately 95–115 cm works as a starting range for a longer shoulder or crossbody-style strap, but the required measurement depends on the wearer and hardware.
Fasten off with a 30 cm tail and attach the swivel clips.
Flower Appliqués — Make 5 for the Floral Version
Yarn: camel/tan raffia.
Round 1: 6 sc in MR (6).
Round 2: *(sl st, ch 2, 3 dc, ch 2, sl st) in next st* ×6.
Fasten off, leaving a 15 cm sewing tail.
This construction produces six petals. To create five-petal flowers, begin with 5 sc in the magic ring and work one petal into each stitch.
Add a pearl-style bead or tightly crocheted cream center after attaching each flower to the handbag.
Optional Flower Cords — Make 2
Ch approximately 35–45, depending on the required drop.
Sl st back through every chain.
Fasten off and attach the cords underneath the center closure tab. A small bead or crocheted flower can be fitted to each free end.
Optional Fabric Lining
Cut two fabric rectangles approximately 1.5 cm larger than the handbag interior along each seam edge.
Sew the sides and bottom together. Fold the upper seam allowance toward the wrong side, position the lining inside the handbag and hand-sew it below the crochet rim.
Avoid stitching through the visible outer loops of the upper band. Catch the internal crochet bars so the lining stitches remain less visible from the outside.
Assembly
- Shape the rectangular base and check that all four corners sit evenly before attaching any hardware.
- Center the first handle on the front upper band and mark both attachment positions.
- Position the second handle directly opposite the first so the four handle ends align symmetrically.
- Sew each handle through several rows of the solid band rather than attaching it to only one crochet round.
- Center the closure tab on the back rim and sew approximately 3–4 cm of its base to the dense upper section.
- Fit the magnetic snap or decorative button after checking where the closed tab naturally reaches the front panel.
- Attach the D-ring tabs at the side seams and position both rings at exactly the same height.
- Add the optional shoulder strap and check that neither clip twists its D-ring tab.
- Sew optional flowers onto the decorative panel by securing their centers and selected petal bases.
- Install the lining, weave remaining raffia tails through dense crochet sections and trim the ends only after testing each attachment.
The completed handbag should have a flat base, symmetrical handles and an upper edge that maintains approximately the same width when the bag is lifted.
7 Technical Tips for a Structured Raffia Crochet Bag
- Prevent stitch-marker drift: place a locking marker in the first stitch of every solid round. Losing one stitch per round would reduce an 88-stitch circumference to 80 stitches after eight rounds.
- Correct a soft base: a base that folds sharply under its own weight needs tighter tension or added reinforcement. Aim for approximately 8–9 cm of base depth before starting the walls.
- Avoid unnecessary decrease ridges: do not add random decreases to correct an oversized decorative panel. Correct the gauge or fan repeat instead.
- Prevent crooked handles: mark all four handle ends before permanently sewing the first one. A difference of only 1–2 stitches between attachment positions can make the front panel appear asymmetrical.
- Control raffia tension: stop and check the pattern if the fan section becomes more than approximately 2 cm wider than the solid upper band. Excess width commonly indicates looser decorative stitches.
- Pin before sewing: position the closure, both handles and both D-ring tabs at the same time. This makes alignment problems visible before the components are permanently attached.
- Prevent tail slippage: weave structural raffia tails through at least 5 cm of dense crochet and reverse direction once. Short straight tails can migrate toward the surface during use.
Finishing the Raffia Crochet Handbag
Measure the completed base and upper rim before permanently attaching the handles. Those two measurements control most of the final silhouette. If the body stays square and the 88-stitch rim remains stable, attach the handles, closure and optional hardware before adding the decorative flowers.
The next practical step is to crochet a small raffia gauge sample with the 3.5 mm hook and compare its stiffness with the intended bag structure. Save this raffia crochet handbag pattern to Pinterest or share the finished handbag on Instagram with #RaffiaFanHandbag.
For this specific handbag, would you keep the fan panel undecorated like the upper version or add the raised crochet flowers shown on the lower version?









