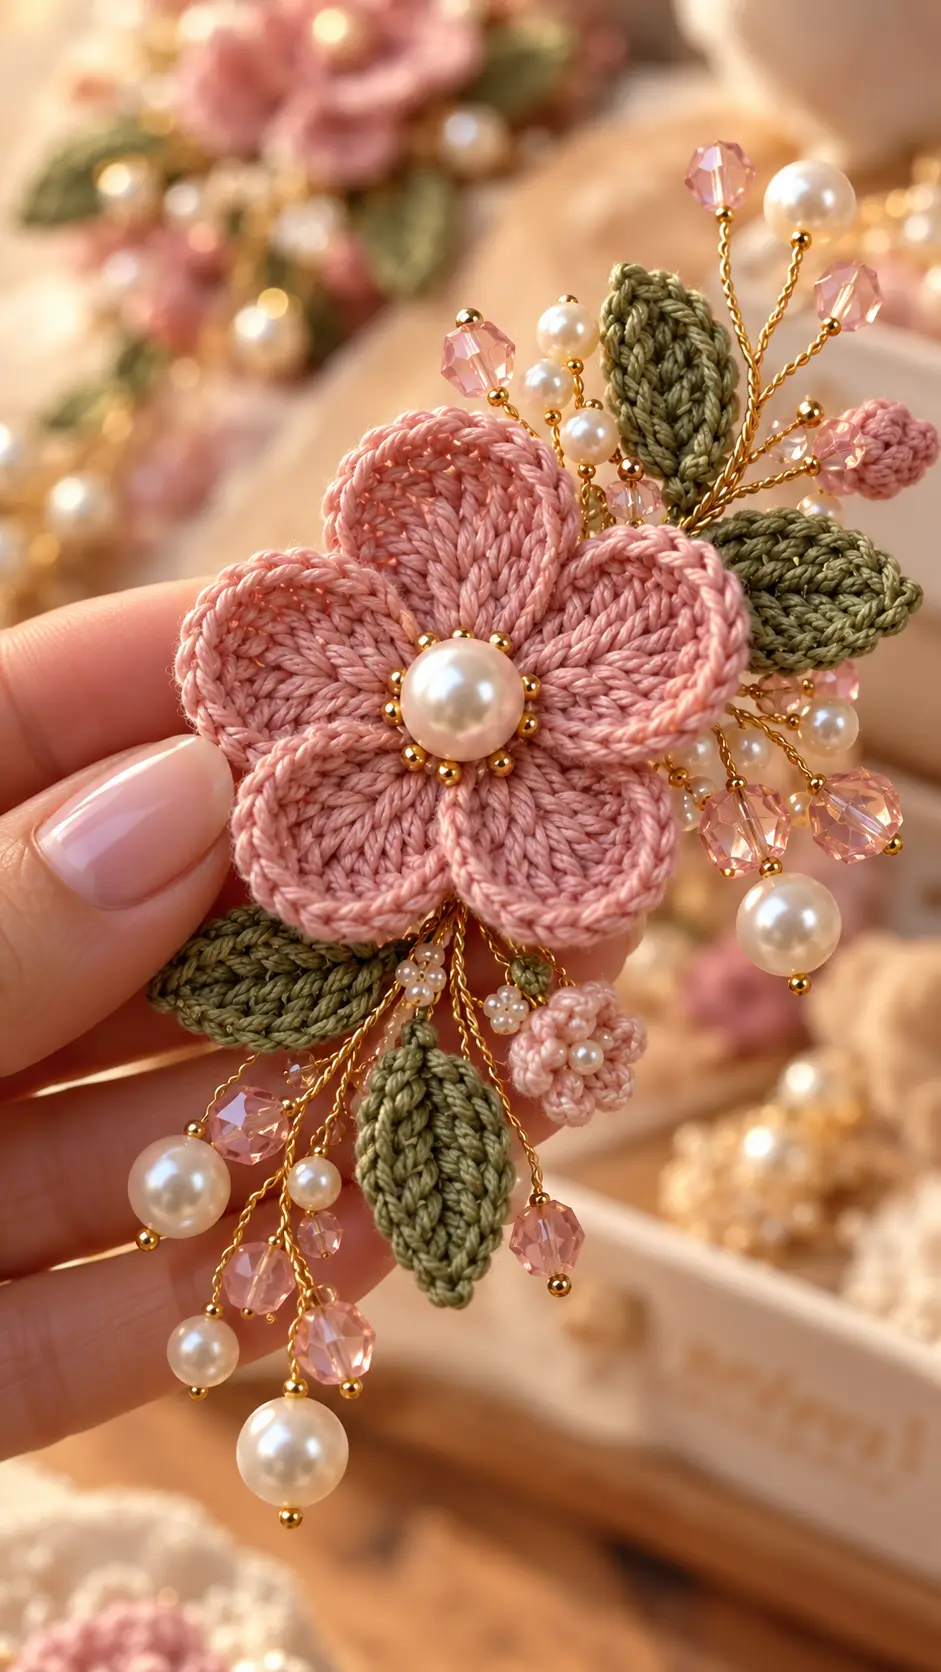
Five broad pink petals have to leave enough room for a pearl center without hiding the flower’s radial stitch lines. This crochet flower brooch pattern recreates the photographed accessory with a blush five-petal flower, olive leaves, miniature buds, pearls, pink crystal-style beads and gold-tone wire sprays. Use DK cotton with a 2.5–3 mm hook for a firm jewelry-scale motif approximately 7–10 cm across after decoration.
The Design: What Makes This Crochet Flower Brooch Different
The main flower is deliberately flatter than an amigurumi blossom. Five individually defined petals radiate from one compact center, allowing the large pearl to sit directly over the joining point without creating excessive thickness.
The second structural element is the foliage. Narrow olive leaves extend behind the flower rather than beside it, which gives the finished crochet floral brooch an elongated botanical outline. Small pink buds repeat the flower color without competing with the main blossom.
Finally, bead sprays fill the spaces between the crochet pieces. The photograph combines pearl beads, translucent pink faceted beads and fine gold-tone wire. A frequent construction mistake is attaching heavy beads directly to petal edges. Concentrate their weight around the reinforced flower center and brooch backing instead.
Project Info at a Glance
| Skill Level | Time | Finished Size | Hook | Best For |
|---|---|---|---|---|
| Intermediate | 2–4 hours | Approx. 7–10 cm decorated | 2.5–3 mm | Brooches, hair accessories, corsages |
Published crochet flower brooch patterns use fine hooks around 2.5 mm with DK cotton or bamboo yarn. A separate Ravelry flower-brooch design uses a 3.25 mm hook and lists a finished circumference of approximately 12.5 cm. The smaller hook range used here is intended to keep the petals firm enough for jewelry construction.
Materials and Tools
Yarn
- Blush pink DK cotton — approximately 10–15 g
- Olive green DK cotton — approximately 5–10 g
- Optional darker olive cotton — small quantity for leaf definition
Smooth cotton, bamboo-cotton or tightly spun mercerized cotton works particularly well because the individual stitches remain visible at this scale. Published flower-brooch patterns also use DK bamboo-cotton and wool/silk yarns.
Jewelry Components
- 1 large pearl bead — approximately 10–12 mm for the flower center
- Small gold spacer beads — approximately 2–3 mm
- Pearl beads — approximately 4–10 mm in mixed sizes
- Pink faceted beads — approximately 5–8 mm
- Gold-tone jewelry wire — approximately 0.3–0.5 mm
- Brooch pin or bar pin — approximately 25–35 mm
- Strong sewing thread in a coordinating color
Tools
- 2.5–3 mm crochet hook
- Yarn needle
- Fine sewing needle
- Scissors
- Round-nose jewelry pliers
- Flat-nose pliers
- Wire cutters
- Stitch markers
Abbreviations
- MR — magic ring
- ch — chain
- sl st — slip stitch
- sc — single crochet
- hdc — half double crochet
- dc — double crochet
- tr — treble crochet
- st/sts — stitch/stitches
- sp — space
- rep — repeat
US crochet terminology is used throughout. Keep the stitches firm but flexible; loose petals tend to collapse when the pearl and bead sprays are attached.
Pattern Notes
This is a photo-inspired reconstruction. The photograph shows the finished accessory but does not reveal the original designer’s written stitch counts, exact yarn or jewelry assembly method.
The instructions below reproduce the visible components: one five-petal flower, several narrow leaves, small pink buds, a pearl center and branching bead sprays.
Make the crochet pieces first. Arrange them dry before cutting the decorative wire. Jewelry components should be attached only after the final flower orientation has been selected.
Crochet Flower Brooch Pattern – Main Flower
Flower Center
Yarn: blush pink
Make an MR.
Round 1: Ch 1, work 10 sc into MR. Pull the ring firmly closed. Join with sl st. (10)
Round 2: Ch 1, work 2 sc in each st around. Join with sl st. (20)
Do not fasten off.
The 20-stitch center divides evenly into five groups of four stitches. Each group supports one petal.
Five Pink Petals
Each petal is worked outward and back toward the center.
Petal 1
Working across the next 4 center stitches:
Row 1: Ch 1, sc in next 4 sts. Turn. (4)
Row 2: Ch 1, 2 sc in first st, sc in next 2 sts, 2 sc in final st. Turn. (6)
Row 3: Ch 1, sc across. Turn. (6)
Row 4: Ch 1, 2 sc in first st, sc in next 4 sts, 2 sc in final st. Turn. (8)
Row 5: Ch 1, sc across. Turn. (8)
Row 6: Ch 1, hdc in first st, dc in next 2 sts, 2 dc in each of next 2 sts, dc in next 2 sts, hdc in final st. Turn. (10)
Row 7: Ch 1, sc in first st, hdc in next st, dc in next 6 sts, hdc in next st, sc in final st. (10)
Do not fasten off yet.
Petal Edging
Work sc evenly down the first side of the petal.
Sl st into the flower center.
Work sc evenly up the opposite petal edge, around the rounded top and back down to the center.
Sl st into the next available center stitch.
The edging should form the raised cord-like outline visible around the photographed petals.
Petals 2–5
Repeat the Petal 1 instructions over each remaining group of four center stitches.
Keep all five petals approximately equal in width and length.
After Petal 5, join with sl st at the flower center.
Fasten off, leaving approximately 15 cm for securing the back.
Alternative Rounded Petal Top
If the final petal looks too pointed, modify Row 7.
Work:
sc, hdc, dc, 2 dc, 2 dc, 2 dc, 2 dc, dc, hdc, sc.
This concentrates additional height and width around the upper center.
Do not add several extra rounds to make the petal larger. Excess length causes the petals to fold beneath the bead arrangement.
Defining the Petal Ridges
The reference flower shows directional stitch lines running from the center toward the rounded tips.
To strengthen this effect, work one line of surface slip stitches from the base toward the center of each petal.
Use the same blush yarn.
Insert the hook from the front, pull up a loop and surface sl st along the central stitch column.
Stop approximately 5 mm before the outer petal edge.
Fasten off on the back.
Large Olive Crochet Leaves
The photograph contains several pointed oval leaves. Published leaf appliqués demonstrate several workable scales: DK cotton with a 3.5 mm hook can produce a leaf around 3 cm long, while other light-cotton constructions reach approximately 8 × 4 cm. For this brooch, use a smaller hook and adjust the foundation chain to target approximately 3.5–5 cm.
Leaf – Make 3 or 4
Yarn: olive green
Ch 12.
Starting in the second ch from hook:
Side 1: Sl st, sc, hdc, dc in next 5 ch, hdc, sc, sl st.
Ch 2 at the tip.
Rotate the work and crochet into the unused loops on the opposite side of the foundation chain.
Side 2: Sl st, sc, hdc, dc in next 5 sts, hdc, sc, sl st.
Join at the base.
Fasten off, leaving a 15 cm sewing tail.
Leaf Center Vein
Using the same olive yarn, surface sl st along the foundation chain from the leaf base toward the tip.
Stop one stitch before the point.
Fasten off.
This central ridge gives the leaf more structure and helps it remain visible behind the flower.
Smaller Olive Leaves
For smaller foliage, ch 9 instead of 12.
Beginning in the second chain, work:
sl st, sc, hdc, dc, dc, hdc, sc, sl st.
Ch 2 at the tip and repeat the same sequence along the opposite side.
Fasten off with a sewing tail.
Make one or two smaller leaves to fill spaces between the larger foliage and bead sprays.
Mini Pink Crochet Buds
The reference includes small rounded pink buds on the outer branches.
Bud – Make 2 or 3
Yarn: blush pink
Make an MR.
Round 1: 6 sc in MR. (6)
Round 2: 2 sc in each st around. (12)
Round 3: Sc in each st around. (12)
Round 4: Repeat (sc, sc2tog) around. (8)
Insert a tiny amount of yarn tail or fiberfill only if a rounded three-dimensional bud is required.
Round 5: Sc2tog around. (4)
Fasten off and close the remaining opening.
Leave approximately 15 cm for attachment.
Mini Open Flower Accent
The lower-right area of the reference also includes a miniature open pink flower.
Make an MR.
Round 1: Work 5 sc in MR. Join. (5)
For each petal work:
Ch 3, 2 dc in same st, ch 3, sl st in same st.
Repeat in all five stitches.
Fasten off.
Sew a 3–4 mm pearl bead into the center.
Large Pearl Flower Center
The central pearl is the visual anchor of the accessory.
Use a pearl approximately 10–12 mm for a main flower around 5–6 cm across.
Thread a strong sewing needle with doubled coordinating thread.
Pass through the center of the crochet flower from back to front.
Thread on the pearl.
Pass back through the crochet center.
Repeat the attachment at least twice through separate center stitches.
Knot securely on the back.
Gold Bead Ring Around the Pearl
Small gold beads surround the central pearl in the photograph.
Thread approximately 8–12 small 2–3 mm gold beads onto strong sewing thread.
Arrange them evenly around the pearl.
Take a small anchoring stitch between every one or two beads.
Do not attach this ring to the outer petals. Stitch it into the dense central crochet fabric.
Making the Pearl and Crystal Sprays
The bead branches are jewelry components rather than crochet stitches.
Cut several pieces of gold-tone wire approximately 8–15 cm long.
Thread one pearl or pink faceted bead onto a wire.
Position it approximately 1–2 cm from the wire end.
Fold the wire around the bead and twist the two wire sections together several times.
Continue twisting downward to create a narrow stem.
Make branches in several lengths so the beads do not form a rigid circle around the flower.
Suggested Bead Spray Mix
- 3–5 large pearl branches — approximately 8–10 mm pearls
- 5–8 small pearl branches — approximately 4–6 mm pearls
- 6–10 pink crystal branches — approximately 5–8 mm beads
- Several tiny gold bead tips — approximately 2–3 mm
These quantities are adjustable. The reference uses an asymmetrical arrangement, with taller branches extending above and to the right of the main flower and longer hanging elements below.
Creating Branched Wire Stems
Take two or three finished bead stems.
Hold their twisted wire bases together.
Position the bead tips at different heights.
Twist the lower wires together for approximately 2–3 cm.
Repeat to create several small sprays.
Keep the twisted ends behind the crochet pieces. No cut wire end should remain exposed at the outer edge of the brooch.
Preparing the Brooch Layout
Place the main flower face up on a flat surface.
Slide one large olive leaf behind the upper-right petal.
Add a second leaf horizontally behind the right side.
Place another leaf beneath the lower flower edge.
Add the remaining leaf toward the lower-left side.
Position one or two pink buds between the upper leaves.
Insert the tallest pearl and crystal spray behind the upper-right section.
Place shorter sprays around the sides.
Allow two or three longer bead branches to hang below the flower.
Photograph the arrangement before beginning permanent assembly.
Assembly
- Secure the large center pearl and its small gold bead ring to the dense center of the five-petal flower.
- Sew the upper olive leaf behind the flower, catching only its lower 1–1.5 cm so most of the leaf remains visible.
- Attach the remaining large and small leaves around the back, checking the front after every piece.
- Sew the miniature pink buds and open flower into the spaces between the leaves.
- Group the pearl and crystal wire branches into small sprays and twist their bases securely.
- Position the tallest sprays above and to one side of the flower rather than distributing them evenly around all five petals.
- Stitch or wire the spray bases firmly to the reinforced center area on the back.
- Trim excess wire with cutters and turn every cut end inward with flat-nose pliers.
- Sew the brooch pin horizontally across the reinforced back, keeping it close to the center of gravity.
- Cover the wire junctions with a small felt or tightly crocheted backing circle if required, then test that no sharp wire end or loose bead contacts the wearer.
The completed accessory should have one dominant five-petal flower, visible olive foliage, small pink accents and an asymmetrical halo of pearl and crystal branches.
Optional Crochet Backing Circle
A backing circle hides thread knots and provides a stronger surface for the brooch pin.
Use olive or blush yarn.
Round 1: 6 sc in MR. (6)
Round 2: 2 sc in each st. (12)
Round 3: Repeat (sc, inc) around. (18)
Round 4: Repeat (2 sc, inc) around. (24)
Fasten off with a long sewing tail.
Sew the circle over the central assembly area after the wire ends have been bent inward.
Attach the brooch pin through both the backing and several dense stitches of the main flower for additional stability.
Turning the Design into a Hair Clip
Replace the brooch pin with a metal alligator clip or barrette base.
Make a narrow crochet strip slightly shorter than the clip.
Sew the strip securely to the flower backing.
Slide the upper section of the clip beneath the strip and stitch around its mounting holes where available.
Keep wire sprays away from the moving hinge.
Turning the Design into a Corsage
Reduce the number of hanging bead branches and increase the number of leaves.
Add a second smaller crochet flower beside the main blossom.
Mount both flowers onto a felt or crochet backing approximately 6–8 cm long.
Use a suitable corsage attachment rather than relying on a small decorative brooch pin for a larger arrangement.
Adjusting the Flower Size
Small Flower
Use fine cotton thread with a 1.75–2 mm hook. Reduce each petal by one expansion row and use a center pearl around 6–8 mm.
Medium Brooch Flower
Use DK cotton with a 2.5–3 mm hook. Target a main flower approximately 5–6 cm across before foliage and beads.
Large Corsage Flower
Use DK or light-worsted cotton with a 3–3.5 mm hook. Add one plain row to each petal before the rounded top and use a larger backing.
Increasing hook size alone can make the fabric too loose to support jewelry components. Check petal firmness before committing to the larger scale.
Alternative Color Combinations
- Blush pink + olive + pearl — closest to the photographed design
- Ivory + sage + champagne beads — neutral botanical version
- Burgundy + forest green + cream pearls — darker floral arrangement
- Lavender + dusty green + clear crystals — cool-toned variation
- Peach + eucalyptus green + gold — warmer variation
- White + emerald + pearl — higher-contrast version
Keep the flower and bead colors related, but use enough contrast between petals and leaves to maintain a clear botanical silhouette.
7 Technical Tips for a Better Crochet Flower Brooch
- Measure all five petals before attaching the pearl. A petal more than approximately 5 mm longer than its opposite neighbors makes the center bead appear off-center.
- Use a 10–12 mm pearl only on a flower around 5–6 cm wide. An oversized center hides the inner petal shaping and concentrates too much weight in one location.
- Leave at least 15 cm sewing tails on every leaf. A short tail may secure the leaf initially but provides too little yarn for reinforcing the attachment point.
- Keep at least 5 mm between exposed wire ends and the outer backing edge. A cut end positioned at the perimeter can work through the crochet fabric during handling.
- Attach bead sprays to the center backing rather than petal tips. Weight placed on a flexible petal causes it to twist or sag away from the flower.
- Position the brooch pin within approximately 1 cm of the assembled center of gravity. A pin mounted too low allows the decorated top of the brooch to rotate forward when worn.
- Limit visible leaf attachment stitches to the lower 1–1.5 cm of each leaf. Sewing farther toward the tip flattens the foliage and removes the layered effect visible in the reference.
Keeping the Crochet Petals Firm
Use a hook slightly smaller than you would choose for a draping garment. The stitches should be compact enough to support the pearl without leaving large gaps around the center.
If the petal edges flare, reduce the number of increases in the widest row.
If a petal curls tightly inward, move up one hook size or add a stitch to the outer curve.
Block the flower before adding beads. Once the wire components are installed, wet blocking becomes considerably less practical.
Blocking the Flower and Leaves
Pin the flower center first.
Spread the five petals at approximately equal angles.
Shape each petal into a rounded teardrop, keeping the widest area toward the outer third.
Pin each olive leaf through its base and point.
Allow all crochet components to dry completely before jewelry assembly.
Do not wet-block the finished accessory unless every metal and bead component is known to tolerate the chosen washing method.
Securing Heavy Beads
Large pearl beads should pass through multiple dense center stitches rather than a single crochet loop.
Use doubled strong sewing thread or an appropriate jewelry thread.
After securing the bead, knot on the back and pass the thread through several neighboring stitches before trimming it.
Test the center pearl by moving it gently from side to side. Visible movement at its base indicates that another securing pass is required.
Finishing the Crochet Floral Brooch
Inspect the accessory from the front before covering the back. The five petals should remain visible, and no leaf should disappear entirely beneath the main flower.
Next, turn the brooch over and inspect every twisted wire junction. Bend trimmed ends inward and cover the central hardware with the backing circle.
Open and close the brooch pin several times. Its mechanism must move without catching yarn, sewing thread or decorative wire.
Finally, hold the accessory vertically. If the top rotates downward, move the pin upward or reduce the weight of the highest bead spray.
Conclusion
Make the five-petal flower and olive leaves before assembling any jewelry components, then block those crochet pieces to their final shape. Position the pearl center through reinforced stitches, arrange the leaves behind the petals and attach the bead sprays to the central backing rather than flexible edges. The next practical step is to crochet one DK cotton petal with a 2.5–3 mm hook and check its firmness before completing the flower. Save this crochet flower brooch pattern to Pinterest and share the finished accessory on Instagram with #PearlCrochetFlowerBrooch. Would you place the longest pearl spray above the flower or let it hang below the lower leaves?









