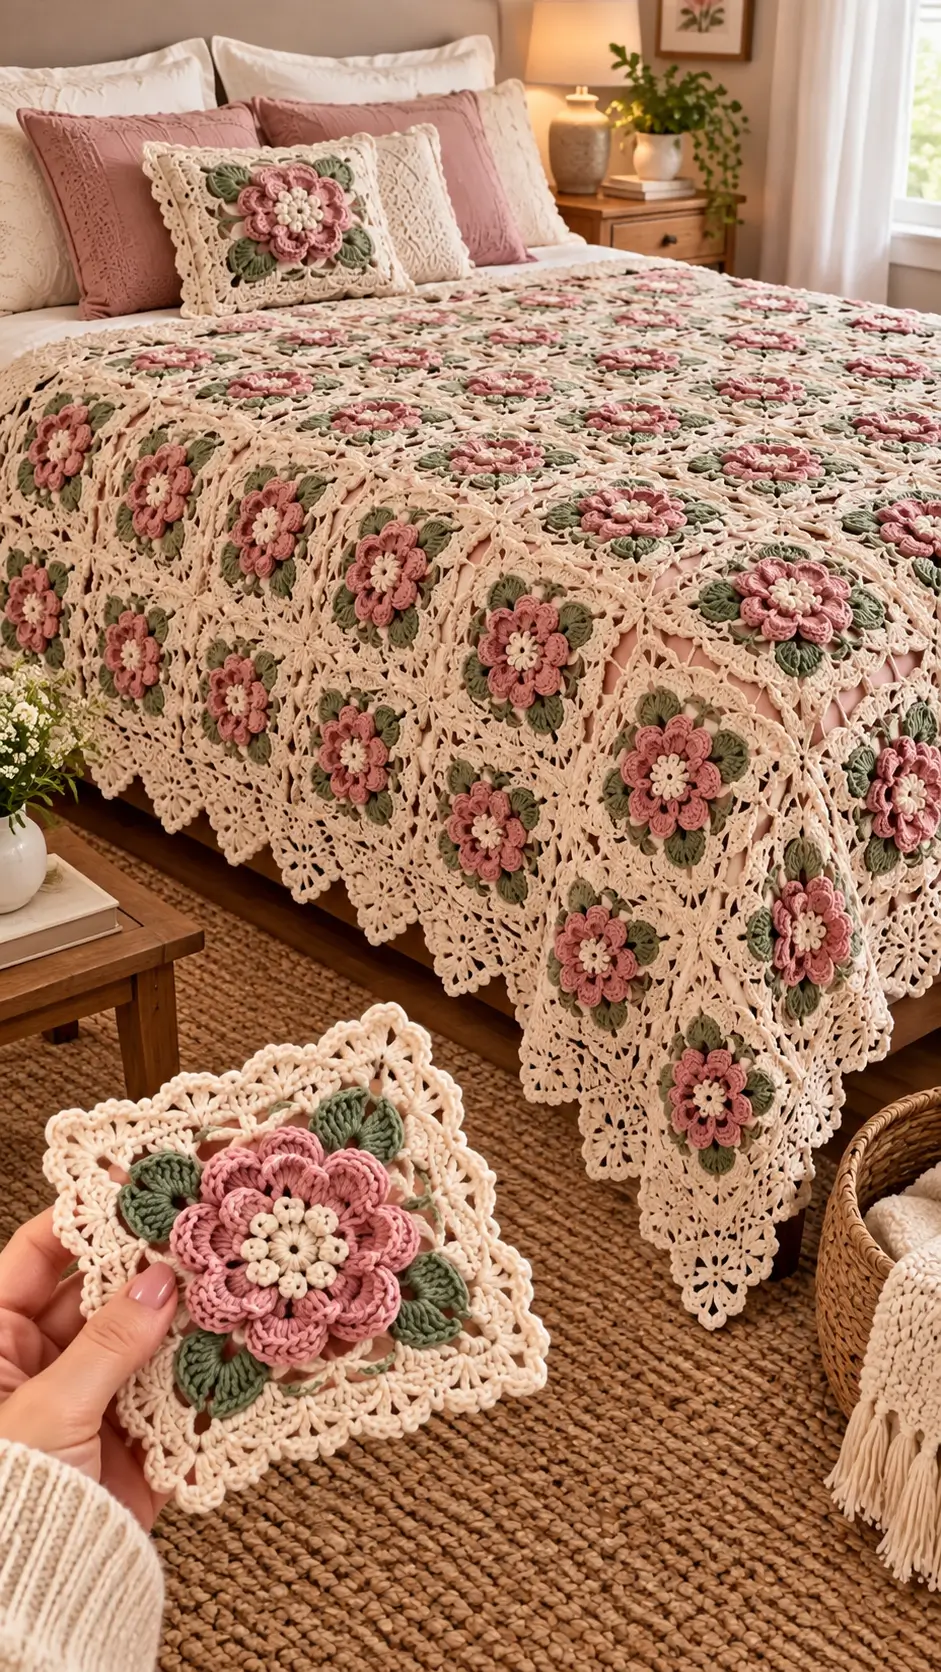
A raised pink flower sits at the center of every square in this floral crochet bedspread, while olive-green leaves frame the petals against an open cream background. This 3D flower granny square blanket uses layered petals, lacy square edges, floral joins and a scalloped outer border. The photographed design is best treated as a photo-inspired reconstruction rather than an exact reproduction of a published pattern.
The Design: What Makes This Floral Blanket Different
The defining feature is the combination of a dimensional flower with a highly open granny-square background. The pink petals are built in layers so the flower remains visually separate from the cream square. Green leaves occupy the four diagonal areas around the flower, giving every block a consistent botanical orientation.
The second structural decision is the openwork square itself. Instead of filling the area between flowers with dense stitches, the cream yarn forms a lace-like framework. When the squares are joined, those open spaces create a continuous decorative mesh across the blanket.
The third decision is the scalloped perimeter. The individual squares retain their floral identity at the blanket edge, while additional cream lace extends downward into repeated pointed sections.
A common mistake with a 3D flower granny square pattern is making the flower too large for the square. The petals then overlap the joining areas and interfere with blocking. Keep the raised flower centered and leave a consistent cream margin around it.
Project Info at a Glance
| Skill Level | Time | Finished Size | Hook | Best For |
|---|---|---|---|---|
| Intermediate | Multi-session project | Scalable; approximately 9–15 cm per motif depending on yarn and tension | 3.5–5 mm | Bedspreads, throws and decorative blankets |
Published flower-square patterns vary substantially in size. One documented 3D rose tutorial produces a 9 × 9 cm square, while another 3D flower design using worsted yarn and a 5 mm hook produces approximately 14 cm. A separate published flower granny square measures 12 inches using Aran yarn and a 5 mm hook. The photograph itself cannot provide an exact finished measurement, so use the gauge that matches your chosen yarn rather than treating the image as a measurement reference.
Materials and Tools
Yarn
- Warm cream — DK or light-worsted — main square and lace background
- Dusty rose pink — DK or light-worsted — main flower petals
- Soft blush pink — DK — secondary petal layer
- Warm ivory — DK — flower center
- Muted sage green — DK — leaves
For the closest visual effect, use the same yarn thickness throughout the motif. A published Ravelry flower-square example uses DK yarn with a 4.5 mm hook, while other documented flower squares use worsted or Aran yarn with 5–6 mm hooks. Hook size should therefore be selected from the yarn and the target square measurement rather than copied blindly from another pattern.
Tools
- 3.5–5 mm crochet hook, selected according to yarn weight and tension
- Tapestry needle
- Sharp scissors
- Locking stitch markers
- Blocking mat
- Blocking pins
- Measuring tape
Abbreviations
- MR — magic ring
- ch — chain
- sc — single crochet
- hdc — half double crochet
- dc — double crochet
- tr — treble crochet
- sl st — slip stitch
- st — stitch
- sp — space
- FLO — front loop only
- BLO — back loop only
- RS — right side
Invisible decrease is not required for this flat granny-square construction; decreases are used only where the lace shaping calls for them.
Pattern — Step by Step
Make one complete sample square before producing the remaining motifs. The flower, leaves and outer lace need to fit inside a repeatable square measurement. Once the sample is blocked, use it as the physical template for every subsequent block.
Flower Center — Make 1 Per Square
Yarn: warm ivory.
R1: Make a MR. Work 8 sc into the ring. Join with sl st. (8)
R2: Ch 1. Work 2 sc in each stitch around. Join. (16)
R3: Ch 1. Work 1 sc in each stitch around. Join. (16)
Keep this center compact. A loose center will enlarge the flower before the petals are added.
Fasten off and leave a 15 cm tail.
Inner Pink Petals — Make 8
Yarn: dusty rose pink.
Join pink yarn to a front loop of the center.
R1: In the selected FLO work (sl st, ch 2, 2 hdc, ch 2, sl st). Repeat in every second available front loop around. Eight petals.
R2: Move behind the first petal layer. Work a loose anchor chain behind each petal so that a second set of eight petal spaces is formed.
R3: In each rear loop work (sc, hdc, 3 dc, hdc, sc).
The second petal layer should sit behind the center petals rather than directly on top of them.
Fasten off. Leave a 20 cm tail.
Outer Pink Petals — Make 8
Yarn: soft blush pink or a second shade of rose.
Work into the remaining rear loops behind the previous petal layer.
R1: Create eight evenly spaced loops using ch 5 and a sc anchor.
R2: In each loop work (sc, hdc, 3 dc, 2 tr, 3 dc, hdc, sc).
Spread each outer petal with the hook or tapestry needle before the flower is attached to the square.
Fasten off. Leave a 25 cm tail.
Green Leaves — Make 4 Per Square
Yarn: muted sage green.
Ch 9.
R1: Starting in the second chain from hook, work sl st, sc, hdc, dc, dc, hdc, sc, sl st. Work 3 sc into the final chain and rotate the foundation chain.
Work back along the opposite side with sc, hdc, dc, dc, hdc, sc, sl st.
Fasten off. Leave a 15 cm tail.
Make four leaves for the basic motif. Position one leaf group in each diagonal area surrounding the flower.
Leaf Veins — Make 4 Per Square
Yarn: darker sage green or the same green.
Insert the hook at the base of a leaf and work a loose line of sl sts toward the tip.
Do not pull the stitches tight. The central line should slightly curve the leaf without folding it.
Fasten off and weave the short tail into the back of the leaf.
Cream Square Framework
Yarn: warm cream.
The reference design uses an open square structure surrounding the flower. The following reconstruction keeps the same visual principle while allowing the motif to be resized.
Attach cream yarn behind the completed flower.
R1: Ch 4, skip the next petal section, sc into the following gap. Repeat around the flower to create eight open spaces.
R2: In each ch-4 space work (3 dc, ch 2, 3 dc). Place a single 3-dc group between corner sections.
R3: Work 3 dc into each side space. In each corner space work (3 dc, ch 2, 3 dc).
R4: Repeat the granny-square expansion. Work 3 dc into each side space and (3 dc, ch 2, 3 dc) in every corner.
R5: Continue the same structure until the square reaches the target size.
For a smaller motif, stop after R4. For a larger bedspread motif, add additional granny rounds before the decorative border.
Fasten off. Leave a 15 cm tail.
Openwork Square Border
Yarn: warm cream.
R1: Attach yarn to a corner. Ch 1, sc around the square. Work 3 sc in each corner.
R2: Ch 3, 2 dc in the same corner area, ch 1. Work 3 dc in each side space, separated by ch 1. At each corner work (3 dc, ch 2, 3 dc).
R3: Ch 3, 2 dc in the first space. Work 3 dc in each following space. At each corner work (3 dc, ch 2, 3 dc).
R4: Ch 1, sc into each stitch or space around. Work 3 sc in each corner.
This creates a firmer outer edge while retaining the open appearance of the reference blanket.
Scalloped Joining Edge
Yarn: warm cream.
Place two finished squares side by side with their right sides facing upward.
Join cream yarn at one corner.
Joining Row: Ch 1, sc through corresponding edge stitches of both squares. Skip every second edge space where needed to prevent puckering.
Continue to the opposite corner.
Repeat until the complete row of squares is joined.
Join the horizontal rows first, then connect the rows vertically. The resulting cream seams form the open lattice visible between the flowers.
Blanket Border
Yarn: warm cream.
Work one stabilizing round of sc around the entire blanket.
Corner: Work 3 sc in the corner space.
Side: Place stitches evenly so the border remains flat.
Do not increase heavily around the perimeter. The photographed blanket has a decorative drop rather than a heavily ruffled edge.
Pointed Floral Lace Edge
Yarn: warm cream.
R1: Ch 5, skip 3 stitches, sc in the next stitch. Repeat around.
R2: Sl st into the first ch-5 space. Ch 3, 4 dc in the same space, sc in the next space. Repeat around.
R3: Ch 5, sc into the center of the next shell. Repeat around.
R4: In each ch-5 space work (sc, ch 3, 2 dc, ch 3, sc).
R5: Ch 4, sc into the next decorative space. Repeat around.
R6: Work 5 dc into each ch-4 space.
At selected intervals, extend the lace into a deeper point by adding one additional shell repeat. This creates the triangular hanging sections visible along the lower edge of the reference blanket.
Fasten off and weave in all tails.
Outer Scallops
Yarn: warm cream.
Work along the final border spaces.
R1: Sc in the first space, skip 2 stitches, 7 dc in the next space, skip 2 stitches. Repeat.
R2: Sc into the center dc of each shell. At the points of the border, work an additional ch-2 space before beginning the next shell.
Keep the scallops evenly distributed along the edge. The lower edge should hang vertically rather than curl inward.
Final Blocking
Lay the completed blanket flat on a clean blocking surface.
Measure several squares across the center and along the edge. If the central squares have different dimensions, gently pin the blanket until the grid is aligned.
Allow the piece to dry completely before folding or placing it on the bed.
Assembly
- Make one complete flower motif and one complete square before producing the full set.
- Block the test square and record its finished width and height.
- Make the required number of pink flowers, keeping the petal layers consistent.
- Make four green leaves for every square and keep the leaf orientation identical.
- Attach the flowers to the center of the cream framework before joining the squares.
- Place the leaves diagonally around each flower and sew through their central veins.
- Complete the open cream border around every square.
- Join the squares into horizontal rows using the cream joining method.
- Join the horizontal rows vertically and check the blanket for rippling before adding the outer edge.
- Work the cream perimeter, pointed lace sections and scalloped finishing edge.
The finished blanket should have a consistent floral grid, raised pink flowers, four green leaves per motif and an open cream lace perimeter.
7 Technical Tips
- Flower size: Keep the completed flower at least 1–2 cm inside the square’s outer edge. Petals touching the joining line can become caught during assembly.
- Petal tension: Loose petal chains create oversized loops while tight chains flatten the flower. Compare the first finished flower with the second before producing the entire batch.
- Center placement: Mark the horizontal and vertical center of every square before attaching the flower. A 5–10 mm shift becomes obvious once several motifs are joined.
- Leaf direction: Point each leaf toward a diagonal corner rather than toward the side edge. Consistent rotation makes the blanket read as one continuous floral pattern.
- Openwork tension: If the cream lattice pulls inward, increase hook size by 0.5 mm or loosen the working tension. If it waves outward, reduce the number of joining increases.
- Joining alignment: Compare the first five joined squares against a ruler before continuing. A single uneven joining edge can shift an entire blanket row.
- Border depth: Measure the lace drop at several points along the edge. Keeping the pointed sections within approximately 8–12 cm of one another prevents an uneven blanket hem.
Finishing the Floral Crochet Bedspread
The visual structure of this 3D flower granny square blanket depends on repetition rather than complicated color changes. The dusty rose flowers need consistent petal proportions, the sage leaves need consistent placement and the cream lace needs enough open space to remain visible between motifs.
Make one complete sample first and record its blocked dimensions. That measurement determines the number of squares needed for a throw, twin bed, full bed or larger cover. Published flower granny-square designs demonstrate how widely motif dimensions can vary with yarn and hook choice, so the sample square should control the final calculations rather than an assumed measurement from the photograph.
For a closer match to the reference, keep the palette limited to cream, dusty rose, blush, ivory and muted sage. Work the outer border in cream so the floral squares remain the dominant feature. Finish by blocking the entire blanket and checking the hanging edge for consistent points.
Share the finished floral blanket on Pinterest and Instagram with #3DFlowerGrannySquareBlanket. Which arrangement would you use for the flowers: four leaves at the diagonal corners or a fuller six-leaf botanical motif?









