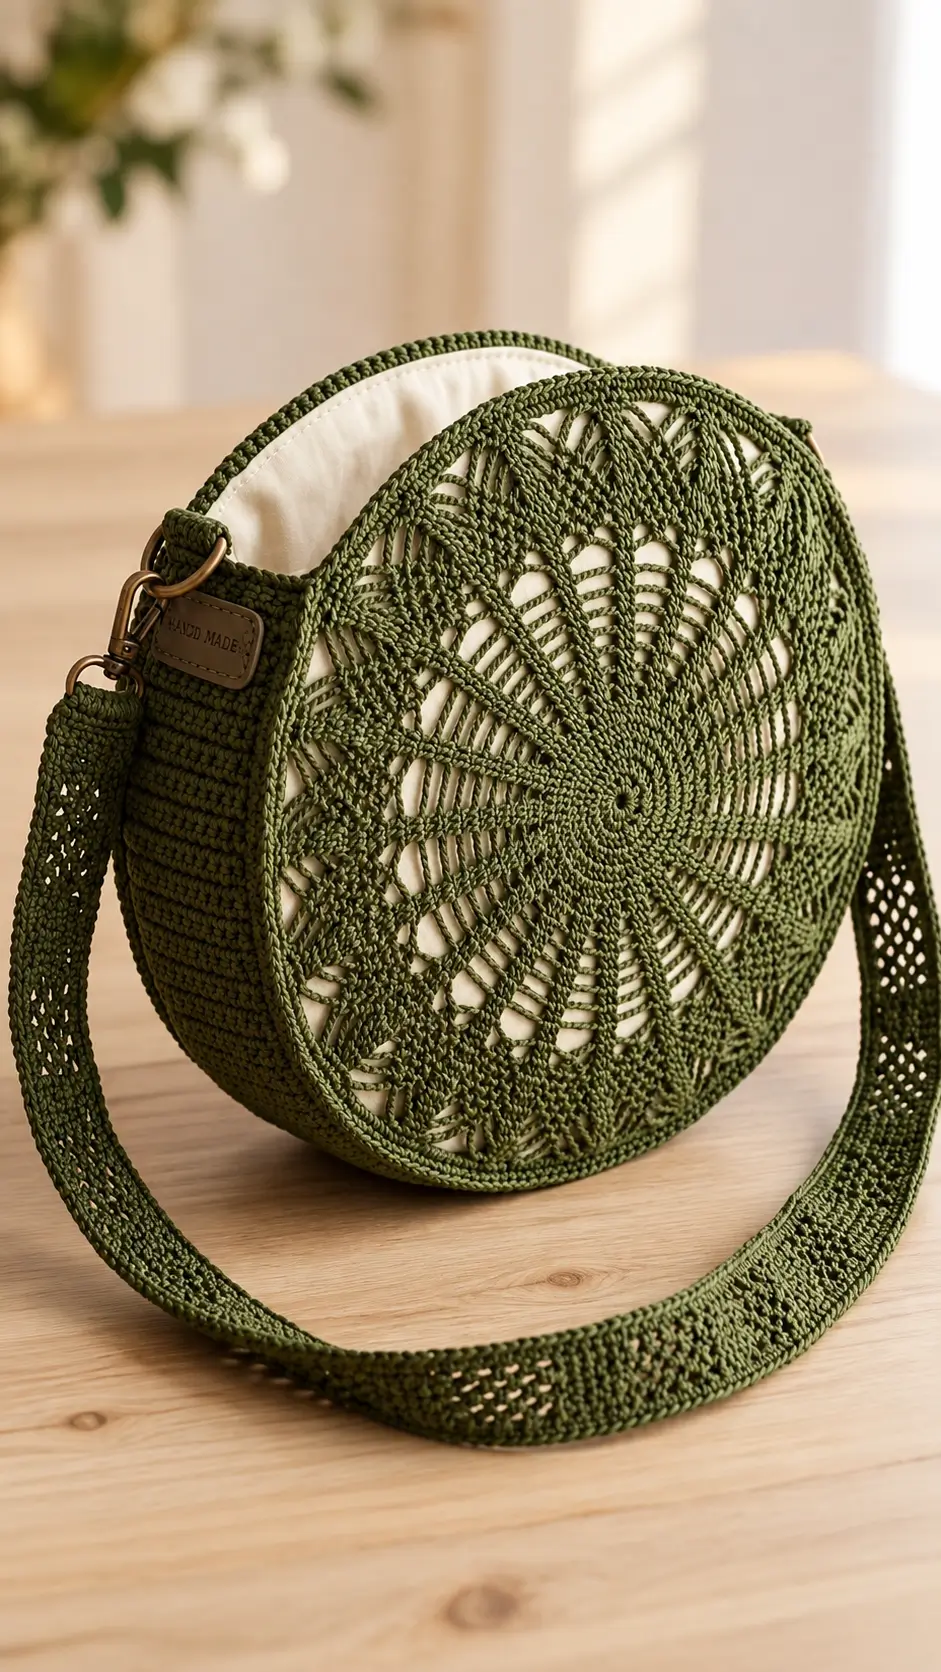
A circular bag stays circular only when its lace spokes expand at the same rate as its solid outer edge. This round crochet bag pattern targets a 30 cm crossbody bag using firm cotton cord, a 5 mm hook, two radial panels and a lined gusset. The project suits intermediate crochet skills. Its broad side wall adds enough depth for everyday items without turning the circle into a soft tote.
The Design: What Makes This Round Bag Different
The front and back are treated as structural panels rather than decorative doilies. Open chain spaces reduce weight, while solid radial sections transfer load from the center toward the reinforced perimeter. A dense final border gives the gusset a stable seam.
The second decision concerns depth. This crochet circle bag pattern uses a separate solid strip instead of folding or cupping the circular panels. That keeps both faces flat and produces the canteen profile visible in the reference image. The crochet crossbody bag strap is also worked densely because an open lace strap can stretch significantly under load.
A frequent failure with circular handbags is adding too many stitches near the perimeter. The panel then ruffles. Too few increases create a bowl. Check flatness after every major motif round before continuing.
Project Info at a Glance
| Skill Level | Time | Finished Size | Hook | Best For |
|---|---|---|---|---|
| Intermediate | 8–12 hours | Approx. 30 cm diameter | 5.0 mm | Structured crossbody bag |
Materials and Tools
Yarn
- Olive green — worsted #4 or firm 2–3 mm cotton cord — 250–300 g
- Cream cotton fabric — approximately 40 × 80 cm — for the lining.
- Olive sewing thread — for securing the lining.
Tools
- 5.0 mm crochet hook
- 2 locking stitch markers
- Tapestry needle
- Scissors
- 2 D-rings, approximately 25–32 mm
- 2 swivel clasps, approximately 25–32 mm
- Magnetic snap or zipper
- Sewing needle
- Pins or sewing clips
Abbreviations
- MR — magic ring
- sc — single crochet
- hdc — half double crochet
- dc — double crochet
- tr — treble crochet
- inc — increase
- sl st — slip stitch
- ch — chain
- sp — space
- BLO — back loop only
- st/sts — stitch/stitches
- RS — right side
- WS — wrong side
An invisible decrease is made by inserting the hook through the front loops of two consecutive stitches before completing one single crochet through both.
Round Crochet Bag Pattern — Step by Step
Construction note: This is a photo-inspired interpretation of the bag rather than the original designer’s exact pattern. Yarn thickness and individual crochet tension affect the final diameter, so measure the panels during construction.
Radial Front Panel — Make 1
Yarn: olive green. Target finished diameter: approximately 30 cm.
R1: MR, ch 3, work 11 dc into ring; join with sl st. (12)
R2: Ch 3, dc in same st, 2 dc in each remaining st; join. (24)
R3: Ch 3, 2 dc in next st, *dc in next st, 2 dc in next st* around; join. (36)
R4: Ch 1, sc in same st, ch 3, skip 1 st, *sc in next 2 sts, ch 3, skip 1 st* around. Adjust the final repeat to close evenly.
R5: Sl st to first ch-3 sp. Ch 3, 3 dc in same sp, ch 2, *4 dc in next ch-3 sp, ch 2* around; join.
R6: Sl st across first dc group. Ch 4, tr in same group, ch 3, work 2 tr in next group, ch 3; repeat around. Join.
R7: Ch 1. Work 3 sc into each ch-3 sp and 1 sc between adjacent treble pairs. Join with sl st.
R8: Ch 4, tr in same st, ch 4, skip approximately 3 sts, *2 tr in next st, ch 4, skip approximately 3 sts* around. Space the final repeats evenly.
R9: Work 4 sc in each ch-4 sp, with 1 sc between adjacent spoke groups. Join.
R10: Ch 3. Work a dc expansion round, increasing evenly at 12 points around the panel.
R11: Ch 1. Sc in each dc, distributing 12 increases evenly.
R12: Ch 5, skip 2 sts, sc in next st; repeat around to form the radial openings. Adjust the final spacing where necessary.
R13: Work 4 sc in each ch-5 sp.
R14: Ch 3. Dc around, distributing 12 increases evenly.
R15: Ch 1. Sc around with no increase unless the panel begins to cup.
Place the work on a flat surface. The panel should rest flat without stretching or forming waves.
R16: Ch 5, skip 3 sts, sc in next st around.
R17: Work 5 sc into each ch-5 sp.
R18: Dc around, adding evenly spaced increases only as required to maintain a flat circle.
R19: Sc around.
R20: Work one dense round of hdc around the entire perimeter.
R21: Sc around.
R22: BLO sc around to form a defined seam ridge.
Fasten off, leaving approximately 40 cm of yarn.
Sizing checkpoint: Block the panel lightly and measure across its widest point. Stop at approximately 30 cm. If the circle is smaller, add alternating dc expansion and sc stabilization rounds. If it is already large enough, omit the additional expansion.
Back Panel — Make 1
Repeat R1–R22 of the Radial Front Panel so both circular faces have matching dimensions.
Place the completed panels on top of each other before continuing. Their outer edges should align without stretching either piece.
Fasten off. Leave approximately 40 cm of yarn.
Gusset / Side Wall — Make 1
Yarn: olive green.
Foundation: Ch 15.
Row 1: Sc in second ch from hook and across. (14)
Row 2: Ch 1, turn, sc across. (14)
Rows 3–8: Repeat Row 2. (14)
Row 9: Ch 1, turn, BLO sc across. (14)
Rows 10–16: Sc across. (14)
Continue repeating Rows 9–16 until the strip reaches approximately 72–78 cm, or roughly 75–80% of the circumference of the finished circular panel.
Do not join the strip into a ring. The remaining unworked section at the top becomes the bag opening.
Fasten off with approximately 50 cm of yarn remaining.
Reinforced Top Edges — Make 2
Attach olive yarn to the unjoined upper edge of one circular panel.
Row 1: Sc evenly across the opening.
Row 2: Ch 1, turn, BLO sc across.
Row 3: Ch 1, turn, sc across.
Fasten off.
Repeat for the second circular panel. These dense rows create a stronger mounting area for the closure and lining.
D-Ring Tabs — Make 2
Yarn: olive green.
Foundation: Ch 7.
Row 1: Sc in second ch from hook and across. (6)
Rows 2–12: Ch 1, turn, sc across. (6)
Fasten off, leaving approximately 25 cm for sewing.
Pass each tab through a D-ring and fold it in half. The folded ends will later be attached securely to the upper gusset.
Crossbody Strap — Make 1
Yarn: olive green.
Foundation: Ch 9.
Row 1: Sc in second ch from hook and across. (8)
Row 2: Ch 1, turn, sc in first 2 sts, ch 4, skip 4 sts, sc in final 2 sts.
Row 3: Ch 1, turn, sc in first 2 sts, 4 sc in ch-4 sp, sc in final 2 sts. (8)
Row 4: Ch 1, turn, sc across. (8)
Rows 5–8: Repeat the openwork sequence from Rows 2–4, followed by one solid sc row.
Continue the established sequence until the strap measures approximately 105–120 cm without stretching.
Finish with four solid sc rows.
Fasten off.
Pass each end through a swivel clasp and fold approximately 4 cm of the strap back against itself. Sew through both layers repeatedly with matching yarn.
Optional Inner Pocket — Make 1
Yarn: olive green.
Foundation: Ch 25.
Row 1: Sc in second ch from hook and across. (24)
Rows 2–20: Ch 1, turn, sc across. (24)
Fasten off with approximately 60 cm of yarn.
Sew the two sides and bottom of the pocket to the lining. Keep the upper edge open.
Fabric Lining
Place one completed crochet panel on folded cream cotton fabric and trace around it. Add a 1.5 cm seam allowance around the circumference before cutting two fabric circles.
Cut a rectangular strip matching the finished crochet gusset, adding approximately 1.5 cm of seam allowance along each edge.
Sew the fabric gusset between the two fabric circles while leaving the top open. Turn the upper raw edge toward the wrong side by approximately 1 cm and press it flat.
If using a magnetic snap, install it before sewing the lining into the crochet shell. A zipper can instead be positioned beneath the reinforced upper crochet edges.
Assembly
- Block both circular panels to the same diameter, targeting approximately 30 cm. Allow them to dry completely before assembly.
- Mark the bottom center and both upper gusset endpoints on each circular panel. Match the corresponding positions on both sides.
- Place the gusset against the first panel with the edges aligned. Starting at one upper marker, crochet or sew through the panel edge and gusset edge around the side and bottom to the opposite marker.
- Attach the second circular panel to the remaining gusset edge. Check the alignment after each quarter of the circumference.
- Turn the crochet shell right side out. Position the magnetic snap or zipper along the reinforced opening.
- Insert the prepared fabric lining. Hand-sew its folded upper edge to the inside of the reinforced crochet opening.
- Fold each D-ring tab around its ring. Position the tabs at the upper ends of the gusset and sew them through several rows of dense crochet.
- Attach the swivel clasps on the crossbody strap to the D-rings. Check that the strap hangs flat without twisting.
- Weave every remaining yarn tail through at least 5 cm of dense crochet. Reverse direction for a second pass before trimming.
- Reshape the bag while empty. Check the panel edges, D-ring tabs, strap ends and closure before placing weight inside.
The finished bag should have two flat circular faces, a structured side wall, reinforced hardware attachments, a lined interior and a detachable crossbody strap.
7 Technical Tips for a Structured Round Crochet Bag
- Control panel ruffling: Waves deeper than approximately 1 cm indicate excessive expansion. Remove the latest expansion round and reduce the number of increases rather than trying to force the excess fabric flat.
- Correct panel cupping: A center that rises more than approximately 1.5 cm from a flat surface needs additional circumference. Add evenly distributed increases during the next solid round.
- Stop stitch-marker drift: Mark the beginning of each round plus four quarter points around the circle. This makes radial distortion visible before several incorrect rounds have been completed.
- Reinforce the hardware: Do not attach a loaded D-ring through a single crochet row. Each tab should overlap approximately 3–4 cm of dense gusset fabric to distribute the load.
- Account for strap stretch: Measure the strap while applying light tension. Cotton crochet may lengthen after the bag is loaded, so test the 105–120 cm strap before permanently securing the clasps.
- Control lining size: Make the completed lining approximately 5–8 mm smaller than the interior crochet shell. Excess fabric creates folds, while an undersized lining can pull the circular panels inward.
- Secure yarn tails: Weave load-bearing tails through at least 5 cm of dense stitches, reverse direction, then make a second pass. Short tails can migrate out when the gusset and strap repeatedly flex.
Final Checks
Measure both panels before attaching the gusset because matching diameter matters more than forcing an exact final-round count when cord thickness and crochet tension differ. After assembly, place approximately the expected carrying weight inside the bag and inspect the D-ring tabs and strap ends for movement.
Record the blocked diameter, gusset depth and finished strap length before making another version. These three measurements make later sizing changes easier to reproduce.
Save this round crochet bag pattern to Pinterest with a clear image of the radial front panel, and share your finished version on Instagram using #OliveLaceRoundBag. Which section would you change on your next bag: the narrow center spokes or the larger openwork sections near the outer edge?









